
For MongoDB's stable versions, the official MongoDB website supplies linked binaries that provide the easiest way to install MongoDB on Linux, Mac OS X, and Windows. Notice that you need to download the right architecture version for your operating system. If you use Windows or Linux, ensure that you download either the 32-bit or 64-bit version according to your system architecture. Mac users are safe to download the 64-bit version.
Note
The MongoDB versioning scheme works in such a way that only even version numbers mark stable releases. So, versions 3.0.x and 3.2x are stable, while 2.9.x and 3.1.x are unstable releases and should not be used in production. The latest stable version of MongoDB is 3.2.x.
When you visit the download page at http://mongodb.org/downloads, you'll be offered a download of an archive that contains the binaries you need to install MongoDB. After downloading and extracting the archive file, you will need to locate the mongod binary, which is usually located in the bin folder. The mongod process runs the main MongoDB server process, which can be used as a standalone server or a single node of a MongoDB replica set. In our case, we will use MongoDB as a standalone server. The mongod process requires a folder to store the database files (the default folder is /data/db) and a port to listen to (the default port is 27017). In the following subsections, we'll go over the setup steps for each operating system. We'll begin with the common Windows installation process.
Note
It is recommended that you learn more about MongoDB by visiting the official documentation at https://mongodb.org.
Once you have downloaded the right version, run the .msi file. MongoDB should be installed in the C:\Program Files\MongoDB\ folder. While running, MongoDB uses a default folder to store its data files. On Windows, the default folder location is C:\data\db. So, in the command prompt, go to C:\ and issue the following command:
> md c:\data\db
Tip
You can tell the mongod service to use an alternative path for the data files, using the --dbpath command-line flag.
Once you've finished creating the data folders, you'll get two options while running the main MongoDB service.
To run MongoDB manually, you will need to run the mongod binary. So, open the command prompt and navigate to the C:\Program Files\MongoDB\Server\3.2\bin folder. Then, issue the following command:
C:\Program Files\MongoDB\Server\3.2\bin> mongod
The preceding command will run the main MongoDB service that starts listening to the default 27017 port. If everything goes well, you should see a console output similar to the following screenshot:
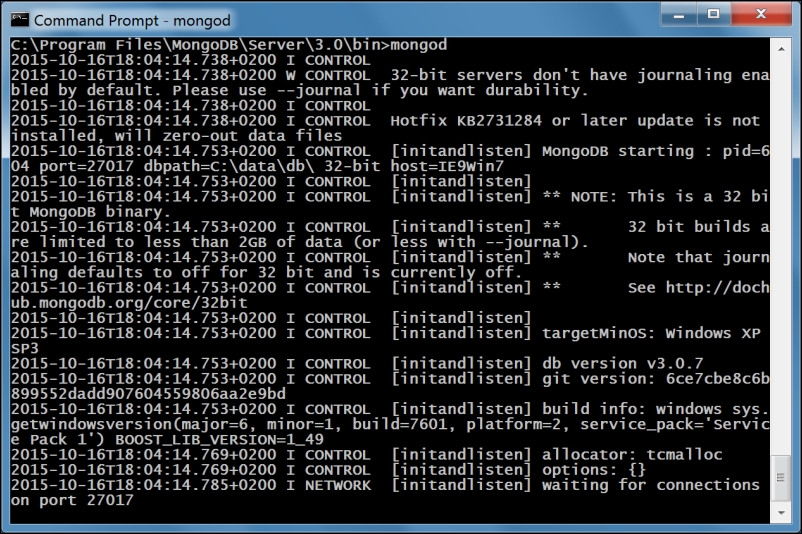
Running the MongoDB server on Windows
Depending on the Windows security level, a security alert dialog, which notifies you about the blocking of some service features, will be issued. If this occurs, select a private network and click on Allow Access.
The more popular approach is running MongoDB automatically after every reboot cycle. Before you begin setting up MongoDB as a Windows service, it's considered a good practice to specify a path for the MongoDB log and configuration files. Start by creating a folder for these files by running the following command in your command prompt:
> md C:\data\log
Then, you'll need to create a configuration file at C:\Program Files\MongoDB\Server\3.2\mongod.cfg that contains these lines:
systemLog:
    destination: file
    path: c:\data\log\mongod.log
storage:
    dbPath: c:\data\db
When you have your configuration file in place, open a new command prompt window with administrative privileges by right-clicking on the command prompt icon and clicking on Run as administrator. Notice that if an older version of the MongoDB service is already running, you'll first need to remove it using the following commands:
> sc stop MongoDB
> sc delete MongoDB
Then, install the MongoDB service by running the following command:
> "C:\Program Files\MongoDB\Server\3.2\bin\mongod.exe" --config "C:\Program Files\MongoDB\Server\3.2\mongod.cfg" --install
Notice that the install process will only succeed if your configuration file is set correctly. After installing your MongoDB service, you can run it by executing the following command in the administrative command prompt window:
> net start MongoDB
Be aware that the MongoDB configuration file can be modified to accommodate your needs. You can learn more about it by visiting http://docs.mongodb.org/manual/reference/configuration-options/.
In this section, you'll learn the different ways of installing MongoDB on Unix-based operating systems. Let's begin with the simplest way to install MongoDB, which involves downloading MongoDB's precompiled binaries.
You can download the right version of MongoDB using the download page at http://www.mongodb.org/downloads. Alternatively, you can do this via CURL by executing the following command:
$ curl -O http://downloads.mongodb.org/osx/mongodb-osx-x86_64-3.2.10.tgz
Notice that we have downloaded the Mac OS X 64-bit version, so make sure you alter the command to fit the version suitable for your machine. After the downloading process is over, unpack the file by issuing the following command in your command-line tool:
$ tar -zxvf mongodb-osx-x86_64-3.2.10.tgz
Now, change the name of the extracted folder to a simpler folder name by running the following command:
$ mv mongodb-osx-x86_64-3.2.10 mongodb
MongoDB uses a default folder to store its files. On Linux and Mac OS X, the default location is /data/db, so in your command-line tool, run the following command:
$ mkdir -p /data/db
Tip
You may experience some trouble creating this folder. This is usually a permission issue, so use sudo or super user when running the preceding command.
The preceding command will create the data and db folders, because the –p flag creates parent folders as well. Notice that the default folder is located outside your home folder, so make sure you set the folder permission by running the following command:
$ chown -R $USER /data/db
Now that you have everything prepared, use your command-line tool and go to the bin folder to run the mongod service as follows:
$ cd mongodb/bin
$ mongod
This will run the main MongoDB service, which will start listening to the default 27017 port. If everything goes well, you should see a console output similar to the following screenshot:
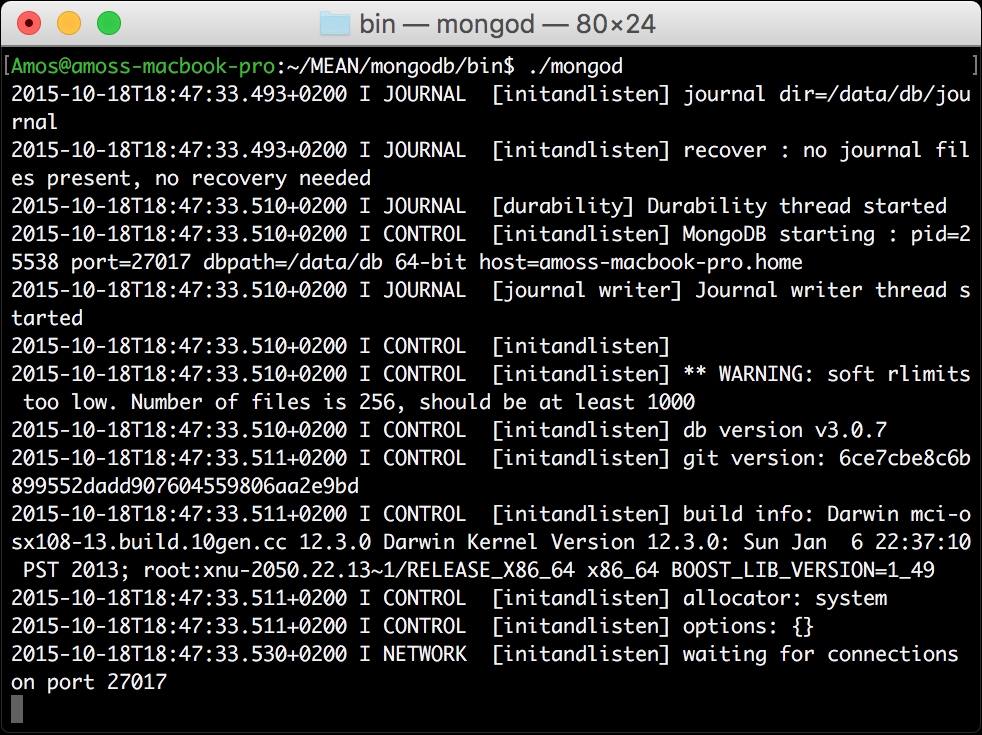
Running the MongoDB server on Mac OS X
Sometimes, the easiest way to install MongoDB is using a package manager. The downside is that some package managers are falling behind in terms of supporting the latest version. Luckily, the team behind MongoDB also maintains the official packages for RedHat, Debian, and Ubuntu, as well as a Homebrew package for Mac OS X. Note that you'll have to configure your package manager repository to include the MongoDB servers to download the official packages.
To install MongoDB on Red Hat Enterprise, CentOS, or Fedora using Yum, follow the instructions at http://docs.mongodb.org/manual/tutorial/install-mongodb-on-red-hat-centos-or-fedora-linux/.
To install MongoDB on Ubuntu using APT, follow the instructions at http://docs.mongodb.org/manual/tutorial/install-mongodb-on-ubuntu/.
To install MongoDB on Debian using APT, follow the instructions at http://docs.mongodb.org/manual/tutorial/install-mongodb-on-debian/.
To install MongoDB on Mac OS X using Homebrew, follow the instructions at http://docs.mongodb.org/manual/tutorial/install-mongodb-on-os-x/.
The MongoDB archive file includes the MongoDB shell, which allows to you to interact with your server instance using the command line. To start the shell, navigate to the MongoDB bin folder and run the mongo service as follows:
$ cd mongodb/bin
$ mongo
If you successfully installed MongoDB, the shell will automatically connect to your local instance, using the test database. You should see a console output similar to the following screenshot:

Running the MongoDB shell on Mac OS X
To test your database, run the following command:
> db.articles.insert({title: "Hello World"})
The preceding command will create a new article collection and insert a JSON object containing a title property. To retrieve the article object, execute the following command:
> db.articles.find()
The console will output a text similar to the following message:
{ _id: ObjectId("52d02240e4b01d67d71ad577"), title: "Hello World" }
Congratulations! This means your MongoDB instance is working properly, and you have successfully managed to interact with it using the MongoDB shell. In the upcoming chapters, you'll learn more about MongoDB and how to use the MongoDB shell.