
Node.js is a platform, which means its features and APIs are kept to a minimum. To achieve more complex functionality, it uses a module system that allows you to extend the platform. The best way to install, update, and remove Node.js modules is using npm. npm is mainly used as:
A registry of packages for browsing, downloading, and installing third-party modules
A CLI tool to manage local and global packages
Conveniently, npm is installed during the Node.js installation process, so let's quickly jump in and learn how to use it.
To understand how npm works, we will install the Express web framework module, which you'll use in the upcoming chapters. npm is a robust package manager, which keeps a centralized registry for public modules. To browse the available public packages, visit the official website at https://www.npmjs.com/.
Most of the packages in the registry are open source and contributed by the Node.js community developers. When developing an open source module, the package author can decide to publish it to the central registry, allowing other developers to download and use it in their projects. In the package configuration file, the author will choose a name that will later be used as a unique identifier to download that package.
Note
It is recommended that you learn more about Node.js by visiting the official documentation at https://docs.npmjs.com.
It is important to remember that npm has two installation modes: local and global. The default local mode is used more often and installs third-party packages in a local node_modules folder placed inside your application folder. It has no effect system-wise and is used to install the packages your application needs, without polluting your system with unnecessary global files.
The global mode is used to install the packages you want Node.js to use globally. Usually, these are CLI tools, such as Grunt, that you'll learn about in the upcoming chapters. Most of the time, the package author will specifically instruct you to install the package globally. Therefore, whenever in doubt, use the local mode. The global mode will usually install the packages in the /usr/local/lib/node_modules folder for Unix-based systems and the C:\Users\%USERNAME%\AppData\Roaming\npm\node_modules folder for Windows-based systems, making it available to any Node.js application running on the system.
Once you find the right package, you'll be able to install it using the npm install command, as follows:
$ npm install <Package Unique Name>
Installing a module globally is similar to its local counterpart, but you'll have to add the –g flag, as follows:
$ npm install –g <Package Unique Name>
Note
You may find out that your user doesn't have the right permissions to install packages globally, so you'll have to use the root user or install it using sudo.
For example, to locally install Express, you'll need to navigate to your application folder and issue the following command:
$ npm install express
The preceding command will install the latest stable version of the Express package in your local node_modules folder. Furthermore, npm supports a wide range of semantic versioning. So, to install a specific version of a package, you can use the npm install command, as follows:
$ npm install <Package Unique Name>@<Package Version>
For instance, to install the second major version of the Express package, you'll need to issue the following command:
$ npm install [email protected]
This will install the latest stable version of Express 2. Note that this syntax enables npm to download and install any minor version of Express 2. To learn more about the supported semantic versioning syntax, it is recommended that you visit https://github.com/npm/node-semver.
When a package has dependencies, npm will automatically resolve those dependencies, installing the required packages in a node_modules folder inside the package folder. In the preceding example, the Express dependencies will be installed under node_modules/express/node_modules.
To remove an installed package, you'll have to navigate to your application folder and run the following command:
$ npm uninstall < Package Unique Name>
npm will then look for the package and try to remove it from the local node_modules folder. To remove a global package, you'll need to use the -g flag, as follows:
$ npm uninstall –g < Package Unique Name>
Installing a single package is nice, but pretty soon, your application will need to use several packages. So, you'll need a better way to manage these dependencies. For this purpose, npm allows you to use a configuration file named package.json in the root folder of your application. In your package.json file, you'll be able to define various metadata properties of your application, including properties such as the name, version, and author of your application. This is also where you define your application dependencies.
The package.json file is basically a JSON file that contains the different attributes you'll need to describe your application properties. An application using the latest Express and Grunt packages will have a package.json file as follows:
{
  "name" : "MEAN",
  "version" : "0.0.1",
  "dependencies" : {
    "express" : "latest",
    "grunt" : "latest"
  }
}
Note
Your application name and version properties are required, so removing these properties will prevent npm from working properly.
While you can manually create a package.json file, an easier approach would be to use the npm init command. To do so, use your command-line tool and issue the following command:
$ npm init
npm will ask you a few questions about your application and will automatically create a new package.json file for you. A sample process should look similar to the following screenshot:
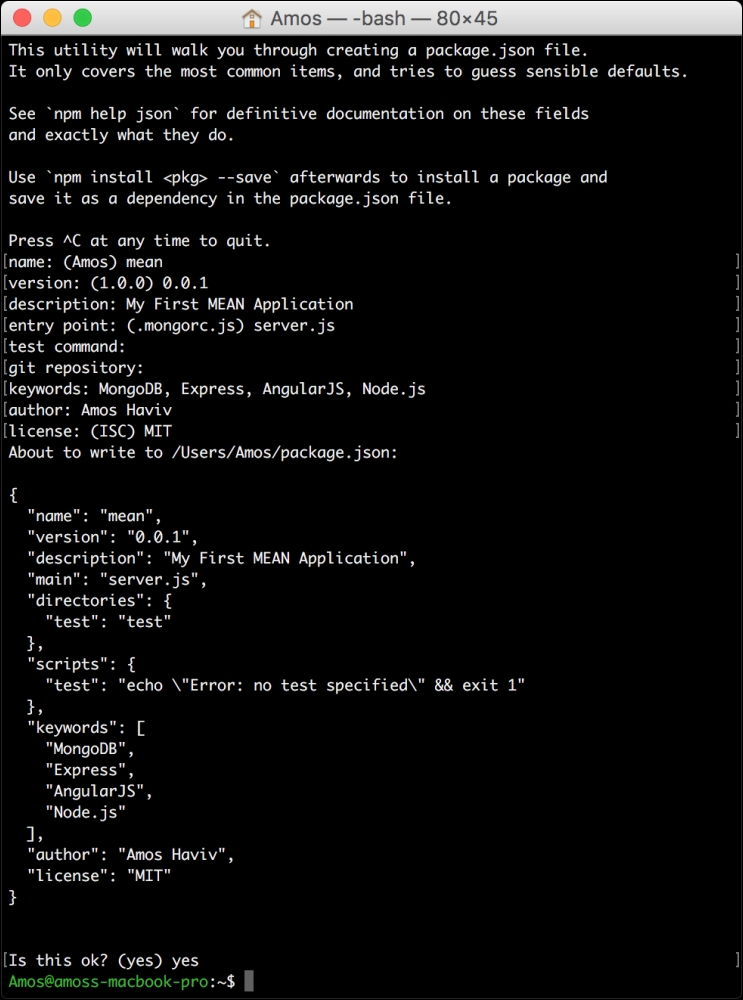
Using npm init on Mac OS X
After creating your package.json file, you'll need to modify it and add a dependencies property. Your final package.json file should look like the following code snippet:
{
  "name": "mean",
  "version": "0.0.1",
  "description": "My First MEAN Application",
  "main": "server.js",
  "directories": {
    "test": "test"
  },
  "scripts": {
    "test": "echo \"Error: no test specified\" && exit 1"
  },
  "keywords": [
    "MongoDB",
    "Express",
    "Angular",
    "Node.js"
  ],
  "author": "Amos Haviv",
  "license": "MIT",
  "dependencies": {
    "express": "latest",
    "grunt": "latest"
  }
}
Note
In the preceding code example, we used the latest keyword to tell npm to install the latest versions of these packages. However, it is highly recommended that you use specific version numbers or range to prevent your application dependencies from changing during development cycles. This is because new package versions might not be backward compatible with older versions, which will cause major issues in your application.
After creating your package.json file, you'll be able to install your application dependencies by navigating to your application's root folder and using the npm install command, as follows:
$ npm install
npm will automatically detect your package.json file and install all your application dependencies, placing them under a local node_modules folder. An alternative and sometimes better approach to installing your dependencies is to use the following npm update command:
$ npm update
This will install any missing packages and will update all of your existing dependencies to their specified version.
Another robust feature of the npm install command is the ability to install a new package and save the package information as a dependency in your package.json file. This can be accomplished using the --save optional flag when installing a specific package. For example, to install the latest version of Express and save it as a dependency, you can just use the following command:
$ npm install express --save
npm will install the latest version of Express and will add the Express package as a dependency to your package.json file. For clarity, in the upcoming chapters, we prefer to manually edit the package.json file. However, this useful feature can come in pretty handy in your daily development cycles.
Note
It is recommended that you learn more about npm's vast array of configuration options by visiting the official documentation at https://docs.npmjs.com/files/package.json.