

Despite the existence of a great solution such as Zend Framework for its system, Magento 2.0 needs some fine tuning to get the best performance in order to provide the users with a better shopping experience. As you noted in the previous chapters, it is very important to focus on every aspect for successful e-commerce.
The following topics will be covered in this chapter:
- Magento Entity-Attribute-Value
- Indexing and re-indexing data
- Caching
- Selecting the right Magento hosting service
- Apache web server deflation
- Enabling the
expiresheader - PHP memory configuration
- Optimizing the MySQL server
- Cleaning the database log
- Minifying scripts
- CDN for Magento
With a complex system architecture, Magento developers realized that a traditional development approach could be counterproductive for a scalable idea to implement an e-commerce solution.
Developers, therefore, decided to adopt the Entity-Attribute-Value (EAV) architecture approach.
This database structure embraces the Magento 2.0 complexity processes and variables and allows an unlimited numbers of attributes to any item, such as categories, products, costumers, addresses, and more.
The three main points of EAV can be described as follows:
- Entity: Data items are represented as entities. In the database, each entity has a record.
- Attribute: Many attributes could belong to a specific entity; for example, the customer entity has name, birth date, phone, and so on. In Magento, all the attributes are listed in a single table.
- Value: This is the value of each attribute. For example, customer is an entity that has an attribute called name with the value Fernando Miguel.

This book is a hands–on guide to Magento, but I strongly suggest you to read more about EAV in the Magento official documentation at http://devdocs.magento.com/guides/v2.0/extension-dev-guide/attributes.html.
With the increase in content, images, and script demands for a better experience in e-commerce, we have to handle network consumption in order to provide fast access to our system. Search engines measure some technical points with their algorithms, and fast access is, of course, one of the requisites validated.
Magento has a complex architecture and works with MySQL database constant queries to show specific products information, render pages, and process checkouts. This high process volume demand can slow the download speed when your Magento 2.0 solution is in a production environment.
To improve the Magento 2.0 performance, we can use two important tools: indexing and caching.
In the Magento 2.0 life cycle, at a determined point, we will have considerable megabytes of data on the MySQL database, including information regarding products, orders, customers, and payments. To improve its performance, Magento uses indexed tables to provide faster lookups.
However, as your Magento 2.0 e-commerce grows, the indexation feature starts to lose performance too.
In order to correct this issue, you can precompile database relationships using the flat table option in Magento. This technique combines EAV relationships for categories and products in one table to increase the speed of queries. To enable this feature, you can follow these instructions:
- Log in to your Magento backend (
http://localhost/packt/admin_packt). - Go to Stores | Configuration | Catalog.
- Expand the Storefront option and select Yes for both Use Flat Category and Use Flat Catalog Product.
- Next, click on Save Config.

- After the activation of the flat resource, you will probably get this Magento message:

If you make changes to your catalog, product, or some page that has a relationship with indexers, the Magento system needs to re-index the information to keep the flat table schema working. You can manage the indexers with the Magento command-line tool, as follows:

The reindex command rebuilds all the product, catalog, customer, and stock information. The index feature enables a fast return of data once the system has no need to process any basic data, such as product price, every single time that the user accesses the store.
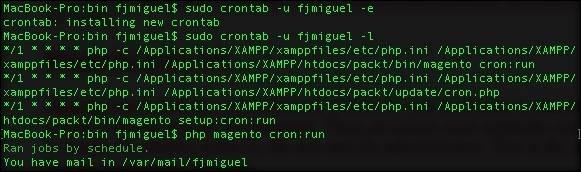
Did you notice in the preceding system message one issue about Magento cron job? Cron job allows you to automate this task and others to improve your efficiency. Let's take a look at how cron job works.
Note
For further information about Magento indexing, take a look at the official Magento documentation at http://devdocs.magento.com/guides/v2.0/extension-dev-guide/indexing.html.
Magento has important system processes that are very important to maintain the system's working at its full potential. These processes need automated executions to handle the updates made by the user and administrator. That is the why this feature is critical to Magento.
Cron job works with UNIX systems and can schedule specific tasks to be executed in a predetermined time on the server. The following activities can be scheduled to execute on the Magento 2.0 system:
- The updating of currency rates
- Customer notifications
- The generation of Google sitemap
- Price rules
- Sending e-mails
- Re-indexing
To configure the cron job, follow this recipe.
Find the php.ini file path.
If you use XAMPP, as was suggested for a web server solution at the beginning of the book, you simply can use the XAMPP/xamppfiles/etc/php.ini path. If you use a Unix-based terminal, you can use the command to find the PHP configuration file. Perform the following steps:
- Open the terminal.
- Run the
sudo crontab -u magento_user –ecommand; here,magento_userrefers to your system's owner. - Enter with the following instructions in the text editor that will show up:
*/1 * * * * php -c <php-ini-file-path> <your Magento install dir>/bin/magento cron:run
*/1 * * * * php -c <php-ini-file-path> <your Magento install dir>/update/cron.php
*/1 * * * * php -c <php-file-path> <your Magento install dir>/bin/magento setup:cron:run
Here's an example:
*/1 * * * * php -c /Applications/XAMPP/xamppfiles/etc/php.ini /Applications/XAMPP/xamppfiles/etc/php.ini /Applications/XAMPP/htdocs/packt/bin/magento cron:run
*/1 * * * * php -c /Applications/XAMPP/xamppfiles/etc/php.ini /Applications/XAMPP/xamppfiles/etc/php.ini /Applications/XAMPP/htdocs/packt/update/cron.php
*/1 * * * * php -c /Applications/XAMPP/xamppfiles/etc/php.ini /Applications/XAMPP/htdocs/packt/bin/magento setup:cron:run
- Run the
sudo crontab -u fjmiguel –lcommand to take a look at your new cron job configuration. - Save the changes and exit the text editor.
In some cases, it is necessary to give write permissions again to the directories.
The */1 * * * * configuration specifies that the cron job will be executed every minute. The cron job will now run in the background every minute. To manually execute the cron job, you can run the php magento cron:run command on the Magento command-line tool, as shown in the following figure:
For further information about the cron job, follow the link at https://help.ubuntu.com/community/CronHowto.
For Magento cron, take a look at the official Magento documentation http://devdocs.magento.com/guides/v2.0/config-guide/cli/config-cli-subcommands-cron.html.
While the indexing technique works on database layer, the caching feature does the same for the HTML page components to increase fast access to the frontend. Caching stores this kind of data in order to provide the visitors with access to faster download.
To enable caching, you need to perform the following steps:

For further information about cache configuration, follow the link at http://devdocs.magento.com/guides/v2.0/config-guide/cli/config-cli-subcommands-cache.html.
You can work with third-party cache solutions to provide a better performance. Some of this solution has support and works very well with the Magento 2.0 solution. This book doesn't cover server configurations, but I strongly suggest you to take a look at the following:
- Redis can be found at http://devdocs.magento.com/guides/v2.0/config-guide/redis/config-redis.html
- Memcached session storage can be found at http://devdocs.magento.com/guides/v2.0/config-guide/memcache/memcache.html
- Varnish cache can be found at http://devdocs.magento.com/guides/v2.0/config-guide/varnish/config-varnish.html
Magento 2.0 has a complex structure, but it follows the good practices of software development, which gives the administrators and the developers of this fantastic e-commerce solution the real possibility to implement a scalable system to conquer a great site traffic and constantly increase the sales.
Despite this advantage, all the scalable systems need a great server infrastructure to provide fast content access through the Internet.
As a developer, you need to always think about all the stages that a successful software needs to go through in an order to aggregate the real value to its administrator and to its users. Try to always see the big picture of your project.
Let's take a look at some techniques and tips to increase your Magento server's capability.
First of all, we need to conduct a deep research on the existent solutions. We will try to gather information about clients of these solutions and test Magento's performance by accessing the Magento website as a visitor.
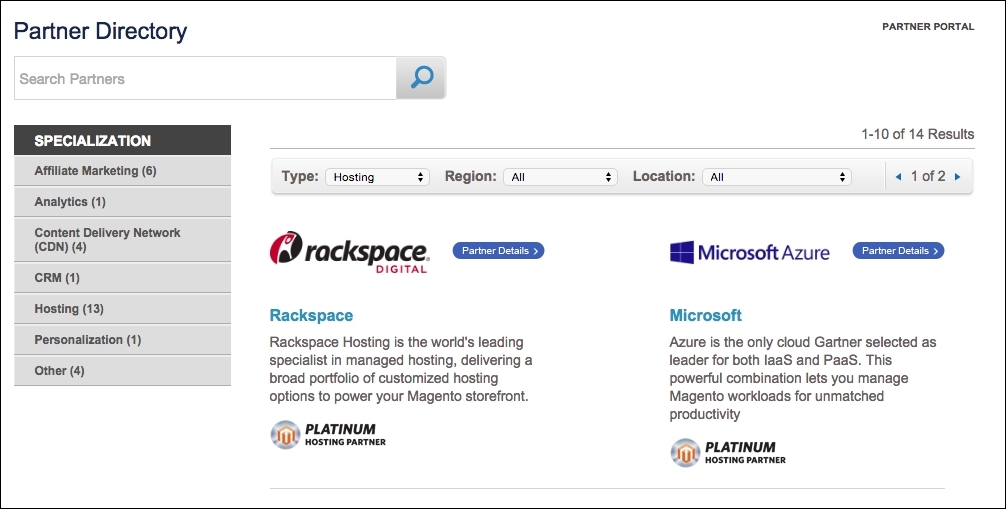
The Magento official project website provides you with an online tool to search for Magento. You can use this tool by accessing the URL at http://partners.magento.com/partner_locator/search.aspx.
Magento hosting services generally use Apache as a web server solution. Magento is written in PHP, and Apache has a mature environment to handle PHP processes.
In order to give fast response to visitors' requests, we will use Apache's mod_deflate to speed up server response.
According to Apache's official documentation (http://httpd.apache.org/docs/2.2/mod/mod_deflate.html), this module provides the deflate output filter that allows output from your server to be compressed before being sent to the client over the network.
To enable this feature on your server, you need to create the .htaccess file and enter the following code:
<IfModule mod_deflate.c>

############################################
## enable apache served files compression
## http://developer.yahoo.com/performance/rules.html#gzip

    # Insert filter on all content
    SetOutputFilter DEFLATE
    # Insert filter on selected content types only
    AddOutputFilterByType DEFLATE text/html text/plain text/xml text/css text/javascript

    # Netscape 4.x has some problems...
    BrowserMatch ^Mozilla/4 gzip-only-text/html

    # Netscape 4.06-4.08 have some more problems
    BrowserMatch ^Mozilla/4\.0[678] no-gzip

    # MSIE masquerades as Netscape, but it is fine
    BrowserMatch \bMSIE !no-gzip !gzip-only-text/html

    # Don't compress images
    SetEnvIfNoCase Request_URI \.(?:gif|jpe?g|png)$ no-gzip dont-vary

    # Make sure proxies don't deliver the wrong content
    Header append Vary User-Agent env=!dont-vary

</IfModule>
This adjustment reduces about 70% of the amount of data delivered.
For further information about the .htaccess and mod_deflate configurations, take a look at the links at http://httpd.apache.org/docs/current/howto/htaccess.html and http://httpd.apache.org/docs/2.2/mod/mod_deflate.html.
Continuing to take advantage of the Apache web server, we will activate the mod_expires module. This module sends a message to the client machine about the document's validity, and the client can store a cache of the site until the client receives a new message from the server expiration of data. This technique increases the speed of download.
To activate this feature, you can open the .htaccess file available in the Magento root directory and enter this block of code:
<IfModule mod_expires.c>

############################################
## Add default Expires header
## http://developer.yahoo.com/performance/rules.html#expires

    ExpiresActive On
    ExpiresDefault "access plus 1 year"

</IfModule>
For further information about the .htaccess configuration, follow the link at http://httpd.apache.org/docs/2.2/mod/mod_expires.html.
Increasing PHP memory by host configuration has a direct relationship with your contracted hosting service. Some shared hosting services do not give this option to the developers. This is one of the main reasons to choose a specialized Magento hosting service.
Generally, this configuration can be done by adding the following code to the .htaccess file available in the Magento root directory:
<IfModule mod_php5.c>

############################################
## adjust memory limit

php_value memory_limit 256M
php_value max_execution_time 18000

</IfModule>
MySQL has the query cache feature to provide fast queries on a database. Once again, you need to conduct deep research on your possible hosting services before contracting any to make sure you have all the services you need for a great production environment.
Before starting the optimization, refer to the PHP and MySQL documentations of your hosting service to check the availability of these changes.
Open the php.ini hosting service file and place these configurations:
;;;;;;;;;;;;;;;;;;;
; Resource Limits ;
;;;;;;;;;;;;;;;;;;;

max_execution_time = 30     ; Maximum execution time of each script, in seconds
max_input_time = 60	; Maximum amount of time each script may spend parsing request data
memory_limit = 512M      ; Maximum amount of memory a script may consume (8MB)
query_cache_size = 64M

[MySQLi]
; Please refer to http://php.net/manual/en/mysqli.configuration.php for further information

; Maximum number of persistent links.  -1 means no limit.
mysqli.max_persistent = -1

; Allow accessing, from PHP's perspective, local files with LOAD DATA statements
;mysqli.allow_local_infile = On

; Allow or prevent persistent links.
mysqli.allow_persistent = On

; Maximum number of links.  -1 means no limit.
mysqli.max_links = -1

; If mysqlnd is used: Number of cache slots for the internal result set cache
mysqli.cache_size = 2000

; Default port number for mysqli_connect().  If unset, mysqli_connect() will use
; the $MYSQL_TCP_PORT or the mysql-tcp entry in /etc/services or the
; compile-time value defined MYSQL_PORT (in that order).  Win32 will only look
; at MYSQL_PORT.
mysqli.default_port = 3306

; Default socket name for local MySQL connects.  If empty, uses the built-in
; MySQL defaults.
mysqli.default_socket =

; Default host for mysql_connect() (doesn't apply in safe mode).
mysqli.default_host =

; Default user for mysql_connect() (doesn't apply in safe mode).
mysqli.default_user =

; Default password for mysqli_connect() (doesn't apply in safe mode).
; Note that this is generally a *bad* idea to store passwords in this file.
; *Any* user with PHP access can run 'echo get_cfg_var("mysqli.default_pw")
; and reveal this password!  And of course, any users with read access to this
; file will be able to reveal the password as well.
mysqli.default_pw =

; Allow or prevent reconnect
mysqli.reconnect = Off
Now, let's configure the query_cache_size variable directly on the MySQL database.
Open the phpMyAdmin web SQL console, and execute the SHOW VARIABLES LIKE 'query_cache_size'; query without selecting a database. The query will probably return the 0 value for the query_cache_size variable.
Execute the SET GLOBAL query_cache_size = 1048576; query and execute SHOW VARIABLES LIKE 'query_cache_size'; again.
The query will probably return the following information:
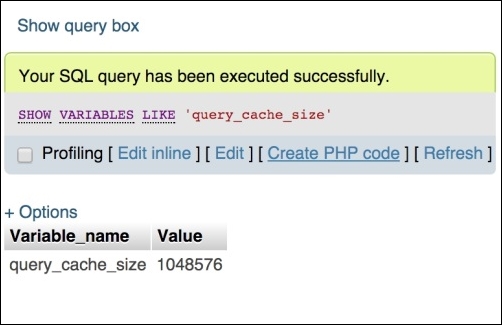
The query_cache_size variable was activated with success!
For further information about the MySQL cache size configuration, follow the link at https://dev.mysql.com/doc/refman/5.0/en/query-cache-configuration.html.
Even by testing these configurations in your localhost environment, you can feel the huge positive difference between the first access in your Magento installation and the last access after the configuration. This is really awesome!
PHP memory configuration
Increasing PHP memory by host configuration has a direct relationship with your contracted hosting service. Some shared hosting services do not give this option to the developers. This is one of the main reasons to choose a specialized Magento hosting service.
Generally, this configuration can be done by adding the following code to the .htaccess file available in the Magento root directory:
<IfModule mod_php5.c>

############################################
## adjust memory limit

php_value memory_limit 256M
php_value max_execution_time 18000

</IfModule>
MySQL has the query cache feature to provide fast queries on a database. Once again, you need to conduct deep research on your possible hosting services before contracting any to make sure you have all the services you need for a great production environment.
Before starting the optimization, refer to the PHP and MySQL documentations of your hosting service to check the availability of these changes.
Open the php.ini hosting service file and place these configurations:
;;;;;;;;;;;;;;;;;;;
; Resource Limits ;
;;;;;;;;;;;;;;;;;;;

max_execution_time = 30     ; Maximum execution time of each script, in seconds
max_input_time = 60	; Maximum amount of time each script may spend parsing request data
memory_limit = 512M      ; Maximum amount of memory a script may consume (8MB)
query_cache_size = 64M

[MySQLi]
; Please refer to http://php.net/manual/en/mysqli.configuration.php for further information

; Maximum number of persistent links.  -1 means no limit.
mysqli.max_persistent = -1

; Allow accessing, from PHP's perspective, local files with LOAD DATA statements
;mysqli.allow_local_infile = On

; Allow or prevent persistent links.
mysqli.allow_persistent = On

; Maximum number of links.  -1 means no limit.
mysqli.max_links = -1

; If mysqlnd is used: Number of cache slots for the internal result set cache
mysqli.cache_size = 2000

; Default port number for mysqli_connect().  If unset, mysqli_connect() will use
; the $MYSQL_TCP_PORT or the mysql-tcp entry in /etc/services or the
; compile-time value defined MYSQL_PORT (in that order).  Win32 will only look
; at MYSQL_PORT.
mysqli.default_port = 3306

; Default socket name for local MySQL connects.  If empty, uses the built-in
; MySQL defaults.
mysqli.default_socket =

; Default host for mysql_connect() (doesn't apply in safe mode).
mysqli.default_host =

; Default user for mysql_connect() (doesn't apply in safe mode).
mysqli.default_user =

; Default password for mysqli_connect() (doesn't apply in safe mode).
; Note that this is generally a *bad* idea to store passwords in this file.
; *Any* user with PHP access can run 'echo get_cfg_var("mysqli.default_pw")
; and reveal this password!  And of course, any users with read access to this
; file will be able to reveal the password as well.
mysqli.default_pw =

; Allow or prevent reconnect
mysqli.reconnect = Off
Now, let's configure the query_cache_size variable directly on the MySQL database.
Open the phpMyAdmin web SQL console, and execute the SHOW VARIABLES LIKE 'query_cache_size'; query without selecting a database. The query will probably return the 0 value for the query_cache_size variable.
Execute the SET GLOBAL query_cache_size = 1048576; query and execute SHOW VARIABLES LIKE 'query_cache_size'; again.
The query will probably return the following information:
The query_cache_size variable was activated with success!
For further information about the MySQL cache size configuration, follow the link at https://dev.mysql.com/doc/refman/5.0/en/query-cache-configuration.html.
Even by testing these configurations in your localhost environment, you can feel the huge positive difference between the first access in your Magento installation and the last access after the configuration. This is really awesome!
Optimizing the MySQL server
MySQL has the query cache feature to provide fast queries on a database. Once again, you need to conduct deep research on your possible hosting services before contracting any to make sure you have all the services you need for a great production environment.
Before starting the optimization, refer to the PHP and MySQL documentations of your hosting service to check the availability of these changes.
Open the php.ini hosting service file and place these configurations:
;;;;;;;;;;;;;;;;;;;
; Resource Limits ;
;;;;;;;;;;;;;;;;;;;

max_execution_time = 30     ; Maximum execution time of each script, in seconds
max_input_time = 60	; Maximum amount of time each script may spend parsing request data
memory_limit = 512M      ; Maximum amount of memory a script may consume (8MB)
query_cache_size = 64M

[MySQLi]
; Please refer to http://php.net/manual/en/mysqli.configuration.php for further information

; Maximum number of persistent links.  -1 means no limit.
mysqli.max_persistent = -1

; Allow accessing, from PHP's perspective, local files with LOAD DATA statements
;mysqli.allow_local_infile = On

; Allow or prevent persistent links.
mysqli.allow_persistent = On

; Maximum number of links.  -1 means no limit.
mysqli.max_links = -1

; If mysqlnd is used: Number of cache slots for the internal result set cache
mysqli.cache_size = 2000

; Default port number for mysqli_connect().  If unset, mysqli_connect() will use
; the $MYSQL_TCP_PORT or the mysql-tcp entry in /etc/services or the
; compile-time value defined MYSQL_PORT (in that order).  Win32 will only look
; at MYSQL_PORT.
mysqli.default_port = 3306

; Default socket name for local MySQL connects.  If empty, uses the built-in
; MySQL defaults.
mysqli.default_socket =

; Default host for mysql_connect() (doesn't apply in safe mode).
mysqli.default_host =

; Default user for mysql_connect() (doesn't apply in safe mode).
mysqli.default_user =

; Default password for mysqli_connect() (doesn't apply in safe mode).
; Note that this is generally a *bad* idea to store passwords in this file.
; *Any* user with PHP access can run 'echo get_cfg_var("mysqli.default_pw")
; and reveal this password!  And of course, any users with read access to this
; file will be able to reveal the password as well.
mysqli.default_pw =

; Allow or prevent reconnect
mysqli.reconnect = Off
Now, let's configure the query_cache_size variable directly on the MySQL database.
Open the phpMyAdmin web SQL console, and execute the SHOW VARIABLES LIKE 'query_cache_size'; query without selecting a database. The query will probably return the 0 value for the query_cache_size variable.
Execute the SET GLOBAL query_cache_size = 1048576; query and execute SHOW VARIABLES LIKE 'query_cache_size'; again.
The query will probably return the following information:
The query_cache_size variable was activated with success!
For further information about the MySQL cache size configuration, follow the link at https://dev.mysql.com/doc/refman/5.0/en/query-cache-configuration.html.
Even by testing these configurations in your localhost environment, you can feel the huge positive difference between the first access in your Magento installation and the last access after the configuration. This is really awesome!
Code minification is a technique to remove unnecessary characters from the source code. Minify your JavaScript (.js) and stylesheets (.css) files and improve the load time of your site by compressing the files.
In order to activate this process in Magento, navigate to the admin area (http://localhost/packt/admin_packt) and follow these instructions:
- First, navigate to Stores | Configuration | Advanced | Developer.
- Expand the JavaScript Settings options and select the Yes option for Merge JavaScript Files and Minify JavaScript Files.
- Expand the CSS Settings options and select the Yes option for Merge CSS Files and Minify CSS Files.
- Finally, click on the Save Config button.

Content Delivery Networks, also known as CDN, are servers of fast access for your static or non-dynamic content. JavaScript files and images are examples of files hosted on CDN servers.
The main idea behind the use of CDN is saving the process time of your Magento server using a CDN solution.
I suggest you to conduct research on hosting services that provide this integration. For example, Nexcess as a Magento partner company provides specific documentation about CDN integration on the URL https://docs.nexcess.net/article/how-to-configure-cdn-access-for-magento.html.
For JavaScript CDN, we have a free-of-charge service available on the Internet! This is thanks to Google for providing us with this amazing feature at https://developers.google.com/speed/libraries/.
CDN for Magento
Content Delivery Networks, also known as CDN, are servers of fast access for your static or non-dynamic content. JavaScript files and images are examples of files hosted on CDN servers.
The main idea behind the use of CDN is saving the process time of your Magento server using a CDN solution.
I suggest you to conduct research on hosting services that provide this integration. For example, Nexcess as a Magento partner company provides specific documentation about CDN integration on the URL https://docs.nexcess.net/article/how-to-configure-cdn-access-for-magento.html.
For JavaScript CDN, we have a free-of-charge service available on the Internet! This is thanks to Google for providing us with this amazing feature at https://developers.google.com/speed/libraries/.
In this chapter, you learned important lessons about how to improve Magento performance and pay attention to all the aspects that can make a positive difference in Magento development, including how to create a full-speed environment for Magento System.
I invite you to think in this very for now. We are progressing and walking through all the aspects of Magento: design, development, marketing, and performance. I feel comfortable to say to you, dear reader, that you have the tools to elevate your Magento professional career. Just keep continuing to study hard.
In this chapter, you learned how to:
- Increase Magento performance in different aspects and technologies
- Use the power of indexation and caching
- Develop solutions to create a better Magento user experience through fast download techniques
In the final chapter, we will explore some tools and ways to improve your Magento skills. See you!