

We will focus on creating REST services for a basic todo management system. We will create services for the following:
Retrieving a list of todos for a given user
Retrieving details for a specific todo
Creating a todo for a user
One of the best practices of REST services is to use the appropriate HTTP request method based on the action we perform. In the services we exposed until now, we used the GET method, as we focused on services that read data.
The following table shows the appropriate HTTP Request method based on the operation that we perform:
|
HTTP Request Method |
Operation |
|---|---|
|
|
Read--Retrieve details for a resource |
|
|
Create--Create a new item or resource |
|
|
Update/replace |
|
|
Update/modify a part of the resource |
|
|
Delete |
Let's quickly map the services that we want to create to the appropriate request methods:
Retrieving a list of todos for a given user: This is READ. We will use GET. We will use a URI:
/users/{name}/todos. One more good practice is to use plurals for static things in the URI: users, todo, and so on. This results in more readable URIs.Retrieving details for a specific todo: Again, we will use
GET. We will use a URI/users/{name}/todos/{id}. You can see that this is consistent with the earlier URI that we decided for the list of todos.Creating a todo for a user: For the create operation, the suggested HTTP Request method is
POST. To create a new todo, we will post toURI /users/{name}/todos.
To be able to retrieve and store details of a todo, we need a Todo bean and a service to retrieve and store the details.
Let's create a Todo Bean:
    public class Todo {
      private int id;
      private String user;

      private String desc;

      private Date targetDate;
      private boolean isDone;

      public Todo() {}

      public Todo(int id, String user, String desc,
      Date targetDate, boolean isDone) {
        super();
        this.id = id;
        this.user = user;
        this.desc = desc;
        this.targetDate = targetDate;
        this.isDone = isDone;
      }

       //ALL Getters
    }
We have a created a simple Todo bean with the ID, the name of user, the description of the todo, the todo target date, and an indicator for the completion status. We added a constructor and getters for all fields.
Let's add TodoService now:
   @Service
   public class TodoService {
     private static List<Todo> todos = new ArrayList<Todo>();
     private static int todoCount = 3;

     static {
       todos.add(new Todo(1, "Jack", "Learn Spring MVC",
       new Date(), false));
       todos.add(new Todo(2, "Jack", "Learn Struts", new Date(),
       false));
       todos.add(new Todo(3, "Jill", "Learn Hibernate", new Date(),
       false));
      }

     public List<Todo> retrieveTodos(String user) {
       List<Todo> filteredTodos = new ArrayList<Todo>();
       for (Todo todo : todos) {
         if (todo.getUser().equals(user))
         filteredTodos.add(todo);
        }
      return filteredTodos;
     }

    public Todo addTodo(String name, String desc,
    Date targetDate, boolean isDone) {
      Todo todo = new Todo(++todoCount, name, desc, targetDate,
      isDone);
      todos.add(todo);
      return todo;
    }

    public Todo retrieveTodo(int id) {
      for (Todo todo : todos) {
      if (todo.getId() == id)
        return todo;
      }
      return null;
     }
   }
Quick things to note are as follows:
To keep things simple, this service does not talk to the database. It maintains an in-memory array list of todos. This list is initialized using a static initializer.
We are exposing a couple of simple retrieve methods and a method to add a to-do.
Now that we have the service and bean ready, we can create our first service to retrieve a list of to-do's for a user.
We will create a new RestController annotation called TodoController. The code for the retrieve todos method is shown as follows:
    @RestController
    public class TodoController {
     @Autowired
     private TodoService todoService;

     @GetMapping("/users/{name}/todos")
     public List<Todo> retrieveTodos(@PathVariable String name) {
       return todoService.retrieveTodos(name);
     }
    }
A couple of things to note are as follows:
We are autowiring the todo service using the
@AutowiredannotationWe use the
@GetMappingannotation to map the Get request for the"/users/{name}/todos"URI to theretrieveTodosmethod
Let's send a test request and see what response we get. The following screenshot shows the output:

The response for the http://localhost:8080/users/Jack/todos URL is as follows:
   [
    {"id":1,"user":"Jack","desc":"Learn Spring
     MVC","targetDate":1481607268779,"done":false},
    {"id":2,"user":"Jack","desc":"Learn
    Struts","targetDate":1481607268779, "done":false}
]The code to unit test the TodoController class is shown in the following screenshot:
   @RunWith(SpringRunner.class)
   @WebMvcTest(TodoController.class)
   public class TodoControllerTest {

    @Autowired
    private MockMvc mvc;

    @MockBean
    private TodoService service;

    @Test
    public void retrieveTodos() throws Exception {
     List<Todo> mockList = Arrays.asList(new Todo(1, "Jack",
     "Learn Spring MVC", new Date(), false), new Todo(2, "Jack",
     "Learn Struts", new Date(), false));

     when(service.retrieveTodos(anyString())).thenReturn(mockList);

     MvcResult result = mvc
    .perform(MockMvcRequestBuilders.get("/users
    /Jack/todos").accept(MediaType.APPLICATION_JSON))
    .andExpect(status().isOk()).andReturn();

    String expected = "["
     + "{id:1,user:Jack,desc:\"Learn Spring MVC\",done:false}" +","
     + "{id:2,user:Jack,desc:\"Learn Struts\",done:false}" + "]";

     JSONAssert.assertEquals(expected, result.getResponse()
      .getContentAsString(), false);
     }
    }
A few important things to note are as follows:
We are writing a unit test. So, we want to test only the logic present in the
TodoControllerclass. So, we initialize a Mock MVC framework with only theTodoControllerclass using@WebMvcTest(TodoController.class).@MockBean private TodoService service: We are mocking out theTodoServiceusing the@MockBeanannotation. In test classes that are run withSpringRunner, the beans defined with@MockBeanwill be replaced by a mock, created using the Mockito framework.when(service.retrieveTodos(anyString())).thenReturn(mockList): We are mocking theretrieveTodosservice method to return the mock list.MvcResult result = ..: We are accepting the result of the request into an MvcResult variable to enable us to perform assertions on the response.JSONAssert.assertEquals(expected, result.getResponse().getContentAsString(), false): JSONAssert is a very useful framework to perform asserts on JSON. It compares the response text with the expected value.JSONAssertis intelligent enough to ignore values that are not specified. Another advantage is a clear failure message in case of assertion failures. The last parameter, false, indicates using non-strict mode. If it is changed to true, then the expected should exactly match the result.
The code to perform integration testing on the TodoController class is shown in the following code snippet. It launches up the entire Spring context with all the controllers and beans defined:
   @RunWith(SpringJUnit4ClassRunner.class)
   @SpringBootTest(classes = Application.class, webEnvironment =
   SpringBootTest.WebEnvironment.RANDOM_PORT)
   public class TodoControllerIT {

    @LocalServerPort
    private int port;

    private TestRestTemplate template = new TestRestTemplate();

    @Test
    public void retrieveTodos() throws Exception {
     String expected = "["
     + "{id:1,user:Jack,desc:\"Learn Spring MVC\",done:false}" + ","
     + "{id:2,user:Jack,desc:\"Learn Struts\",done:false}" + "]";

     String uri = "/users/Jack/todos";

     ResponseEntity<String> response =
     template.getForEntity(createUrl(uri), String.class);

     JSONAssert.assertEquals(expected, response.getBody(), false);
    }

     private String createUrl(String uri) {
     return "http://localhost:" + port + uri;
    }
  }
This test is very similar to the integration test for BasicController, except that we are using JSONAssert to assert the response.
We will now add the method to retrieve details for a specific Todo:
    @GetMapping(path = "/users/{name}/todos/{id}")
    public Todo retrieveTodo(@PathVariable String name, @PathVariable
    int id) {
      return todoService.retrieveTodo(id);
    }
A couple of things to note are as follows:
The URI mapped is
/users/{name}/todos/{id}We have two path variables defined for
nameandid
Let's send a test request and see what response we will get, as shown in the following screenshot:

The response for the http://localhost:8080/users/Jack/todos/1 URL is shown as follows:
    {"id":1,"user":"Jack","desc":"Learn Spring MVC",
"targetDate":1481607268779,"done":false}The code to unit test retrieveTodo is as follows:
     @Test
     public void retrieveTodo() throws Exception {
       Todo mockTodo = new Todo(1, "Jack", "Learn Spring MVC",
       new Date(), false);

       when(service.retrieveTodo(anyInt())).thenReturn(mockTodo);

       MvcResult result = mvc.perform(
       MockMvcRequestBuilders.get("/users/Jack/todos/1")
       .accept(MediaType.APPLICATION_JSON))
       .andExpect(status().isOk()).andReturn();

       String expected = "{id:1,user:Jack,desc:\"Learn Spring
       MVC\",done:false}";

      JSONAssert.assertEquals(expected,
       result.getResponse().getContentAsString(), false);

     }
A few important things to note are as follows:
when(service.retrieveTodo(anyInt())).thenReturn(mockTodo): We are mocking theretrieveTodoservice method to return the mock todo.MvcResult result = ..: We are accepting the result of the request into an MvcResult variable to enable us to perform assertions on the response.JSONAssert.assertEquals(expected, result.getResponse().getContentAsString(), false): Asserts whether the result is as expected.
The code to perform integration testing on retrieveTodos in TodoController is shown in the following code snippet. This would be added to the TodoControllerIT class:
     @Test
     public void retrieveTodo() throws Exception {
       String expected = "{id:1,user:Jack,desc:\"Learn Spring
       MVC\",done:false}";
       ResponseEntity<String> response = template.getForEntity(
       createUrl("/users/Jack/todos/1"), String.class);
       JSONAssert.assertEquals(expected, response.getBody(), false);
}We will now add the method to create a new Todo. The HTTP method to be used for creation is Post. We will post to a "/users/{name}/todos" URI:
    @PostMapping("/users/{name}/todos")
    ResponseEntity<?> add(@PathVariable String name,
    @RequestBody Todo todo) {
      Todo createdTodo = todoService.addTodo(name, todo.getDesc(),
      todo.getTargetDate(), todo.isDone());
      if (createdTodo == null) {
         return ResponseEntity.noContent().build();
      }

     URI location = ServletUriComponentsBuilder.fromCurrentRequest()

    .path("/{id}").buildAndExpand(createdTodo.getId()).toUri();
    return ResponseEntity.created(location).build();
   }
A few things to note are as follows:
@PostMapping("/users/{name}/todos"):@PostMappingannotations map theadd()method to the HTTP Request with aPOSTmethod.ResponseEntity<?> add(@PathVariable String name, @RequestBody Todo todo): An HTTP post request should ideally return the URI to the created resources. We useResourceEntityto do this.@RequestBodybinds the body of the request directly to the bean.ResponseEntity.noContent().build(): Used to return that the creation of the resource failed.ServletUriComponentsBuilder.fromCurrentRequest().path("/{id}").buildAndExpand(createdTodo.getId()).toUri(): Forms the URI for the created resource that can be returned in the response.ResponseEntity.created(location).build(): Returns a status of201(CREATED)with a link to the resource created.
If you are on Mac, you might want to try the Paw application as well.
Let's send a test request and see what response we get. The following screenshot shows the response:

We will use Postman app to interact with the REST Services. You can install it from the website, https://www.getpostman.com/. It is available on Windows and Mac. A Google Chrome plugin is also available.
To create a new Todo using POST, we would need to include the JSON for the Todo in the body of the request. The following screenshot shows how we can use the Postman app to create the request and the response after executing the request:
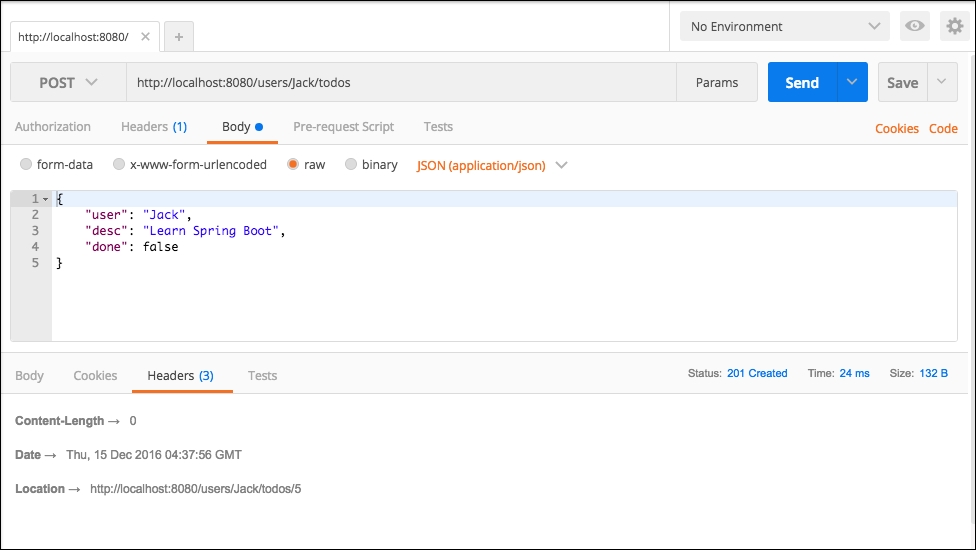
A few important things to note are as follows:
We are sending a POST request. So, we choose the
POSTfrom the top-left dropdown.To send the Todo JSON as part of the body of the request, we select the
rawoption in theBodytab (highlighted with a blue dot). We choose the content type as JSON (application/json).Once the request is successfully executed, you can see the status of the request in the bar in the middle of the screen:
Status: 201 Created.The location is
http://localhost:8080/users/Jack/todos/5. This is the URI of the newly created todo that is received in the response.
Complete details of the request to http://localhost:8080/users/Jack/todos are shown in the block, as follows:
    Header
    Content-Type:application/json

   Body
    {
      "user": "Jack",
      "desc": "Learn Spring Boot",
       "done": false
}The code to unit test the created Todo is shown as follows:
    @Test
    public void createTodo() throws Exception {
     Todo mockTodo = new Todo(CREATED_TODO_ID, "Jack",
     "Learn Spring MVC", new Date(), false);
     String todo = "{"user":"Jack","desc":"Learn Spring MVC",
     "done":false}";

    when(service.addTodo(anyString(), anyString(),
    isNull(),anyBoolean()))
    .thenReturn(mockTodo);

   mvc
    .perform(MockMvcRequestBuilders.post("/users/Jack/todos")
    .content(todo)
    .contentType(MediaType.APPLICATION_JSON)
    )
    .andExpect(status().isCreated())
    .andExpect(
      header().string("location",containsString("/users/Jack/todos/"
     + CREATED_TODO_ID)));
   }
A few important things to note are as follows:
String todo = "{"user":"Jack","desc":"Learn Spring MVC","done":false}": The Todo content to post to the create todo service.when(service.addTodo(anyString(), anyString(), isNull(), anyBoolean())).thenReturn(mockTodo): Mocks the service to return a dummy todo.MockMvcRequestBuilders.post("/users/Jack/todos").content(todo).contentType(MediaType.APPLICATION_JSON)): Creates a POST to a given URI with the given content type.andExpect(status().isCreated()): Expects that the status is created.andExpect(header().string("location",containsString("/users/Jack/todos/" + CREATED_TODO_ID))): Expects that the header containslocationwith the URI of created resource.
The code to perform integration testing on the created todo in TodoController is shown as follows. This would be added to the TodoControllerIT class, as follows:
    @Test
    public void addTodo() throws Exception {
      Todo todo = new Todo(-1, "Jill", "Learn Hibernate", new Date(),
      false);
      URI location = template
     .postForLocation(createUrl("/users/Jill/todos"),todo);
      assertThat(location.getPath(),
      containsString("/users/Jill/todos/4"));
    }
A few important things to note are as follows:
URI location = template.postForLocation(createUrl("/users/Jill/todos"), todo):postForLocationis a utility method especially useful in tests to create new resources. We are posting the todo to the given URI and getting the location from the header.assertThat(location.getPath(), containsString("/users/Jill/todos/4")): Asserts that the location contains the path to the newly created resource.