Book Image

Mastering Adobe Captivate 2019 - Fifth Edition

By : Dr. Pooja Jaisingh, Damien Bruyndonckx
Book Image

Mastering Adobe Captivate 2019 - Fifth Edition

By: Dr. Pooja Jaisingh, Damien Bruyndonckx

Overview of this book

Adobe Captivate is used to create highly engaging, interactive, and responsive eLearning content. This book takes you through the production of a few pieces of eLearning content, covering all the project types and workflows of Adobe Captivate. First, you will learn how to create a typical interactive Captivate project. This will give you the opportunity to review all Captivate objects and uncover the application's main tools. Then, you will use the built-in capture engine of Captivate to create an interactive software simulation and a Video Demo that can be published as an MP4 video. Then, you will approach the advanced responsive features of Captivate to create a project that can be viewed on any device. And finally, you will immerse your learners in a 360o environment by creating Virtual Reality projects of Adobe Captivate. At the end of the book, you will empower your workflow and projects with the newer and most advanced features of the application, including variables, advanced actions, JavaScript, and using Captivate 2019 with other applications. If you want to produce high quality eLearning content using a wide variety of techniques, implement eLearning in your company, enable eLearning on any device, assess the effectiveness of the learning by using extensive Quizzing features, or are simply interested in eLearning, this book has you covered!
Table of Contents (17 chapters)
7
Working with Quizzes
14
Variables and Advanced Actions

Adding Fluid Boxes

Let's take a deep dive into learning how to add Fluid Boxes, change their properties, and add content to these Fluid Boxes:

  1. If you still have the project open from the last exercise, close it. Then, open the Chapter10/FluidBoxes.cptx file.
  2. Go to slide 3. You can start adding Fluid Boxes to this blank slide.
  3. On the Toolbar, click Fluid Box. It gives you the option of selecting either a Horizontal or Vertical flow based on your screen layout requirements. Let's select Vertical in this example.
  1. Add 3 vertical Fluid Boxes in this example:
Note that you can add up to 10 Fluid Boxes in each direction.

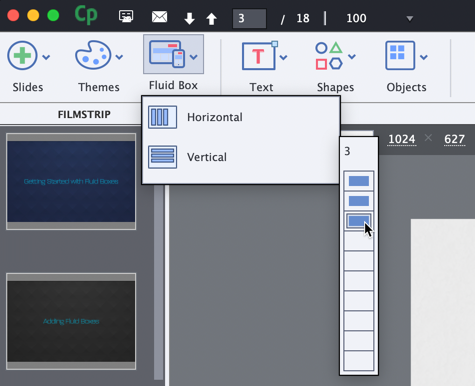
This creates one main Fluid Box on the screen, with three child Fluid Boxes. You can see the hierarchy of the Fluid Boxes anytime in the Select Fluid Box section in the Properties inspector. Please note that the Fluid Box number you see on your computer might be different from the number you see here in the screenshot:

  1. You can then resize the...