Book Image

Mastering Adobe Captivate 2019 - Fifth Edition

By : Dr. Pooja Jaisingh, Damien Bruyndonckx
Book Image

Mastering Adobe Captivate 2019 - Fifth Edition

By: Dr. Pooja Jaisingh, Damien Bruyndonckx

Overview of this book

Adobe Captivate is used to create highly engaging, interactive, and responsive eLearning content. This book takes you through the production of a few pieces of eLearning content, covering all the project types and workflows of Adobe Captivate. First, you will learn how to create a typical interactive Captivate project. This will give you the opportunity to review all Captivate objects and uncover the application's main tools. Then, you will use the built-in capture engine of Captivate to create an interactive software simulation and a Video Demo that can be published as an MP4 video. Then, you will approach the advanced responsive features of Captivate to create a project that can be viewed on any device. And finally, you will immerse your learners in a 360o environment by creating Virtual Reality projects of Adobe Captivate. At the end of the book, you will empower your workflow and projects with the newer and most advanced features of the application, including variables, advanced actions, JavaScript, and using Captivate 2019 with other applications. If you want to produce high quality eLearning content using a wide variety of techniques, implement eLearning in your company, enable eLearning on any device, assess the effectiveness of the learning by using extensive Quizzing features, or are simply interested in eLearning, this book has you covered!
Table of Contents (17 chapters)
7
Working with Quizzes
14
Variables and Advanced Actions

Customizing the Playback Controls bar

The first and most visible element of the Skin is the Playback Controls bar. By default, it appears below the project and contains the necessary buttons and switches to let the student control the playback of the project.

In the following exercise, you will explore the available options and create a customized Playback Controls bar for your project:

  1. Return to the Chapter15/encoderSim_800.cptx file.
  2. Use the Project | Skin Editor menu item to open the Skin Editor floating pane.

The Skin Editor floating pane should look similar to what is shown in the following screenshot:

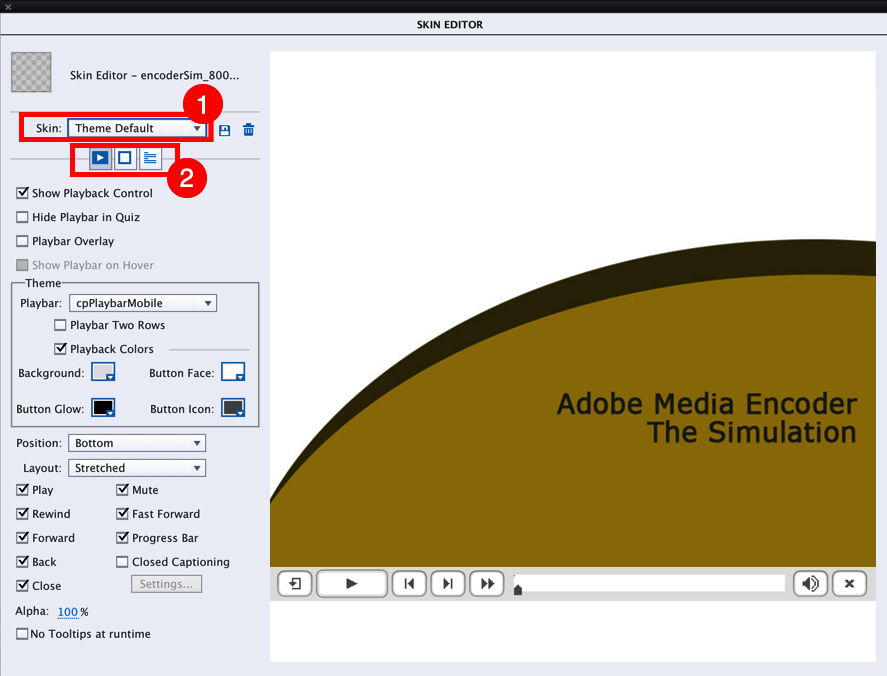
The Skin Editor floating pane is divided into two main areas. On the left-hand side are the switches, checkboxes, and buttons that you will use to customize the various elements of the Skin. On the right-hand side is a live preview of the first slide of the project. This area of the Skin Editor is automatically updated as you turn the options of the left area on and off.

Note two...