

Most of the hard work has already been done while defining the model and implementing the component. Now, we just need to skin the HTML using the super-awesome data binding capabilities of Angular. It's going to be simple, sweet, and elegant!
For the 7 Minute Workout view, we need to show the exercise name, the exercise image, a progress indicator, and the time remaining. Replace the local content of the workout-runner.component.html file with the content of the file from the Git branch checkpoint2.2, (or download it from http://bit.ly/ng6be-2-2-workout-runner-component-html). The view HTML looks as follows:
<div class="row">
  <div id="exercise-pane" class="col-sm">
    <h1 class="text-center">{{currentExercise.exercise.title}}</h1>
    <div class="image-container row">
      <img class="img-fluid col-sm" [src]="'/assets/images/' +
                                      currentExercise.exercise.image" />
    </div>
    <div class="progress time-progress row">
      <div class="progress-bar col-sm"
            role="progressbar"
            [attr.aria-valuenow]="exerciseRunningDuration"
            aria-valuemin="0"
            [attr.aria-valuemax]="currentExercise.duration"
            [ngStyle]="{'width':(exerciseRunningDuration/currentExercise.duration) *
                                                                100 + '%'}">
      </div>
    </div>
    <h1>Time Remaining: {{currentExercise.duration-exerciseRunningDuration}}</h1>
  </div>
</div>
WorkoutRunnerComponent currently uses an inline template; instead, we need to revert back to using an external template. Update the workout-runner.component.ts file and get rid of the template property, then uncomment templateUrl, which we commented out earlier.
Before we understand the Angular pieces in the view, let's just run the app again. Save the changes in workout-runner.component.html and if everything went fine, we will see the workout app in its full glory:
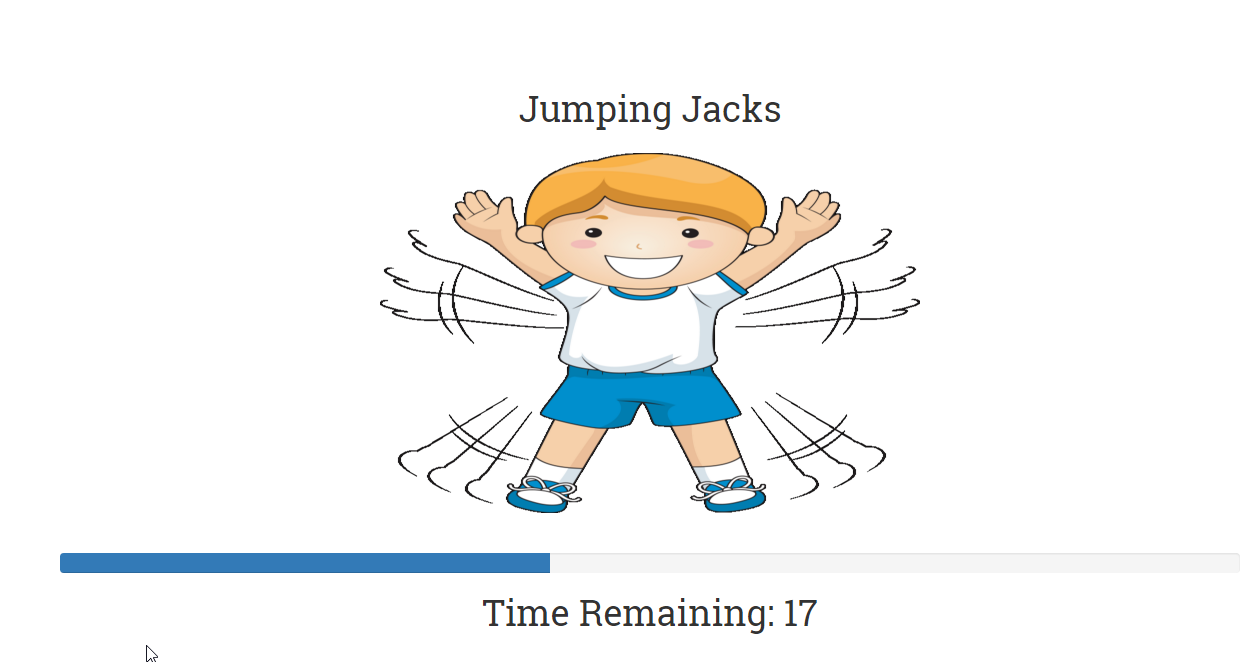
The basic app is now up and running. The exercise image and title show up, the progress indicator shows the progress, and exercise transitioning occurs when the exercise time lapses. This surely feels great!
Note
If you are having a problem with running the code, look at the Git branch checkpoint2.2 for a working version of what we have done thus far. You can also download the snapshot of checkpoint2.2 (a ZIP file) from this GitHub location: http://bit.ly/ng6be-checkpoint-2-2. Refer to the README.md file in the trainer folder when setting up the snapshot for the first time.
Looking at the view HTML, other than some Bootstrap styles, there are some interesting Angular pieces that need our attention. Before we dwell on these view constructs in detail, let's break down these elements and provide a quick summary:
<h1 ...>{{currentExercise.exercise.title}}</h1>: Uses interpolation<img ... [src]="'/assets/images/' + currentExercise.exercise.image" .../>: Uses property binding to bind thesrcproperty of the image to the component model propertycurrentExercise.exercise.image<div ... [attr.aria-valuenow]="exerciseRunningDuration" ... >: Uses attribute binding to bind the aria attribute on div toexerciseRunningDuration< div ... [ngStyle]="{'width':(exerciseRunningDuration/currentExercise.duration) * 100 + '%'}">: Uses a directivengStyleto bind thestyleproperty on the progress-bardivto an expression that evaluates the exercise progress
Phew! There is a lot of binding involved. Let's dig deeper into the binding infrastructure.
Most modern JavaScript frameworks today come with strong model-view binding support, and Angular is no different. The primary aim of any binding infrastructure is to reduce the boilerplate code that a developer needs to write to keep the model and view in sync. A robust binding infrastructure is always declarative and terse.
The Angular binding infrastructure allows us to transform template (raw) HTML into a live view that is bound to model data. Based on the binding constructs used, data can flow and be synced in both directions: from model to view and view to model.
The link between the component's model and its view is established using the template or templateUrl property of the @Component decorator. With the exception of the script tag, almost any piece of HTML can act as a template for the Angular binding infrastructure.
To make this binding magic work, Angular needs to take the view template, compile it, link it to the model data, and keep it in sync with model updates without the need for any custom boilerplate synchronization code.
Based on the data flow direction, these bindings can be of three types:
- One-way binding from model to view: In model-to-view binding, changes to the model are kept in sync with the view. Interpolations, property, attribute, class, and style bindings fall in this category.
- One-way binding from view to model: In this category, view changes flow towards the model. Event bindings fall in this category.
- Two-way/bidirectional binding: Two-way binding, as the name suggests, keeps the view and model in sync. There is a special binding construct used for two-way binding,
ngModel, and some standard HTML data entry elements such asinputandselectsupport two-way binding.
Let's understand how to utilize the binding capabilities of Angular to support view templatization. Angular provides these binding constructs:
- Interpolations
- Property binding
- Attribute binding
- Class binding
- Style binding
- Event binding
This is a good time to learn about all these binding constructs. Interpolation is the first one.
Interpolations are quite simple. The expression (commonly known as a template expression) inside the interpolation symbols ({{ }}) is evaluated in the context of the model (or the component class members), and the outcome of the evaluation (string) is embedded in HTML. A handy framework construct to display a component's data/properties. We render the exercise title and the exercise time remaining using interpolation:
<h1>{{currentExercise.exercise.title}}</h1>
...
<h1>Time Remaining: {{currentExercise.duration?-exerciseRunningDuration}}</h1>
Remember that interpolations synchronize model changes with the view. Interpolation is one way of binding from a model to a view.
Interpolations, in fact, are a special case of property binding, which allows us to bind any HTML element/component properties to a model. We will shortly discuss how an interpolation can be written using property binding syntax. Consider interpolation as syntactical sugar over property binding.
Property bindings allow us to bind native HTML/component properties to the component's model and keep them in sync (from model->view). Let's look at property binding from a different context.
Look at this view excerpt from the 7 Minute Workout's component view (workout-runner.component.html):
<img class="img-responsive" [src]="'/static/images/' + currentExercise.exercise.image" />
It seems that we are setting the src attribute of img to an expression that gets evaluated at runtime. But are we really binding to an attribute? Or is this a property? Are properties and attributes different?
In Angular realms, while the preceding syntax looks like it is setting an HTML element's attribute, it is, in fact, doing property binding. Moreover, since many of us are not aware of the difference between an HTML element's properties and its attributes, this statement is very confusing. Therefore, before we look at how property bindings work, let's try to grasp the difference between an element's property and its attribute.
Take any DOM element API and you will find attributes, properties, functions, and events. While events and functions are self-explanatory, it is difficult to understand the difference between properties and attributes. In daily use, we use these words interchangeably, which does not help much either. Take, for example, this line of code:
<input type="text" value="Awesome Angular">
When the browser creates a DOM element (HTMLInputElement to be precise) for this input textbox, it uses the value attribute on input to set the initial state of the value property of input to Awesome Angular.
After this initialization, any changes to the value property of input do not reflect on the value attribute; the attribute always has Awesome Angular (unless set explicitly again). This can be confirmed by querying the input state.
Suppose we change the input data to Angular rocks! and query the input element state:
input.value // value property
The value property always returns the current input content, which is Angular rocks!. Whereas this DOM API function:
input.getAttribute('value') // value attribute Returns the value attribute, and is always the Awesome Angular that was set initially.
The primary role of an element attribute is to initialize the state of the element when the corresponding DOM object is created.
There are a number of other nuances that add to this confusion. These include the following:
- Attribute and property synchronization is not consistent across properties. As we saw in the preceding example, changes to the
valueproperty oninputdo not affect thevalueattribute, but this is not true for all property-value pairs. Thesrcproperty of an image element is a prime example of this; changes to property or attribute values are always kept in sync.
- It's surprising to learn that the mapping between attributes and properties is also not one-to-one. There are a number of properties that do not have any backing attribute (such as
innerHTML), and there are also attributes that do not have a corresponding property defined on the DOM (such ascolspan). - Attribute and property mapping adds to this confusion too, as they do not follow a consistent pattern. An excellent example of this is available in the Angular developer's guide, which we are going to reproduce here verbatim:
Note
The disabled attribute is another peculiar example. A button's disabled property is false by default so the button is enabled. When we add the disabled attribute, its presence alone initializes the button's disabled property to true so the button is disabled. Adding and removing the disabled attribute disables and enables the button. The value of the attribute is irrelevant, which is why we cannot enable a button by writing <button disabled="false">Still Disabled</button>.
The aim of this discussion is to make sure that we understand the difference between the properties and attributes of a DOM element. This new mental model will help us as we continue to explore the framework's property and attribute binding capabilities. Let's get back to our discussion on property binding.
Now that we understand the difference between a property and an attribute, let's look at the binding example again:
<img class="img-responsive" [src]="'/static/images/' + currentExercise.exercise.image" />
The [propertName] square bracket syntax is used to bind the img.src property to an Angular expression.
The general syntax for property binding looks as follows:
[target]="sourceExpression";
In the case of property binding, the target is a property on the DOM element or component. With property binding, we can literally bind to any property on the element's DOM. The src property on the img element is what we use; this binding works for any HTML element and every property on it.
Note
Binding source and targetIt is important to understand the difference between source and target in an Angular binding. The property appearing inside [] is a target, sometimes called binding target. The target is the consumer of the data and always refers to a property on the component/element. The source expression constitutes the data source that provides data to the target.
At runtime, the expression is evaluated in the context of the component's/element's property (the WorkoutRunnerComponent.currentExercise.exercise.image property in the preceding case).
Note
Always remember to add square brackets [] around the target. If we don't, Angular treats the expression as a string constant and the target is simply assigned the string value.
Property binding, event binding, and attribute binding do not use the interpolation symbol. The following is invalid: [src]="{{'/static/images/' + currentExercise.exercise.image}}".
Note
If you have worked on AngularJS, property binding together with event binding allows Angular to get rid of a number of directives, such as ng-disable, ng-src, ng-key*, ng-mouse*, and a few others.
From a data binding perspective, Angular treats components in the same way as it treats native elements. Hence, property binding works on component properties too! Components can define input and output properties that can be bound to the view, such as this:
<workout-runner [exerciseRestDuration]="restDuration"></workout-runner>
This hypothetical snippet binds the exerciseRestDuration property on the WorkoutRunnerComponent class to the restDuration property defined on the container component (parent), allowing us to pass the rest duration as a parameter to the WorkoutRunnerComponent. As we enhance our app and develop new components, you will learn how to define custom properties and events on a component.
Note
We can enable property binding using the bind- syntax, which is a canonical form of property binding. This implies that [src]="'/assets/images/' + currentExercise.exercise.image" is equivalent to the following: bind-src="'/static/images/' + currentExercise.exercise.image".
Note
Property binding, like interpolation, is unidirectional, from the component/element source to the view. Changes to the model data are kept in sync with the view.
The template view that we just created has only one property binding (on [src]). The other bindings with square brackets aren't property bindings. We will cover them shortly.
We concluded the section on interpolations by describing interpolation as syntactical sugar over property binding. The intent was to highlight how both can be used interchangeably. The interpolation syntax is terser than property binding and hence is very useful. This is how Angular interprets an interpolation:
<h3>Main heading - {{heading}}</h3>
<h3 [text-content]="' Main heading - '+ heading"></h3>
Angular translates the interpolation in the first statement into the textContent property binding (second statement).
Interpolation can be used in more places than you can imagine. The following example contrasts the same binding using interpolation and property binding:
<img [src]="'/assets/images/' + currentExercise.exercise.image" />
<img src="/assets/images/{{currentExercise.exercise.image}}" />      // interpolation on attribute

<span [text-content]="helpText"></span>
<span>{{helpText}}</span>
While property binding (and interpolations) makes it easy for us to bind any expression to the target property, we should be careful with the expression we use. Angular's change detection system will evaluate your expression binding multiple times during the life cycle of the application, as long as our component is alive. Therefore, while binding an expression to a property target, keep these two guidelines in mind.
A property binding expression should evaluate quickly. Slow expression evaluation can kill your app's performance. This happens when a function performing CPU intensive work is part of an expression. Consider this binding:
<div>{{doLotsOfWork()}}</div> Angular will evaluate the preceding doLotsOfWork() expression every time it performs a change detection run. These change detection runs happen more often than we imagine and are based on some internal heuristics, so it becomes imperative that the expressions we use evaluate quickly.
If a function is used in a binding expression, it should be side effect-free. Consider yet another binding:
<div [innerHTML]="getContent()"></div>
And the underlying function, getContent:
getContent() {
  var content=buildContent();
  this.timesContentRequested +=1;
  return content;
}
The getContent call changes the state of the component by updating the timesContentRequested property every time it is called. If this property is used in views such as:
<div>{{timesContentRequested}}</div> Angular throws errors such as:
Expression '{{getContent()}}' in AppComponent@0:4' has changed after it was checked. Previous value: '1'. Current value: '2'Note
The Angular framework works in two modes, dev and production. If we enable production mode in the application, the preceding error does not show up. Look at the framework documentation at http://bit.ly/enableProdMode for more details.
The bottom line is that your expression used inside property binding should be side effect-free.
Let's now look at something interesting, [ngStyle], which looks like a property binding, but it's not. The target specified in [] is not a component/element property (div does not have an ngStyle property), it's a directive.
Two new concepts need to be introduced, target selection and directives.
As a framework, Angular tries to enhance the HTML DSL (short for Domain-Specific Language):
- Components are referenced in HTML using custom tags such as
<abe-workout-runner></abe-workout-runner>(not part of standard HTML constructs). This highlights the first extension point. - The use of
[]and()for property and event binding defines the second. - And then there are directives, the third extension point which are further classified into attribute and structural directives, and components (components are directive too!).
While components come with their own view, attribute directives are there to enhance the appearance and/or behavior of existing elements/components.
Structural directives do not have their own view too; they change the DOM layout of the elements on which they are applied. We will dedicate a complete section later in the chapter to understanding these structural directives.
The ngStyle directive used in the workout-runner view is, in fact, an attribute directive:
<div class="progress-bar" role="progressbar"
 [ngStyle] = "{'width':(exerciseRunningDuration/currentExercise.duration) * 100 + '%'}"></div>
The ngStyle directive does not have its own view; instead, it allows us to set multiple styles (width in this case) on an HTML element using binding expressions. We will be covering a number of framework attribute directives later in this book.
Note
Directive nomenclature
Directives is an umbrella term used for component directives (also known as components), attribute directives, and structural directives. Throughout the book, when we use the term directive, we will be referring to either an attribute directive or a structural directive depending on the context. Component directives are always referred to as components.
With a basic understanding of the directive types that Angular has, we can comprehend the process of target selection for binding.
The target specified in [] is not limited to a component/element property. While the property name is a common target, the Angular templating engine actually does heuristics to decide the target type. Angular first searches the registered known directives (attribute or structural) that have matching selectors before looking for a property that matches the target expression. Consider this view fragment:
<div [ngStyle]='expression'></div>
The search for a target starts with a framework looking at all internal and custom directives with a matching selector (ngStyle). Since Angular already has an NgStyle directive, it becomes the target (the directive class name is NgStyle, whereas the selector is ngStyle). If Angular did not have a built-in NgStyle directive, the binding engine would have looked for a property called ngStyle on the underlying component.
If nothing matches the target expression, an unknown directive error is thrown.
That completes our discussion on target selection. The next section is about attribute binding.
The only reason attribute binding exists in Angular is that there are HTML attributes that do not have a backing DOM property. The colspan and aria attributes are some good examples of attributes without backing properties. The progress bar div in our view uses attribute binding.
Note
If attribute directives are still playing your head, I cannot blame you, it can become a bit confusing. Fundamentally, they are different. Attribute directives (such as [ngStyle]) change the appearance or behavior of DOM elements and as the name suggests are directives. There is no attribute or property named ngStyle on any HTML element. Attribute binding, on the other hand, is all about binding to HTML attributes that do not have backing for a DOM property.
The 7 Minute Workout uses attribute binding at two places, [attr.aria-valuenow] and [attr.aria-valuemax]. We may ask a question: can we use standard interpolation syntax to set an attribute? No, that does not work! Let's try it: open workout-runner.component.html and replace the two aria attributes attr.aria-valuenow and attr.aria-valuemax enclosed in [] with this highlighted code:
<div class="progress-bar" role="progressbar"
    aria-valuenow = "{{exerciseRunningDuration}}"
    aria-valuemin="0"
    aria-valuemax= "{{currentExercise.duration}}"  ...> </div>
Save the view and if the app is not running, run it. This error will pop up in the browser console:
Can't bind to 'ariaValuenow' since it isn't a known native property in WorkoutRunnerComponent ...
Angular is trying to search for a property called ariaValuenow in the div that does not exist! Remember, interpolations are actually property bindings.
We hope that this gets the point across: to bind to an HTML attribute, use attribute binding.
To support attribute binding, Angular uses a prefix notation, attr, within []. An attribute binding looks as follows:
[attr.attribute-name]="expression"
Revert to the original aria setup to make attribute binding work:
<div ... [attr.aria-valuenow]="exerciseRunningDuration"
[attr.aria-valuemax]="currentExercise.duration" ...> While we have not used style and class-based binding in our workout view, these are some binding capabilities that can come in handy. Hence, they are worth exploring.
We use class binding to set and remove a specific class based on the component state, as follows:
[class.class-name]="expression"
This adds class-name when expression is true and removes it when it is false. A simple example can look as follows:
<div [class.highlight]="isPreferred">Jim</div> // Toggles the highlight class
Use style bindings to set inline styles based on the component state:
[style.style-name]="expression";
While we have used the ngStyle directive for the workout view, we could have easily used style binding as well, as we are dealing with a single style. With style binding, the same ngStyle expression would become the following:
[style.width.%]="(exerciseRunningDuration/currentExercise.duration) * 100"
width is a style, and since it takes units too, we extend our target expression to include the % symbol.
Note
Remember that style. and class. are convenient bindings for setting a single class or style. For more flexibility, there are corresponding attribute directives: ngClass and ngStyle.
Earlier in the chapter, we formally introduced directives and their classifications. One of the directives types, attribute directives (again, don't confuse them with attribute binding, which we introduced in the preceding section) are the focus of our attention in the next section.
Attribute directives are HTML extensions that change the look, feel or behavior of a component/element. As described in the section on Angular directives, these directives do not define their own view.
Other than ngStyle and ngClass directives, there are a few more attribute directives that are part of the core framework. ngValue, ngModel, ngSelectOptions, ngControl, and ngFormControl are some of the attribute directives that Angular provides.
Since 7 Minute Workout uses the ngStyle directive, it would be wise to dwell more on this directive and its close associate ngClass.
Note
While the next section is dedicated to learning how to use the ngClass and ngStyle attribute directives, it is not until Chapter 4, Angular Directives in Depth, that we learn how to create our own attribute directives.
Angular has two excellent directives that allow us to dynamically set styles on any element and toggle CSS classes. For the bootstrap progress bar, we use the ngStyle directive to dynamically set the element's style, width, as the exercise progresses:
<div class="progress-bar" role="progressbar" ...
    [ngStyle]="{'width':(exerciseRunningDuration/currentExercise.duration) * 100 + '%'}"> </div>
ngStyle allows us to bind one or more styles to a component's properties at once. It takes an object as a parameter. Each property name on the object is the style name, and the value is the Angular expression bound to that property, such as the following example:
<div [ngStyle]= "{
'width':componentWidth,
'height':componentHeight,
'font-size': 'larger',
'font-weight': ifRequired ? 'bold': 'normal' }"></div>
The styles can not only bind to component properties (componentWidth and componentHeight), but also be set to a constant value ('larger'). The expression parser also allows the use of the ternary operator (?:); check out isRequired.
If styles become too unwieldy in HTML, we also have the option of writing in our component a function that returns the object hash, and setting that as an expression:
<div [ngStyle]= "getStyles()"></div>
Moreover, getStyles on the component looks as follows:
getStyles () {
    return {
      'width':componentWidth,
      ...
    }
}
ngClass works on the same lines too, except that it is used to toggle one or multiple classes. For example, check out the following code:
<div [ngClass]= "{'required':inputRequired, 'email':whenEmail}"></div> The required class is applied when inputRequired is true and is removed when it evaluates to false.
Note
Directives (custom or platform) like any other Angular artifact, always belong to a module. To use them across modules, the module needs to be imported. Wondering where ngStyle is defined? ngStyle is part of the core framework module, CommonModule,, and has been imported in the workout runner module definition (workout-runner.module.ts). CommonModule defines a number of handy directives that are used across Angular.
Well! That covers everything we had to learn about our newly developed view.
Note
And as described earlier, if you are having a problem with running the code, look at the Git branch checkpoint2.2. If not using Git, download the snapshot of checkpoint2.2 (a ZIP file) from http://bit.ly/ng2be-checkpoint2-2. Refer to the README.md file in the trainer folder when setting up the snapshot for the first time.
Time to add some enhancements and learn a bit more about the framework!