

For people who are doing this workout for the first time, it will be good to detail the steps involved in each exercise. We can also add references to some YouTube videos for each exercise to help the user understand the exercise better.
We are going to add the exercise description and instructions in the left panel and call it the description panel. We will also add references to YouTube videos in the right panel, which is the video player panel. To make things more modular and learn some new concepts, we are going to create independent components for each description panel and video panel.
The model data for this is already available. The description and procedure properties in the Exercise class (see model.ts) provide the necessary details about the exercise. The videos array contains some related YouTube video IDs, which will be used to fetch these videos.
An Angular app is nothing but a hierarchy of components, similar to a tree structure. As of now, 7 Minute Workout has two components, the root component, AppComponent, and its child, WorkoutRunnerComponent, in line with the HTML component layout, which now looks as follows:
<abe-root>
    ...
    <abe-workout-runner>...</abe-workout-runner>
</abe-root>
Run the app and do a view source to verify this hierarchy. As we all more components to implement new features in the application this component tree grows and branches out.
We are going to add two subcomponents to WorkoutRunnerComponent, one each to support the exercise description and exercise videos. While we could have added some HTML directly to the WorkoutRunnerComponent view, what we are hoping here is to learn a bit more about cross-component communication. Let's start with adding the description panel on the left and understand how a component can accept inputs.
Navigate to the workour-runner folder and generate a boilerplate exercise description component:
ng generate component exercise-description -isTo the generated exercise-description.component.ts file, add the highlighted code:
import { Component, OnInit, Input } from '@angular/core';
...
export class ExerciseDescriptionComponent {
  @Input() description: string;
  @Input() steps: string;
}
The @Input decorator signifies that the component property is available for data binding. Before we dig into the @Input decorator, let's complete the view and integrate it with WorkoutRunnerComponent.
Copy the view definition for exercise description, exercise-description.component.html, from the Git branch checkpoint2.3, in the workout-runner/exercise-description folder. Look at the highlighted HTML for the exercise description:
<div class="card-body">
    <div class="card-text">{{description}}</div>
</div>
...
<div class="card-text">
{{steps}}
</div>
The preceding interpolation references the input properties of ExerciseDescriptionComponent: description and steps.
The component definition is complete. Now, we just need to reference ExerciseDescriptionComponent in WorkoutRunnerComponent and provide values for description and steps for the ExerciseDescriptionComponent view to render correctly.
Open workout-runner.component.html and update the HTML fragments as highlighted in the following code. Add a new div called description-panel before the exercise-pane div and adjust some styles on the exercise-pane div, as follows:
<div class="row">
    <div id="description-panel" class="col-sm-3">
        <abe-exercise-description
            [description]="currentExercise.exercise.description"
            [steps]="currentExercise.exercise.procedure"></abe-exercise-description>
   </div>
   <div id="exercise-pane" class="col-sm-6">
   ...
If the app is running, the description panel should show up on the left with the relevant exercise details.
Note
WorkoutRunnerComponent was able to use ExerciseDescriptionComponent because it has been declared on WorkoutRunnerModule (see the workout-runner.module.ts declaration property). The Angular CLI component generator does this work for us.
Look back at the abe-exercise-description declaration in the preceding view. We are referring to the description and steps properties in the same manner as we did with the HTML element properties earlier in the chapter (<img [src]='expression' ...). Simple, intuitive, and very elegant!
The Angular data binding infrastructure makes sure that whenever the currentExercise.exercise.description and currentExercise.exercise.procedure properties on WorkoutRunnerComponent change, the bound properties on ExerciseDescriptionComponent, description, and steps are also updated.
Note
The @Input decoration can take a property alias as a parameter, which means the following: consider a property declaration such as: @Input("myAwesomeProperty") myProperty:string. It can be referenced in the view as follows: <my-component [myAwesomeProperty]="expression"....
The power of the Angular binding infrastructure allows us to use any component property as a bindable property by attaching the @Input decorator (and @Output too) to it. We are not limited to basic data types such as string, number, and boolean; there can be complex objects too, which we will see next as we add the video player:
Generate a new component in the workout-runner directory for the video player:
ng generate component video-player -isUpdate the generated boilerplate code by copying implementation from video-player.component.ts and video-player.component.html available in the Git branch checkpoint2.3 in the trainer/src/components/workout-runner/video-player folder (GitHub location: http://bit.ly/ng6be-2-3-video-player).
Let's look at the implementation for the video player. Open video-player.component.ts and check out the VideoPlayerComponent class:
export class VideoPlayerComponent implements OnInit, OnChanges {
  private youtubeUrlPrefix = '//www.youtube.com/embed/';

  @Input() videos: Array<string>;
  safeVideoUrls: Array<SafeResourceUrl>;

  constructor(private sanitizer: DomSanitizationService) { }

  ngOnChanges() {
    this.safeVideoUrls = this.videos ?
        this.videos
            .map(v => this.sanitizer.bypassSecurityTrustResourceUrl(this.youtubeUrlPrefix + v))
    : this.videos;
  }
}
The videos input property here takes an array of strings (YouTube video codes). While we take the videos array as input, we do not use this array directly in video player view; instead, we transform the input array into a new array of safeVideoUrls and bind it. This can be confirmed by looking at the view implementation:
<div *ngFor="let video of safeVideoUrls">
   <iframe width="198" height="132" [src]="video" frameborder="0" allowfullscreen></iframe>
</div>
The view also uses a new Angular directive called ngFor to bind to the safeVideoUrls array. The ngFor directive belongs to a class of directives called structural directives. The directive's job is to take an HTML fragment and regenerate it based on the number of elements in the bound collection.
If you are confused about how the ngFor directive works with safeVideoUrls, and why we need to generate safeVideoUrls instead of using the videos input array, wait for a while as we are shortly going to address these queries. But, let's first complete the integration of VideoPlayerComponent with WorkoutRunnerComponent to see the final outcome.
Update the WorkoutRunnerComponent view by adding the component declaration after the exercise-pane div:
<div id="video-panel" class="col-sm-3">
    <abe-video-player [videos]="currentExercise.exercise.videos"></abe-video-player>
</div>
The VideoPlayerComponent's videos property binds to the exercise's videos collection.
Start/refresh the app and the video thumbnails should show up on the right.
Note
If you are having a problem with running the code, look at the Git branch checkpoint2.3 for a working version of what we have done thus far. You can also download the snapshot of checkpoint2.3 (a ZIP file) from http://bit.ly/ng6be-checkpoint-2-3. Refer to the README.md file in the trainer folder when setting up the snapshot for the first time.
Now, it's time to go back and look at the parts of the VideoPlayerComponent implementation. We specifically need to understand:
- How the
ngFordirective works - Why there is a need to transform the input
videosarray intosafeVideoUrls - The significance of the Angular component life cycle event
OnChanges(used in the video player)
To start with, it's time to formally introduce ngFor and the class of directives it belongs to: structural directives.
The third categorization of directives, structural directives, work on the components/elements to manipulate their layout.
The Angular documentation describes structural directives in a succinct manner:
"Instead of defining and controlling a view like a Component Directive, or modifying the appearance and behavior of an element like an Attribute Directive, the Structural Directive manipulates the layout by adding and removing entire element sub-trees."
Since we have already touched upon component directives (such as workout-runner and exercise-description) and attribute directives (such as ngClass and ngStyle), we can very well contrast their behaviors with structural directives.
The ngFor directive belongs to this class. We can easily identify such directives by the * prefix. Other than ngFor, Angular comes with some other structural directives such as ngIf and ngSwitch.
Every templating language has constructs that allow the templating engine to generate HTML (by repetition). Angular has NgForOf. The NgForOfdirective is a super useful directive used to duplicate a piece of an HTML fragment n number of times. Let's again look at how we have used NgForOf in the video player:
<div *ngFor="let video of safeVideoUrls">
   <iframe width="198" height="132" [src]="video" frameborder="0" allowfullscreen></iframe>
</div>
Note
The directive selector for NgForOf is {selector: '[ngFor][ngForOf]'}, so we can use either ngFor or ngForOf in the view template. We also at times refer to this directive as ngFor.
The preceding code repeats the div fragment for each exercise video (using the safeVideoUrls array). The let video of safeVideoUrls string expression is interpreted as follows: take each video in the safeVideoUrls array and assign it to a template input variable, video.
This input variable can now be referenced inside the ngFor template HTML, as we do when we set the src property binding.
Interestingly, the string assigned to the ngFor directive is not a typical Angular expression. Instead, it's a microsyntax—a micro language, which the Angular engine can parse.
Note
You can learn more about microsyntax in Angular's developer guide: http://bit.ly/ng6be-micro-syntax.
This microsyntax exposes a number of iteration context properties that we can assign to template input variables and use them inside the ngFor HTML block.
One such example is index. index increases from 0 to the length of the array for each iteration, something similar to a for loop, in any programming language. The following example shows how to capture it:
<div *ngFor="let video of videos; let i=index">
     <div>This is video - {{i}}</div>
</div>
Other than index, there are some more iteration context variables; these include first, last, even, and odd. This context data allows us to do some nifty stuff. Consider this example:
<div *ngFor="let video of videos; let i=index; let f=first">
     <div [class.special]="f">This is video - {{i}}</div>
</div>
It applies a special class to the first video div.
The NgForOf directive can be applied to HTML elements as well as our custom components. This is a valid use of NgForOf:
<user-profile *ngFor="let userDetail of users" [user]= "userDetail"></user-profile>
Always remember to add an asterisk (*) before ngFor (and other structural directives). * has a significance.
The * prefix is a terser format to represent a structural directive. Take, for example, the usage of ngFor by the video player. The ngFor template:
<div *ngFor="let video of safeVideoUrls">
   <iframe width="198" height="132" [src]="video" frameborder="0" allowfullscreen></iframe>
</div>
Actually expands to the following:
<ng-template ngFor let-video [ngForOf]="safeVideoUrls">
    <div>
        <iframe width="198" height="132"  [src]="video" ...></iframe>
    </div>
</ng-template>
The ng-template tag is an Angular element that has a declaration for ngFor, a template input variable (video), and a property (ngForOf) that points to the safeVideoUrls array. Both the preceding declarations are a valid usage of ngFor.
Not sure about you, but I prefer the terser first format for ngFor!
Since NgForOf generates HTML based on collection elements, it is notorious for causing performance issues. But we cannot blame the directive. It does what it is supposed to do: iterate and generate elements! If the underlying collection is huge, UI rendering can take a performance hit, especially if the collection changes too often. The cost of continuously destroying and creating elements in response to a changing collection can quickly become prohibitive.
One of the performance tweaks for NgForOf allows us to alter the behavior of ngForOf when it comes to creating and destroying DOM elements (when the underlying collection elements are added or removed).
Imagine a scenario where we frequently get an array of objects from the server and bind it to the view using NgForOf. The default behavior of NgForOf is to regenerate the DOM every time we refresh the list (since Angular does a standard object equality check). However, as developers, we may very well know not much has changed. Some new objects may have been added, some removed, and maybe some modified. But Angular just regenerates the complete DOM.
To alleviate this situation, Angular allows us to specify a custom tracking function, which lets Angular know when two objects being compared are equal. Have a look at the following function:
trackByUserId(index: number, hero: User) { return user.id; } A function such as this can be used in the NgForOf template to tell Angular to compare the user object based on its id property instead of doing a reference equality check.
This is how we then use the preceding function in the NgForOf template:
<div *ngFor="let user of users; trackBy: trackByUserId">{{user.name}}</div> NgForOf will now avoid recreating DOM for users with IDs already rendered.
Remember, Angular may still update the existing DOM elements if the bound properties of a user have changed.
That's enough on the ngFor directive; let's move ahead.
We still need to understand the role of the safeVideoUrls and the OnChange life cycle events in the VideoPlayerComponent implementation. Let's tackle the former first and understand the need for safeVideoUrls.
The easiest way to understand why we need to bind to safeVideoUrls instead of the videos input property is by trying the videos array out. Replace the existing ngFor fragment HTML with the following:
<div *ngFor="let video of videos">
    <iframe width="198" height="132"
        [src]="'//www.youtube.com/embed/' + video"  frameborder="0" allowfullscreen></iframe>
</div>
And look at the browser's console log (a page refresh may be required). There are a bunch of errors thrown by the framework, such as:
Error: unsafe value used in a resource URL context (see http://g.co/ng/security#xss)
No prize for guessing what is happening! Angular is trying to safeguard our application against a Cross-Site Scripting (XSS) attack.
Such an attack enables the attacker to inject malicious code into our web pages. Once injected, the malicious code can read data from the current site context. This allows it to steal confidential data and also impersonate the logged-in user, hence gaining access to privileged resources.
Angular has been designed to block these attacks by sanitizing any external code/script that is injected into an Angular view. Remember, content can be injected into a view through a number of mechanisms, including property/attribute/style bindings or interpolation.
Consider an example of binding HTML markup through a component model to the innerHTML property of an HTML element (property binding):
this.htmlContent = '<span>HTML content.</span>'    // Component

<div [innerHTML]="htmlContent"> <!-- View -->
While the HTML content is emitted, any unsafe content (such as a script) if present is stripped.
But what about Iframes? In our preceding example, Angular is blocking property binding to Iframe's src property too. This is a warning against third-party content being embedded in our own site using Iframe. Angular prevents this too.
All in all, the framework defines four security contexts around content sanitization. These include:
- HTML content sanitization, when HTML content is bound using the
innerHTMLproperty - Style sanitization, when binding CSS into the
styleproperty - URL sanitization, when URLs are used with tags such as
anchorandimg - Resource sanitization, when using
Iframesorscripttags; in this case, content cannot be sanitized and hence it is blocked by default
Angular is trying its best to keep us out of danger. But at times, we know that the content is safe to render and hence want to circumvent the default sanitization behavior.
To let Angular know that the content being bound is safe, we use DomSanitizer and call the appropriate method based on the security contexts just described. The available functions are as follows:
bypassSecurityTrustHtmlbypassSecurityTrustScriptbypassSecurityTrustStylebypassSecurityTrustUrlbypassSecurityTrustResourceUrl
In our video player implementation, we use bypassSecurityTrustResourceUrl; it converts the video URL into a trusted SafeResourceUrl object:
this.videos.map(v => this.sanitizer.bypassSecurityTrustResourceUrl(this.youtubeUrlPrefix + v))
The map method transforms the videos array into a collection of SafeResourceUrl objects and assigns it to safeVideoUrls.
Each of the methods listed previously takes a string parameter. This is the content we want Angular to know is safe. The return object, which could be any of SafeStyle, SafeHtml, SafeScript, SafeUrl, or SafeResourceUrl, can then be bound to the view.
Note
A comprehensive treatment of this topic is available in the framework security guide available at http://bit.ly/ng6be-security. A highly recommended read!
The last question to answer is why do this in the OnChanges Angular life cycle event?
The OnChanges life cycle event is triggered whenever the component's input(s) change. In the case of VideoPlayerComponent, it is the videos array input property that changes whenever a new exercise is loaded. We use this life cycle event to recreate the safeVideoUrls array and re-bind it to the view. Simple!
Video panel implementation is now complete. Let's add a few more minor enhancements and explore it a bit more in Angular.
One of the sore points in the current app is the formatting of the exercise steps. It's a bit difficult to read these steps.
The steps should either have a line break (<br>) or be formatted as an HTML list for easy readability. This seems to be a straightforward task, and we can just go ahead and change the data that is bound to the step interpolation, or write a pipe that can add some HTML formatting using the line delimiting convention (.). For a quick verification, let's update the first exercise steps in workout-runner.component.ts by adding a break (<br>) after each line:
`Assume an erect position, with feet together and arms at your side. <br>
 Slightly bend your knees, and propel yourself a few inches into the air. <br>
 While in air, bring your legs out to the side about shoulder width or slightly wider. <br>
 ...
As the workout restarts, look at the first exercise steps. The output does not match our expectations, as shown here:
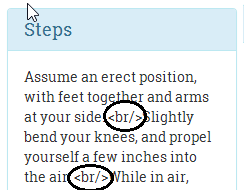
The break tags were literally rendered in the browser. Angular did not render the interpolation as HTML; instead, it escaped the HTML characters, and we know why, security!
How to fix it? Easy! Replace the interpolation with the property binding to bind step data to the element's innerHTML property (in exercise-description.html), and you are done!
<div class="card-text" [innerHTML]="steps">
Refresh the workout page to confirm.
Note
Preventing Cross-Site Scripting Security (XSS) issues
By using innerHTML, we instruct Angular to not escape HTML, but Angular still sanitizes the input HTML as described in the security section earlier. It removes things such as <script> tags and other JavaScript to safeguard against XSS attacks. If you want to dynamically inject styles/scripts into HTML, use the DomSanitizer to bypass this sanitization check.
Time for another enhancement! It's time to learn about Angular pipes.
It will be nice if we can tell the user the time left to complete the workout and not just the duration of the exercise in progress. We can add a countdown timer somewhere in the exercise pane to show the overall time remaining.
The approach that we are going to take here is to define a component property called workoutTimeRemaining. This property will be initialized with the total time at the start of the workout and will reduce with every passing second until it reaches zero. Since workoutTimeRemaining is a numeric value, but we want to display a timer in the hh:mm:ss format, we need to make a conversion between the seconds data and the time format. Angular pipes are a great option for implementing such a feature.
The primary aim of a pipe is to format the data displayed in the view. Pipes allow us to package this content transformation logic (formatting) as a reusable element. The framework itself comes with multiple predefined pipes, such as date, currency, lowercase, uppercase, slice, and others.
This is how we use a pipe with a view:
{{expression | pipeName:inputParam1}} An expression is followed by the pipe symbol (|), which is followed by the pipe name and then an optional parameter (inputParam1) separated by a colon (:). If the pipe takes multiple inputs, they can be placed one after another separated by a colon, such as the inbuilt slice pipe, which can slice an array or string:
{{fullName | slice:0:20}} //renders first 20 characters The parameter passed to the pipe can be a constant or a component property, which implies we can use template expressions with pipe parameter. See the following example:
{{fullName | slice:0:truncateAt}} //renders based on value truncateAt Here are some examples of the use of the date pipe, as described in the Angular date documentation. Assume that dateObj is initialized to June 15, 2015 21:43:11 and locale is en-US:
{{ dateObj | date }}               // output is 'Jun 15, 2015        '
{{ dateObj | date:'medium' }}      // output is 'Jun 15, 2015, 9:43:11 PM'
{{ dateObj | date:'shortTime' }}   // output is '9:43 PM            '
{{ dateObj | date:'mmss' }}        // output is '43:11'
Some of the most commonly used pipes are the following:
- date: As we just saw, the date filter is used to format the date in a specific manner. This filter supports quite a number of formats and is locale-aware too. To know about the other formats supported by the date pipe, check out the framework documentation at http://bit.ly/ng2-date.
- uppercase and lowercase: These two pipes, as the name suggests, change the case of the string input.
- decimal and percent:
decimalandpercentpipes are there to format decimal and percentage values based on the current browser locale. - currency: This is used to format numeric values as a currency based on the current browser locale:
    {{14.22|currency:"USD" }} <!-Renders USD 14.22 -->
{{14.22|currency:"USD":'symbol'}} <!-Renders $14.22 -->- json: This is a handy pipe for debugging that can transform any input into a string using
JSON.stringify. We made good use of it at the start of this chapter to render theWorkoutPlanobject (see the Checkpoint 2.1 code). - slice: This pipe allows us to split a list or a string value to create a smaller trimmed down list/string. We saw an example in the preceding code.
We are not going to cover the preceding pipes in detail. From a development perspective, as long as we know what pipes are there and what they are useful for, we can always refer to the platform documentation for exact usage instructions.
A really powerful feature of pipes is that they can be chained, where the output from one pipe can serve as the input to another pipe. Consider this example:
{{fullName | slice:0:20 | uppercase}} The first pipe slices the first 20 characters of fullName and the second pipe transforms them to uppercase.
Now that we have seen what pipes are and how to use them, why not implement one for the 7 Minute Workout app: a seconds to time pipe?
SecondsToTimePipe, as the name suggests, should convert a numeric value into the hh:mm:ss format.
Create a folder shared in the workout-runner folder and from the shared folder invoke this CLI command to generate the pipe boilerplate:
ng generate pipe seconds-to-timeNote
The shared folder has been created to add common components/directives/pipes that can be used in the workout-runner module. It is a convention we follow to organize shared code at different levels. In the future, we can create a shared folder at the app module level, which has artifacts shared globally. In fact, if the second to time pipe needs to be used across other application modules, it can also be moved into the app module.
Copy the following transform function implementation into seconds-to-time.pipe.ts(the definition can also be downloaded from the Git branch checkpoint.2.4 on the GitHub site at http://bit.ly/nng6be-2-4-seconds-to-time-pipe-ts):
export class SecondsToTimePipe implements PipeTransform {
  transform(value: number): any {
    if (!isNaN(value)) {
      const hours = Math.floor(value / 3600);
      const minutes = Math.floor((value - (hours * 3600)) / 60);
      const seconds = value - (hours * 3600) - (minutes * 60);

      return ('0' + hours).substr(-2) + ':'
        + ('0' + minutes).substr(-2) + ':'
        + ('0' + seconds).substr(-2);
    }
    return;
  }
}
In an Angular pipe, the implementation logic goes into the transform function. Defined as part of the PipeTransform interface, the preceding transform function transforms the input seconds value into an hh:mm:ss string. The first parameter to the transform function is the pipe input. The subsequent parameters, if provided, are the arguments to the pipe, passed using a colon separator (pipe:argument1:arugment2..) from the view.
For SecondsToTimePipe, while Angular CLI generates a boilerplate argument (args?:any), we do not make use of any pipe argument as the implementation does not require it.
The pipe implementation is quite straightforward, as we convert seconds into hours, minutes, and seconds. Then, we concatenate the result into a string value and return the value. The addition of 0 on the left for each of the hours, minutes, and seconds variables is done to format the value with a leading 0 in case the calculated value for hours, minutes, or seconds is less than 10.
The pipe that we just created is just a standard TypeScript class. It's the Pipe decorator (@Pipe) that instructs Angular to treat this class as a pipe:
@Pipe({
  name: 'secondsToTime'
})
The pipe definition is complete, but to use the pipe in WorkoutRunnerComponent the pipe has to be declared on WorkoutRunnerModule. Angular CLI has already done this for us as part of the boilerplate generation (see the declaration section in workout-runner.module.ts).
Now we just need to add the pipe in the view. Update workout-runner.component.html by adding the highlighted fragment:
<div class="exercise-pane" class="col-sm-6">
    <h4 class="text-center">Workout Remaining - {{workoutTimeRemaining | secondsToTime}}</h4>
    <h1 class="text-center">{{currentExercise.exercise.title}}</h1>
Surprisingly, the implementation is still not complete! There is one more step left. We have a pipe definition, and we have referenced it in the view, but workoutTimeRemaining needs to update with each passing second for SecondsToTimePipe to be effective.
We have already initialized WorkoutRunnerComponent's workoutTimeRemaining property in the start function with the total workout time:
start() {
    this.workoutTimeRemaining = this.workoutPlan.totalWorkoutDuration();
    ...
}
Now the question is: how to update the workoutTimeRemaining variable with each passing second? Remember that we already have a setInterval set up that updates exerciseRunningDuration. While we can write another setInterval implementation for workoutTimeRemaining, it will be better if a single setInterval setup can take care of both the requirements.
Add a function called startExerciseTimeTracking to WorkoutRunnerComponent; it looks as follows:
startExerciseTimeTracking() {
    this.exerciseTrackingInterval = window.setInterval(() => {
      if (this.exerciseRunningDuration >= this.currentExercise.duration) {
        clearInterval(this.exerciseTrackingInterval);
        const next: ExercisePlan = this.getNextExercise();
        if (next) {
          if (next !== this.restExercise) {
            this.currentExerciseIndex++;
          }
          this.startExercise(next);
        }
        else {
          console.log('Workout complete!');
        }
        return;
      }
      ++this.exerciseRunningDuration;
      --this.workoutTimeRemaining;
    }, 1000);
  }
As you can see, the primary purpose of the function is to track the exercise progress and flip the exercise once it is complete. However, it also tracks workoutTimeRemaining (it decrements this counter). The first if condition setup just makes sure that we clear the timer once all the exercises are done. The inner if conditions are used to keep currentExerciseIndex in sync with the running exercise.
This function uses a numeric instance variable called exerciseTrackingInterval. Add it to the class declaration section. We are going to use this variable later to implement an exercise pausing behavior.
Remove the complete setInterval setup from startExercise and replace it with a call to this.startExerciseTimeTracking();. We are all set to test our implementation. If required, refresh the browser and verify the implementation:

The next section is about another inbuilt Angular directive, ngIf, and another small enhancement.
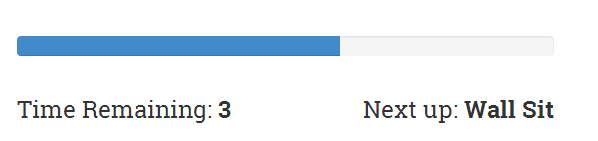
It will be nice for the user to be told what the next exercise is during the short rest period between exercises. This will help them prepare for the next exercise. So let's add it.
To implement this feature, we can simply output the title of the next exercise from the workoutPlan.exercises array. We show the title next to the Time Remaining countdown section.
Change the workout div (class="exercise-pane") to include the highlighted content, and remove existing Time Remainingh1:
<div class="exercise-pane">
<!-- Exiting html -->
   <div class="progress time-progress">
       <!-- Exiting html -->
   </div>
<div class="row">
      <h4 class="col-sm-6 text-left">Time Remaining:
        <strong>{{currentExercise.duration-exerciseRunningDuration}}</strong>
      </h4>
      <h4 class="col-sm-6 text-right" *ngIf="currentExercise.exercise.name=='rest'">Next up:
        <strong>{{workoutPlan.exercises[currentExerciseIndex + 1].exercise.title}}</strong>
      </h4>
    </div>
</div>
We wrap the existing Time Remaining h1 and add another h3 tag to show the next exercise inside a new div with some style updates. Also, there is a new directive, ngIf, in the second h3. The * prefix implies that it belongs to the same set of directives that ngFor belongs: structural directives. Let's talk a bit about ngIf.
The ngIf directive is used to add or remove a specific section of the DOM based on whether the expression provided to it returns true or false. The DOM element is added when the expression evaluates to true and is destroyed otherwise. Isolate the ngIf declaration from the preceding view:
ngIf="currentExercise.details.name=='rest'"
The directive expression checks whether we are currently in the rest phase and accordingly shows or hides the linked h3.
Also in the same h3, we have an interpolation that shows the name of the exercise from the workoutPlan.exercises array.
A word of caution here: ngIf adds and destroys the DOM element, and hence it is not similar to the visibility constructs that we employed to show and hide elements. While the end result of style, display:none is the same as that of ngIf, the mechanism is entirely different:
<div [style.display]="isAdmin" ? 'block' : 'none'">Welcome Admin</div>
Versus this line:
<div *ngIf="isAdmin" ? 'block' : 'none'">Welcome Admin</div>
With ngIf, whenever the expression changes from false to true, a complete re-initialization of the content occurs. Recursively, new elements/components are created and data binding is set up, starting from the parent down to the children. The reverse happens when the expression changes from true to false: all of this is destroyed. Therefore, using ngIf can sometimes become an expensive operation if it wraps a large chunk of content and the expression attached to it changes very often. But otherwise, wrapping a view in ngIf is more performant than using CSS/style-based show or hide, as neither the DOM is created nor the data binding expressions are set up when the ngIf expression evaluates to false.
New version of Angular support branching constructs too. This allows us to implement the if then else flow in the view HTML. The following sample has been lifted directly from the platform documentation of ngIf:
<div *ngIf="show; else elseBlock">Text to show</div>
<ng-template #elseBlock>Alternate text while primary text is hidden</ng-template>
The else binding points to a ng-template with template variable #elseBlock.
There is another directive that belongs in this league: ngSwitch. When defined on the parent HTML, it can swap the child HTML elements based on the ngSwitch expression. Consider this example:
<div id="parent" [ngSwitch] ="userType">
<div *ngSwitchCase="'admin'">I am the Admin!</div>
<div *ngSwitchCase="'powerUser'">I am the Power User!</div>
<div *ngSwitchDefault>I am a normal user!</div>
</div>
We bind the userType expression to ngSwitch. Based on the value of userType (admin, powerUser, or any other userType), one of the inner div elements will be rendered. The ngSwitchDefault directive is a wildcard match/fallback match, and it gets rendered when userType is neither admin nor powerUser.
If you have not realized it yet, note that there are three directives working together here to achieve switch-case-like behavior:
ngSwitchngSwitchCasengSwitchDefault
Coming back to our next exercise implementation, we are ready to verify the implementation, start the app, and wait for the rest period. There should be a mention of the next exercise during the rest phase, as shown here:
The app is shaping up well. If you have used the app and done some physical workouts along with it, you will be missing the exercise pause functionality badly. The workout just does not stop until it reaches the end. We need to fix this behavior.
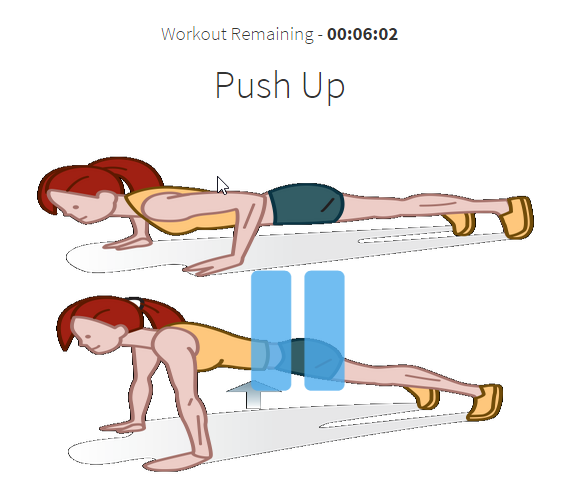
To pause an exercise, we need to stop the timer. We also need to add a button somewhere in the view that allows us to pause and resume the workout. We plan to do this by drawing a button overlay over the exercise area in the center of the page. When clicked on, it will toggle the exercise state between paused and running. We will also add keyboard support to pause and resume the workout using the key binding p or P. Let's update the component.
Update the WorkoutRunnerComponent class, add these three functions, and add a declaration for the workoutPaused variable:
workoutPaused: boolean;
...
pause() {
    clearInterval(this.exerciseTrackingInterval);
    this.workoutPaused = true;
}

resume() {
    this.startExerciseTimeTracking();
    this.workoutPaused = false;
}

pauseResumeToggle() {
    if (this.workoutPaused) { this.resume();    }
    else {      this.pause();    }
}
The implementation for pausing is simple. The first thing we do is cancel the existing setInterval setup by calling clearInterval(this.exerciseTrackingInterval);. While resuming, we again call startExerciseTimeTracking, which again starts tracking the time from where we left off.
Now we just need to invoke the pauseResumeToggle function for the view. Add the following content to workout-runner.html:
<div id="exercise-pane" class="col-sm-6">
    <div id="pause-overlay" (click)="pauseResumeToggle()"><span class="pause absolute-center"
            [ngClass]="{'ion-md-pause' : !workoutPaused, 'ion-md-play' : workoutPaused}">
        </span>
</div>
    <div class="row workout-content">
The click event handler on the div toggles the workout running state, and the ngClass directive is used to toggle the class between ion-md-pause and ion-md-play- standard Angular stuff. What is missing now is the ability to pause and resume on a P key press.
One approach could be to apply a keyup event handler on the div:
<div id="pause-overlay" (keyup)= "onKeyPressed($event)">
But there are some shortcomings to this approach:
There is a better way to implement this; attach the event handler to the global window event keyup. This is how the event binding should be applied on the div:
<div id="pause-overlay" (window:keyup)= "onKeyPressed($event)">
Make note of the special window: prefix before the keyup event. We can use this syntax to attach events to any global object, such as the document. A handy and very powerful feature of Angular binding infrastructure! The onKeyPressed event handler needs to be added to WorkoutRunnerComponent. Add this function to the class:
onKeyPressed(event: KeyboardEvent) {
    if (event.which === 80 || event.which === 112) {
      this.pauseResumeToggle();
    }
  }
The $event object is the standard DOM event object that Angular makes available for manipulation. Since this is a keyboard event, the specialized class is KeyboardEvent. The which property is matched to ASCII values of p or P. Refresh the page and you should see the play/pause icon when your mouse hovers over the exercise image, as follows:
While we are on the topic of event binding, it would be a good opportunity to explore Angular's event binding infrastructure
Angular event binding allows a component to communicate with its parent through events.
If we look back at the app implementation, what we have encountered thus far are the property/attribute bindings. Such bindings allow a component/element to take inputs from the outside world. The data flows into the component.
Event bindings are the reverse of property bindings. They allow a component/element to inform the outside world about any state change.
As we saw in the pause/resume implementation, event binding employs round brackets (()) to specify the target event:
<div id="pause-overlay" (click)="pauseResumeToggle()">
This attaches a click event handler to the div that invokes the expression pauseResumeToggle() when the div is clicked.
Note
Like properties, there is a canonical form for events too. Instead of using round brackets, the on- prefix can be used: on-click="pauseResumeToggle()"
Angular supports all types of events. Events related to keyboard inputs, mouse movements, button clicks, and touches. The framework even allows us to define our own event for the components we create, such as:
<workout-runner (paused)= "stopAudio()"></workout-runner>
It is expected that events have side effects; in other words, an event handler may change the state of the component, which in turn may trigger a chain reaction in which multiple components react to the state change and change their own state. This is unlike a property binding expression, which should be side-effect-free. Even in our implementation, clicking on the div element toggles the exercise run state.
When Angular attaches event handlers to standard HTML element events, the event propagation works in the same way as standard DOM event propagation works. This is also called event bubbling. Events on child elements are propagated upwards, and hence event binding is also possible on a parent element, as follows:
<div id="parent " (click)="doWork($event)"> Try
  <div id="child ">me!</div>
</div>
Clicking on either of the divs results in the invocation of the doWork function on the parent div. Moreover, $event.target contains the reference to the div that dispatched the event.
Event bubbling stops if the expression assigned to the target evaluates to a falsey value (such as void, false). Therefore, to continue propagation, the expression should evaluate to true:
<div id="parent" (click)="doWork($event) || true">
Here too, the $event object deserves some special attention.
Angular makes an $event object available whenever the target event is triggered. This $event contains the details of the event that occurred.
The important thing to note here is that the shape of the $event object is decided based on the event type. For HTML elements, it is a DOM event object (https://developer.mozilla.org/en-US/docs/Web/Events), which may vary based on the actual event.
But if it is a custom component event, what is passed in the $event object is decided by the component implementation.
We have now covered most of the data binding capabilities of Angular, with the exception of two-way binding. A quick introduction to the two-way binding constructs is warranted before we conclude the chapter.
Two-way binding helps us keep the model and view in sync. Changes to the model update the view and changes to the view update the model. The obvious area where two-way binding is applicable is form input. Let's look at a simple example:
<input [(ngModel)]="workout.name">
The ngModel directive here sets a two-way binding between the input's value property and the workout.name property on the underlying component. Anything that the user enters in the preceding input is synced with workout.name, and any changes to workout.name are reflected back on the preceding input.
Interestingly, we can achieve the same result without using the ngModel directive too, by combining both property and event binding syntax. Consider the next example; it works in the same way as input before:
<input [value]="workout.name"
    (input)="workout.name=$event.target.value" >
There is a property binding set up on the value property and an event binding set up on the input event that make the bidirectional sync work.
We will get into more details on two-way binding in Chapter 2, Personal Trainer, where we build our own custom workouts.
We have created a diagram that summarizes the data flow patterns for all the bindings that we have discussed thus far. Here is a handy diagram to help you memorize each of the binding constructs and how data flows:
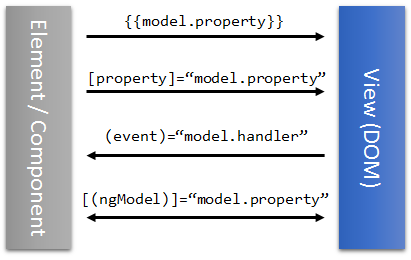
We now have a fully functional 7 Minute Workout, with some bells and whistles too, and hopefully you had fun creating the app. It's time to conclude the chapter and summarize the lessons.
Note
If you are having a problem with running the code, look at the Git branch checkpoint2.4 for a working version of what we have done thus far. You can also download a snapshot of checkpoint2.4 (a ZIP file) from this GitHub location: http://bit.ly/ng6be-checkpoint-2-4. Refer to the README.md file in the trainer folder when setting up the snapshot for the first time.