
Creating full-stack serverless web and native apps with AWS Amplify
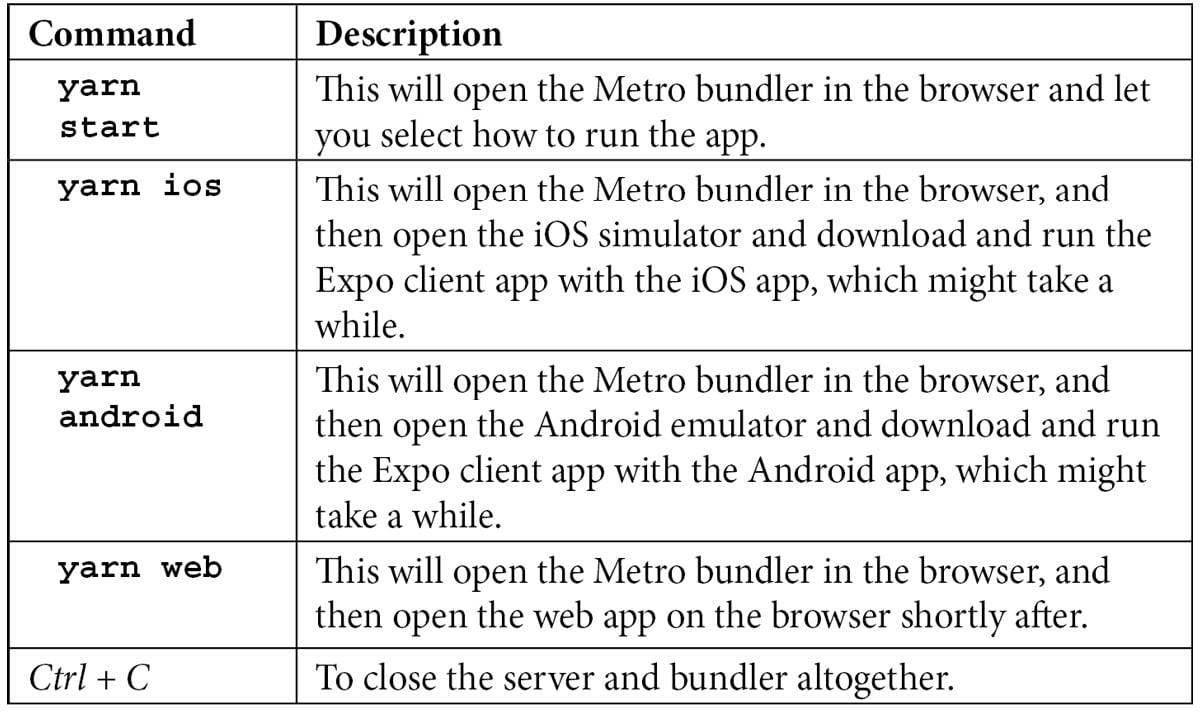
In order to connect AWS Console with a Git repository provider, we will need to create our Git repository first. Let's assume you have created a new blank project in one of the Git repositories we mentioned earlier. Open the terminal and choose your path, as outlined next, to create your first AWS Amplify app with either React, React Native, or React Native with Expo. I have put together the following table for you to decide which options to choose from, and they can be all written in TypeScript:
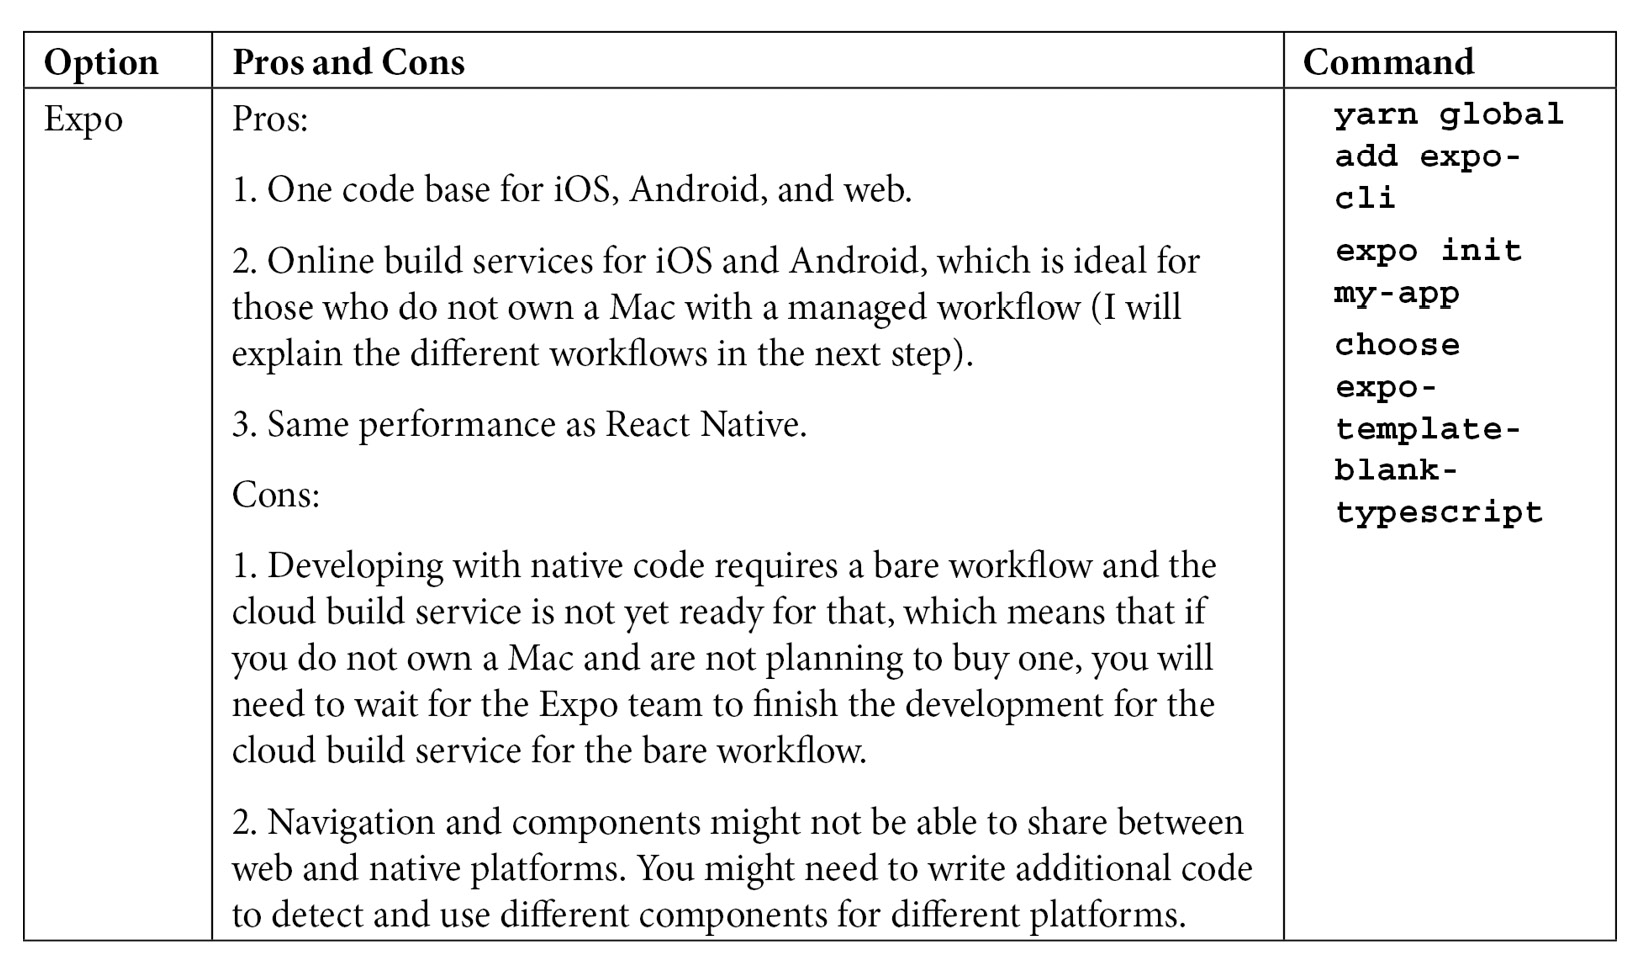
Creating an Expo app
I personally consider Expo the go-to option for most new projects, especially for proofs of concept (POCs), because it supports both mobile devices (iOS and Android) and web devices but at the same time gives you the native performance of React Native. If later in your project you need to write custom native scripts for iOS and Android platforms, then you have two options—either eject the Expo app altogether with the expo eject command or select a new bare workflow from the start.
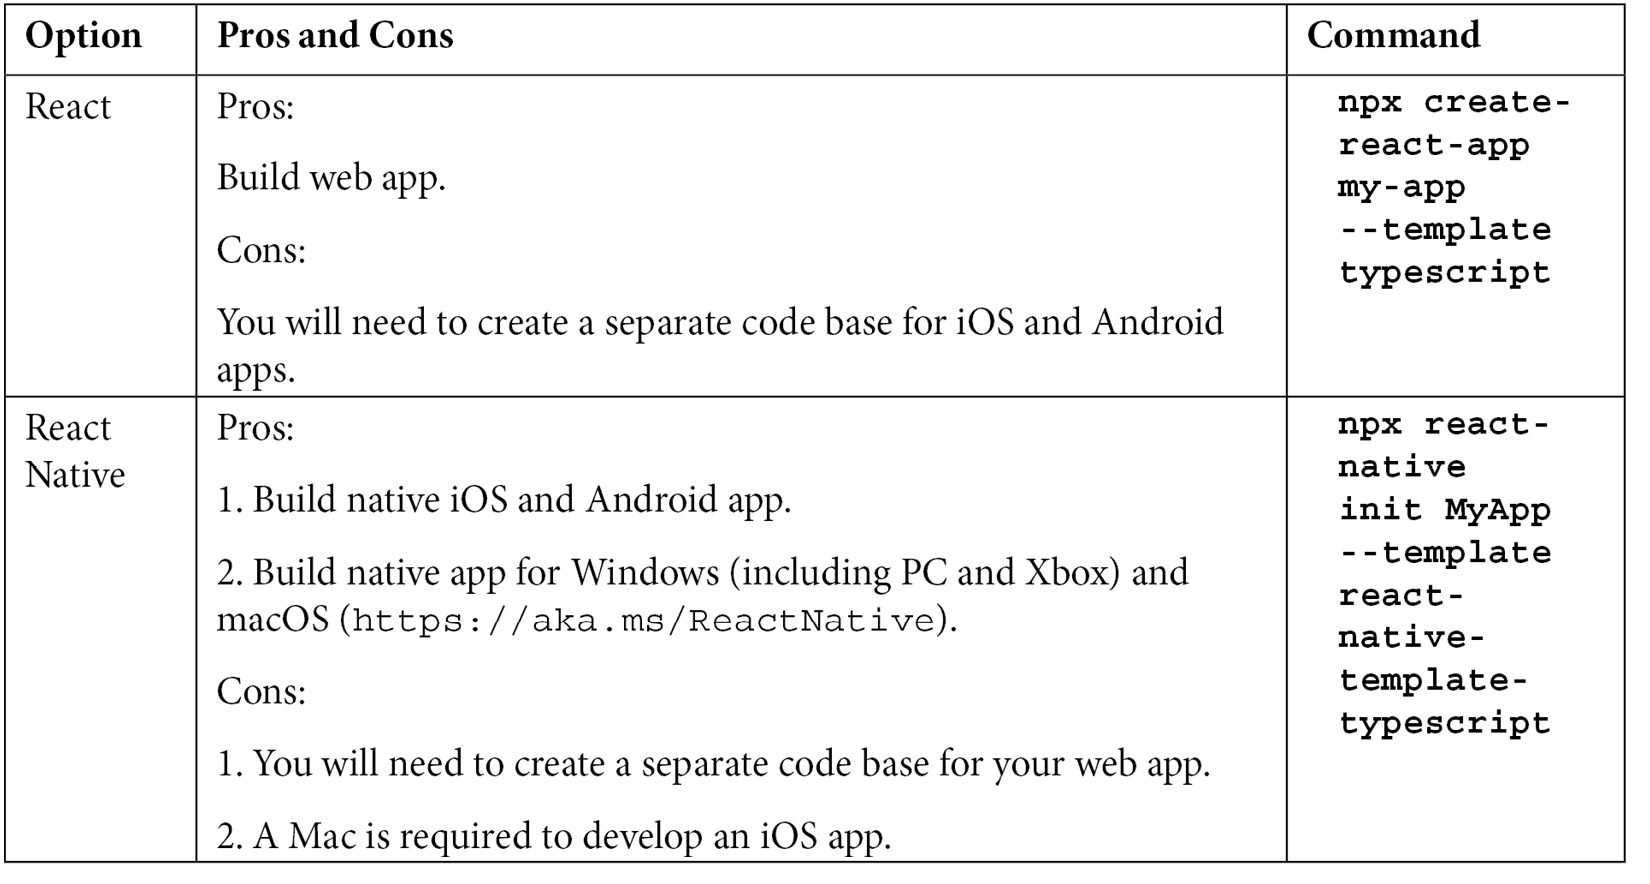
There are two workflows that you can choose from when you are developing a React Native app with Expo: a managed workflow and a bare workflow. With a managed workflow, you only write JavaScript/TypeScript, and Expo tools and services take care of everything else for you. With a bare workflow, you have full control over every aspect of a native project, but Expo tools and services are a little more limited. I have put together the following table for you to decide which workflow to choose:
Let's go ahead and create a React Native app with Expo by entering a few commands in the terminal:
- Run the following command in the terminal in order to create a React Expo app:
expo init my-app
- Since we want to write our code once and run it on iOS, Android, and the web with TypeScript, we will choose
blank (TypeScript)in the terminal, as follows:? Choose a template: ----- Managed workflow ----- Blank: a minimal app as clean as an empty canvas
 blank (TypeScript) same as blank but with TypeScript
configuration
Tabs: several example screens and tabs using react-
navigation
----- Bare workflow -----
minimal bare and minimal, just the essentials to get
you started
minimal (TypeScript) same as minimal but with
TypeScript
configuration
blank (TypeScript) same as blank but with TypeScript
configuration
Tabs: several example screens and tabs using react-
navigation
----- Bare workflow -----
minimal bare and minimal, just the essentials to get
you started
minimal (TypeScript) same as minimal but with
TypeScript
configuration - Once it's done, you can use the following commands to start running and developing the Expo app:
Alternatively, you can run the create-react-native-app command, as shown in the following code snippet, to create an Expo app. This has done all the hardwiring for you, such as configuration with iOS and Android projects:
npx create-react-native-app -t with-typescript
For iOS apps only, you will need one extra step, which requires a macOS computer. Change the directory to the ios folder under the project folder and run this command in order to install the CocoaPods dependencies:
cd ios && pod install
As you might have realized, the create-react-native-app command supports both web and native apps. You could actually focus on this path to create both React web and native apps instead of creating two projects. You can learn more about the differences between Expo and React Native at this link: https://reactnative.dev/docs/environment-setup.
Let's create an app with Expo first so that we can actually experience what Expo is like compared to pure React Native afterward, with firsthand experience. If you are not targeting iOS, you can skip the iOS exercise; the same goes for Android and the web. Feel free to jump to the one you're most interested in starting with.
Developing for iOS
If your Mac did not have Xcode installed, please go to the Mac App Store to download the Xcode app first. You can install Xcode from the Mac App Store with this link: https://apps.apple.com/us/app/xcode/id497799835?mt=12. You will then be taken to the following page:
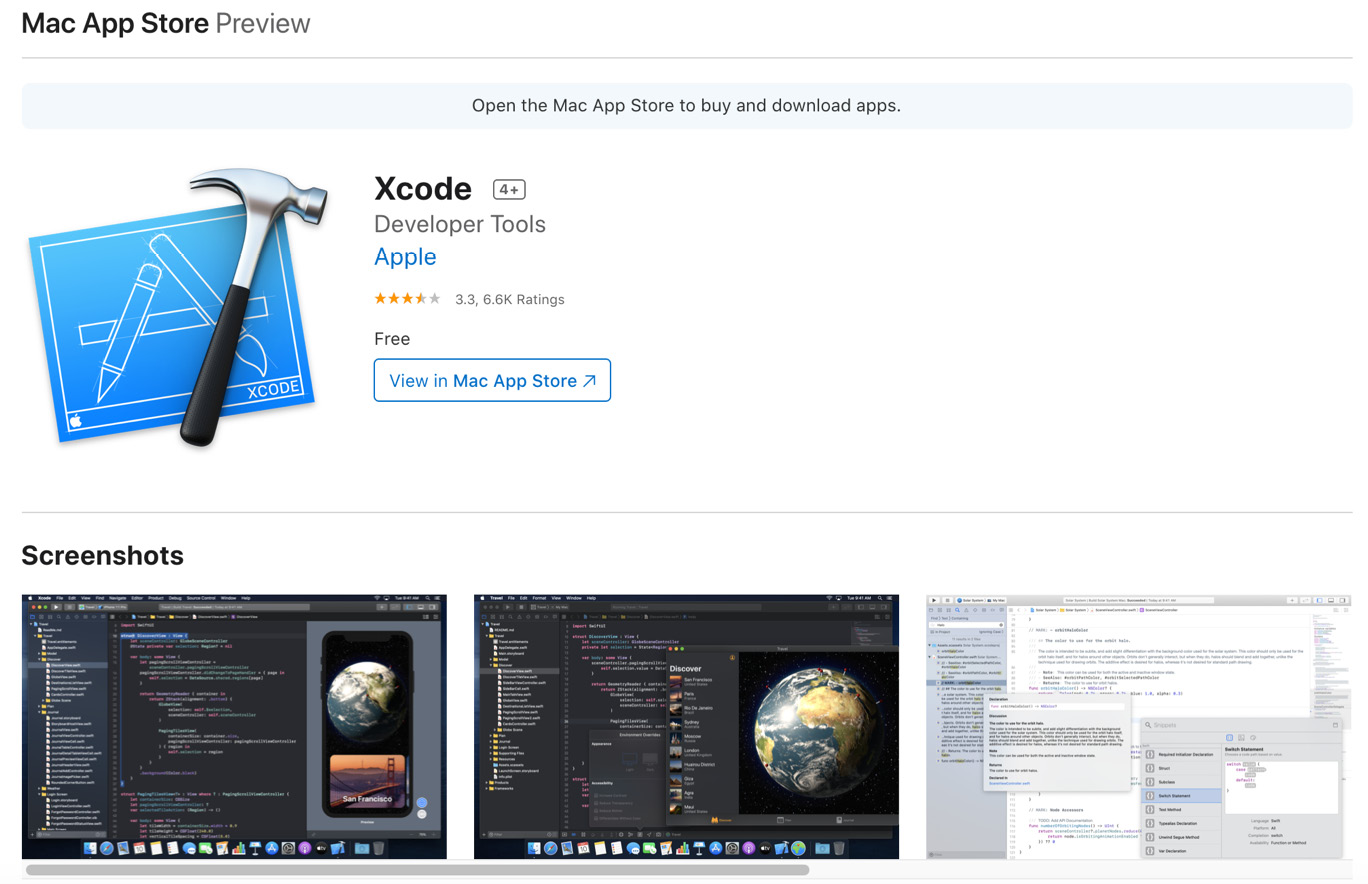
Figure 1.9 – Xcode
Once you have installed Xcode on your Mac, go to the terminal and enter the following command in order to build and launch the Expo iOS app:
yarn ios
You will see the following screen as the app is built, installed, and launched on the iOS simulator (which is part of Xcode):

Figure 1.10 – iPhone simulator
Since the screen is asking you to open up the App.tsx file on your project to start working on your app, go to the code editor and edit the App.tsx file, change the text on the screen to something that you like, and save it (Command + S on a Mac or Ctrl + S on a PC/Linux). You should then be able to see that the app has changed accordingly in real time on the iOS simulator, and that's how we can confirm that the setup and workflow is working, as illustrated in the following screenshot:
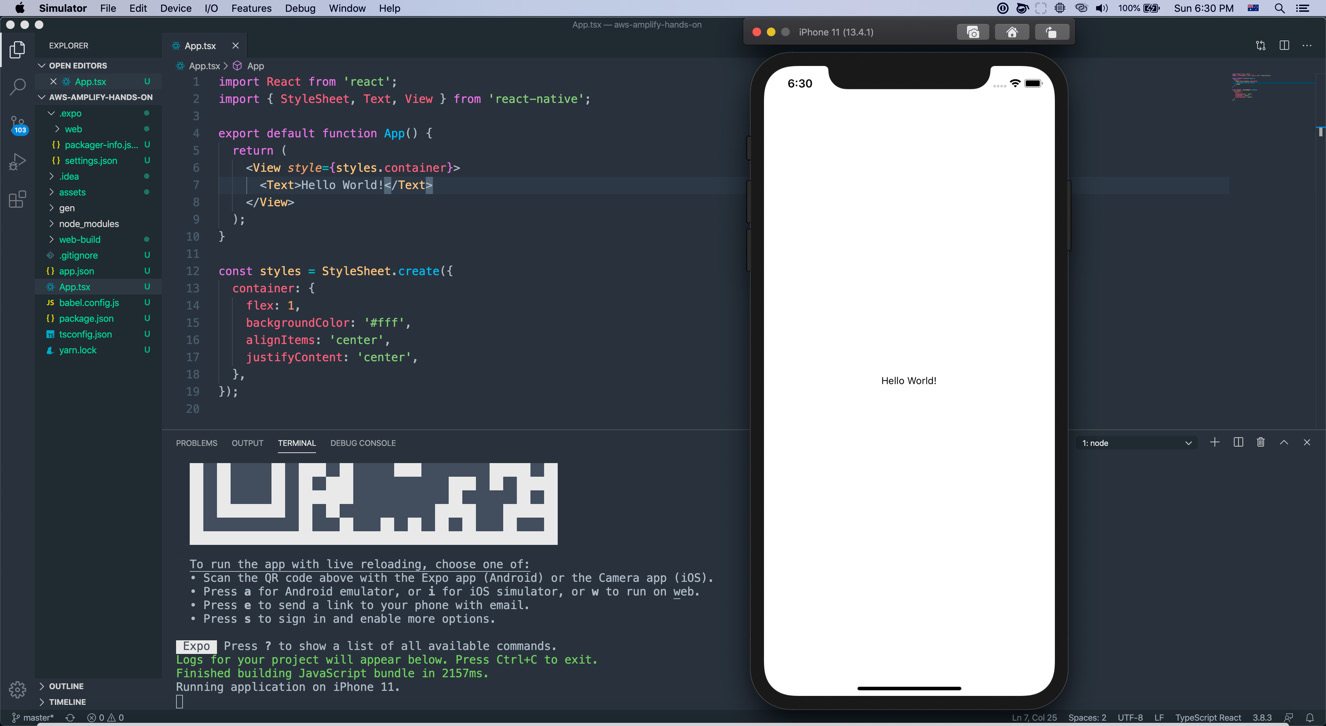
Figure 1.11 – iPhone simulator with the Expo CLI
You should now have a good understanding of how Expo works with iOS. We will be using Expo to develop an app for Android next.
Developing for Android
If you want to develop and test an Expo app on Android, you will need to either connect your Android device to your computer (with Developer and Debugging modes enabled) or set up a virtual device with Android Studio first. If you don't have an Android device, you will need to first install Android Studio with this link: https://developer.android.com/studio. After the installation, open Android Studio, go to Tools | AVD Manager, and select Create Virtual Device.
Choose an emulator device on the following screen, based on either the device you own or the desirable resolution that you would want to use to build your app:
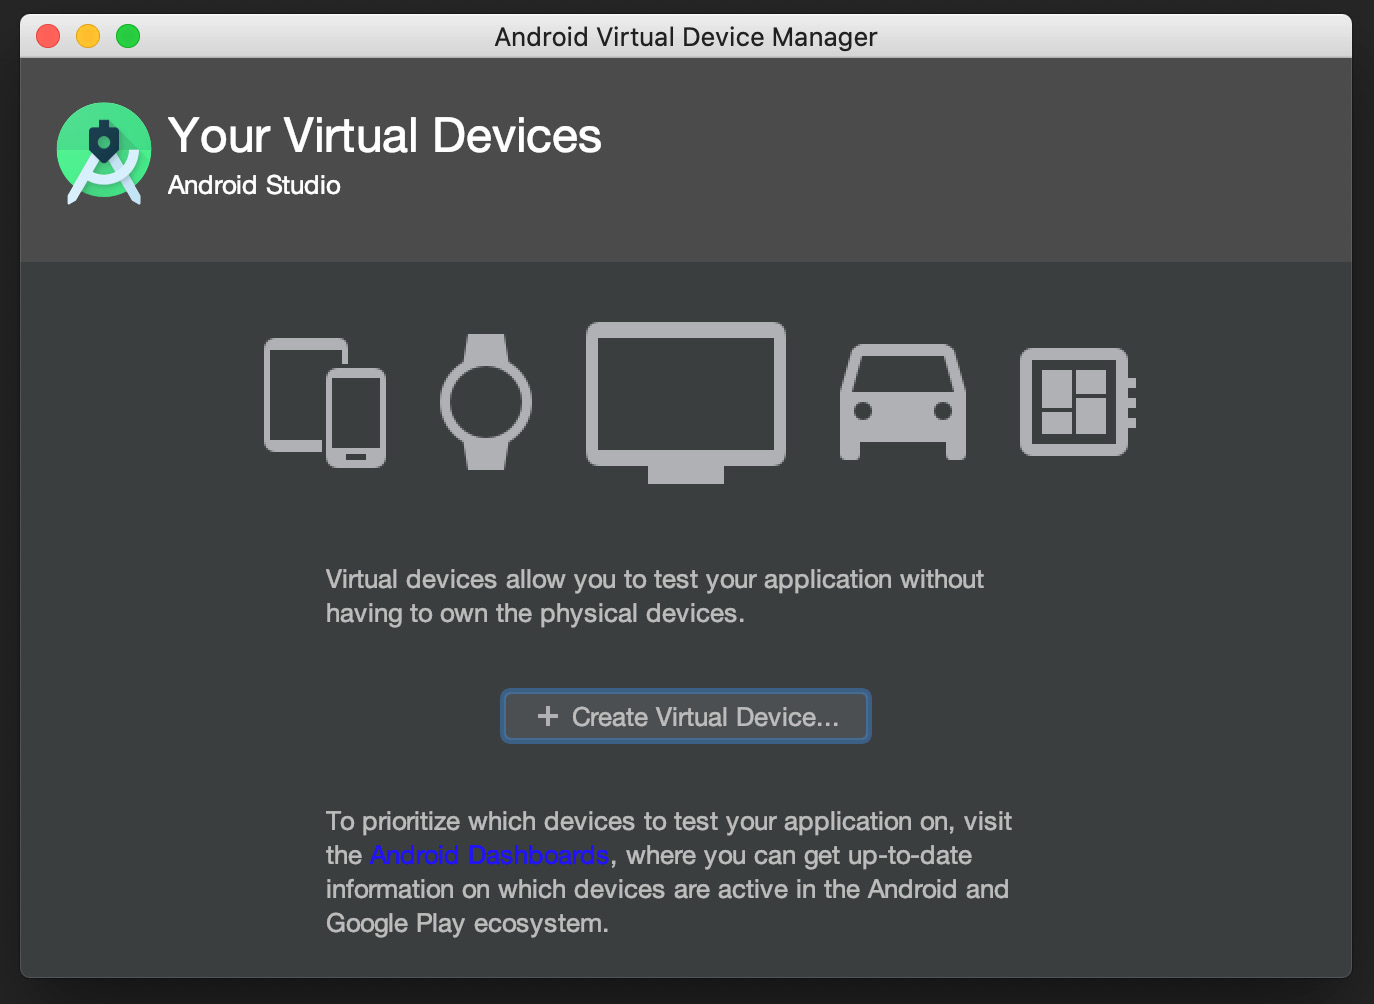
Figure 1.12 – Android Studio: Virtual Device Manager
I would recommend choosing a device with the highest resolution and density to ensure your graphical elements are prepared for these devices. Since I actually own a Nexus 6 and it has the highest resolution (screen resolution 1,440x2,960) and density (pixel density 560 dots per inch (dpi)), I selected Nexus 6 as the emulator for development. Nexus 6 is still capable of running an Android 10 OS, which is why I do not yet need to buy any new Android devices for development. For those who do not own an Android device and aren't planning to buy one for development, you could choose the Pixel 3 XL option for now, as illustrated in the following screenshot. If you need to test the Google Play API services, then you could always install an additional device such as Pixel:
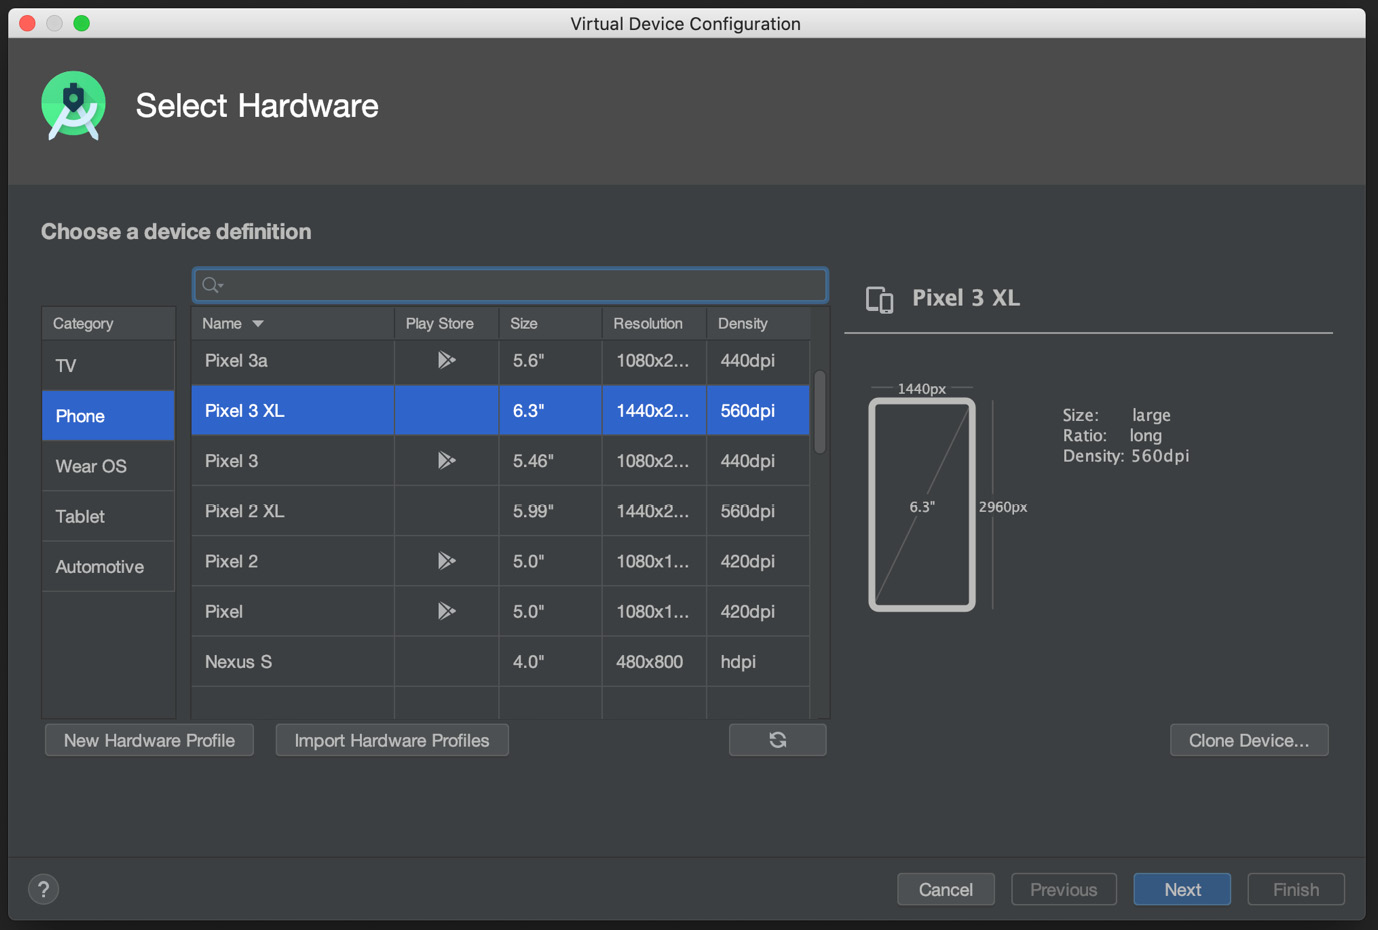
Figure 1.13 – Virtual Device Configuration – Selecting a device
Once you hit Next, you will be asked to choose a system image, as follows:
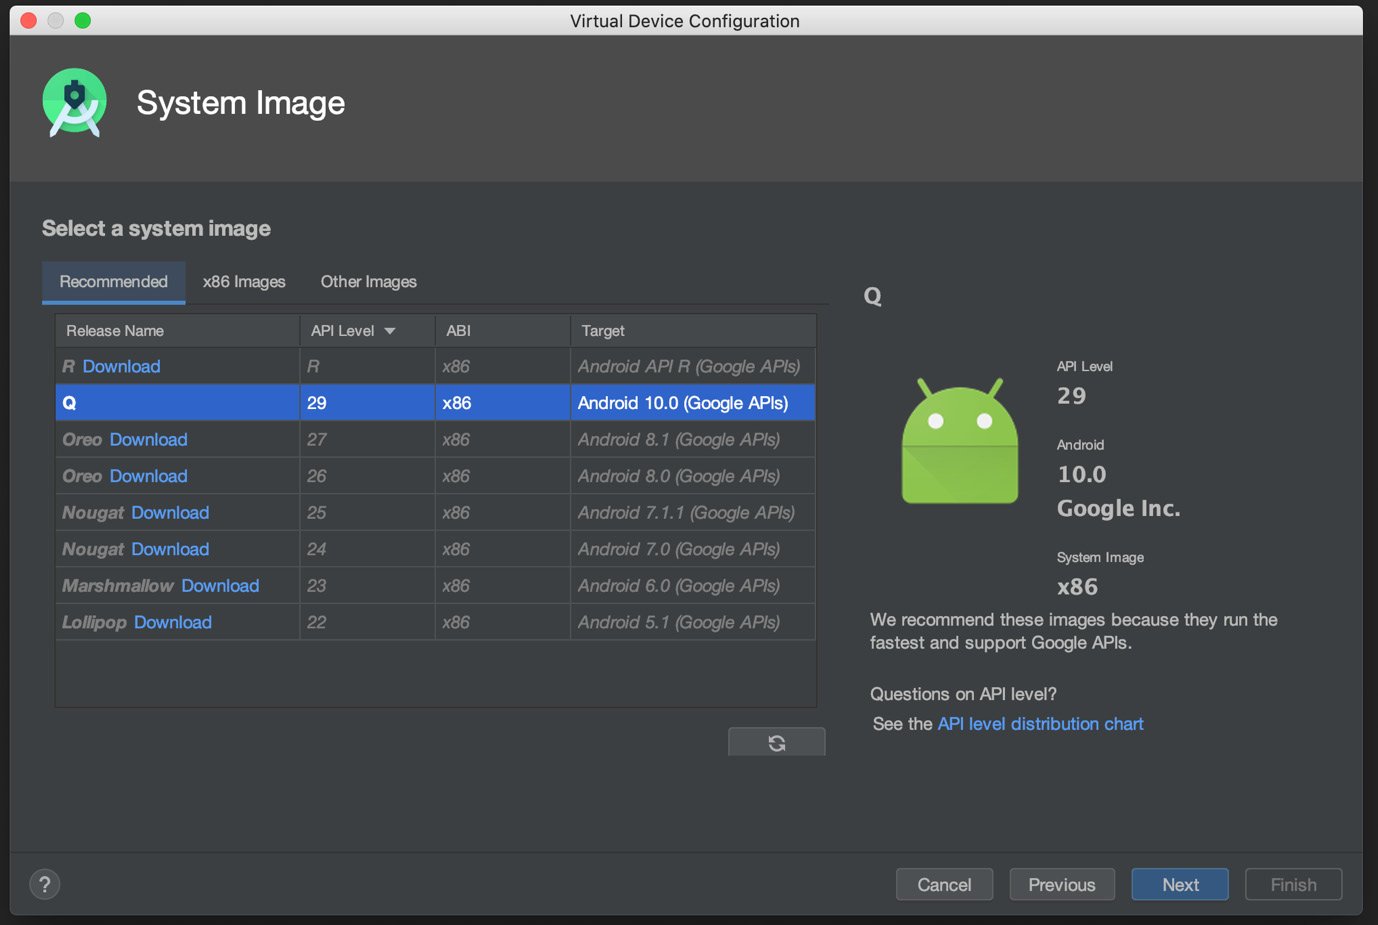
Figure 1.14 – Virtual Device Configuration: Selecting a system image
By default, Android Studio pre-selects the x86 Android Q image with Google APIs support. If you want to change that for whatever reason, such as developing for the next-gen Android R OS, click on the x86 Images tab and then choose the x86_64 image with Android API R (Google APIs) as the target, as illustrated in the following screenshot. Since Android R might not be installed by default, you have to click the Download button to download the Android R image before you can click Next to go on to the next step:
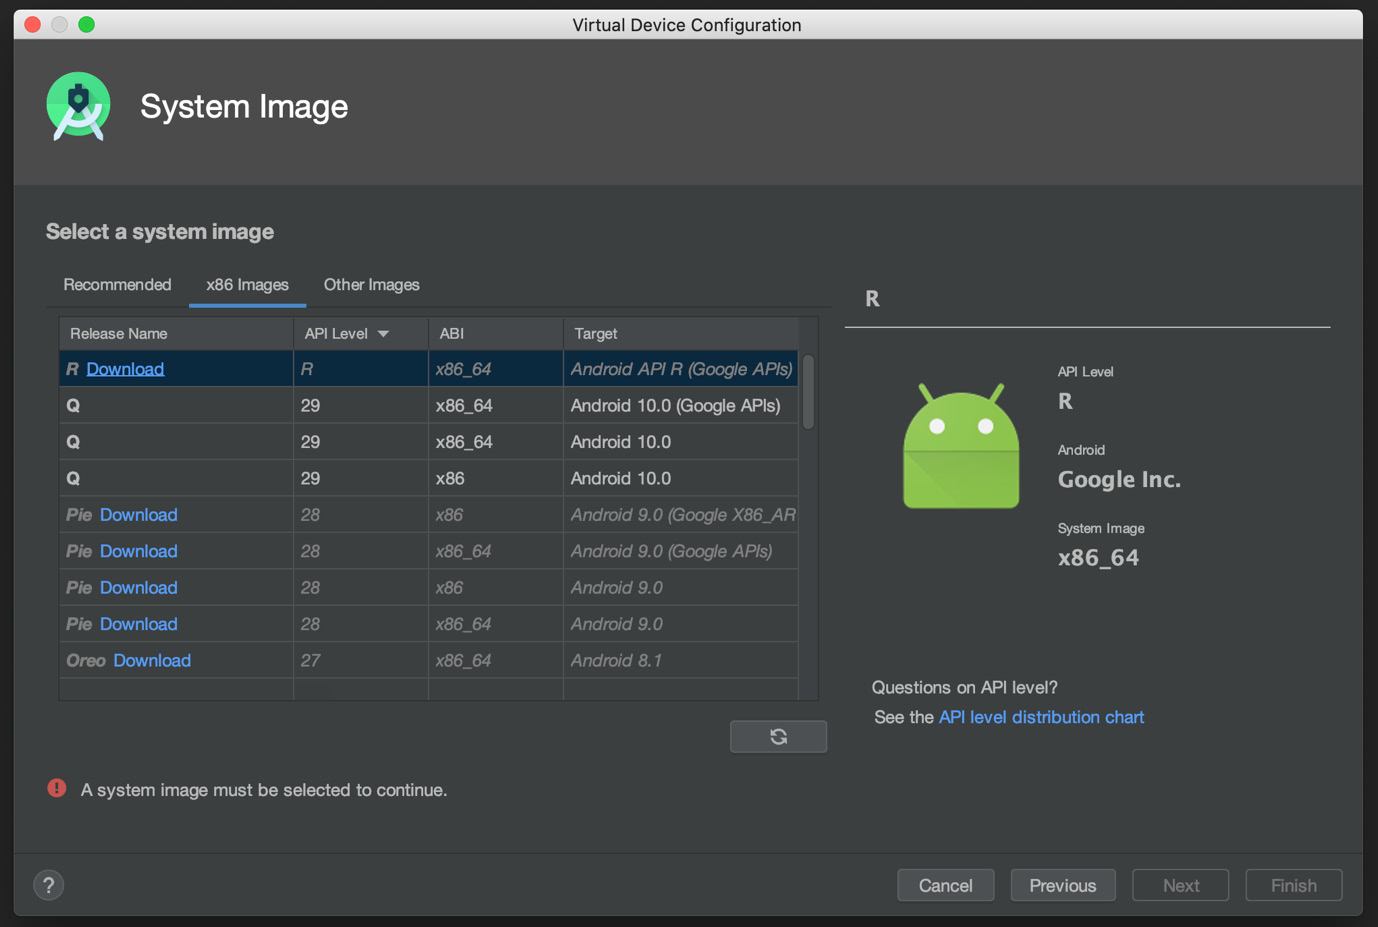
Figure 1.15 – Virtual Device Configuration: Selecting an x86_64 system image
Once you have decided on your emulator and system image (in my case, I've selected Nexus 6 with Android 10.0 x86), you will see the following screen, which lets you rename the Android Virtual Device (AVD). Let's click on the Show Advanced Settings button:
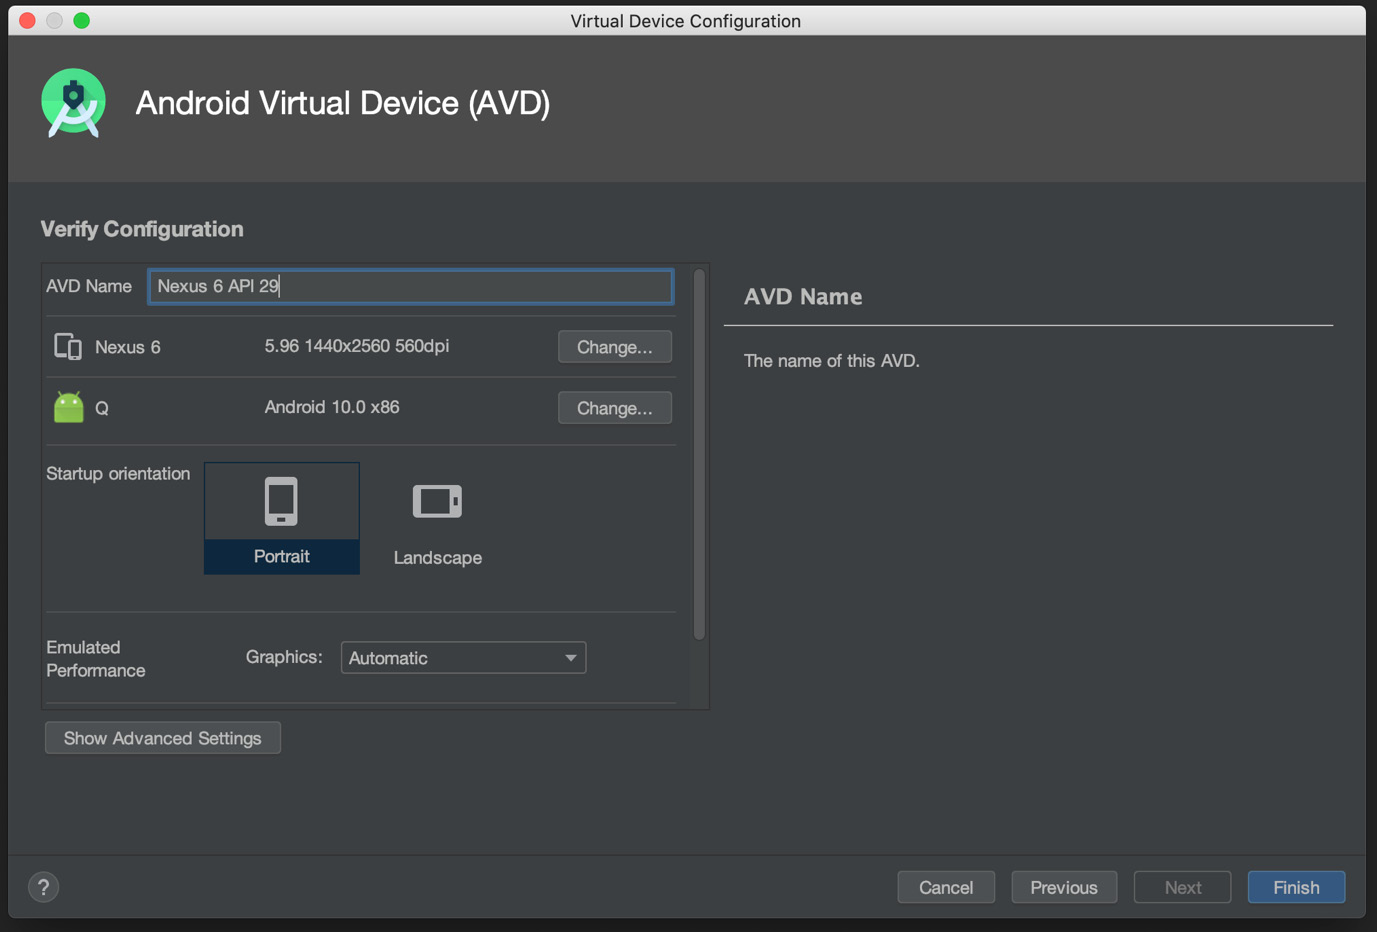
Figure 1.16 – Virtual Device Configuration: Verify the Configuration
As you can see on the following screen, the front camera is set to Emulated by default and the back camera is disabled, which is not what we want during development if our app needs to use the cameras on the phone:
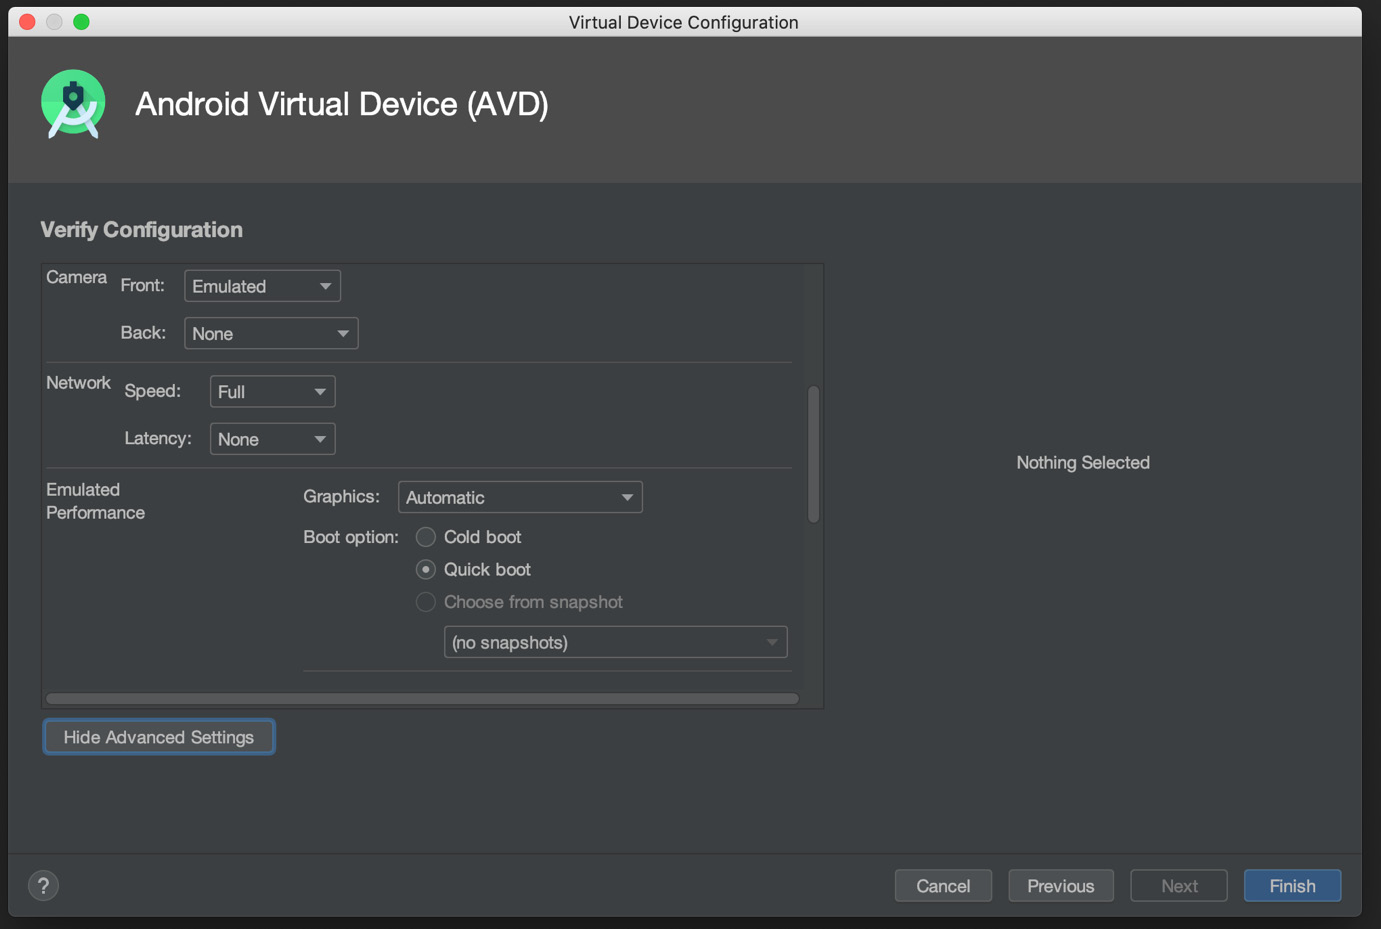
Figure 1.17 – Virtual Device Configuration: Advanced Settings
Since you might want to actually test the camera quickly during development, you can choose Webcam0 for both front and back camera if your development machine has a webcam installed (otherwise, you can choose Emulated for both the front and back cameras). If you don't need to use the camera for your app, you can just leave the setting as is.
In the Emulated Performance section, leave the Graphics setting as Automatic to let the emulator allocate resources automatically. But on the Boot option part, we have to choose the Cold boot option in Advanced Settings to avoid running into the well-known Can't find service: package error in Expo (there is a link to the issue on GitHub, at https://github.com/facebook/react-native/issues/24725). You can leave the rest of Advanced Settings at their default settings because they are based on the actual device settings, unless you want to squeeze more performance out of your development machine, in which case you are free to select more central processing unit (CPU) core and memory allocation, which should be very straightforward so we won't cover it here. Just click Finish on the following screen:
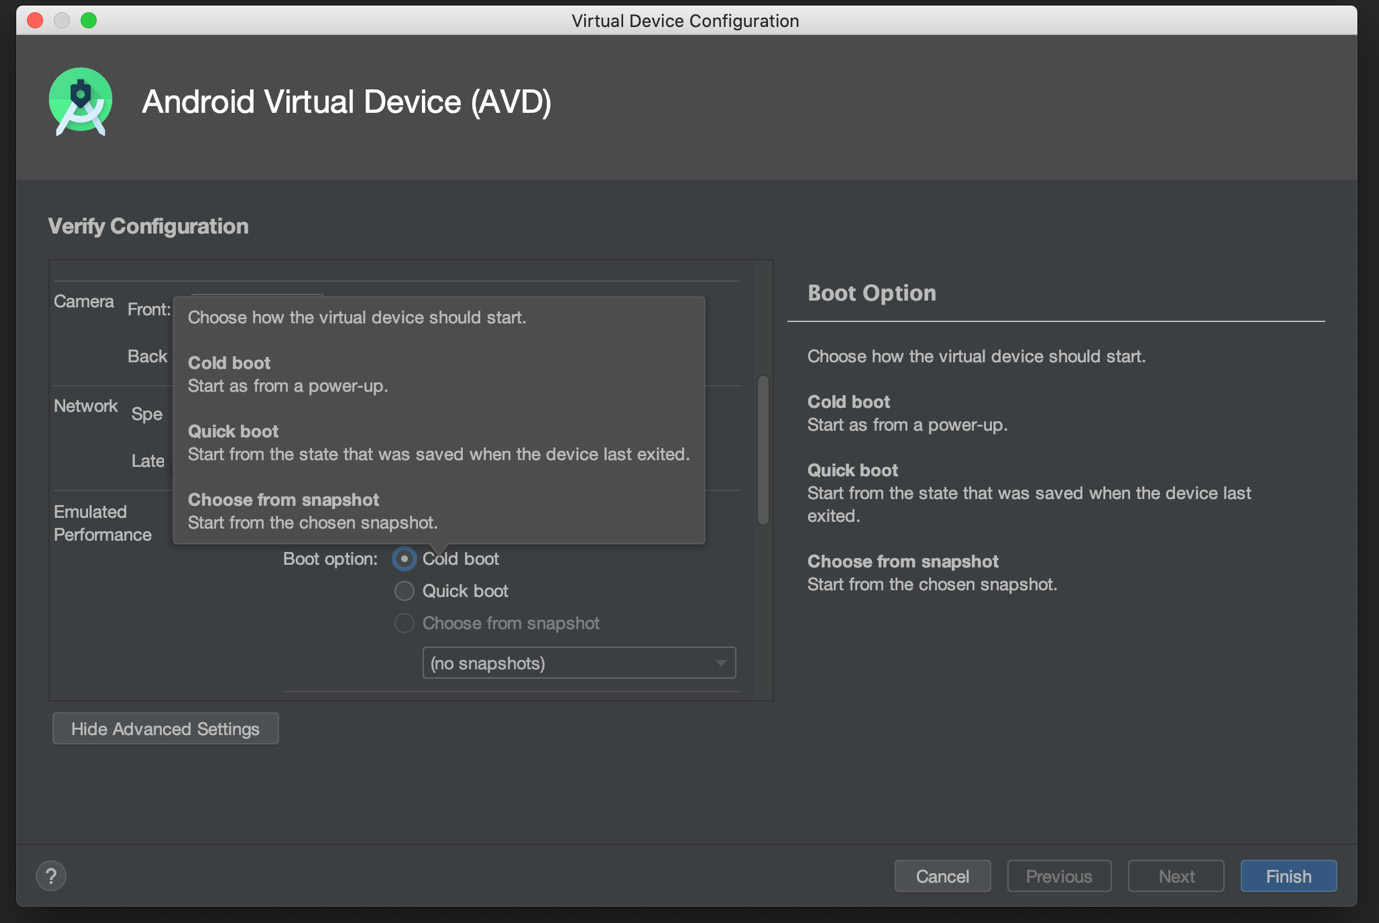
Figure 1.18 – Virtual Device Configuration: Boot option
You should now be able to see the new emulator device being created in the Your Virtual Devices list and the device selection on the emulator dropdown at the top. You can always install more emulators by yourself later if you want to cover more devices for testing. Since Android has a huge fragmentation on screen resolution and pixel density as well as running OSes on the market, it makes sense to test on different emulators and OSes during development. If you want to change the settings for whatever reason, you can always click the little pen icon to edit the settings, as illustrated in the following screenshot:
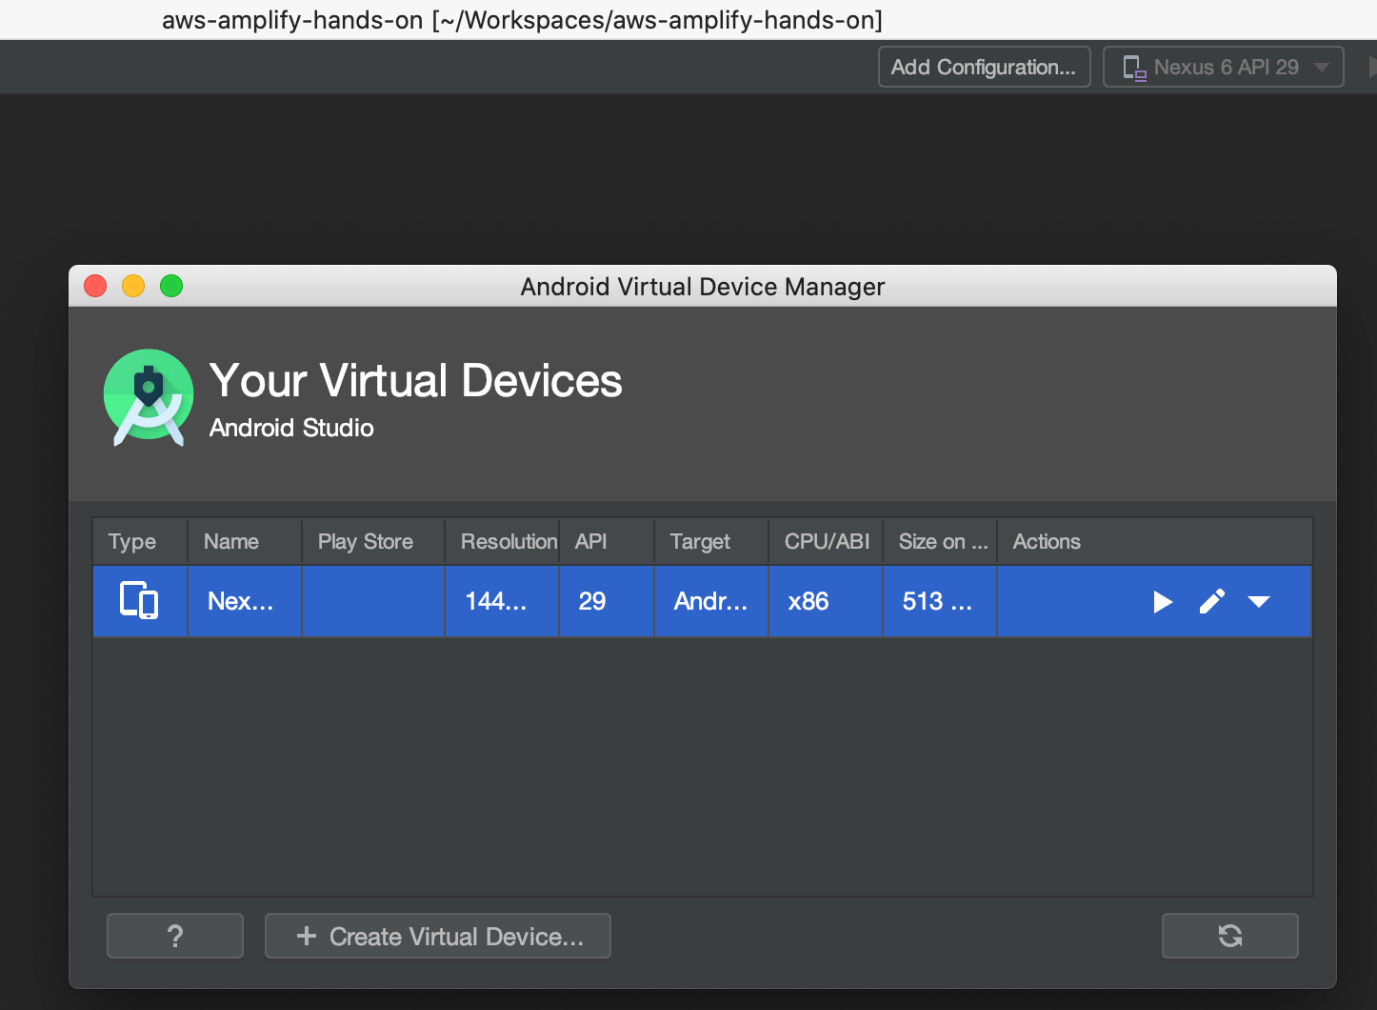
Figure 1.19 – Virtual Device Configuration: Camera settings
Now, go back to Terminal or the terminal of your code editor and run the following command:
yarn android
You should be able to see the following screen if everything worked as expected:
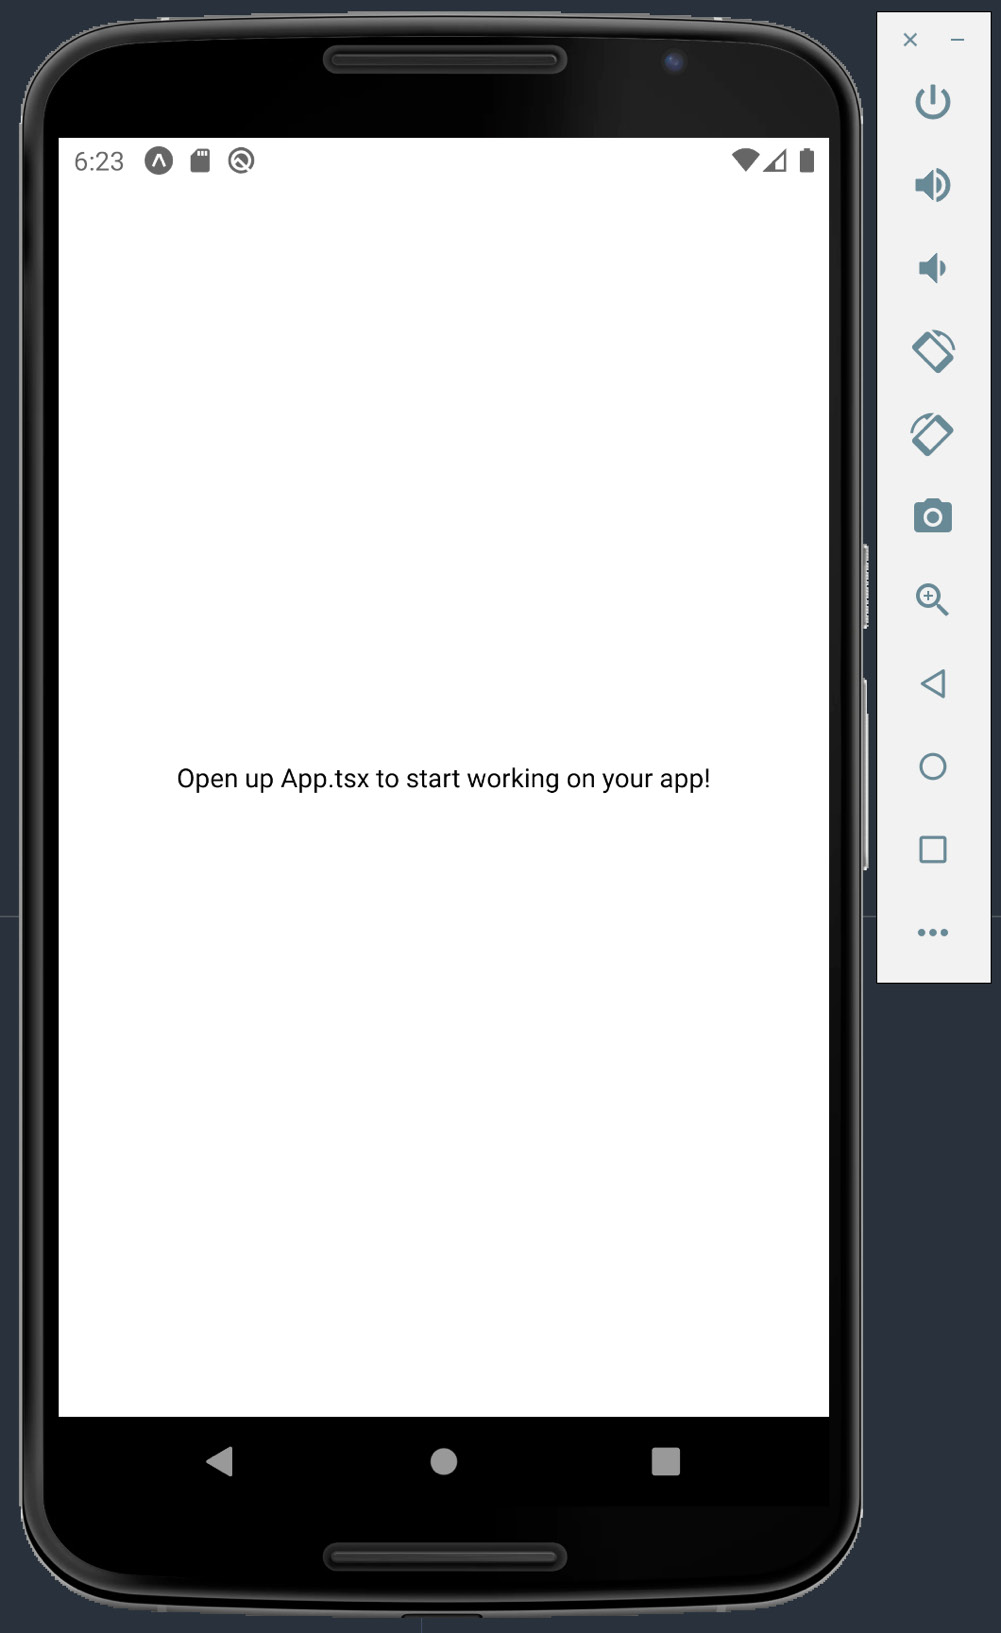
Figure 1.20 – Android emulator
Since the screen is asking you to open up the App.tsx file on your project to start working on your app, you can go ahead and edit the App.tsx file and save it (Command + S on a Mac or Ctrl + S on a PC/Linux). You should then be able to see that the app has changed accordingly in real time on the Android emulator to confirm it is working, as illustrated in the following screenshot:
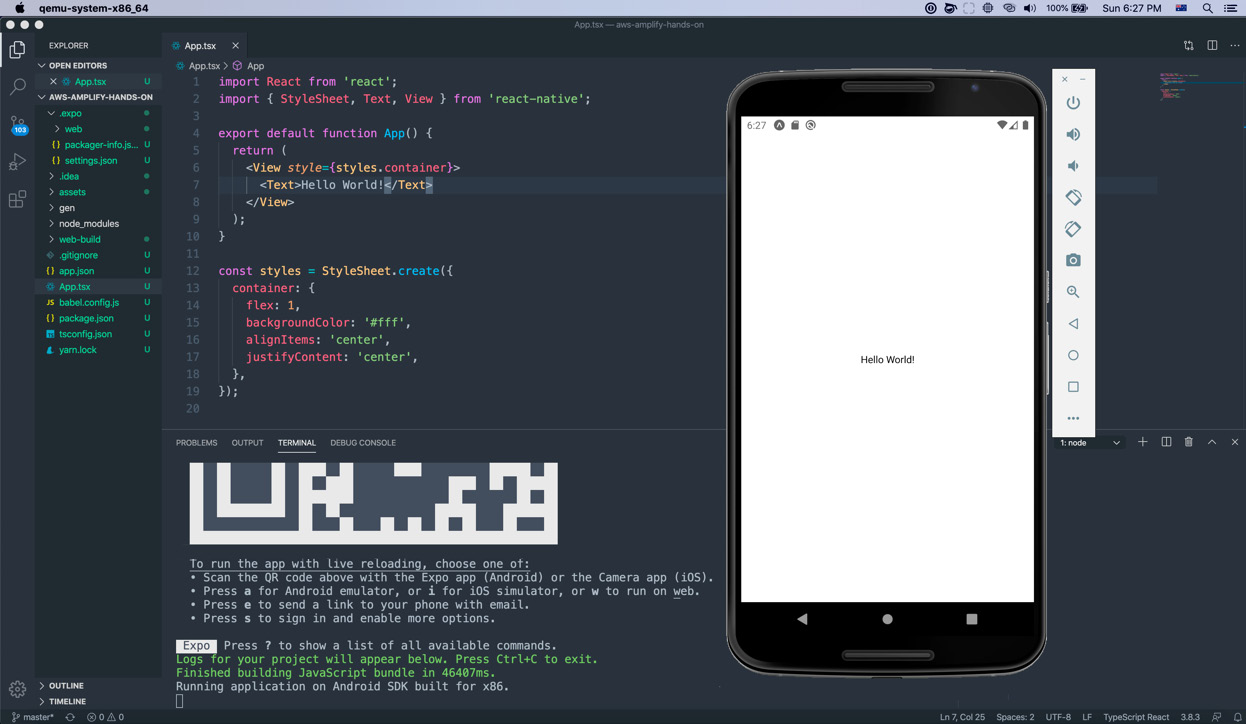
Figure 1.21 – Running the Expo app in the Android emulator
Important note
If you still encounter the Can't find service: package error even with the Cold boot option of Advanced Settings, as in the Expo CLI not being able to install and run the new build package on the Android emulator, the reason could be that the Expo client has not been installed properly on the Android emulator. If that happens, you can shut down the emulator with the Power button and press A on the keyboard to rerun the Android emulator in the terminal, which will trigger the Expo client installation for the Android emulator. Once the Expo client is being installed locally, turn on the emulator again and see if the Expo app is installed or not. Now, you can rerun the yarn android command to run the app on the Android emulator with the Expo client.
Developing for the web
Run the following command to run the Expo app as a web app in the browser:
yarn web
You should be able to see the following screen if everything worked as expected:
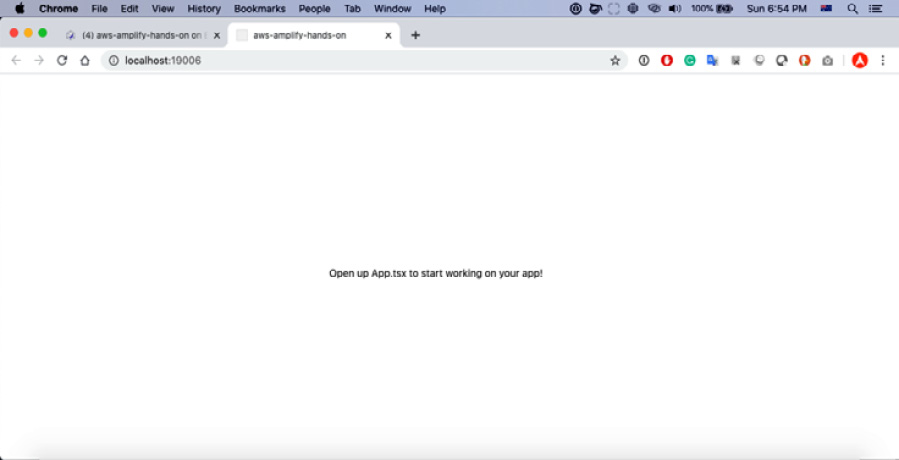
Figure 1.22 – Running the Expo app on a browser
Since the screen is asking you to open up the App.tsx file in your project to start working on your app, you can go ahead and edit the App.tsx file and save it (Command + S on a Mac or Ctrl + S on a PC/Linux). You should then be able to see that the app has changed accordingly in real time in the browser to confirm it is working, as illustrated in the following screenshot:
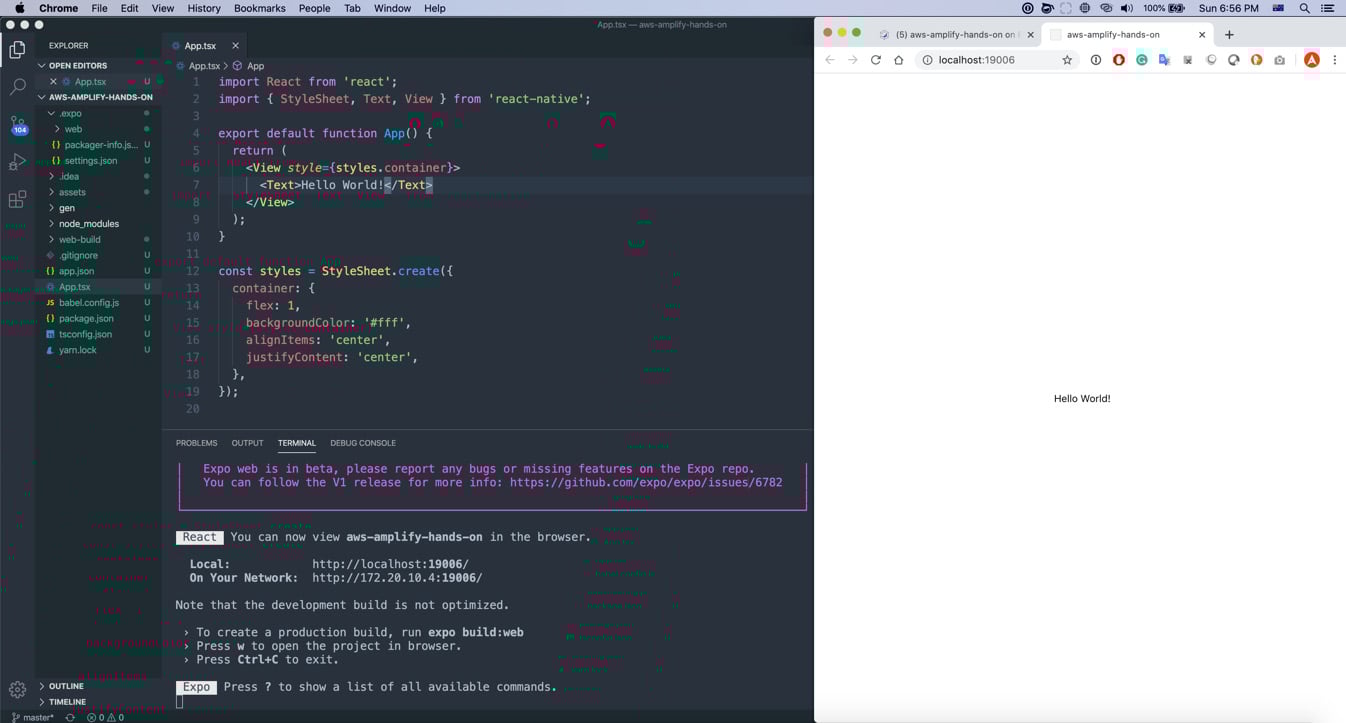
Figure 1.23 – Refreshing the Expo app in the browser
Important note
At the time of writing this book, web support is out of the box but it is still in beta, which means some of the components are not fully supported for the web yet.
Now that you are familiar with how to create a new app with the Expo CLI, we will discover how to create a Progressive Web App (PWA) with React in the next section.
Creating a new PWA
If you are planning on developing your Amplify app with React for the web only or you are planning to write the React Native code separately, creating a pure React app makes much more sense. You can run the following command to create a React app with TypeScript:
yarn create react-app my-app-name --template typescript
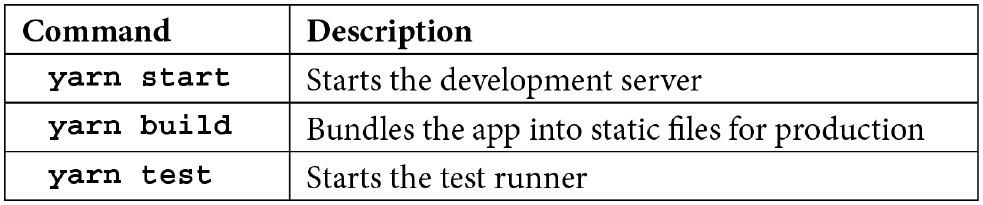
Once you have created your React PWA with TypeScript, here are a few commands to remember:
You should be able to see the following screen when you run the yarn start command:
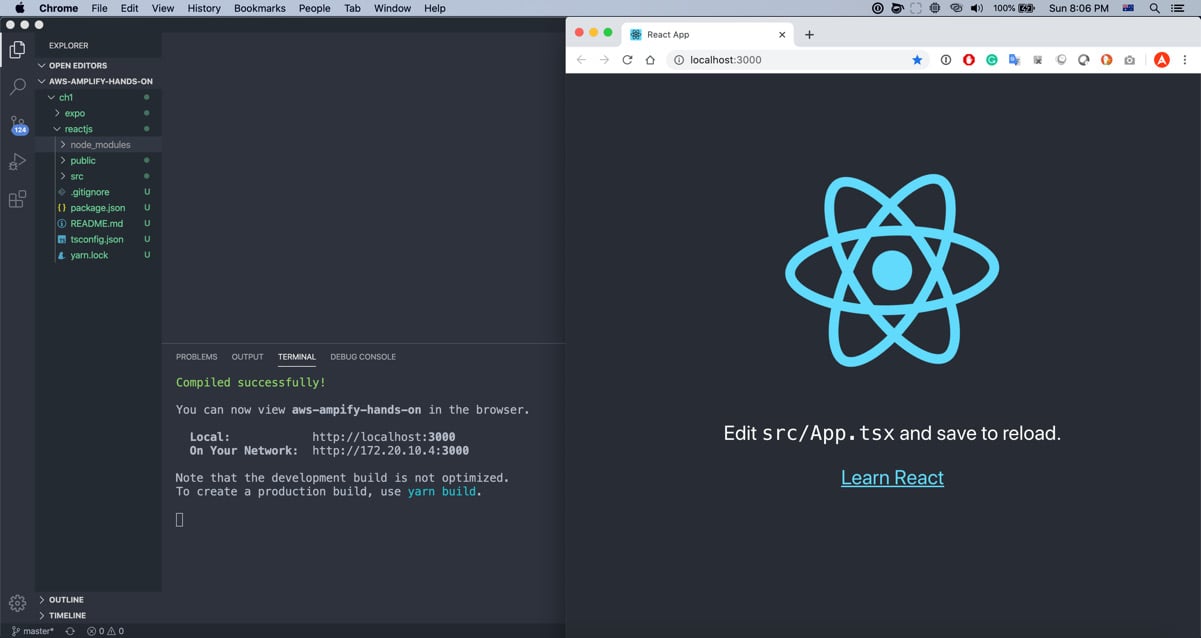
Figure 1.24 – Running the ReactJS app in a browser
Change something in the App.tsx file and save it (Command + S on a Mac or Ctrl + S on a PC/Linux). You should then be able to see that the app has changed accordingly in real time in the browser to confirm it is working, as illustrated in the following screenshot:
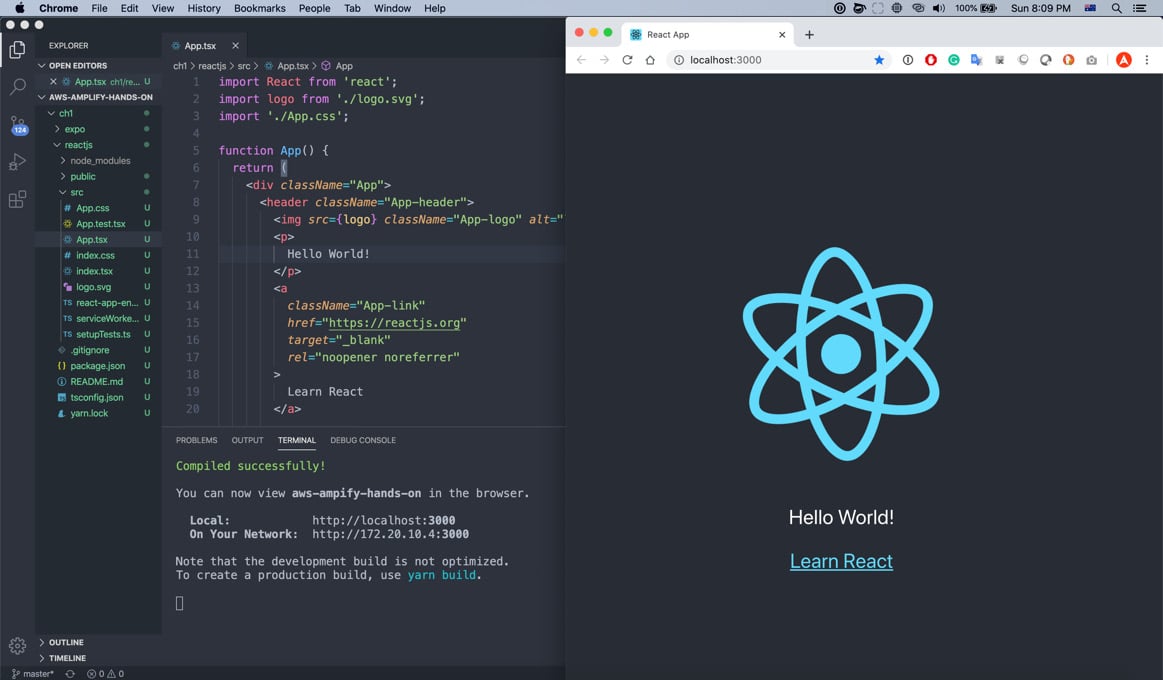
Figure 1.25 – Updating the ReactJS app in the browser
If you run the yarn build command, you will see a build folder being created, as illustrated in the following screenshot. You can upload the build folder to your web server or AWS S3 bucket as static web hosting to see it working in production, which we will cover later in this book:
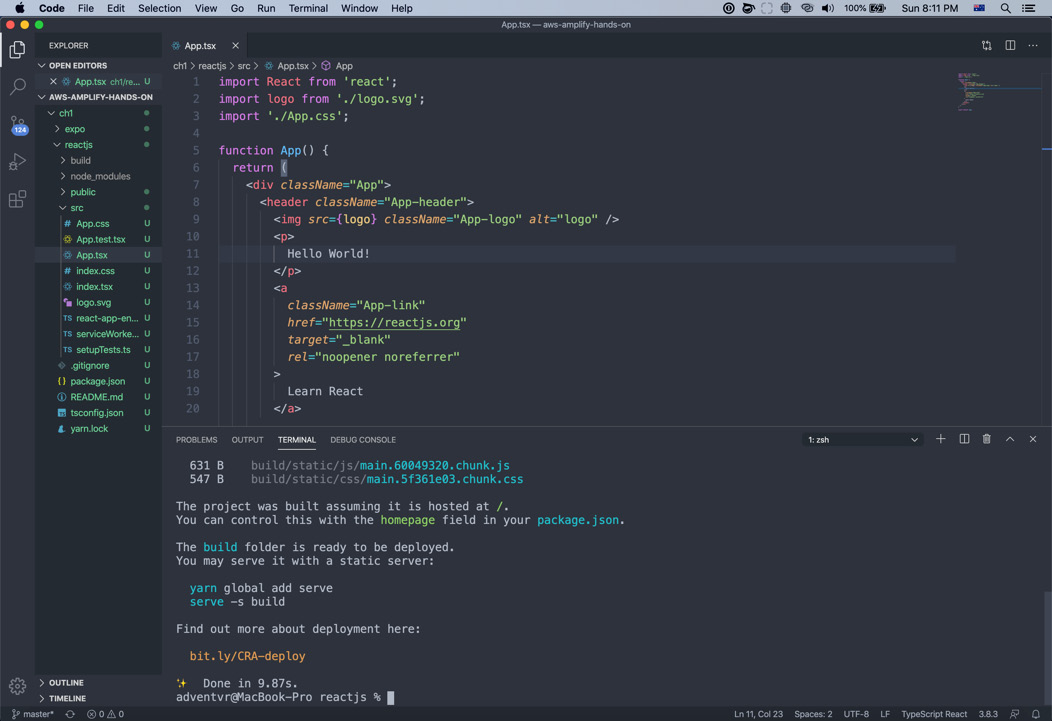
Figure 1.26 – Creating the ReactJS app folder
If you run the yarn test command, you will see the App.test.tsx script being executed to test against the App.tsx file. The console will tell you how many tests have been run and how many have passed, as illustrated in the following screenshot:
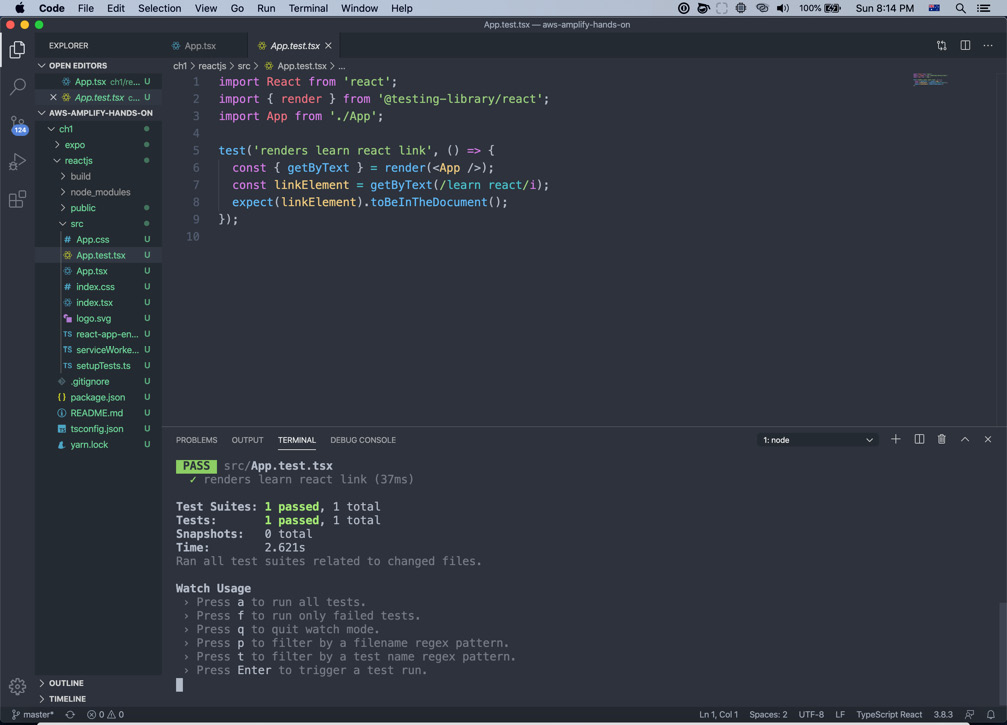
Figure 1.27 – Passing the unit test of the ReactJS app
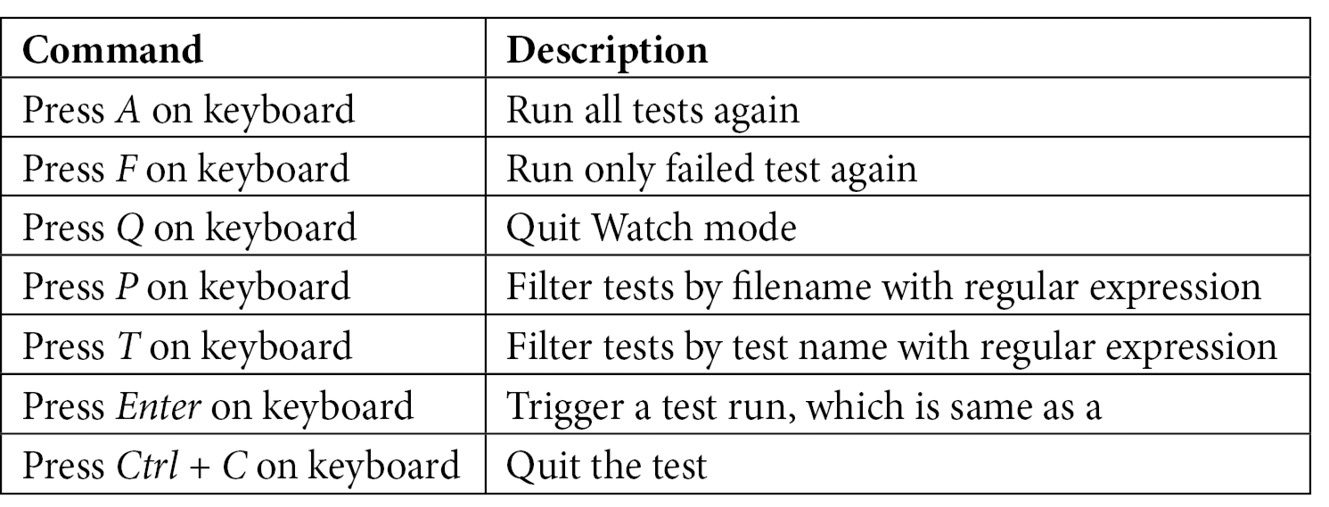
It is important to know that the test command will watch the changes of the directory as well as the start command, so any changes to the repository will trigger the test again. You can always use the command the terminal suggested to run the test in different ways, as follows:
Now that you are familiar with how to build a React app with TypeScript, we will go through how to create a React Native app with the React Native CLI in the next section.
Creating a new React Native app
If you have a Mac and you want to create a React Native app without Expo or you want to support a platform such as macOS or Windows in the future, you can use the React Native CLI to create one. In order to build a React Native app, we need to install a few dependencies, such as Node.js, Watchman (Watchman is a tool by Facebook for watching changes in the filesystem), Xcode command-line tools, and CocoaPods (CocoaPods is a dependency manager for Swift and Objective-C Cocoa projects). You can use the following commands to install the dependencies and create a React Native app with TypeScript:
brew install node
brew install watchman
xcode-select --install
sudo gem install cocoapods
npx react-native init MyApp --template react-native-template-typescript
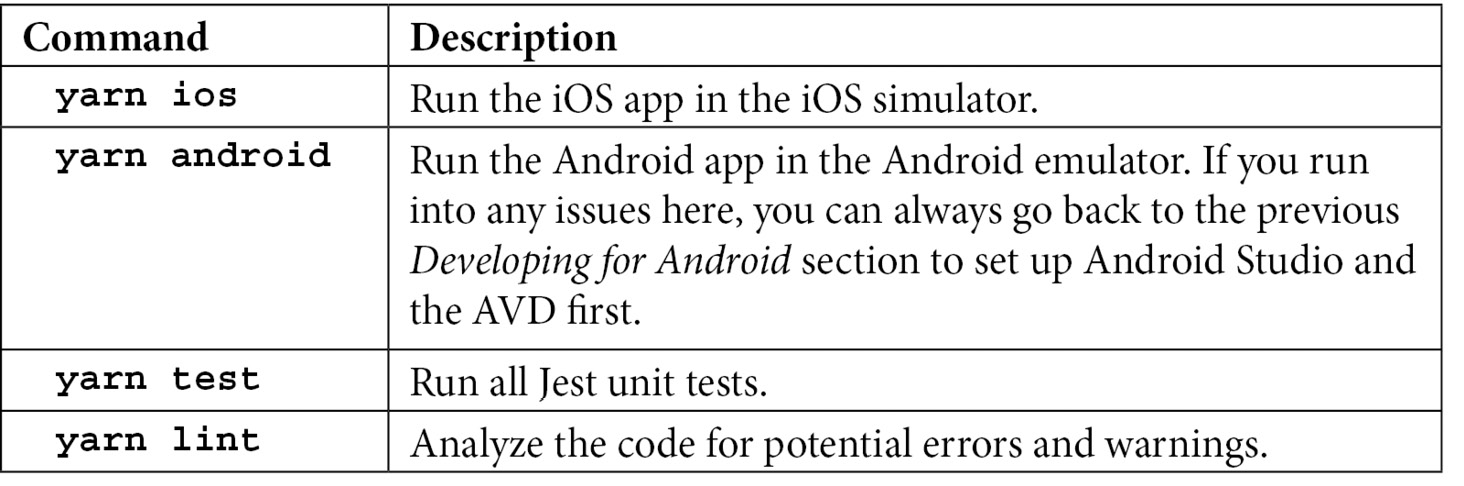
Once you have created your React Native app with the React Native CLI, here are a few commands to remember:
When you run the yarn ios command, the React Native CLI will build the iOS app and then launch the iOS simulator. Once the build is done, the React Native CLI will launch the Metro builder in the terminal and then launch the React Native app, as shown in the following screenshot:
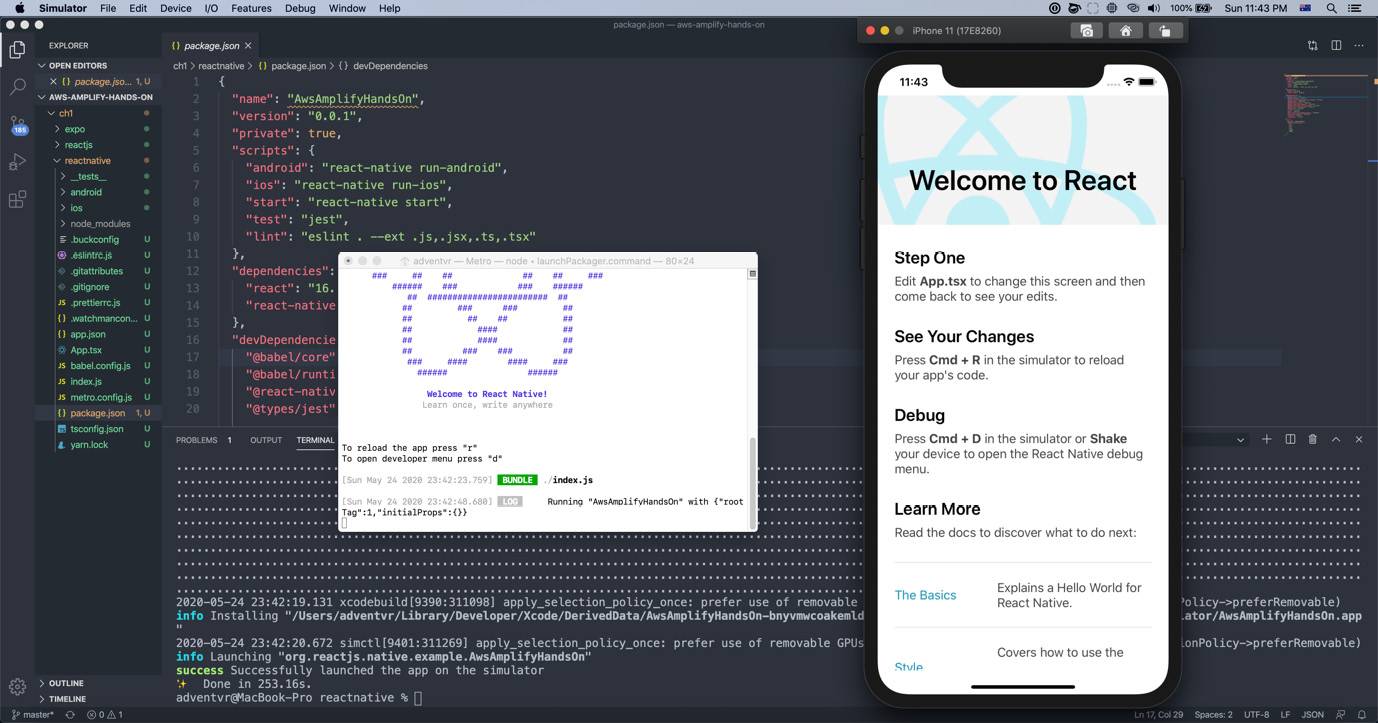
Figure 1.28 – Running the iOS React Native app
The Metro builder is working with the native iOS app in the simulator simultaneously in order to push the build result to the app as soon as there are new changes. Change something in the App.tsx file and save it (Command + S on a Mac or Ctrl + S on a PC/Linux). You should then be able to see that the app has changed accordingly in real time in the iOS simulator, as illustrated in the following screenshot:
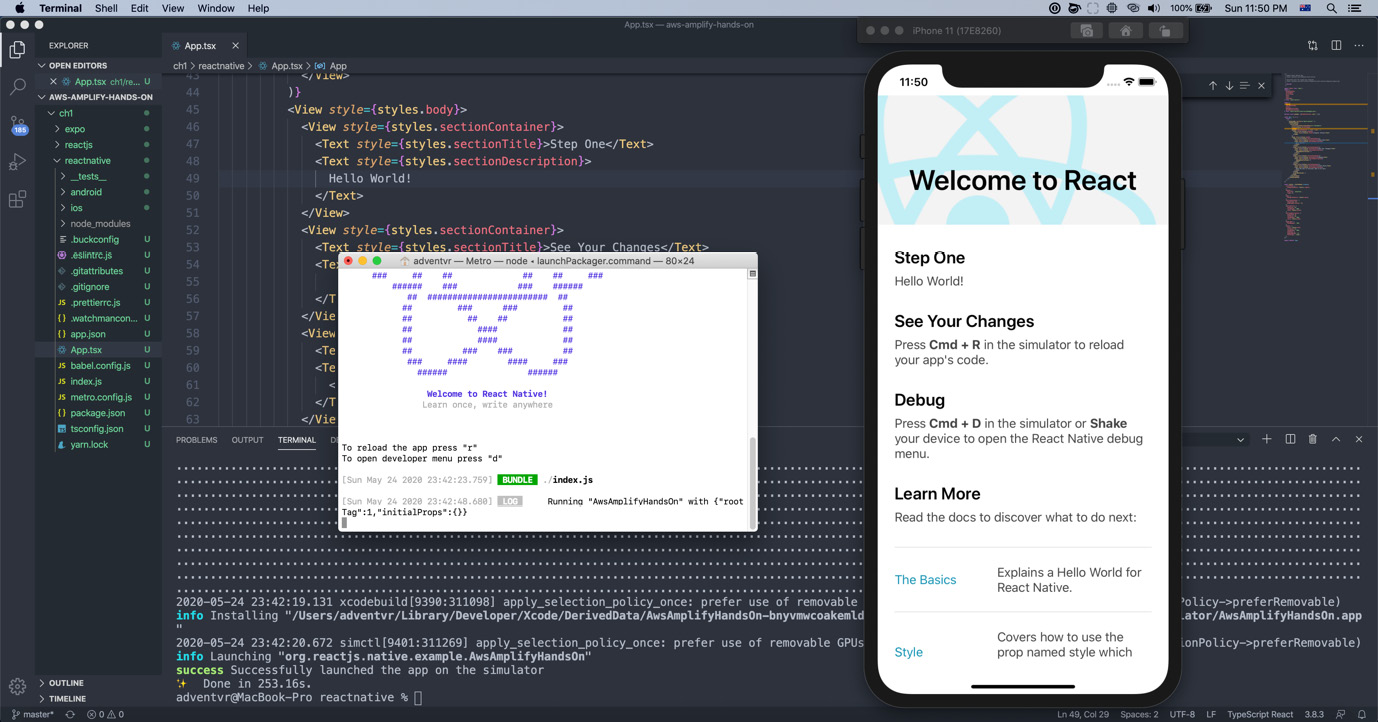
Figure 1.29 – Updating the iOS React Native app
If you run the yarn android command while leaving the iOS simulator and the Metro builder open in the terminal, you will see the Android app being built and launched with the Android emulator. When you make changes in the App.tsx file, you will see changes being updated on both virtual devices simultaneously, as shown here:
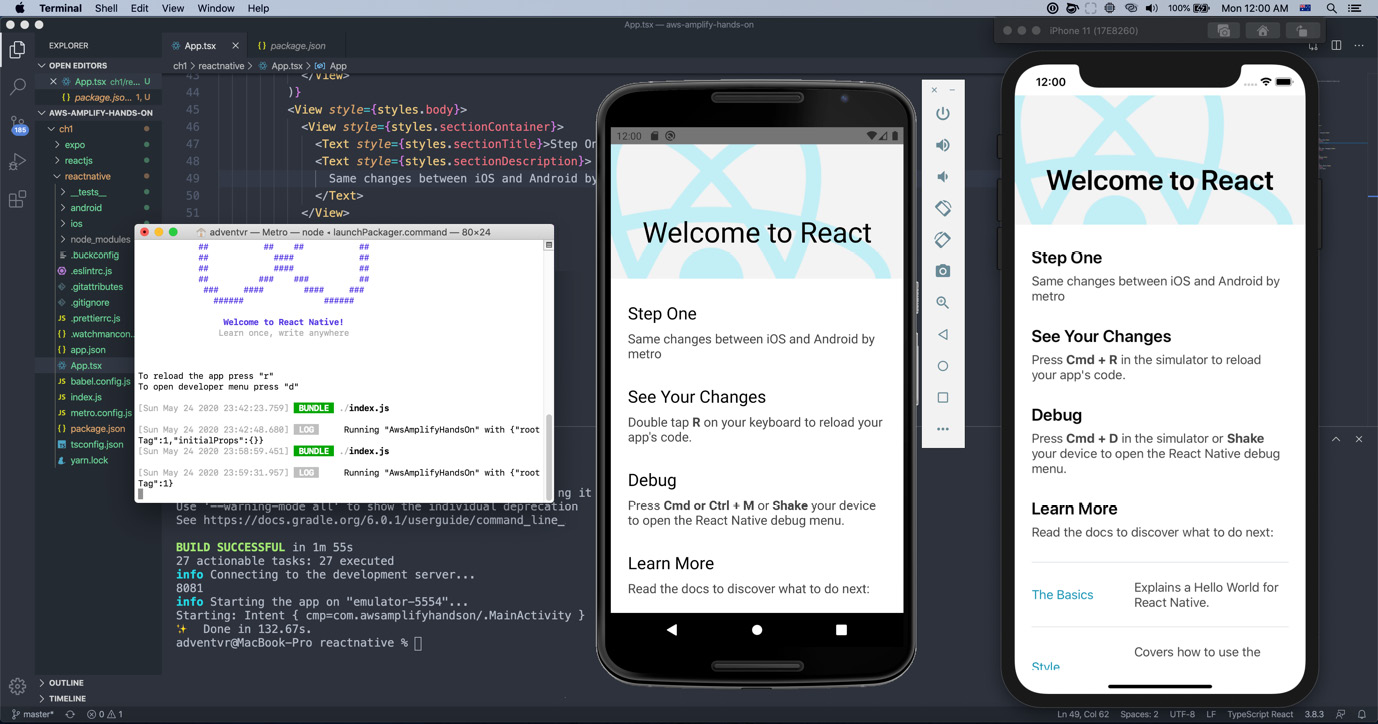
Figure 1.30 – Running both an iOS and an Android React Native app
You have now created at least one—or several—React and React Native apps if you followed the instructions in this chapter. You should now be familiar with the different CLIs and ways to create React and React Native apps.