

Testing presentational components
In this section, we will use our knowledge of installing and structuring tests with React Testing Library to test presentational components. Presentational components are components that do not manage state. Typically, you use presentational components to display data passed down from parent components as props or to display hardcoded data directly in the component itself.
Creating snapshot tests
Snapshot tests are provided by Jest and are great to use when you simply want to make sure the HTML output of a component does not change unexpectedly. Suppose a developer does change the component's HTML structure, for example, by adding another paragraph element with static text. In that case, the snapshot test will fail and provide a visual of the changes so you can respond accordingly. The following is an example of a presentational component that renders hardcoded data related to travel services to the DOM:
const Travel = () => {
  return (
    <div className="card text-center m-1" style={{ width:
      '18rem' }}>
      <i className="material-icons" style={{ fontSize:
         '4rem' }}>
        airplanemode_active
      </i>
      <h4>Travel Anywhere</h4>
The component displays an airplane icon in the previous code snippet in an <i> element and a heading inside an <h4> element:
<p className="p-1">
        Our premium package allows you to take exotic trips
          anywhere at the cheapest prices!
      </p>
    </div>
  )
}
export default Travel
In the last piece of the component, the preceding code snippet displays text inside a paragraph element. The resulting DOM output looks like the following:

Figure 2.3 – Travel component
Since the component simply displays a few lines of static hardcoded text, it makes it a good candidate for a snapshot test. In the following example, we use snapshot testing to test the Travel component:
import { render } from '@testing-library/react'
import Travel from './Travel'
it('displays the header and paragraph text', () => {
  const { container } = render(<Travel />)
First, in our test file we import the render method from React Testing Library. Next, we import the Travel component. Then, we use object destructuring to get container off the rendered component. container represents the resulting HTML output of the component. Finally, we use the toMatchInlineSnapshot method from Jest to capture the resulting HTML output.
The following is a portion of the snapshot for the Travel component output we saw at the beginning of this section:
  expect(container).toMatchInlineSnapshot(`
    <div>
      <div
        class="card text-center m-1"
        style="width: 18rem;"
      >
        <i
          class="material-icons"
          style="font-size: 4rem;"
        >
          airplanemode_active
        </i>
Now, if in the future a developer changes the output of the Travel component, the test will fail and inform us of the unexpected changes. For example, a developer may change the heading from Travel Anywhere to Go Anywhere:
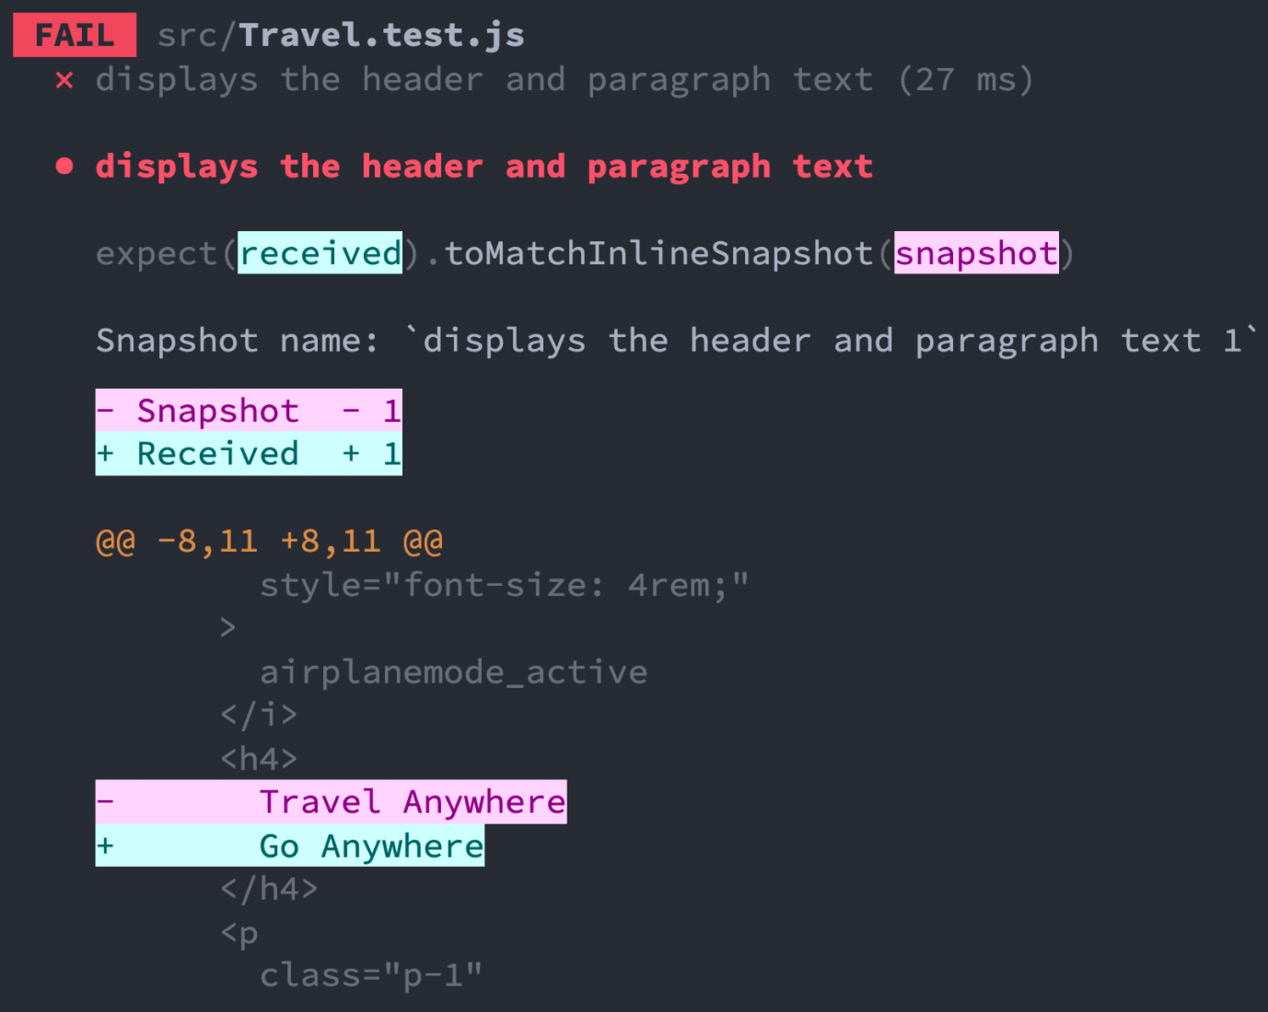
Figure 2.4 – Failed travel snapshot test
The preceding screenshot shows that the test failed and shows us which lines changed. Travel Anywhere is the text the snapshot is expected to receive that differed from the received text, Go Anywhere. Also, the line number, 8, and position in the line, 11, where the difference was found are also pointed out. If the change was intentional, we can update our snapshot with the new change. Run the following command to update the snapshot:
npm test -- -u
If your tests are currently running in watch mode, simply press the U key on your keyboard to update the snapshot. If the change was not intentional, we can simply change the text back to the original value inside the component file.
Now that you know how to create snapshot tests for presentational components, we will now learn how to verify properties passed into presentational components.
Testing expected properties
Presentational components can have data passed into them as props, instead of hardcoded data directly in the component. The following is an example of a presentational component that expects an array of objects for employees to display in a table:
const Table = props => {
  return (
    <table className="table table-striped">
      <thead className="thead-dark">
        <tr>
          <th scope="col">Name</th>
          <th scope="col">Department</th>
          <th scope="col">Title</th>
        </tr>
      </thead>
In the preceding code snippet, the component has a table with the headings Name, Department, and Title for each employee. The following is the table body:
      <tbody>
        {props.employees.map(employee => {
          return (
            <tr key={employee.id}>
              <td>{employee.name}</td>
              <td>{employee.department}</td>
              <td>{employee.title}</td>
            </tr>
          )
        })}
      </tbody>
    </table>
  )
}
export default Table
In the preceding code snippet, we iterate over the employees array from the props object inside the table body. We create a table row for each employee, access the employee's name, department, and title, and render the data into a table cell element.
The following is an example of the resulting DOM output:

Figure 2.5 – Table component
The Table component displays rows of employees that match the expected shape of an array of objects with Name, Department, and Title properties. We can test that the component properly accepts and displays the rows of employee data in the DOM:
import { render, screen } from '@testing-library/react'
import fakeEmployees from './mocks/employees'
import Table from './Table'
it('renders with expected values', () => {
  render(<Table employees={fakeEmployees} />)
First, we import the render method and screen object from React Testing Library. Next, we pass in a fake array of employee objects called fakeEmployees, created for testing purposes, and the Table component. The fakeEmployees data looks like the following:
const fakeEmployees = [
  {
    id: 1,
    name: 'John Smith',
    department: 'Sales',
    title: 'Senior Sales Agent'
  },
  {
    id: 2,
    name: 'Sarah Jenkins',
    department: 'Engineering',
    title: 'Senior Full-Stack Engineer'
  },
  { id: 3, name: 'Tim Reynolds', department: 'Design',
     title: 'Designer' }
]
Finally, we create the main test code to verify the fakeEmployee data is present in the DOM:
it('renders with expected values', () => {
  render(<Table employees={fakeEmployees} />)
  expect(screen.getByRole('cell', { name: /john smith/i
    })).toBeInTheDocument()
  expect(screen.getByRole('cell', { name: /engineering/i
    })).toBeInTheDocument()
  expect(screen.getByRole('cell', { name: /designer/i
    })).toBeInTheDocument()
})
For the preceding code snippet's assertions, we verified that at least one piece of each object was present in the DOM. You could also verify that every piece of data is present in the DOM if that aligns with your testing objectives. Be sure to verify that your code tests what you expect it is testing. For example, try making the test fail by using the screen object to query the DOM for employee data that should not be present. If the test fails, you can be more confident that the code tests what you expect.
Although most of the time we want to avoid implementation details and write our tests from the perspective of the user, there may be times where testing specific details is important to our testing goals. For example, if it might be important to you to verify that the striped color theme is present in the rendered version of the table component. The toHaveAttribute assertion method of Jest-dom can be used in this situation:
it('has the correct class', () => {
  render(<Table employees={fakeEmployees} />)
  expect(screen.getByRole('table')).toHaveAttribute(
    'class',
    'table table-striped'
  )
})
In the preceding code snippet, we created a test to verify that the table component has the correct class attribute. First, we render the Table component with employees. Next, we select the table element using the getByRole method off the screen object. Finally, we assert that the component has a class attribute with the value table table-striped. By using toHaveAttribute, we can assert the value of component attributes when needed.
Now you know how to test presentational components that accept props as data.
In the next section, we will learn how to use the debug method to analyze the current state of component output as we build out our tests.