

Creating a custom Blazor WebAssembly project template
As you have seen, the Demo Blazor WebAssembly project created by the Blazor WebAssembly App project template includes quite a few files. In later chapters, we will want to start with an empty Blazor project. So, we will create our own project template that creates an empty Blazor WebAssembly project.
Creating an empty Blazor project
We need to create an empty Blazor WebAssembly project to base our new project template on. We do this as follows:
- Return to Visual Studio.
- Delete the
wwwroot\sample-datafolder. - Delete all of the components in the
Pagesfolder, except for theIndexcomponent. - Open the
Index.razorfile. - Delete all of the markup from the
Indexcomponent. Make sure that you do not delete the@pagedirective at the top of the page. - Delete the
Shared\SurveyPrompt.razorfile. - Open the
Shared\MainLayout.razorfile. - Remove the
Aboutlink from the top row of the layout by removing the following markup:<a href="http://blazor.net" target="_blank" class="ml-md-auto"> About </a>
- Open the
Shared\NavMenu.razorfile. - Remove the
lielements for theCounterandFetch datapages. - From the Build menu, select the Build Solution option.
- From the Debug menu, select the Start Without Debugging (Ctrl+F5) option to run the
Demoproject.The
Demoproject is now empty. It only contains a blankHomepage.
Creating a project template
The Export Template Wizard is used to create custom project templates. We will use the empty project that we just created as the basis for a custom project template. We do this as follows:
- Return to Visual Studio.
- From the Project menu, select the Export Template option to open the Export Template Wizard window.
- Select Project template on the Choose Template Type dialog and click the Next button:

Figure 2.18 – The Choose Template Type dialog
- Complete the Select Template Options dialog as shown in the following screenshot and click the Finish button:
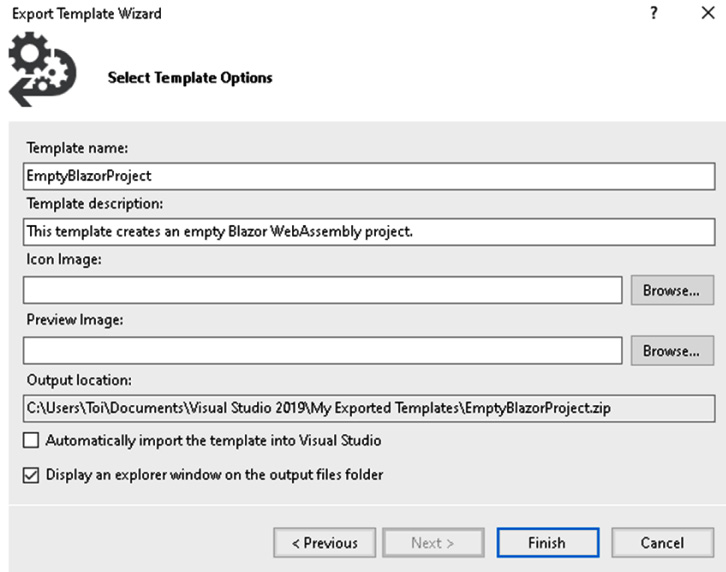
Figure 2.19 – The Select Template Options dialog
After you click the Finish button, your new project template will be saved to the folder indicated in the Output location field on the Select Template Options dialog and the folder will automatically open. The files that comprise your new project template are compressed into a file called EmptyBlazorProject.zip.
Updating a custom project template
We need to make a few updates to our custom project template before it is ready to use. First, we will declare a template parameter for the project's name, and then we will update the metadata. We do this as follows:
- Extract all of the files from the
EmptyBlazorProject.zipfile.The
EmptyBlazorProject.zipfile contains all of the files from the emptyDemoproject as well as aMyTemplate.vstemplatefile that contains all of the metadata for the project template. - Open the
Shared/NavMenu.razorfile and replace the wordDemowith$projectname$:<a class="navbar-brand" href="">$projectname$</a>
The
$projectname$parameter will be replaced by the name of the project that is provided by the user when the project is created.Open the
_Imports.razorfile and replace the wordDemowith$projectname$:@using $projectname$ @using $projectname$.Shared
- Open the
MyTemplate.vstemplatefile. - Update the value of the
Nameelement toEmpty Blazor WebAssembly App:<Name>Empty Blazor WebAssembly App</Name>
- Add the following elements after the
Descriptionelement:<LanguageTag>C#</LanguageTag> <ProjectTypeTag>Web</ProjectTypeTag>
- Replace the
Iconelement with the followingIcon Packageelement:<Icon Package="{AAB75614-2F8F-4DA6-B0A6-763C6DBB2969}" ID="13"/> - Change the
ReplaceParametersattribute totrueforNavMenu.razor ProjectItem:<ProjectItem ReplaceParameters="true" TargetFileName="NavMenu.razor"> NavMenu.razor </ProjectItem>
- Change the
ReplaceParametersattribute totruefor_Imports.razor ProjectItem:<ProjectItem ReplaceParameters="true" TargetFileName="_Imports.razor"> _Imports.razor </ProjectItem>
- Save all of the updated files.
- Update the
EmtpyBlazorProject.zipfile with the updated files. - Copy
EmtpyBlazorProject.zipfrom theVisual Studio2019\MyExportedTemplatesfolder to theVisual Studio2019\Templates\ProjectTemplatesfolder.
Using a custom project template
We can use a custom project template the same way that we use any of the built-in project templates. We do this as follows:
- From the File menu, select the New, Project option.
- Enter
Blazorin the Search for templates textbox to locate your new template:
Figure 2.20 – Empty Blazor WebAssembly App template
- Select the Empty Blazor WebAssembly App template and click the Next button.
- Update the project name to
Sampleand click the Create button. - From the Build menu, select the Build Solution option.
- From the Debug menu, select Start Without Debugging (Ctrl+F5).
We have created a new Sample project by using our custom project template. The only page in the Sample project is the Home page.
We created an empty project by deleting some of the components and code from the Demo project that we created in the previous section. Then, we used the Export Template Wizard to create a custom project template based on the empty project. After we updated some of the files in the custom project template, we copied them into the ProjectTemplates folder. Finally, we used the custom project template to create the Sample project.