

Using WordPress path utility functions to load external files and images
On occasion, plugins need to refer to external files (for example, images, JavaScript, or jQuery script files) that are stored in the plugin directory. Since users are free to rename a plugin's folder or even install plugin files straight into the WordPress plugins directory, paths to any external files must be built dynamically based on the actual plugin location. Thankfully, a number of utility functions are present to simplify this task.
How to do it...
Follow these steps to create a simple plugin that will add a favicon meta tag to a website's header, pointing to an image file located in the plugin's directory:
- Navigate to the WordPress
pluginsdirectory of your development installation. - Create a new directory called
ch2-favicon. - Use a web service, such as https://favicongrabber.com/, to retrieve a website's favicon (for example, https://www.packtpub.com) and store it in the
ch2-favicondirectory with its default name (favicon.ico). - Navigate to the
ch2-favicondirectory and create a new text file calledch2-favicon.php. - Open the new file in a code editor and add an appropriate header at the top of the plugin file, naming the plugin
Chapter 2 - Favicon. - Add the following line of code to register a function that will be called when WordPress renders the page header:
add_action( 'wp_head', 'ch2fi_page_header_output' );
- Add the following code section to provide an implementation for the
ch2fi_page_header_outputfunction:function ch2fi_page_header_output() { $site_icon_url = get_site_icon_url(); if ( !empty( $site_icon_url ) ) { wp_site_icon(); } else { $icon = plugins_url( 'favicon.ico', __FILE__ ); ?> <link rel="shortcut icon" href="<?php echo esc_url( $icon ); ?>" /> <?php } } - Save and close the plugin file.
- Log in to the administration page of your development WordPress installation.
- Click on Plugins in the left-hand navigation menu.
- Activate your new plugin.
- Navigate to your website's front page and refresh it to see that the icon file that you assigned through your plugin code now appears in your browser's address bar, title bar, or navigation tab, depending on your preferred browser. The following screenshot shows how the favicon file is rendered in Microsoft Edge, Google Chrome, and Mozilla Firefox, from top to bottom:
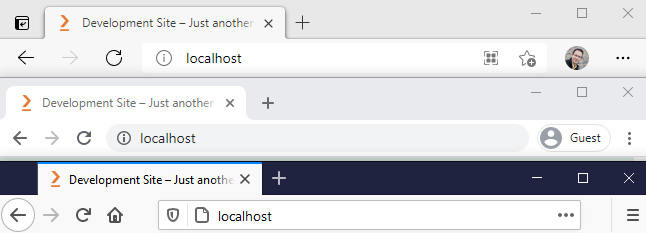
Figure 2.3 – The website favicon appearing in Microsoft Edge, Google Chrome, and Mozilla Firefox
- Go to the Appearance section of your development site's Dashboard and Activate a theme other than Twenty Twenty-Two (for example, Twenty Twenty-One or Twenty Twenty). You may need to install one of these themes if they are not present in your development environment.
- Select the Customize submenu under the Appearance menu.
- Under Site Identity, assign a square image that is at least 512 x 512 pixels in dimension as the Site Icon; then, click the Publish button at the top of the customizer.
- Refresh your website to see that the newly assigned site icon image is now displayed instead of the
favicon.icofile. - Go back to the Appearance section and Activate the Twenty Twenty-Two theme.
How it works...
The plugins_url utility function, used in conjunction with the __FILE__ PHP constant and the name of our favicon file, allows us to quickly get the URL of this file located in our plugin directory. Once we have it, we can print out the appropriate HTML command to notify browsers of the location of this file.
The plugins_url function can be called with or without parameters. In the first case, it builds a URL by appending the path or filename found in the first parameter to the location of the file specified in the second argument. In the second situation, it simply returns the location of the plugin directory:
plugins_url( $path, $plugin );
Before we display our plugin's favicon file, we also call the get_site_icon_url function to see whether the user has already assigned a site icon using the WordPress customizer. If that is the case, we give priority to that icon and display it using the wp_site_icon() function.
Note
The Twenty Twenty-Two theme found in WordPress 5.9 is built using a new theme creation technique and does not have a customizer section. This is why we change our site theme to demonstrate how our code takes into consideration site icons assigned in the customizer. The majority of themes available today have customizer sections, but this may change as WordPress evolves. The Twenty Twenty-Two theme may also add a customizer section in future releases.
There's more...
The plugins_url function is one of the many functions that can be used in plugins to help find the location of files in a WordPress installation. Other useful functions include the following:
get_theme_root(): Returns the address of the theme installation directoryget_template_directory_uri(): Retrieves the URL to the current theme's filesadmin_url(): Provides the address of the WordPress administrative pagescontent_url(): Indicates where thewp-contentdirectory can be foundsite_url()andhome_url(): Returns the site addressincludes_url(): Provides the location of WordPress include fileswp_upload_dir(): Indicates the directory where user-uploaded files are stored
See also
- The Creating a plugin file and header recipe
- The Adding output content to page headers using plugin actions recipe