
Troubleshooting coding errors and printing variable content
As you transcribe code segments from the pages of this book or start writing your own plugins, there is a strong chance that you will have to troubleshoot problems with your code. You might also run into trouble working with data that your plugin is meant to manipulate. This recipe shows basic techniques to identify and quickly resolve these errors while creating a plugin that will hide an item from the navigation menu for users who are not logged in to your site.
How to do it...
Follow these steps to learn how to troubleshoot problematic plugin code:
- Navigate to the WordPress
pluginsdirectory of your development installation. - Create a new directory called
ch2-nav-menu-filter. - Navigate to this directory and create a new text file called
ch2-nav-menu-filter.php. - Open the new file in a code editor and add an appropriate header at the top of the plugin file, naming the plugin
Chapter 2 - Nav Menu Filter. - Add the following line of code to register a function that will be called when WordPress is preparing data to display the site's navigation menu:
add_filter( 'wp_nav_menu_objects',
            'ch2nmf_new_nav_menu_items', 10, 2 );
- Add the following code section to provide an implementation for the
ch2nmf_new_nav_menu_itemsfunction. Note that the wordfunctiois mistyped on purpose at the beginning of the first line:functio ch2nmf_new_nav_menu_items ( $sorted_menu_items, $args ) { print_r( $sorted_menu_items ); return $sorted_menu_items; }Tip
If you are using a dedicated code editor, you should be able to tell that the
functiotext is not a recognized keyword, since it will not be colored as a PHP keyword and might also be underlined to indicate an error. - Save the plugin file and leave your code editor open.
- Log in to the administration page of your development WordPress installation.
- Click on Plugins in the left-hand navigation menu.
- Activate your new plugin.
- WordPress will display a fatal error message, indicating that the plugin could not be activated, since a parsing error was found. It also indicates the exact filename and line where the error occurred, helping to narrow down where the problem occurred. The actual format of the error message may be different based on the local development tool that you're using:
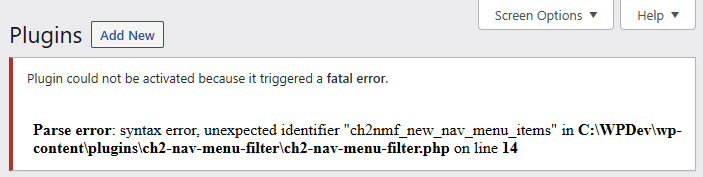
Figure 2.7 – A fatal error upon plugin activation due to a syntax error
- Go back to your code editor, correct the spelling of the word
function, and save the file. - Activate the plugin a second time. It should now activate correctly.
- Back in the code editor, remove the last letter of the word
functionto re-introduce a syntax error, and save the file. - Visit the development site in your browser. You will now see that the entire site has been replaced with a Parse error message similar to the one we just saw. You may also only get a blank page or a critical error, depending on your web server configuration.
- Go to the Appearance section of your development site's Dashboard and Activate a theme other than Twenty Twenty-Two (for example, Twenty Twenty-One or Twenty Twenty). You may need to install one of these themes if they are not present in your development environment.
- In the WordPress Dashboard, navigate to the Appearance | Menus item.
- If you don't have any menu defined, type
Main Menuin the Menu Name field. Check the appropriate Display location checkboxes to assign your new menu to the theme's main navigation area. The exact name of this location will change based on the theme you're using. Click on Create menu to save your menu. - Create an additional item in your menu as a Custom Link, setting the URL to
/privateareaand the Link Text toPrivate Area; then, click on Add to Menu:
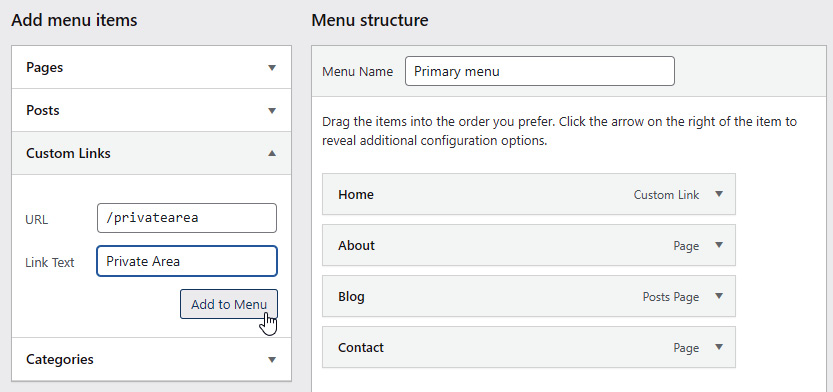
Figure 2.8 – Creating a new menu item
- Click on the Save Menu button to save your changes.
- Back in your code editor, correct the spelling error once again and refresh the page to see the website return to normal. You will also see that a lot of information is now being printed before the navigation menu. This output is generated by the
print_rfunction and is meant to help us understand how the data received by our filter function is organized. Once we have a good understanding of that data, we will be able to properly make changes to this information in the next step. To view theprint_rdata in a more organized way, bring up the View Page Source function of your browser and search for the keywordArrayto quickly find the menu data. - Back in the code editor, replace the line containing the
print_rfunction call with the following code:// Check if used is logged in, continue if not logged if ( is_user_logged_in() == FALSE ) { // Loop through all menu items received // Place each item's key in $key variable foreach ( $sorted_menu_items as $key => $sorted_menu_item ) { // Check if menu item matches search string if ( 'Private Area' == $sorted_menu_item->title ) { // Remove item from menu array if found // using item key unset( $sorted_menu_items[ $key ] ); } } } - Refresh your website, and you will see that the large array printout has disappeared. If you are logged in as the administrator, you will also notice the Private Area link in your menu. Log out of your site or open an incognito session in your browser to see the page without the new menu item.
- Go back to the Appearance section and Activate the Twenty Twenty-Two theme.
How it works...
As WordPress assembles a list of all available plugins to display them in the administration interface, it does not check to see whether each plugin's PHP code is valid. This check is only done when a plugin is activated. At that time, any syntax error will be caught immediately and the newly activated plugin will remain inactive, preventing a failure of the entire website.
That being said, once a plugin is activated, its code is evaluated every time WordPress renders a web page, and any subsequent code error that gets saved to the plugin file will cause the site to stop working correctly. For this reason, it is highly recommended to set up a local development environment, as discussed in Chapter 1, Preparing a Local Development Environment, to avoid affecting a live site when an inevitable error creeps up in your plugin code. To avoid potential outages on a live website, it is safer to deactivate plugins before making changes to them and then reactivate them once changes are completed. This way, all changes are validated before the plugin code is reactivated. It should be noted that, with this method, the plugin's functionality won't be available on your site while you make changes, so it is not an optimal way to modify deployed code.
Once the code is working correctly, the second part of this recipe shows us how to visualize the information received by a registered filter function. While the WordPress Codex website provides great documentation of the purpose of most available filters, it does not go into detail about the structure of the information that is sent to each filter function.
Thankfully, the PHP print_r function comes in very handy, since it can display the content of any variable on the screen, no matter what information is stored in the variable that it receives as an argument.
Last, but not least, the implementation of the custom filter function uses the WordPress API is_user_logged_in() function to see whether the person viewing the site has provided login credentials. If the return value of the function is true, our code goes on to parse all the menu items and remove the Private Area menu item.
Note
This is the second time in this chapter that we ask you to activate a theme other than the default WordPress 5.9 Twenty Twenty-Two theme. With WordPress 5.9, WordPress is introducing a new theme-building paradigm where users will be able to modify their site layout using a graphical tool. Some action and filter hooks don't work with this new theme structure in this first version. That being said, all code samples in this book work with the large majority of themes that are available today and are running on most WordPress sites.
There's more...
In addition to the debugging techniques used in this recipe, WordPress offers a number of built-in tools to facilitate plugin troubleshooting.
Built-in WordPress debugging features
While the wp-config.php file, located at the top of the WordPress file structure, is primarily used to store basic site configuration data, it can also be used to trigger a number of debugging features. The first of these is debug mode, which will display all PHP errors, warnings, and notices at the top of site pages. For example, having this option active will show any undefined variables that you try to access in your code along with any deprecated WordPress function. To activate this tool, change the second parameter of the line defining the WP_DEBUG constant from false to true in wp_config.php:
define( 'WP_DEBUG', true );
If the WP_DEBUG line does not appear in your development site's wp-config.php file, you can add it before the line that reads the following:
/* That's all, stop editing! Happy publishing. */
To prevent debug messages from affecting the site's layout, you can download a useful plugin called Debug Bar (https://wordpress.org/plugins/debug-bar/) to collect messages and display them in the admin bar, as shown here:
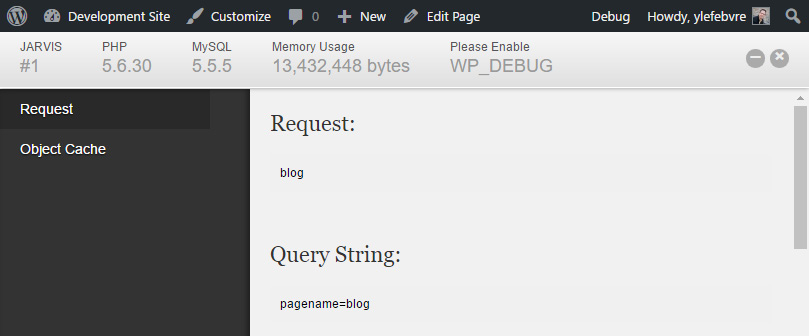
Figure 2.9 – The Debug Bar plugin
Other debugging features that can be activated from the wp-config.php file are as follows:
WP_DEBUG_LOG: Stores all debug messages in a file nameddebug.login the site'swp-contentdirectory for later analysisWP_DEBUG_DISPLAY: Indicates whether error messages should be displayed on the siteSAVEQUERIES: Stores database queries in a variable that can be displayed in the page footer (see https://wordpress.org/support/article/editing-wp-config-php/#save-queries-for-analysis for more information)
Better debugging with Xdebug
While all of the debugging techniques mentioned in this chapter are valid, they do require manual intervention to insert and remove code, especially in the case of the print_r function called to view data received by the filter function. If you forget to remove a manual debugging statement, your users will end up with debug data on their site if you distribute your work.
As you become more invested in plugin development, you should consider setting up a development server that supports Xdebug. One of the benefits of this debugging tool is that coding errors will be displayed with more details about where they were found and the code that was executed leading up to the error. More importantly, Xdebug allows developers to connect a code editor such as Visual Studio Code to the web server to be able to step through each individual line of code as they are executed. It is also possible to set breakpoints to stop execution in specific places and see data in all variables every step of the way.
See also
- The Modifying the site generator meta tag using plugin filters recipe