

Understanding Vue directives
All Vue-based directives start with a v-* prefix as a Vue-specific attribute:
v-text: Thev-textdirective has the same reactivity as with interpolation. Interpolation with{{ }}is more performant than thev-textdirective. However, you may find yourself in situations where you have pre-rendered text from a server and want to override it once your Vue application has finished loading. For example, you can pre-define a static placeholder text while waiting for the Vue engine to eventually replace it with the dynamic value received fromv-text, as shown in the following code block:<template>
<div v-text="msg">My placeholder</div>
</template>
<script setup>
const msg = "My message"
</script>
v-once: When used, it indicates the starting point of static content. The Vue engine will render the component with this attribute and its children exactly once. It also ignores all data updates for this component or element after the initial render. This attribute is handy for scenarios with no reactivity needed for certain parts. You can combinev-oncewithv-text, interpolation, and any Vue directive.V-html: Vue will parse the value passed to this directive and render your text data as a valid HTML code into the target element. We don’t recommend using this directive, especially on the client side, due to its performance impact and the potential security leak. Thescripttag can be embedded and triggered using this directive.v-bind: This directive is one of the most popular Vue features. You can use this directive to enable one-way binding for a data variable or an expression to an HTML attribute, as shown in the following example:<template>
<img v-bind:src="logo" />
</template>
<script setup>
const logo = '../assets/logo.png';
</script>
The preceding code demonstrates how to bind the logo data variable to image’s src. The img component now takes the source value from the logo variable and renders the image accordingly.
You can also use it to pass a local data variable as props to another component. A shorter way is using the :attr syntax instead of v-bind:attr. Take the preceding example, for instance. We can rewrite the template as follows:
<template>
  <img :src="logo" />
</template>
v-if: This is a powerful directive you can use to conditionally control how elements render inside a component. This directive operates like theif…elseandif…else if…conditions. It comes with supporting directives, such asv-else, standing for theelsecase, andv-else-if, standing for theelse ifcase. For example, we want to render different text whencountis2,4, and6. The following code will demonstrate how to do so:<template>
<div v-if="count === 2">Two</div>
<div v-else-if="count === 4">Four</div>
<div v-else-if="count === 6">Six</div>
<div v-else>Others</div>
</template>
v-show: You can also control the visible state of HTML elements by usingv-show. Unlikev-if, withv-show, the Vue engine still mounts the element to the DOM tree but hides it using thedisplay: noneCSS style. You can still see the content of the hidden element visible in the DOM tree upon inspecting it, but it is not visible on the UI to end users. This directive does not work withv-elseorv-else-if. Ifv-showresults in atrueBoolean, it will leave the DOM element as is. If it resolves asfalse, it will apply thedisplay: nonestyle to the element.v-for: We use thev-fordirective to accomplish the goal of list rendering based on a data source. The data source is an iterative data collection, such as anarrayorobject. We will dive deeper into different use cases for this directive in a separate section within this chapter.
We have gone over the most common directives in Vue. Let’s review and experiment with how to use these directives with the following exercise.
Exercise 1.03 – exploring basic directives (v-text, v-once, v-html, v-bind, v-if, v-show)
More complicated components will use multiple directives to achieve the desired outcome. In this exercise, we will construct a component that uses several directives to bind, manipulate, and output data to a template view.
To access the code file for this exercise, refer to https://github.com/PacktPublishing/Frontend-Development-Projects-with-Vue.js-3/tree/v2-edition/Chapter01/Exercise1.03.
Let’s start the exercise by performing the following steps:
- Use the application generated with
npm init vue@3as a starting point, or within the root folder of the code repository, navigate into theChapter01/Exercise1.03folder by using the following commands in order:> cd Chapter01/Exercise1.03/
> yarn
- Run the application using the following command:
yarn dev
- Open the exercise project in VS Code (by using
code .command within the project directory) or your preferred IDE. - Create a new Vue component file named
Exercise1-03.vuein thesrc/componentsdirectory. - Inside
Exercise1-03.vue, compose the following code to display thetextcontent:<template>
<div>
<h1>{{ text }}</h1></div>
</template>
<script setup>
const text = 'Directive text';
</script>
- Replace the
{{}}interpolation with thev-textattribute. The output should not change:<template>
<div>
<h1 v-text="text">Loading...</h1>
</div>
</template>
Figure 1.10 displays the output of the preceding code:

Figure 1.10 – Same output for v-text and the interpolation method
- Add the
v-oncedirective to the same element. This will force this DOM element to only load thev-textdata once:<template>
<div>
<h1 v-once v-text="text">Loading...</h1>
</div>
</template>
- Underneath the
h1element, include a newh2element that uses thev-htmlattribute. Add a new local data calledhtmlthat contains a string with HTML formatting in it, as shown in the following code block:<template>
<div>
<h1 v-once v-text="text">Loading...</h1>
<h2 v-html="html" />
</div>
</template>
<script setup>
const text = 'Directive text';
const html = 'Stylise</br>HTML in<br/><b>your data</b>'
</script>
Running the preceding code will generate an output as follows:
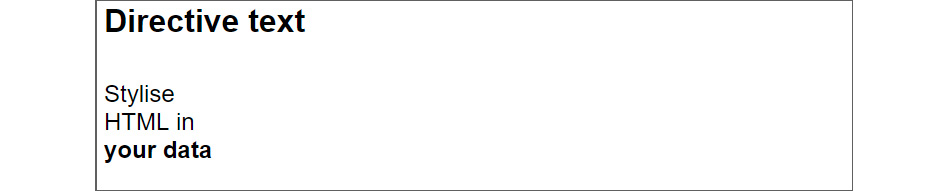
Figure 1.11 – Rendering HTML elements from a string using v-html
- Add a new local
linkobject that contains a bunch of information such as the URL, target, title, and tab index. Inside the template, add a new anchor HTML element and bind thelinkobject to the HTML element using thev-bindshort syntax – for example,:href="link.url":<template>
<div>
<h1 v-once v-text="text">Loading...</h1>
<h2 v-html="html" />
<a
:href="link.url"
:target="link.target"
:tabindex="link.tabindex"
>{{ link.title }}</a></div>
</template>
<script setup>
const text = 'Directive text';
const html = 'Stylise</br>HTML in<br/><b>your data</b>'
const link = {title: "Go to Google",
url: https://google.com,
tabindex: 1,
target: '_blank',
};
</script>
The following screenshot displays the output:
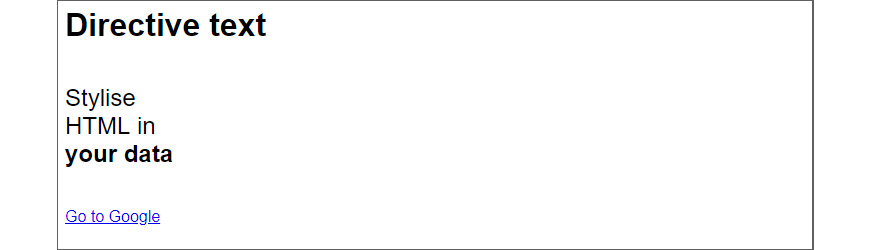
Figure 1.12 – Output on binding the reactive data from the Vue instance to any HTML attribute
- Apply
v-if="false"to theh1element,v-else-if="false"toh2, andv-elseto theatag like this:<template>
<div>
<h1 v-if="false" v-once v-text="text">Loading...
</h1>
<h2 v-html="html" v-else-if="false" />
<a
v-else
:href="link.url"
:target="link.target"
:tabindex="link.tabindex"
>{{ link.title }}</a></div>
</template>
You should only see the <a> tag on the page since we have set the main conditional statements to false.
The v-else condition will display the following:

Figure 1.13 – false v-if statements hiding the whole HTML element from the DOM
- Change the template to use
v-showinstead of thev-ifstatements, removev-elsefrom the<a>element, and change the value ofv-showinh1totrue:<template>
<div>
<h1 v-show="true" v-once v-text="text">Loading...
</h1>
<h2 v-html="html" v-show="false" />
<a
:href="link.url"
:target="link.target"
:tabindex="link.tabindex"
>{{ link.title }}</a></div>
</template>
The output of the preceding code will be as follows:

Figure 1.14 – Changing v-show to true will display the main directive text
When you open the Elements tab of your browser Devtools, you should be able to observe that the h2 display state is set to none as follows:
Figure 1.15 – h2 has “display: none” for the false condition
In this exercise, we learned about the core Vue directives to control, bind, show, and hide HTML template elements without requiring any JavaScript outside of adding new data objects to your local state.
In the next section, we will learn how to achieve two-way binding with the help of Vue’s v-model.