Understanding routing and navigation in UmiJS
In this section, you'll understand the Umi routing system and options for configuring routes. You will also learn how to access route parameters and query strings and about navigating between pages.
A Umi project is a single-page application. This means that the entire application remains on the first page served to the browser (index.html), and all other pages we see when accessing different addresses are components rendered on this same page. Umi does the job of parsing the route and rendering the correct component; we just need to define which component to render when the route matches a specific path. As you may have noticed, we already did that. But there are other configuration options. For example, we can set subroutes to define a standard layout for various pages:
routes.ts
export default [
  {
    path: '/',
    component: '@/layouts/Header',
    routes: [
      { path: '/login', component: '@/pages/Login' },
      { path: '/home', component: '@/pages/Home' },
    ],
  },
];
The preceding example defines that all routes under '/' will have a default header, which is a component located in the src/layouts folder.
The header component should look like this:
import React from 'react';
import styles from './index.less';
export default function (props: { children: React.ReactChild }) {
  return (
    <div className={styles.layout}>
      <header className={styles.header}>
        <h1>Umi App</h1>
      </header>
      {props.children}
    </div>
  );
}
props.children will receive the components when you access a defined route.
Another option we have is to redirect routes. Consider the following example:
routes.ts
export default [
  {
    path: '/',
    redirect: '/app/login',
  },
  {
    path: '/app',
    component: '@/layouts/Header',
    routes: [
      { path: '/app/login', component: '@/pages/Login' },
      { path: '/app/home', component: '@/pages/Home' },
    ],
  },
];
With this configuration, when you access http://localhost:8000/, Umi will immediately redirect the page to http://localhost:8000/app/login.
We can also define whether a path should be exact or not:
{
   exact: false,
   path: '/app/login',
   component: '@/pages/Login',
}
This configuration defines that you can access this page in any path under /app/login, such as http://localhost:8000/app/login/user. By default, all paths are exact.
You now understand how the routing system works and the different configuration options we have for routing. Now, you will learn how to access path and query string parameters and about conventional routing and navigating between pages.
Understanding path parameters and query strings
Sometimes we need to identify a resource in the route path. Imagine we have a page in our project that only displays product information. When accessing this page, we need to specify what product to get information from. We can do that by identifying the product ID in the route path:
{
  path: '/product/:id',
  component: '@/pages/Product',
},
If the parameter is not mandatory to access the page, you must add the ? character, like this: /product/:id?.
To access the product ID, we can use the useParams hook provided by Umi:
import { useParams } from 'umi';
export default function Page() {
  const { id } = useParams<{ id: string }>();
You can also receive query string parameters after the route. Query string parameters are key-value pairs in the ? character sequence in a URL, such as this example: /app/home?code=eyJhbGci. Here, code contains the value eyJhbGci.
We don't have a specific hook to access query string parameter values, but we can easily do that using umi history:
import { history } from 'umi';
export default function Page() {
  const { query } = history.location;
  const { code } = query as { code: string };
Now, let's see how you can define parameters when working with conventional routing.
Conventional routing
UmiJS offers an automatic route configuration based on your project structure under the pages folder. UmiJS will rely on that if it can't find route definitions in the config.ts or .umirc.ts files.
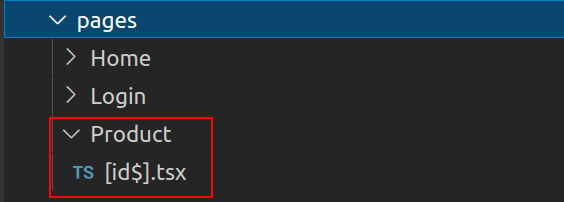
If you want to configure a route parameter, you can name the file enclosed in [], like this: [id].tsx. If this parameter is not mandatory to access the page, you must add the $ character, like this: [id$].tsx.

Figure 1.6 – Optional route parameter in conventional routing
Next, you will see how to navigate between pages.
Navigating between pages
When we need to set navigation between pages, usually, we use the DOM history object and anchor tag. In UmiJS, we have similar options to navigate: umi history and the Link component.
You can create hyperlinks between pages using the Link component, as in the following example:
import { Link } from 'umi';
export default function Page() {
  return (
    <div>
      <Link to="/app/home">Go Home</Link>
    </div>
  );
}
You can also set navigation between pages using the push() umi history command, as in the following example:
import { history } from 'umi';
export default function Page() {
  const goHome = () => {
    history.push('/app/home');
  };
  return (
    <div>
      <button onClick={goHome}></button>
    </div>
  );
}
In addition to the push() command, umi history has the goBack() command to revert one page in the history stack and goForward() to advance one page.
We have covered all the essential aspects of the Umi routing system, the different options to configure routes, access path and query string parameters, and navigation between pages.
Before finishing this chapter, I will introduce an exciting feature Umi provides if you prefer to interact with the project visually.


