

Installing NodeJS for frontend development
As we want our app to run in the browser, we will need to write the frontend in JavaScript or a language that compiles to it. There are many good choices, but I’ve chosen to use TypeScript as it is JavaScript with the addition of typing (as in, it is the same basic language). This means it is close to the required runtime language and has the additional safety and documentation from the typing.
As we will be writing the frontend in TypeScript, we will need NodeJS installed to compile TypeScript to the JavaScript that will run in the browser. NodeJS is best installed with the system package manager as follows:
brew install node
scoop install nodejs
Unlike Python, where we installed a specific package manager, NodeJS comes with one called npm. We’ll use npm to manage the frontend dependencies and tooling. npm also includes the npx tool that we will use to run one-off scripts.
As with the backend, we’ll separate the frontend code into a frontend folder. Then, we’ll use the create-react-app tool in this new folder to set everything up by running the following command in the project directory:
npx create-react-app frontend --template typescript
It should give the following folder structure:
tozo
└── frontend
    ├── node_modules
    ├── public
    └── src
Of the files also installed, only the frontend/package.json, frontend/package-lock.json, frontend/tsconfig.json, frontend/.gitignore, frontend/src/react-app-env.d.ts, and frontend/public/index.html files matter at the moment, so you can delete or adapt the other files as you’d like.
We can now focus on the specific NodeJS tooling for fast development.
Formatting the code
TypeScript does not have an official format/formatter; however, Prettier is the de facto formatter. We should add it to the project as a development dependency by running the following command in the frontend directory:
npm install --save-dev prettier
The --save-dev flag
We use the --save-dev flag here as these tools are only required to develop the frontend, and therefore do not need to be installed when running in production.
By default, Prettier does not add trailing commas, which is different from the style used in Python. To be consistent and therefore not have to think about this, Prettier can be configured by adding the following section to frontend/package.json:
"prettier": {
  "trailingComma": "all"
}
The following command will then run Prettier over our code:
npx prettier --parser typescript --write "src/**/*.{ts,tsx}"
We’ve now installed the tooling to format the code and we can focus on the tooling to lint it.
Linting the code
In the preceding section, we required a linter to type check our Python code, however, as we are using TypeScript, we do not need to install anything extra to type check. However, we can install linters to check for other bugs; the de facto linter for TypeScript and JavaScript is eslint, which is installed by running the following command in the frontend directory:
npm install --save-dev eslint
By default, eslint is not compatible with Prettier; fortunately, the eslint-config-prettier package configures eslint to be compatible. It is installed by running the following command in the frontend directory:
npm install --save-dev eslint-config-prettier
As with the backend, we should order our imports using eslint-plugin-import, which is installed with npm as follows:
npm install --save-dev eslint-plugin-import
These linters are then configured by replacing the existing eslintConfig section with the following in frontend/package.json:
"eslintConfig": {
  "extends": [
    "react-app",
    "react-app/jest",
    "plugin:import/errors",
    "plugin:import/warnings",
    "plugin:import/typescript",
    "prettier"
  ]
}
The highlighted lines will already be present.
eslint can be run over our code via the following command:
npx eslint "src/**/*.{ts,tsx}"
eslint can also fix some of the issues it identifies via the use of the --fix flag as follows:
npx eslint --fix "src/**/*.{ts,tsx}"
We’ve now installed the tooling to lint the code and we can focus on the tooling to test it.
Testing the code
The create-react-app tool used earlier also installed a test runner called Jest, which we can invoke by running the following:
npm run test
Jest allows for tests to be written using an expect syntax, as shown in the following example:
test('addition', () => {
  expect(1 + 1).toBe(2);
});
With the testing tooling present, we can focus on analyzing the built bundle.
Analyzing the bundle
The frontend code will be delivered as bundles (in chunks) to the user. These bundles, especially the main bundle, should be small so that the user isn’t waiting too long for the code to be downloaded. To check the bundle size and analyze what is included in each bundle, I use source-map-explorer, which is installed by running the following command in the frontend directory:
npm install --save-dev source-map-explorer
Before we can analyze the bundle sizes, we first need to build them by running the following command:
npm run build
Then, we can analyze them via this command:
npx source-map-explorer build/static/js/*.js
The output from the preceding command is shown in Figure 1.2:
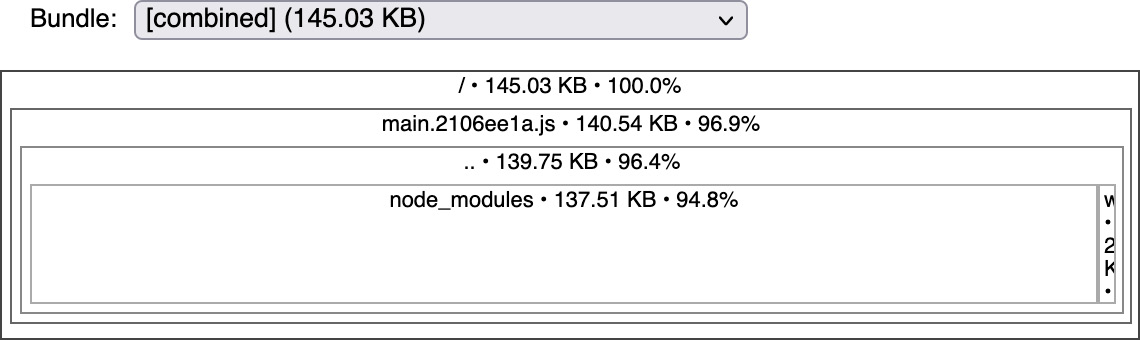
Figure 1.2: The output from source-map-explorer showing that the main bundle is 141 KB
Each bundle should be as small as possible, with a good rule of thumb being that bundles should be split when the bundle exceeds 1 MB. We’ll find that we need to do this when we add a password complexity analyzer to the frontend in Chapter 4, Creating a Reusable Frontend with React.
Scripting the commands
To match the backend, we want to add the following commands:
npm run analyzeto run the bundle analyzernpm run formatto run the formatting tooling and format the codenpm run lintto run the linting toolingnpm run testto run the tests
As npm run test is already present, we only need to add the other three. This is done by adding the following to the scripts section in frontend/package.json:
"scripts": {
  "analyze": "npm run build && source-map-explorer \"build/static/js/*.js\"",
  "format": "eslint --fix \"src/**/*.{ts,tsx}\" && prettier --parser typescript --write \"src/**/*.{ts,tsx}\"",
  "lint": " eslint \"src/**/*.{ts,tsx}\" && prettier --parser typescript --list-different  \"src/**/*.{ts,tsx}\"",
  "start": "react-scripts start",
  "build": "react-scripts build",
  "test": "react-scripts test",
  "eject": "react-scripts eject"
}
The highlighted lines will already be present in the section.
With the frontend tooling in place and accessible via the easy-to-remember commands, we can now do the same for the infrastructure.