

Project overview and preparation
In this book, we will be building a complex Blazor WebAssembly application for managing a movie collection. Our application will be able to manage movies and their directors, actors, categories, and more.
We do not want to create an application with lots of functionality at the beginning. Instead, we want to create an application that can be easily extended with other functionality, such as trailers, reviews, and so on.
In Chapter 3, Creating a Database Using Entity Framework Core, and Chapter 4, Connecting Client and Server with REST API, we will introduce generic components to communicate between the Blazor application client and server parts. In Chapter 5, Building gRPC Services, we will learn how to replace the integrated REST API with gRPC communication to improve application performance. In the last part of our project, in Chapter 6, Diving Deep into Source Generators, we will be implementing source generators to generate repetitive parts of the code. Let’s begin with a simple application.
Creating a demo Blazor WebAssembly project
Our demo project is based on the default Blazor WebAssembly App template in Visual Studio 2022. This template can be a little bit different, depending on the exact minor version of Visual Studio. After we have used the template to create the project, we will examine its different parts and run the default project to see if everything works as expected. Then, we will modify the existing components and create our components to present list views and details of the MediaLibrary data.
Creating the demo MediaLibrary project
Visual Studio has many predefined templates for different kinds of projects. We are going to use the Blazor WebAssembly App template for this. This template can be configured differently, so we need to set everything properly. Follow these steps:
- Open Visual Studio 2022.
- Click the Create a new project button in the right bottom part of the window.
- Use the All languages filter to select C#. Then, in the All project types filter, select Blazor to find Blazor WebAssembly App.
The following screenshot shows the Blazor WebAssembly App project template in the Visual Studio 2022 template list:

Figure 2.3 – Blazor WebAssembly App project template
- Select the Blazor WebAssembly App template and click the Next button.
- On the Configure your new project screen, set the Project name to
MediaLibrary, specify a Location for the project, and click Next. The Solution name area will be automatically filled with the same project name.
The following screenshot shows the Configure your new project window:
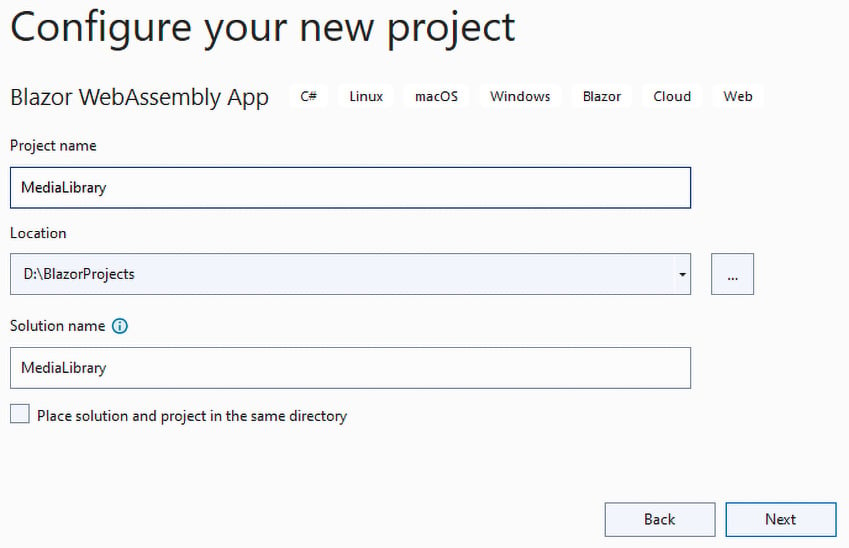
Figure 2.4 – The Configure your new project window
In the preceding screenshot, you can see that we set D:\BlazorProjects as our project’s Location. The location is not important, so you can use whatever location suits you. Click Next.
- In the Additional information window, ensure that Framework is set to .NET 6.0 (Long-term support) and that Authentication type is set to None. Then, check the checkboxes for Configure for HTTPS and ASP.NET Core hosted.
The required state is shown in the following screenshot:

Figure 2.5 – Additional information for setting up the Blazor WebAssembly App template
Running the project
Now, you can run the project to see what the project does. The Demo project from the template contains three pages, where each one shows a different functionality. On the Home page, there are static texts. The Counter page has a Click me button and shows how many times the button was clicked. On the Fetch data page, there is a component showing the weather forecast that was downloaded from the REST API call to the server.
You can run the project using the Debug menu and choosing Start Without Debugging or by using the Ctrl + F5 shortcut. Visual Studio may ask you to install an SSL Certificate to run on HTTPS. Depending on the browser, there may be a warning message about accessing an untrusted website. It is safe to access the site so long as you are on the local host domain.
Examining the project
The advantage of using the Visual Studio Blazor WebAssembly App template is that we don’t start with an empty project and many requirements to run this type of project are preconfigured.
The following figure shows the generated project’s structure:
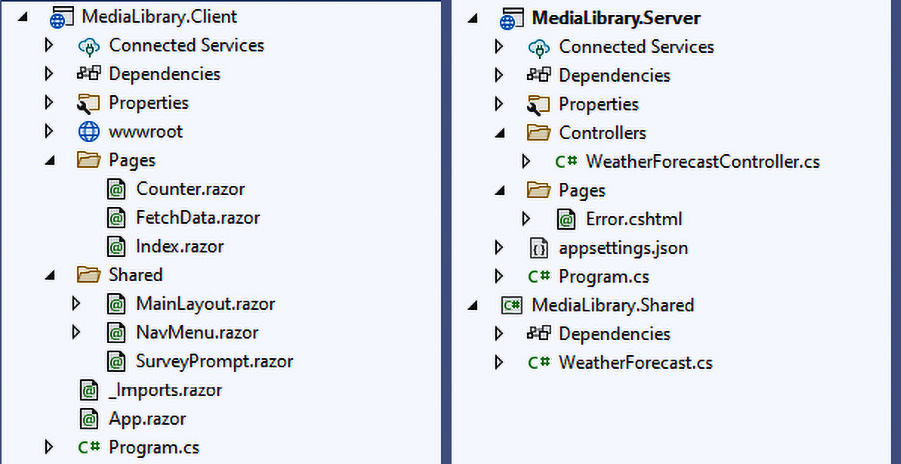
Figure 2.6 – Demo project structure
In the preceding figure, you can see that three projects have been generated in our MediaLibrary solution.
Client project
The client project contains our WebAssembly application. It is constructed from a single .cs file and multiple Razor components and static files, including images, CSS, JavaScript, and so on.
The wwwroot folder
The wwwroot folder is a container for the client application. In our project, you can see that this folder holds custom CSS files, icons, favicon, and an index.html file. This folder can be used for public static resources, such as images and other files, which are not built but are published with the application.
The index.html file is the mounting point of the application. When the browser requests your application, the index.html file is downloaded. This file contains references to additional CSS files, the title of the website, and other meta information. Additional content can be injected into the <head> section of the file from the Razor components.
The <body> section of the file contains two div elements and one script:
<body>
    <div id="app">Loading...</div>
    <div id="blazor-error-ui">
        An unhandled error has occurred.
        <a href="" class="reload">Reload</a>
        <a class="dismiss">🗙</a>
    </div>
    <script src="_framework/blazor.webassembly.js">
      </script>
</body>
The script element has a link to a file provided by the Blazor framework. This JavaScript file contains all the logic needed to run the WebAssembly application in the browser. The file will download the .NET runtime and your application’s assemblies with all their dependencies.
Another highlighted part of the code is the div element, which has an id attribute with a value of app. This is where all the components will be rendered.
A blazor-error-ui element is where unhandled exceptions are shown in case there are any problems on the website.
The Pages folder
The Pages folder contains all Razor components that have the @page directive. These components are discovered as routable components.
Note
The routable components can be discovered even outside the Pages folder but comprise a common way to separate components in the project. The correct component organization will help you navigate through the files in the project.
The Shared folder
The Shared folder contains all the Razor components, which are shared between pages. This folder is a place for all the components that are not routable, regardless of whether you use the component on one page or five. The Shared folder can contain additional folder structure to help organize the components.
This folder is also used to define the layout component. The MainLayout.razor component is defined in our Demo project. The layout component inherits from the LayoutComponentBase class, rather than the ComponentBase class:
@inherits LayoutComponentBase
<div class="page">
    <div class="sidebar">
        <NavMenu />
    </div>
    <main>
        <div class="top-row px-4">
            <a href=https://docs.microsoft.com/aspnet/
              target="_blank">About</a>
        </div>
        <article class="content px-4">
            @Body
        </article>
    </main>
</div>
The layout components contain the @Body directive, which is not used in other components. In the runtime, the @Body directive is replaced with the generated page content.
The _Imports.razor file
This file contains the @using directives for namespaces. The namespaces included in this file are automatically included in all Razor components files. The default content of this file has namespaces for HttpClient, basic Razor components provided by the ASP.NET Core team, the JSInterop library, and the namespace of our Shared folder.
The App.razor file
The App.razor component is the root component of the Blazor WebAssembly application. This component uses the Router component to determine what routable page should be rendered. The default layout component is also defined here. The content of the App.razor component was shown in the Understanding page routing in Blazor section.
The Program.cs file
This file is the entry point for the Blazor WebAssembly application and contains the configuration for the application:
using MediaLibrary.Client;
using Microsoft.AspNetCore.Components.Web;
using Microsoft.AspNetCore.Components.WebAssembly.Hosting;
var builder = WebAssemblyHostBuilder.CreateDefault(args);
builder.RootComponents.Add<App>("#app");
builder.RootComponents.Add<HeadOutlet>("head::after");
builder.Services.AddScoped(sp => new HttpClient {
  BaseAddress = new
   Uri(builder.HostEnvironment.BaseAddress) });
await builder.Build().RunAsync();
Here, you can see the code for creating a new builder for our application. After that, two components are attached. First, the App component is attached to the element with the app ID. After that, the HeadOutlet component is attached inside <head> as a last inner element.
The HeadOutlet component is provided by the Blazor framework and is used to change the title of the page or add additional meta information from the rendered components.
Server project
The server project contains part of the application that is executed on the server. It is a generated API project with support for Razor Pages and has a fallback to the index.html file, which is the mounting point for our client WebAssembly application.
This project is no different from other types of WebApi projects. We will use this part to create our REST API, gRPC services, and more.
Shared project
The shared project is referenced by both the client and server projects in our MediaLibrary solution. This project is used for the code that needs to be shared between these two projects. It is mostly used to specify Data Transfer Objects (DTOs), models, custom types, and enums.
Preparing the demo project
Now, let’s prepare the demo project for our needs. The first thing we have to do is delete all the unnecessary files. So, we need to delete the following files:
-
MediaLibrary.Client:Pages/Counter.razorPages/FetchData.razorShared/SurveyPrompt.razor
MediaLibrary.Server:Controllers/WeatherForecastController.cs
MediaLibrary.Shared:WeatherForecast.cs
Once we’ve deleted the files, we should verify that the project is still correct. We can do this by building the project using the Build menu option and then choosing Build Solution (Ctrl + Shift + B). The project should be built without any errors. The navigation to the Counter and FetchData components defined in Shared/NavMenu.razor component will not work because we’ve deleted the respective pages. We will fix this later when we add new pages. Now, we have a clean Blazor WebAssembly project for the next chapter.
In this section, we introduced the default Blazor WebAssembly App template and explained how to create a demo project using Visual Studio 2022 and this template. Then, we created the demo project and explained the purpose of all the important files. Now, let’s summarize this chapter.