

How to use *ngIf and *ngSwitch together
In certain situations, you might want to use more than one structural directive on the same host—for example, a combination of *ngIf and *ngFor together. In this recipe, you'll learn how to do exactly that.
Getting ready
The project we are going to work with resides in chapter02/start_here/multi-structural-directives, inside the cloned repository:
- Open the project in VS Code.
- Open the terminal, and run
npm installto install the dependencies of the project. - Once done, run
ng serve -o.This should open the app in a new browser tab, and you should see something like this:
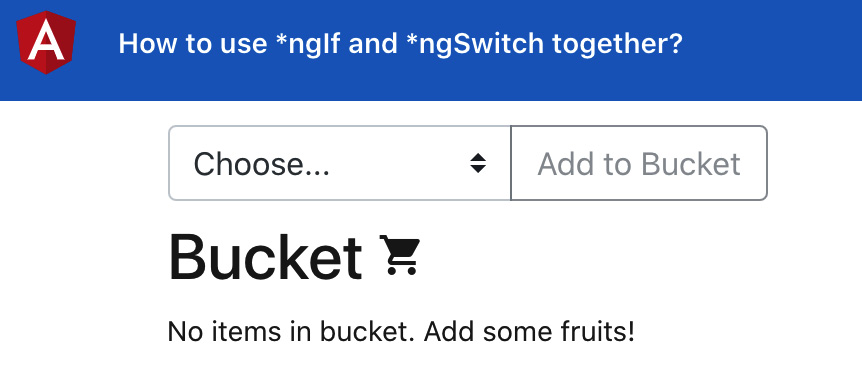
Figure 2.6 – multi-structural-directives app running on http://localhost:4200
Now that we have the app running, let's see the steps for this recipe in the next section.
How to do it…
- We'll start by moving the element with the No items in bucket. Add some fruits! text into its own
<ng-template>element, and we'll give it a template variable called#bucketEmptyMessage. The code should look like this in theapp.component.htmlfile:… <div class="content" role="main"> ... <div class="page-section"> <h2>Bucket <i class="material-icons">shopping_cart </i></h2> <div class="fruits"> <div class="fruits__item" *ngFor="let item of bucket;"> <div class="fruits__item__title">{{item.name}} </div> <div class="fruits__item__delete-icon" (click)="deleteFromBucket(item)"> <div class="material-icons">delete</div> </div> </div> </div> </div> <ng-template #bucketEmptyMessage> <div class="fruits__no-items-msg"> No items in bucket. Add some fruits! </div> </ng-template> </div> - Notice that we moved the entire
divout of the.page-sectiondiv. Now, we'll use thengIf-Elsesyntax to either show a bucket list or an empty bucket message based on the bucket's length. Let's modify the code, as follows:... <div class="content" role="main"> ... <div class="page-section"> <h2>Bucket <i class="material-icons">shopping_cart </i></h2> <div class="fruits"> <div *ngIf="bucket.length > 0; else bucketEmptyMessage" class="fruits__item" *ngFor="let item of bucket;"> <div class="fruits__item__title">{{item.name}} </div> <div class="fruits__item__delete-icon" (click)="deleteFromBucket(item)"> <div class="material-icons">delete</div> </div> </div> </div> </div> ... </div>As soon as you save the preceding code, you'll see the application breaks, mentioning we can't use multiple template bindings on one element. This means we can't use multiple structural directives on one element:

Figure 2.7 – Error on console, showing we can't use multiple directives on one element
- Now, as a final step, let's fix the issue by wrapping the div with
*ngFor="let item of bucket;"inside an<ng-container>element and using the*ngIfdirective on the<ng-container>element, as follows:... <div class="content" role="main"> ... <div class="page-section"> <h2>Bucket <i class="material-icons">shopping_cart </i></h2> <div class="fruits"> <ng-container *ngIf="bucket.length > 0; else bucketEmptyMessage"> <div class="fruits__item" *ngFor="let item of bucket;"> <div class="fruits__item__title">{{item. name}}</div> <div class="fruits__item__delete-icon" (click)="deleteFromBucket(item)"> <div class="material-icons">delete</div> </div> </div> </ng-container> </div> </div> </div>
How it works…
Since we can't use two structural directives on a single element, we can always use another HTML element as a parent to use the other structural directive. However, that adds another element to the DOM and might cause problems for your element hierarchy, based on your implementation. <ng-container>, however, is a magical element from Angular's core that is not added to the DOM. Instead, it just wraps the logic/condition that you apply to it, which makes it really easy for us to just add a *ngIf or *ngSwitchCase directive on top of your existing elements.
See also
- Group sibling elements with
<ng-container>documentation (https://angular.io/guide/structural-directives#group-sibling-elements-with-ng-container)