
SQL CRUD Operations
Let's assume that the editors or the users of our book review application want to make some modifications to the book inventory, such as adding a few books to the database, updating an entry in the database, and so on. SQL provides various ways to perform such CRUD operations. Before we dive into the world of Django models and migrations, let's explore these basic SQL operations first.
For the CRUD operations that follow, you will be running a few SQL queries. To run them, navigate to the Execute SQL tab in DB Browser. You can type in or paste the SQL queries we've listed in the sections that follow in the SQL 1 window. You can spend some time modifying your queries, and understanding them, before you execute them. When you're ready, click the icon that looks like a Play button or press the F5 key to execute the command. The results will show up in the window below the SQL 1 window:
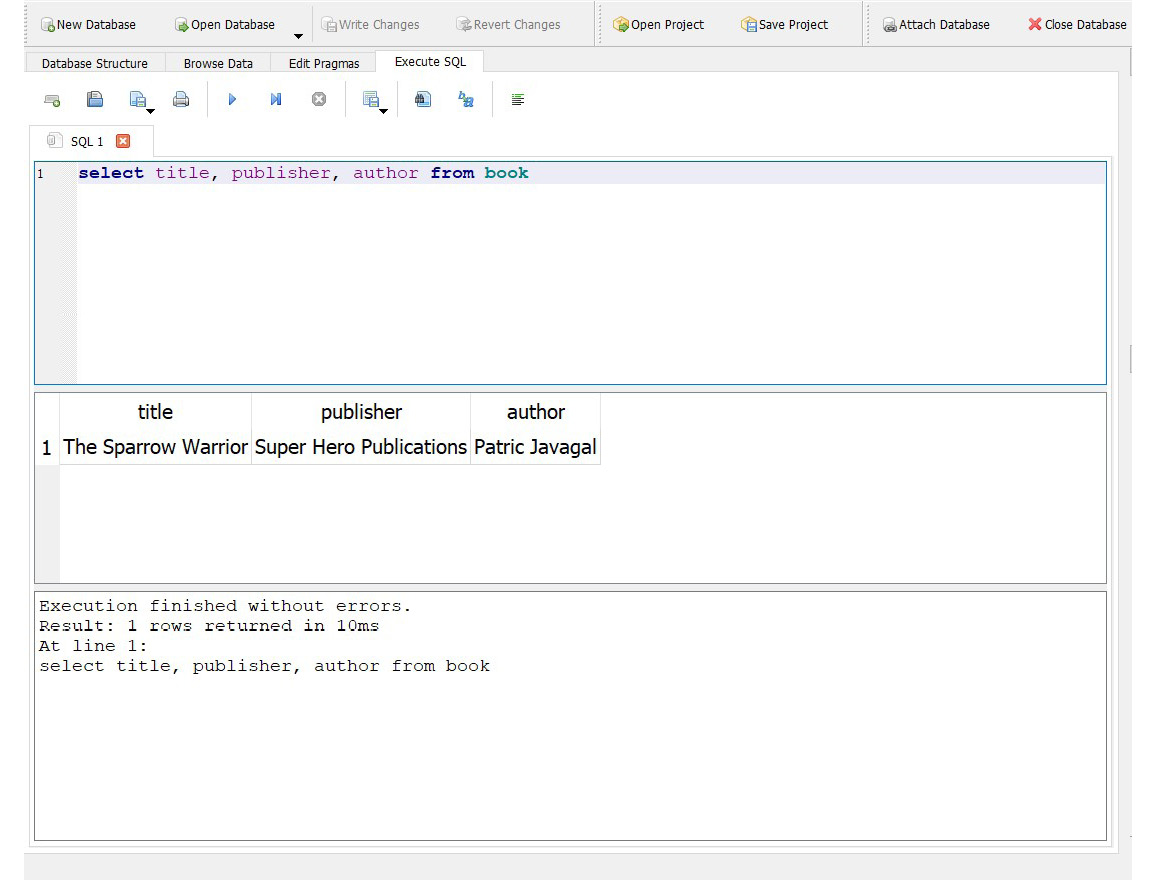
Figure 2.6: Executing SQL queries in DB Browser
SQL Create Operations
The Create operation in SQL is performed using the insert command, which, as the name implies, lets us insert data into the database. Let's go back to our bookr example. Since we have already created the database and the book table, we can now create or insert an entry in the database by executing the following command:
insert into book values ('The Sparrow Warrior', 'Super Hero Publications', 'Patric Javagal');
This inserts into the table named book the values defined in the command. Here, The Sparrow Warrior is the title, Super Hero Publications is the publisher, and Patric Javagal is the author of the book. Note that the order of insertion corresponds with the way we have created our table; that is, the values are inserted into the columns representing title, publisher, and author respectively. Similarly, let's execute two more inserts to populate the book table:
insert into book values ('Ninja Warrior', 'East Hill Publications',   'Edward Smith');
insert into book values ('The European History', 'Northside   Publications', 'Eric Robbins');
The three inserts executed so far will insert three rows into the book table. But how do we verify that? How would we know whether those three entries we inserted were entered into the database correctly? Let's learn how to do that in the next section.
SQL Read Operations
We can read from the database using the select SQL operation. For example, the following SQL select command retrieves the selected entries created in the book table:
select title, publisher, author from book;
You should see the following output:
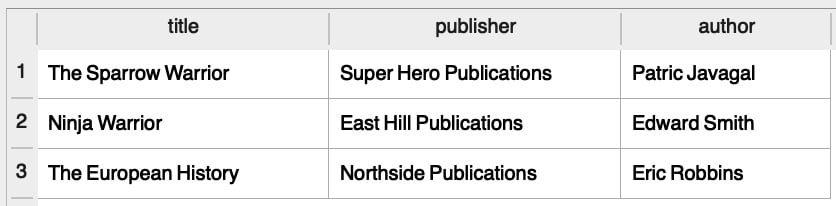
Figure 2.7: Output after using the select command
Here, select is the command that reads from the database, and the fields title, publisher, and author are the columns that we intend to select from the book table. Since these are all the columns the database has, the select statement has returned all the values present in the database. The select statement is also called a SQL query. An alternate way to get all the fields in the database is by using the wildcard * in the select query instead of specifying all the column names explicitly:
select * from book;
This will return the same output as shown in the preceding figure. Now, suppose we want to get the author name for the book titled The Sparrow Warrior; in this case, the select query would be as follows:
select author from book where title="The Sparrow Warrior";
Here, we have added a special SQL keyword called where so that the select query returns only the entries that match the condition. The result of the query, of course, will be Patric Javagal. Now, what if we wanted to change the name of the book's publisher?
SQL Update Operations
In SQL, the way to update a record in the database is by using the update command:
update book set publisher = 'Northside Publications' where title='The Sparrow Warrior';
Here, we are setting the value of publisher to Northside Publications if the value of the title is The Sparrow Warrior. We can then run the select query we ran in the SQL Read Operations section to see how the updated table looks after running the update command:
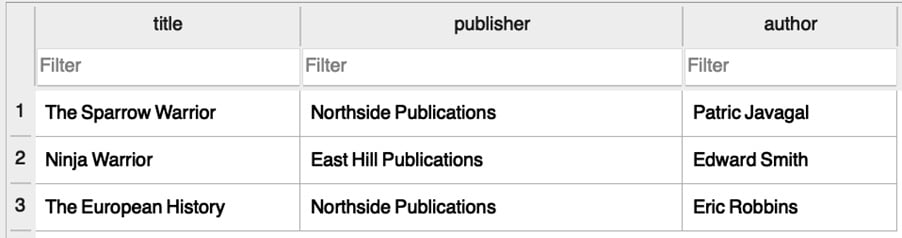
Figure 2.8: Updating the value of publisher for the title The Sparrow Warrior
Next, what if we wanted to delete the title of the record we just updated?
SQL Delete Operations
Here is an example of how to delete a record from the database using the delete command:
delete from book where title='The Sparrow Warrior';
delete is the SQL keyword for delete operations. Here, this operation will be performed only if the title is The Sparrow Warrior. Here is how the book table will look after the delete operation:

Figure 2.9: Output after performing the delete operation
These are the basic operations of SQL. We will not go very deep into all the SQL commands and syntax, but feel free to explore more about database base operations using SQL.
Note
For further reading, you can start by exploring some advanced SQL select operations with join statements, which are used to query data across multiple tables. For a detailed course on SQL, you can refer to The SQL Workshop (https://www.packtpub.com/product/the-sql-workshop/9781838642358).
Django ORM
Web applications constantly interact with databases, and one of the ways to do so is using SQL. If you decide to write a web application without a web framework like Django and instead use Python alone, Python libraries such as psycopg2 could be used to interact directly with the databases using SQL commands. But while developing a web application with multiple tables and fields, SQL commands can easily become overly complex and thus difficult to maintain. For this reason, popular web frameworks such as Django provide a level of abstraction using which we can easily work with databases. The part of Django that helps us do this is called ORM, which stands for Object Relational Mapping.
Django ORM converts object-oriented Python code into actual database constructs such as database tables with data type definitions and facilitates all the database operations via simple Python code. Because of this, we do not have to deal with SQL commands while performing database operations. This helps in faster application development and ease in maintaining the application source code.
Django supports relational databases such as SQLite, PostgreSQL, Oracle Database, and MySQL. Django's database abstraction layer ensures that the same Python/Django source code can be used across any of the above relational databases with very little modification to the project settings. Since SQLite is part of the Python libraries and Django is configured by default to SQLite, for the scope of this chapter, we shall use SQLite while we learn about Django models and migrations.
Database Configuration and Creating Django Applications
As we have already seen in Chapter 1, Introduction to Django, when we create a Django project and run the Django server, the default database configuration is of SQLite3. The database configuration will be present in the project directory, in the settings.py file.
Note
Make sure you go through the settings.py file for the bookr app. Going through the entire file once will help you understand the concepts that follow. You can find the file at this link: http://packt.live/2KEdaUM.
So, for our example project, the database configuration will be present at the following location: bookr/settings.py. The default database configuration present in this file, when a Django project is created, is as follows:
DATABASES = {\
             'default': {\
                         'ENGINE': 'django.db.backends.sqlite3',\
                         'NAME': os.path.join\
                                 (BASE_DIR, 'db.sqlite3'),}}
Note
The preceding code snippet uses a backslash ( \ ) to split the logic across multiple lines. When the code is executed, Python will ignore the backslash, and treat the code on the next line as a direct continuation of the current line.
The DATABASES variable is assigned with a dictionary containing the database details for the project. Inside the dictionary, there is a nested dictionary with a key as default. This holds the configuration of a default database for the Django project. The reason we have a nested dictionary with default as a key is that a Django project could potentially interact with multiple databases, and the default database is the one used by Django for all operations unless explicitly specified. The ENGINE key represents which database engine is being used; in this case, it is sqlite3.
The NAME key defines the name of the database, which can have any value. But for SQLite3, since the database is created as a file, NAME can have the full path of the directory where the file needs to be created. The full path of the db file is processed by joining (or concatenating) the previously defined path in BASE_DIR with db.sqlite3. Note that BASE_DIR is the project directory as already defined in the settings.py file.
If you are using other databases, such as PostgreSQL, MySQL, and so on, changes will have to be made in the preceding database settings as shown here:
DATABASES = {\
             'default': {\
                         'ENGINE': 'django.db\
                                    .backends.postgresql',\
                         'NAME': 'bookr',\
                         'USER': <username>,\
                         'PASSWORD': <password>,\
                         'HOST': <host-IP-address>,\
                         'PORT': '5432',}}
Here, changes have been made to ENGINE to use PostgreSQL. The host IP address and port number of the server need to be provided for HOST and PORT respectively. As the names suggest, USER is the database username and PASSWORD is the database password. In addition to changes in the configuration, we will have to install the database drivers or bindings along with the database host and credentials. This will be covered in detail in later chapters, but for now, since we are using SQLite3, the default configuration will be sufficient. Note that the above is just an example to show the changes you'll need to make to use a different database such as PostgreSQL, but since we are using SQLite, we shall use the database configuration that exists already, and there is no need to make any modifications to the database settings.
Django Apps
A Django project can have multiple apps that often act as discrete entities. That's why, whenever required, an app can be plugged into a different Django project as well. For example, if we are developing an e-commerce web application, the web application can have multiple apps, such as a chatbot for customer support or a payment gateway to accept payments as users purchase goods from the application. These apps, if needed, can also be plugged into or reused in a different project.
Django comes with the following apps enabled by default. The following is a snippet from a project's settings.py file:
INSTALLED_APPS = ['django.contrib.admin',\
                  'django.contrib.auth',\
                  'django.contrib.contenttypes',\
                  'django.contrib.sessions',\
                  'django.contrib.messages',\
                  'django.contrib.staticfiles',]
These are a set of installed or default apps used for the admin site, authentication, content types, sessions, messaging, and an application to collect and manage static files. In the upcoming chapters, we shall study this in-depth. For the scope of this chapter, though, we shall understand why Django migration is needed for these installed apps.
Django Migration
As we have learned before, Django's ORM helps make database operations simpler. A major part of the operation is to transform the Python code into database structures such as database fields with stated data types and tables. In other words, the transformation of Python code into database structures is known as migration. Instead of creating dozens of tables by running SQL queries, you would write models for them in Python, something you'll learn to do in an upcoming section titled Creating Models and Migrations. These models will have fields, which form the blueprints of database tables. The fields, in turn, will have different field types giving us more information about the type of data stored there (recall how we specified the data type of our field as TEXT in step 4 of Exercise 2.01, Creating a Book Database).
Since we have a Django project set up, let's perform our first migration. Although we have not added any code yet to our project, we can migrate the applications listed in INSTALLED_APPS. This is necessary because Django's installed apps need to store the relevant data in the database for their operations, and migration will create the required database tables to store the data in the database. The following command should be entered in the terminal or shell to do this:
python manage.py migrate
Note
For macOS, you can use python3 instead of python in the preceding command.
Here, manage.py is a script that was automatically created when the project was created. It is used for carrying out managerial or administrative tasks. By executing this command, we create all the database structures required by the installed apps.
As we are using DB Browser for SQLite to browse the database, let's take a look at the database for which changes have been made after executing the migrate command.
The database file will have been created in the project directory under the name db.sqlite3. Open DB Browser, click Open Database, navigate until you find the db.sqlite3 file, and open it. You should see a set of newly created tables created by the Django migration. It will look as follows in DB Browser:
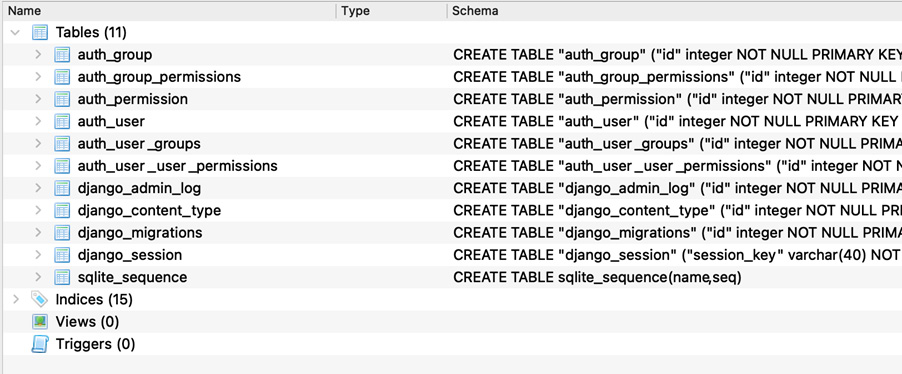
Figure 2.10: Contents of the db.sqlite3 file
Now, if we browse through the newly created database structure by clicking the database tables, we see the following:
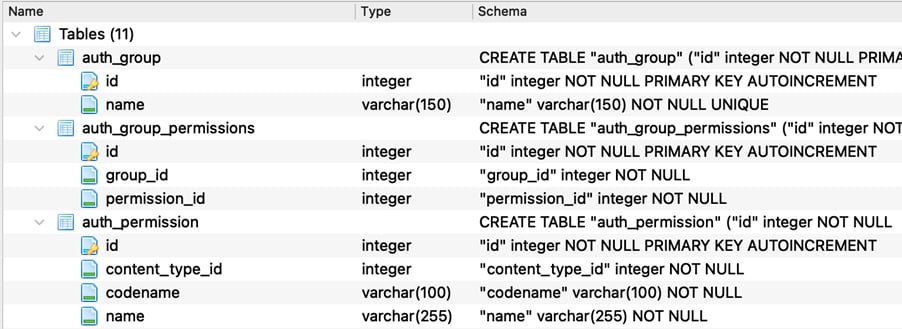
Figure 2.11: Browsing through the newly created database structure
Notice that the database tables created have different fields, each with their respective data types. Click the Browse data tab in DB Browser and select a table from the dropdown. For instance, after clicking the auth_group_permissions table, you should see something like this:

Figure 2.12: Viewing the auth_group_permissions table
You will see that there is no data available for these tables yet because Django migration only creates the database structure or the blueprint, and the actual data in the database is stored during the operation of the application. Now since we have migrated the built-in or default Django apps, let's try to create an app and perform a Django migration.
Creating Django Models and Migrations
A Django model is essentially a Python class that holds the blueprint for creating a table in a database. The models.py file can have many such models, and each model transforms into a database table. The attributes of the class form the fields and relationships of the database table as per the model definitions.
For our reviews application, we need to create the following models and their database tables consequently:
- Book: This should store information about books.
- Contributor: This should store information about the person(s) who contributed to writing the book, such as author, co-author, or editor.
- Publisher: As the name implies, this refers to the book publisher.
- Review: This should store all the books' reviews written by the users of the application.
Every book in our application will need to have a publisher, so let's create Publisher as our first model. Enter the following code in reviews/models.py:
from django.db import models
class Publisher(models.Model):
    """A company that publishes books."""
    name = models.CharField\
           (max_length=50, \
            help_text="The name of the Publisher.")
    website = models.URLField\
              (help_text="The Publisher's website.")
    email = models.EmailField\
            (help_text="The Publisher's email address.")
Note
You can take a look at the complete models.py file for the bookr app by clicking the following link: http://packt.live/3hmFQxn.
The first line of code imports the Django's models module. While this line will be autogenerated at the time of the creation of the Django app, do make sure you add it if it is not present. Following the import, the rest of the code is defining a class named Publisher, which will be a subclass of Django's models.Model. Furthermore, this class will have attributes or fields such as name, website, and email.
Field Types
As we can see, each of these fields is defined to have the following types:
CharField: This field type is used to store shorter string fields, for example, Packt Publishing. For very large strings, we useTextField.EmailField: This is similar toCharField, but validates whether the string represents a valid email address, for example, [email protected].URLField: This is again similar toCharField, but validates whether the string represents a valid URL, for example, https://www.packtpub.com.
Field Options
Django provides a way to define field options to a model's field. These field options are used to set a value or a constraint, and so on. For example, we can set a default value for a field using default=<value>, to ensure that every time a record is created in the database for the field, it is set to a default value specified by us. Following are the two field options that we have used while defining the Publisher model:
help_text: This is a field option that helps us add descriptive text for a field that gets automatically included for Django forms.max_length: This option is provided toCharFieldwhere it defines the maximum length of the field in terms of the number of characters.
Django has many more field types and field options that can be explored from the extensive official Django documentation. As we go about developing our sample book review application, we shall learn about those types and fields that are used for the project. Now let's migrate the Django models into the database. Execute the following command in the shell or terminal to do that (run it from the folder where your manage.py file is stored):
python manage.py makemigrations reviews
The output of the command looks like this:
Migrations for 'reviews':
  reviews/migrations/0001_initial.py
    - Create model Publisher
The makemigrations <appname> command creates the migration scripts for the given app; in this case, for the reviews app. Notice that after running makemigrations, there is a new file created under the migrations folder:

Figure 2.13: New file under the migrations folder
This is the migration script created by Django. When we run makemigrations without the app name, the migration scripts will be created for all the apps in the project. Next, let's list the project migration status. Remember that earlier, we applied migrations to Django's installed apps and now we have created a new app, reviews. The following command, when run in the shell or terminal, will show the status of model migrations throughout the project (run it from the folder where your manage.py file is stored):
python manage.py showmigrations
The output for the preceding command is as follows:
admin
 [X] 0001_initial
 [X] 0002_logentry_remove_auto_add
 [X] 0003_logentry_add_action_flag_choices
auth
 [X] 0001_initial
 [X] 0002_alter_permission_name_max_length
 [X] 0003_alter_user_email_max_length
 [X] 0004_alter_user_username_opts
 [X] 0005_alter_user_last_login_null
 [X] 0006_require_contenttypes_0002
 [X] 0007_alter_validators_add_error_messages
 [X] 0008_alter_user_username_max_length
 [X] 0009_alter_user_last_name_max_length
 [X] 0010_alter_group_name_max_length
 [X] 0011_update_proxy_permissions
contenttypes
 [X] 0001_initial
 [X] 0002_remove_content_type_name
reviews
 [ ] 0001_initial
sessions
 [X] 0001_initial
Here, the [X] mark indicates that the migrations have been applied. Notice the difference that all the other apps' migrations have applied except that of reviews. The showmigrations command can be executed to understand the migration status, but this is not a mandatory step while performing model migrations.
Next, let's understand how Django transforms a model into an actual database table. This can be understood by running the sqlmigrate command:
python manage.py sqlmigrate reviews 0001_initial
We should see the following output:
BEGIN;
--
-- Create model Publisher
--
CREATE TABLE "reviews_publisher" ("id" integer \
    NOT NULL PRIMARY KEY AUTOINCREMENT, "name" \
    varchar(50) NOT NULL, "website" varchar(200) \
    NOT NULL, "email" varchar(254) NOT NULL);
COMMIT;
The preceding snippet shows the SQL command equivalent used when Django migrates the database. In this case, we are creating the reviews_publisher table with the fields name, website, and email with the defined field types. Furthermore, all these fields are defined to be NOT NULL, implying that the entries for these fields cannot be null and should have some value. The sqlmigrate command is not a mandatory step while doing the model migrations.
Primary Keys
Let's assume that a database table called users, as its name suggests, stores information about users. Let's say it has more than 1,000 records and there are at least 3 users with the same name, Joe Burns. How do we uniquely identify these users from the application? The solution is to have a way to uniquely identify each record in the database. This is done using Primary Keys. A primary key is unique for a database table, and as a rule, a table cannot have two rows with the same primary key. In Django, when the primary key is not explicitly mentioned in the database models, Django automatically creates id as the primary key (of type integer), which auto increments as new records are created.
In the previous section, notice the output of the python manage.py sqlmigrate command. While creating the Publisher table, the SQL CREATE TABLE command was adding one more field called id to the table. id is defined to be PRIMARY KEY AUTOINCREMENT. In relational databases, a primary key is used to uniquely identify an entry in the database. For example, the book table has id as the primary key, which has numbers starting from 1. This value increments by 1 as new records are created. The integer value of id is always unique across the book table. Since the migration script has already been created by executing makemigrations, let's now migrate the newly created model in the reviews app by executing the following command:
python manage.py migrate reviews
You should get the following output:
Operations to perform:
    Apply all migrations: reviews
Running migrations:
    Applying reviews.0001_initial... OK
This operation creates the database table for the reviews app. The following is a snippet from DB Browser indicating the new table reviews_publisher has been created in the database:

Figure 2.14: reviews_publisher table created after executing the migration command
So far, we have explored how to create a model and migrate it into the database. Let's now work on creating the rest of the models for our book review application. As we've already seen, the application will have the following database tables:
Book: This is the database table that holds the information about the book itself. We have already created aBookmodel and have migrated this to the database.Publisher: This table holds information about the book publisher.Contributor: This table holds information about the contributor, that is, the author, co-author, or editor.Review: This table holds information about the review comments posted by the reviewers.
Let's add the Book and Contributor models, as shown in the following code snippet, into reviews/models.py:
class Book(models.Model):
    """A published book."""
    title = models.CharField\
            (max_length=70, \
             help_text="The title of the book.")
    publication_date = models.DateField\
                       (verbose_name=\
                        "Date the book was published.")
    isbn = models.CharField\
           (max_length=20, \
            verbose_name="ISBN number of the book.")
class Contributor(models.Model):
"""
A contributor to a Book, e.g. author, editor, \
co-author.
"""
  first_names = models.CharField\
                (max_length=50, \
                 help_text=\
                 "The contributor's first name or names.")
    last_names = models.CharField\
                 (max_length=50, \
                  help_text=\
                  "The contributor's last name or names.")
    email = models.EmailField\
            (help_text="The contact email for the contributor.")
The code is self-explanatory. The Book model has the fields title, publication_date, and isbn. The Contributor model has the fields first_names and last_names fields and the email ID of the contributor. There are some newly added models as well, apart from the ones we have seen in the Publisher model. They have DateField as a new field type, which, as the name suggests, is used to store a date. A new field option called verbose_name is also used. It provides a descriptive name for the field.