

Plone 3 runs only on the old Python 2.4 version. Unfortunately, almost no modern Linux distribution (or distro) ships with or supports that version. To fill this gap, we can use a special buildout to install an isolated Python environment called virtualenv.
Even for the most modern Plone 4, which runs on Python 2.6, this method can also be applied, as we did find problems with Python 2.6, shipped with Fedora 11 and 12.
Note
The idea of using virtualenv is to have a Python installation independent from the operating system's: no matter which version of Python is native in the OS, your Plone site will still work, as it will be never modified again unless you do it explicitly.
This first buildout, not the one that we’ll use to install Plone, is a good place to start to understand its parts and the way it works.
To set up virtualenv, we need any version of Python installed first. So just run your own distro package manager to get it, if it is not installed yet.
Note
The following example installs Python 2.4.6 (the latest 2.4.x available at the time of writing) as a virtualenv. By changing the version number, you can apply the same method to create a Python 2.6 virtualenv. You can also get a copy of these two procedures in the source code that accompanies this book.
In the following procedure, we will compile and make Python, so we will need various packages installed in our system first. For Debian or Ubuntu, run this as root to get all the required dependencies:
# aptitude install gcc g++ libbz2-dev zlib1g-dev libreadline5-dev libssl-dev
In Fedora, run this command instead:
# yum install python-devel gcc gcc-c++ bzip2-devel gzip-devel zlib-devel readline-devel openssl-devel
Create a base folder for your Python 2.4 installation. We prefer ~/libexec/python2.4.
$ mkdir -p ~/libexec/python2.4
$ cd ~/libexec/python2.4
Then get the bootstrap Python script. This script installs the zc.buildout package inside the same buildout environment so that we won’t need any other external command.
$ wget http://svn.zope.org/*checkout*/zc.buildout/trunk/bootstrap/bootstrap.py
Enter the following buildout.cfg file to create virtualenv:
[buildout]parts = python virtualenv make-virtualenv# Add additional egg download sources here.# dist.plone.org contains archives# of Plone packages.find-links =http://dist.plone.orghttp://download.zope.org/ppix/http://download.zope.org/distribution/http://effbot.org/downloads[python]recipe = zc.recipe.cmmiurl = http://www.python.org/ftp/python/2.4.6/Python-2.4.6.tgzexecutable = ${buildout:directory}/parts/python/bin/python2.4extra_options=--enable-unicode=ucs4--with-threads--with-readline--enable-ipv6[virtualenv]recipe = zc.recipe.eggeggs =virtualenv[make-virtualenv]recipe = iw.recipe.cmdon_install=truecmds = ${python:location}/bin/python${buildout:directory}/bin/virtualenv --clear .
The above buildout configuration file has three parts, which have their own recipe parameter. Let’s go through each of them:
The
[python]part uses thezc.recipe.cmmirecipe, which downloads Python source code and compiles it. Thecmmisuffix stands for Compile Make and Make Install.The
[virtualenv]part uses thezc.recipe.eggrecipe, which installs the virtualenv Python egg and creates the executablebin/virtualenvfile.The
[make-virtualenv]part uses theiw.recipe.cmdrecipe, which can execute arbitrary shell commands. In this case, it runs the installation of a virtualenv to create an isolated Python 2.4 environment in your system.
As you must have noticed, there are other lines of code besides the part definitions and their recipes. These lines are parameters required by every recipe, like url for the zc.recipe.cmmi recipe or cmds for iw.recipe.cmd.
Note
Note that you can reference to variables defined in the buildout by writing ${part:parameter} as used in the last line: ${buildout:directory}.
You can correctly guess that there are many different recipes, each with their special parameter configuration and variables. For instance, there are recipes to install Varnish (a proxy cache server) and MySQL.
Note
For a list of available recipes, you can visit http://pypi.python.org/pypi?:action=browse&show=all&c=512.
So far we have just created a configuration file to create a Python 2.4 environment, but we haven’t got it yet. So let’s move on.
Run the bootstrap process:
$ python bootstrap.pyYou should get an output like this:
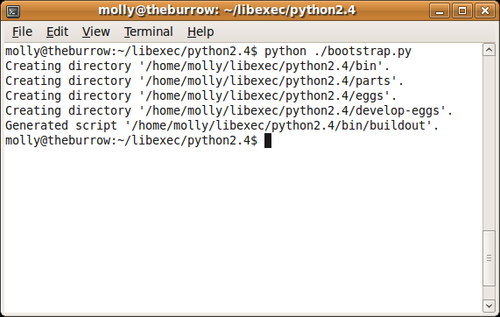
Start the
buildoutprocess with this command:$ ./bin/buildoutCongratulations! You have successfully installed a clean Python 2.4 environment on your computer.

Now you have two different choices in how to use it:
Specifying its path:
~/libexec/python2.4/bin/python <script>or by activating it to include it in your
PATHenvironment variable:source ~/libexec/python2.4/bin/activateYou’ll notice that this will change your prompt, as shown in the following screenshot:
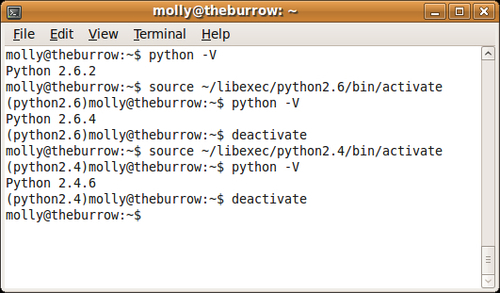
Once activated, you can return to your original Python version by running:
(python2.4) $ deactivate
By
running the bootstrap process in Step 1, we download the zc.buildout package. This creates the required directory structure and generates an executable buildout file, which will read and process buildout.cfg.
In Step 2, the buildout process downloads the Python 2.4 source code, compiles it, and then it creates the virtualenv.