
You may think of the Views UI as a series of questions. Here are some sample questions to consider:
What do I want to name this view?
What do I want to display?
Who should be able to view this content?
In what format should the content appear?
Do I want the content to appear in a page, or in a block (or both)?
How many items to display?
Is there any particular order (By date? Alphabetically?)
We will first need to create the content for our view.
Go to Administer | Content management | Content Types. Select Add content type (
http://YOURSITE.com/admin/content/types/add).If you have the Content Construction Kit (CCK) module installed, you will see more than two tab options, but as seen in the following screenshot, we simply have the Drupal 5 core, plus the Views modules that we have installed.

Keep the Submission form fieldset at default settings.
In the Workflow fieldset, uncheck Promoted to front page and set the Default comment setting to Disabled.

Save your new content type. You will see a list of your Content types, and a message that your new content type has been added.

Go to Create Content | Swim Group, and add at least three content items (
http://YOURSITE.com/node/add/swim-group).
Go to Administer | Site Building | Views (
http://YOURSITE.com/admin/build/views), and select Add.
In the Basic Information fieldset, enter the following:
Name: swim_group
Description: List of swim groups

Sections of the main Views UI form are contained in HTML fieldsets. Click on Page to open that fieldset if it is not already expanded. Note that when a fieldset is closed, a triangle icon points to the fieldset name (as seen in the following image); when the fieldset is expanded, the triangle icon points down. This is a subtle clue (available in most themes) to help you navigate the page.

Enter the following values in their respective fields:
 Provide Page View
URL: swim-groups
View Type: Full Nodes
Title: Swim Groups
- Use Pager
Nodes per Page : 20

In this section, we are essentially creating a new URL on the site, and displaying full content items (nodes). We are specifying that up to 20 items will be displayed on the page, and if we have more, we will have the option to see additional items on subsequent pages.
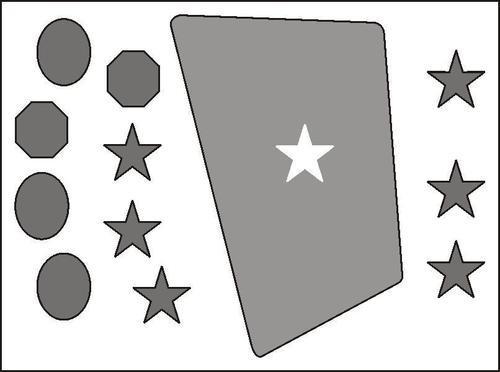
The following figure offers a visual representation of Views filtering. We see the multiple content types available on the site symbolized on the left (for instance, Page, Story, Swim Group). The filter allows only one content type to be displayed. In our case, we just want the Swim Group.
Open the Filters fieldset. If you printed the Views UI Help, as suggested in Recipe 2, now is a good time to review the Filters options. There are many filter options available. We will select just two from the Add Filter drop-down list, Node: Type, and Node: Published. These are by far the two most commonly used filters. Select Node: Type from the drop-down, and click on Add Filter.

The filter is added "above" the drop-down list.
Select the Value as Swim Group and leave the Is One Of option of Operator, as shown in the following screenshot:

Return to the Add Filter dropdown, and add the Node: Published filter. (As you add filters in Views, you may find that the interface hops back to the top of the page. If this happens, dutifully scroll back down to the Filters fieldset.) By default, when you add this filter, Node: Published Equals Yes. Leave the default as-is.
Note
If this filter is not added, the view will display items that are marked unpublished. This is an easy filter to forget, but it is recommended.

-
You will now see a variety of Ops buttons. Note the Delete
 button. With a little imagination, you can see it looks like a trash can. Also, if you move the mouse over the button, the popup text, Delete this item appears. The delete button does not delete content from the site, it simply removes the filter. For instance, if you delete the Node: Published filter, the view would contain both published and unpublished content. The up and down buttons will prove most useful in the Sort and Field fieldsets, which we cover in Chapter 2. In Chapter 4, we will also cover exposed filters.
Click on Save. When you first create a view, you are brought back to the "Views" List page. If you Edit your view from the view itself, you will be brought back to the view itself after editing it. Notice that the full URL of your view is
http://YOURSITE.com/swim-groups. The message, View successfully saved, appears only the first time you view this. As an administrator, you will also see the Edit, Clone, and Export tabs. Those tabs are not displayed to site users who do not have Views administrative rights.
It is worth highlighting some subtle distinctions in naming conventions.
Name: This is the unique identifier for a view. Hyphens are not allowed: use an underscore to separate multiple words.
Compare the Name fields for adding content and adding a view. When creating a content type in Drupal 5 (Step 2, above), the first item on the page is the human-readable Name, while the machine-readable type appears second. The Views interface (Step 8) breaks this convention; the first item on the page is the machine-readable Name.
Example:
Machine-readable: swim_groups
Human-readable: Swim Groups
It is not a big problem if you misname a view (by including spaces, for instance). All of your careful settings will remain intact, and Drupal will simply issue the message: View name must be alphanumeric or underscores only, when you attempt to save your view. Edit the Name, and scroll back down to the bottom of the page to Save the Views form again. You are not required to use lower case in your Views Name, but it is a common and oft-preferred practice.
It is acceptable for a machine-readable view name to be the same as the machine-readable content type. More typically, however, the content type will be singular, and the Views name plural. In our case, the content type is swim_group, and the view name is swim_groups.
URL: If you would like to use more than one word in a URL, use hyphens to separate them. This enables Google (and possibly to other search engines as well) to index them as separate words. Many developers use underscores, but hyphens have the edge when it comes to search engine optimization.
Example:
View Name: swim_groups
View URL: swim-groups
You may include slashes in the URL field. For instance: groups/swim.
Title: The title displays at the top of each page in the view. You may use some HTML markup such as
<em>,<i>, and<b>to highlight phrases in the title. You may use a line break in a title<br />. You may also use HTML entities, such as→A helpful list of entity codes can be found at: http://www.w3schools.com/tags/ref_entities.asp. For the most part, however, formatting of the full title is handled in your theme (thus, you will not specify fonts or other styles on the Views page).Examples:
<em>Swim</em> Groups

Swim Groups: <br />Tadpoles, and Guppies, and Wrigglers, Oh My!

Voilà: Learn to swim at any age

Compare Views Titles with Node Titles. HTML markup is allowed in View Titles, but not in Node Titles.