Book Image

CMS Made Simple 1.6: Beginner's Guide

Book Image

CMS Made Simple 1.6: Beginner's Guide

Overview of this book

CMS Made Simple is a an open source content management system that allows rapid website development in a fraction of the normal time, avoiding hours of coding by providing modules and 3rd Party add-ons. With this book in hand you will be able to harness the power of this modular and extendable content management system at your fingertips.This guide for CMS Made Simple is based on practical and working solutions allowing you to understand how this powerful and simple application can support you in your daily work. The workshop helps you create engaging, effective, and easy-to-use CMS websites for businesses, clubs, or organizations.This is a step- by-step case study, aimed at helping you build a complete professional website with CMS Made Simple. You can take a ready-to-use template or implement your own custom design, enrich the website with features like a photo gallery, an e-commerce solution with PayPal checkout, and forms of any complexity or popular JQuery effects and finish it off by optimizing it for search engines. The useful HTML and CSS code snippets are optimized and can be easily adapted for your own projects. Chapter by chapter you will put yourself in the role of web designer, developer, administrator, and business manager, thus learning every aspect needed for building rich websites that are very simple to manage.
Table of Contents (17 chapters)
CMS Made Simple 1.6
Credits
About the Author
About the Reviewers
Preface

Time for action - adding custom fields


  1. 1. In the admin field, open Content | News and select the tab Field Definitions.

  2. 2. Click Add Field Definition and enter the fields, as shown in the following screenshot:
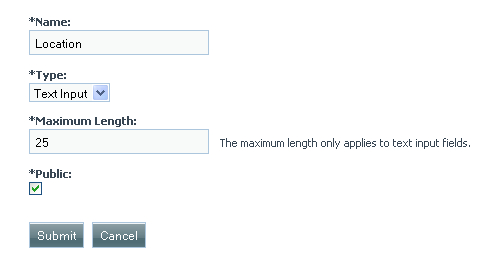
  3. 3. Click on Submit.

  4. 4. Open the last article item you have added, for example, Marketing Manager (Content | News), and you will find the new field Location at the bottom of the page.

  5. 5. Enter Washington in the field Location, and click Submit.

  6. 6. Open your page and you can find the location added below the news article. (Attention: This works only with Sample templates or templates based on default templates!). It should look similar to the following screenshot:

What just happened?

You have added a new custom field to the news articles. As the field is marked as Public, it will be displayed on the website. The field is automatically added to the news editing window. If you like to change the position of the field, you should edit the template. In the default template Sample, all additional...