Book Image

CMS Made Simple 1.6: Beginner's Guide

Book Image

CMS Made Simple 1.6: Beginner's Guide

Overview of this book

CMS Made Simple is a an open source content management system that allows rapid website development in a fraction of the normal time, avoiding hours of coding by providing modules and 3rd Party add-ons. With this book in hand you will be able to harness the power of this modular and extendable content management system at your fingertips.This guide for CMS Made Simple is based on practical and working solutions allowing you to understand how this powerful and simple application can support you in your daily work. The workshop helps you create engaging, effective, and easy-to-use CMS websites for businesses, clubs, or organizations.This is a step- by-step case study, aimed at helping you build a complete professional website with CMS Made Simple. You can take a ready-to-use template or implement your own custom design, enrich the website with features like a photo gallery, an e-commerce solution with PayPal checkout, and forms of any complexity or popular JQuery effects and finish it off by optimizing it for search engines. The useful HTML and CSS code snippets are optimized and can be easily adapted for your own projects. Chapter by chapter you will put yourself in the role of web designer, developer, administrator, and business manager, thus learning every aspect needed for building rich websites that are very simple to manage.
Table of Contents (17 chapters)
CMS Made Simple 1.6
Credits
About the Author
About the Reviewers
Preface

Time for action - creating test accounts


Before you use this environment, you have to register a developer account on http://developer.paypal.com and create two test accounts.

  1. 1. Open http://developer.paypal.com in your browser and click on Sign Up Now.

  2. 2. Fill in the fields and click Agree and Submit.

  3. 3. Log in to your developer account with your e-mail and password.

  4. 4. Click on Create a preconfigured buyer or seller account.

  5. 5. Select Buyer (Use to represent your customer's experience) and fill in the field with any test data. Click Create Account.

  6. 6. Create another account, but this time choose Seller (Use to represent yourself as the merchant) as the Account type.

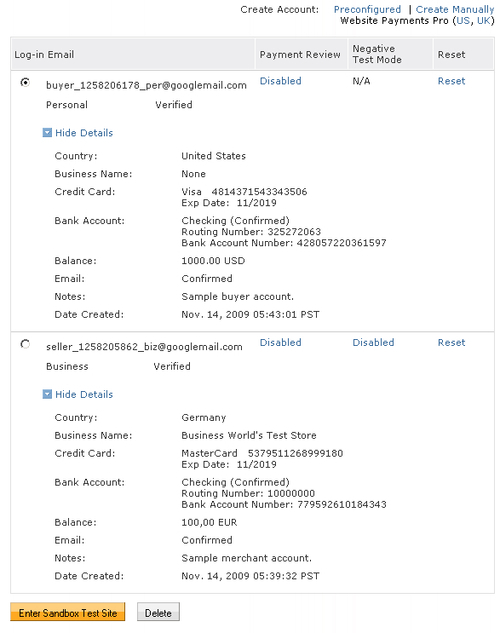
  7. 7. After both accounts are created, click on Test accounts on the left hand side. You should see an overview of the test accounts as shown in the following screenshot:

What just happened?

You have created two test accounts, one for the buyer and one for the seller. The easiest way to create such accounts is to choose the preconfigured...