

With fields, we can customize our content types to our pleasing, by adding select box dropdowns, file attachments, images, radio buttons, and more. Every content type may have different fields, and once a field has been created it can be used for other content types which greatly ease management of fields, for both the user as well as Drupal's inner working.
Note
We can attach fields to any entity, whether it's a node content type like an Article, or the user entity. As we mentioned before, the grouping of an entity type and its fields create a bundle.
Community powered module, CCK, has really helped revolutionize content types by providing flexible field types, field widgets, validation, and more, in the hands of site builders. This great effort did not go unnoticed from Drupal's core developers and it has been introduced in Drupal 7 as part of its core and the fieldable entity concept.
If you are coming with prior Drupal experience, specifically versions prior to Drupal 7, then you are most probably aware that the need for content types to support additional custom fields is essential. It makes a perfect example for the open source development model of scratching the itch where the contributed set of CCK modules, which introduced the ability to create fields and attach them to Drupal's content types, had found itself being a core component in many Drupal installations, and has long been a great tool in a site builder's arsenal.
Note
Scratching the itch is the #1 guideline of The Cathedral and the Bazaar (http://en.wikipedia.org/wiki/The_Cathedral_and_the_Bazaar) essay, in regards to the development models and methods in open source. This guideline relates to a scenario, where due to a rising need for something that is missing in a piece of software (like a feature, or maybe a bug in the system) a solution is produced in many forms by the community. Whether a developer decides to start his own project to address that requirement, or perhaps contributes a patch to add this requirement, this new functionality was introduced to an "itch" that the said developer had and wanted to fix it.
Let's add some fields to our memo content type.
Using the top administrative bar, navigate to Structure | Content types (/admin/structure/types).
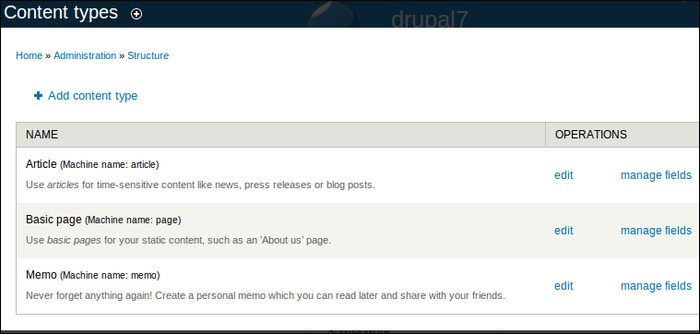
Out of the possible operations we are interested in, is the manage fields option, so we'll click on that for the Memo content type.
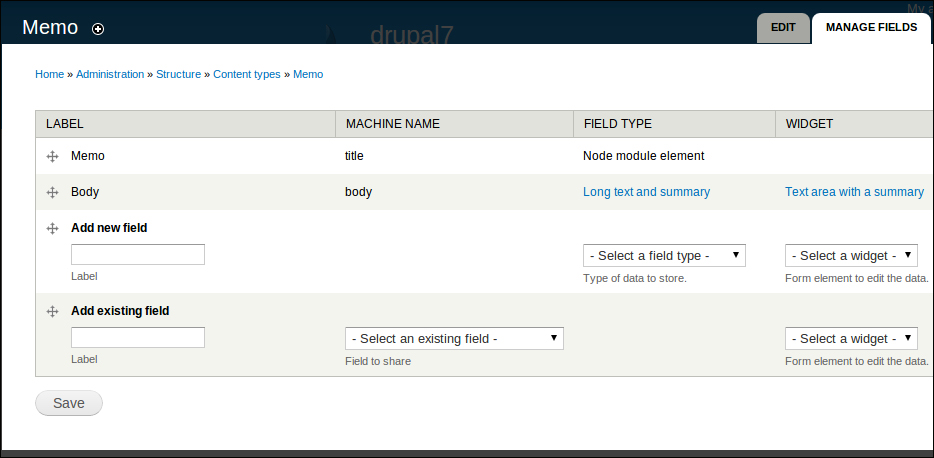
In this page we are now made aware, more than ever, of the fieldability of Drupal's node's content types. The Memo content type that we created has a title and body field (which you can tell by the MACHINE NAME column) and it doesn't come by any surprise as we've already set those when creating it. Yet, notice that the title field is an inherent field that is provided by the node entity, and we can't remove it, unlike the body field which we can customize to our liking, or completely remove it.
Tip
Drupal as a CMS truly has one of the most flexible architecture design and allows developers who are proficient with its internals to really make (almost) anything happen, including making that title field "go away" if required.
Other than the fields already present, we can add fields either by defining a new field type and selecting its widget, or choosing a field type that was already created before, in this case it's Drupal's field_image and field_tags.
We'll continue with adding two more fields for the Memo content type: Images and Tags, and we can utilize the already existing options and set their label, starting with the image field:

After clicking on the Save button, we are presented with the field_image type's settings which we can customize to our needs, some of which are:
Allowed file extensions: By default the permitted file types are .png, .gif, .jpg, and .jpeg.
Maximum upload size: If we want to enforce it so that our hosting space is not abused.
Number of values: By default set to 1, this setting defines how many instances of this field will be allowed. For example, setting it to Unlimited will enable an AJAX user interface for adding more and more images when creating a memo.
Once you're satisfied with the settings click on Save settings button and we'll continue with adding the second Tags field:

The curious of us will notice that there are several widgets to use, for this field, which define the rendered view for each field when editing content: Autocomplete term widget (tagging), Check boxes / radio buttons, and a Select list. This is where we need to put some thinking, tags (in Drupal this concept is referred to as taxonomy) have characteristics of being free form, and as such may grow to very big sets, which does not scale well with checkbox/radio HTML elements; and it's a very poor User Experience (UX) practice, if utilizing large items for a select box, so the Autocomplete term widget (tagging) option seems to be the most reasonable one, for a widget.
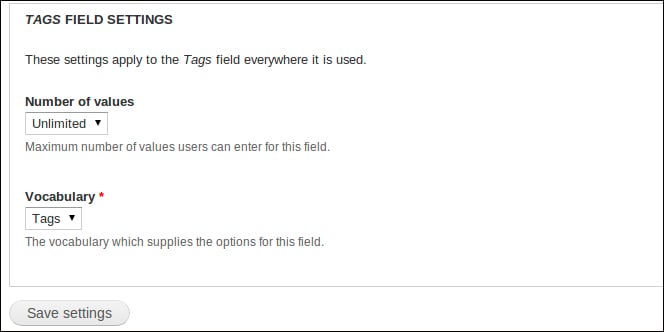
After saving, we're being presented with the FIELD SETTINGS page and we can notice how the settings for this field are very different from the previous image field. One particular setting that is set by default is the Number of values option which is set to Unlimited and it makes some sense with the use of tags as well as with our selection of the autocomplete widget.
Note
Also, notice how the Vocabulary option had also been set by Drupal. A bit on taxonomy in Drupal, also broadly known as Tags, is a core Drupal module which allows you to classify and organize data around your site. When should one use taxonomy, and not a field? When hierarchical structure is required, data needs to be kept as plain text. The vocabulary word comes from the concept of grouping a set of terms (this is what Drupal calls tags) together. Moreover, with the entity model in Drupal, taxonomy is an entity too, like nodes and users, which as you probably guessed right, allows us to attach fields to vocabularies.
Let's add another field to store links that we may want to add in our memos. Since links are really plain text, we can use the Text field type and its default (and only) widget is Text field too.

The default setting of 255 characters length limit is probably enough for most cases, including our purpose of this field for links, so we can leave it like that, and click on Save field settings. After which, we are then presented with the new text field's settings and we should probably change the Number of values option to Unlimited for this field too and click on Save settings.
Observing our new structure for the Memo content type we can see the newly added fields at the bottom of the list.
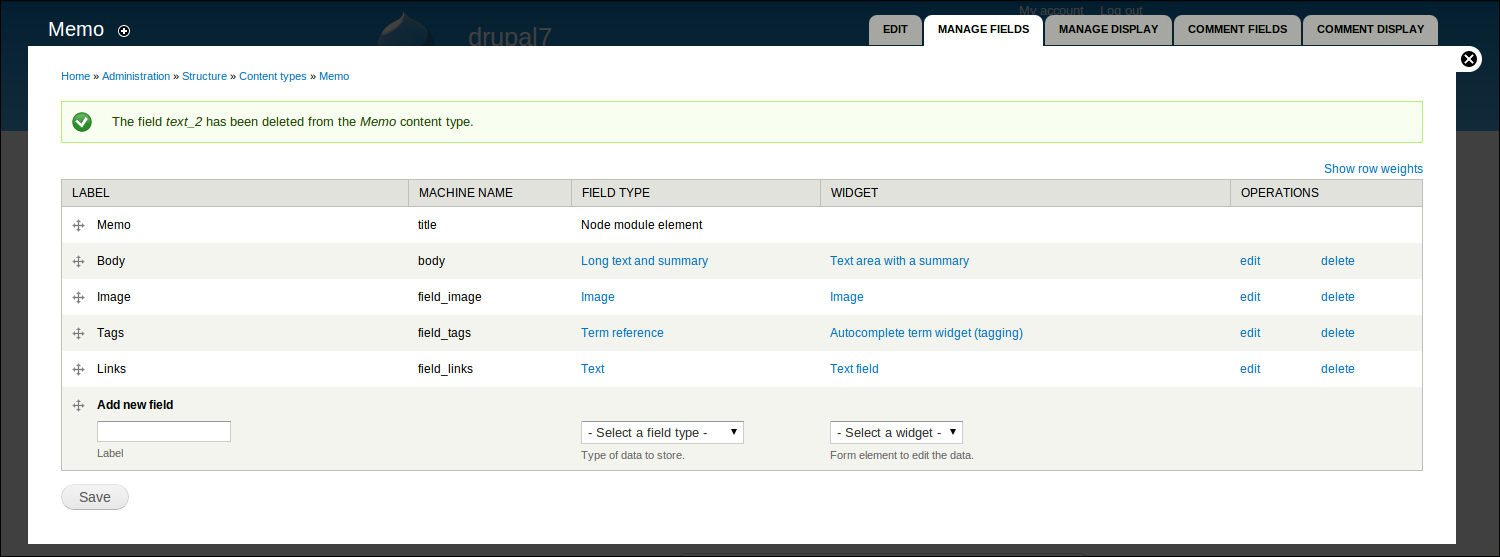
This listing also hints on the ordering of the fields, so if we wanted to make some changes there, such as bringing the Tags field beneath the Memo field, we can simply drag and drop this item by using the grey color arrow icon to the left of the label in the LABEL column. Once finished with reordering, we need to click on the Save button.
Adding a memo now will result in the following:
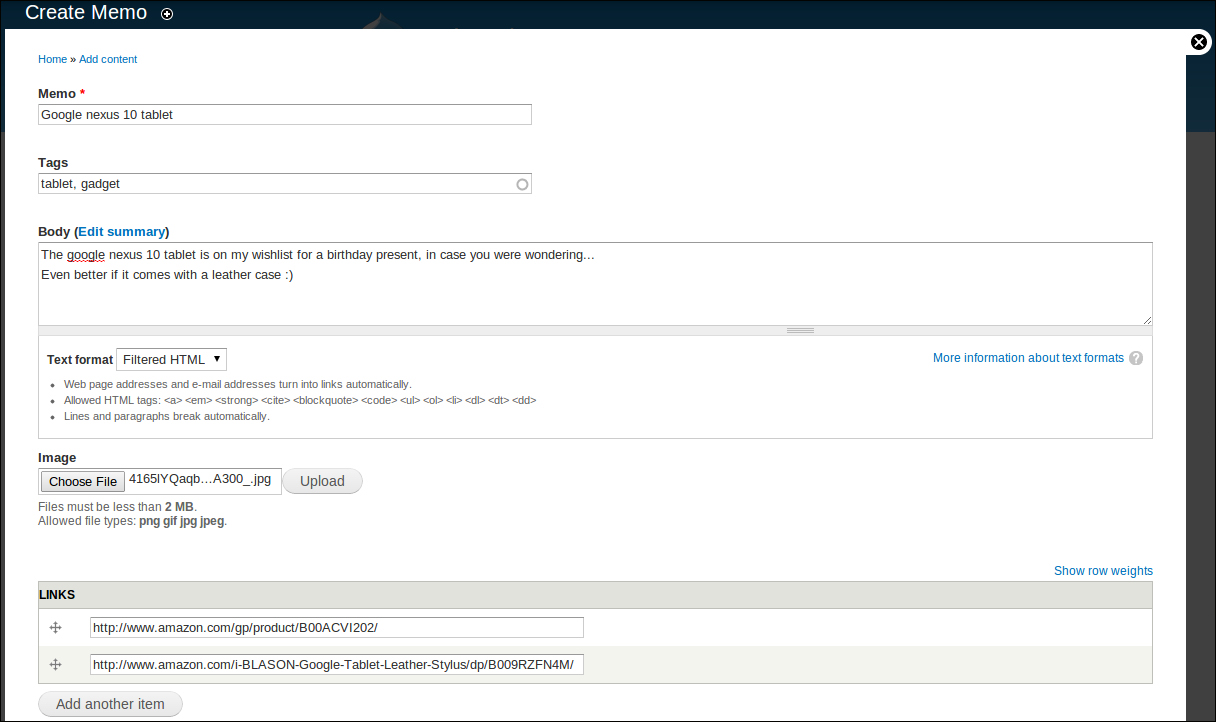
Viewing the form with our newly added fields looks as follows:
While the above fields' ordering dealt with managing the display of the form fields when adding or editing memos, we might also be interested in changing the overall appearance of an actual posted memo.
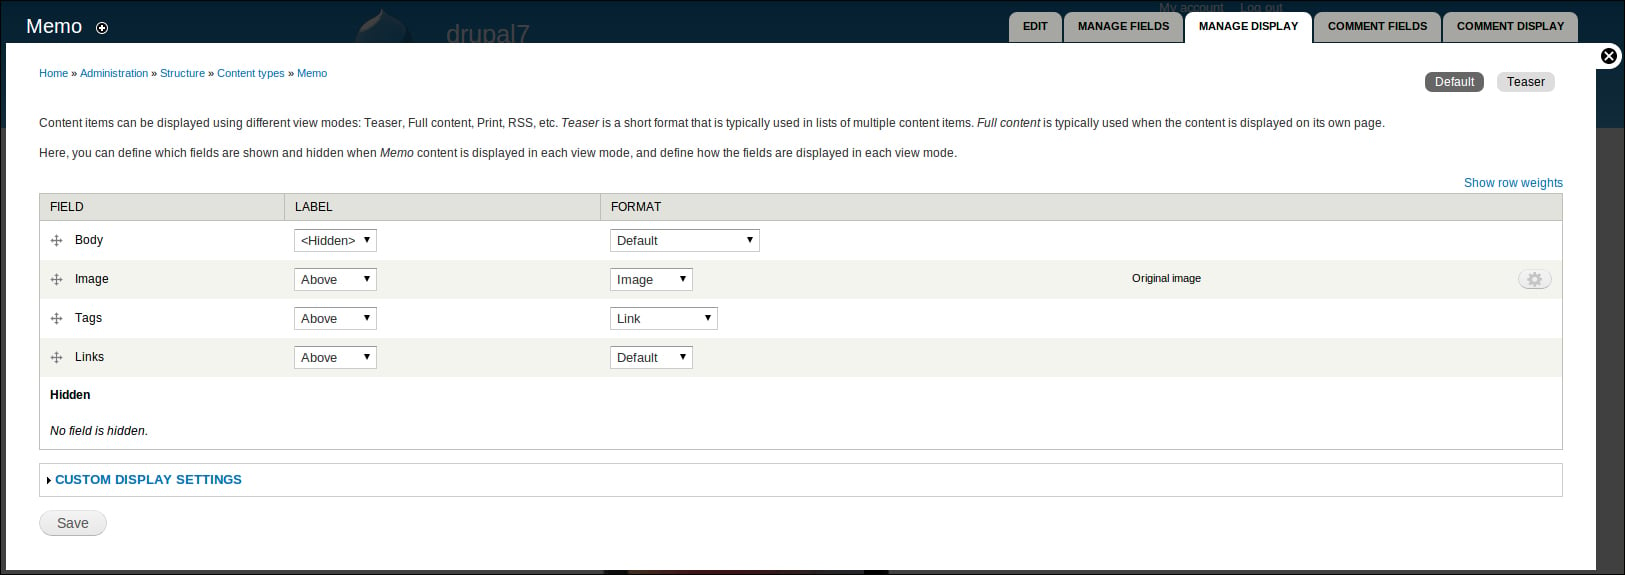
To do this we navigate to the Memo content type's configuration page again, which is at Structure | Content types | Memo | manage display (/admin/structure/types/manage/memo/display), and we're presented with a new configuration page:
Displaying of content types may be different, depending on which view mode is being utilized. These view modes are for example, Full content, which is equivalent to the Default display mode for most purposes, and represents the mode for viewing the full page of the content type (this is for example, when in content listing, like in blogs, when you click on the "read more" link and view the full article on a dedicated page). Another view mode can be Teaser, which is often used when doing the content listing, similar to a blog, where you don't want to put too much content but rather a sort of summary for the content.
On the upper-right corner of the MANAGE DISPLAY configuration tab, we can see sub tabs for each view mode that we want to customize. By default, there's the Default and the Teaser mode. If we want to customize more view modes we can simply expand the CUSTOM DISPLAY SETTINGS link, choose any of the options there, and they will be added as subtabs.
Sticking with the Default view mode and taking a closer look at the fields table we can see the fields being used in this view (notice how all fields are being used, and none of them is hidden from the layout) and the Label and Format settings. The Label column configures where the field's label shows up, if at all, and the Format settings specify what kind of formatting rule to apply on the content that is being displayed for this field. If we examine the Format options for the Body field, then some options such as Trimmed or Summary or trimmed, makes sense for short content listings, like in the Teaser view mode that we mentioned.
There is definitely some room for improvements on the Default view mode for our memo, so here are some ideas for styling the view better:
We can remove the Image label next to the image as that's pretty self-explanatory, and put the Tags field at the top with the LABEL column displayed as Inline, to eat up less space.
Note
Instead of having the image laid out as its own field and space, in the view, we can put it inline to the text. Unfortunately, there's no Drupal way of doing this out-of-the-box function and this requires one of the many handlings, such as using the Insert module (http://drupal.org/project/insert) to put customized HTML image tags on the Body's WYSIWYG editor, or utilizing the Media module (http://drupal.org/project/media).
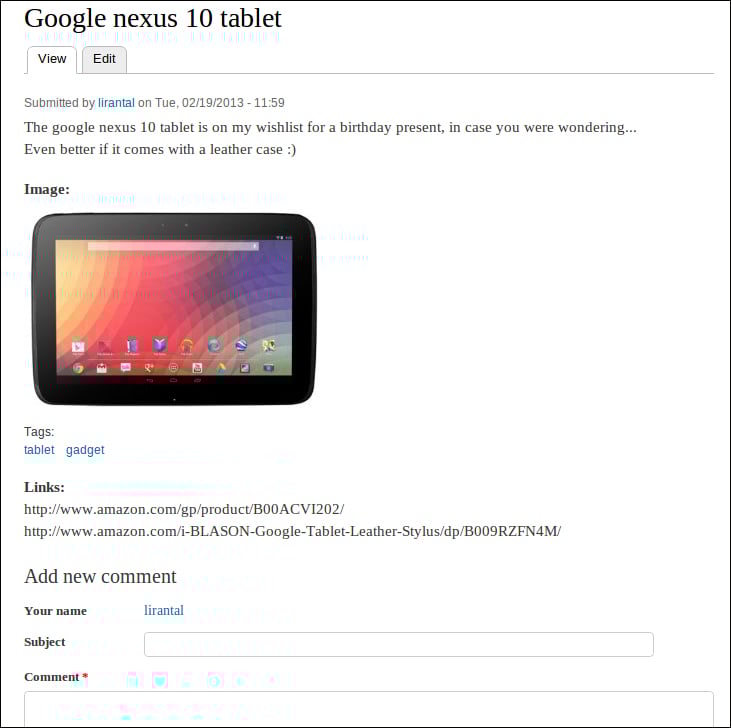
Once you're done setting up the field's display settings click on the Save button, and watch the new layout of your Memo content.
To practice on this, let's revive Drupal's front page node's listing. It uses the Teaser display mode, so we'll go ahead and update the fields listing. In the Image field, add a <hidden> label by drag-and-drop, and set the Image style dropdown to thumbnail by clicking on the gear icon, and setting the select box accordingly, then click on Update. And for Tags, drag and drop this field upwards as well, and set its Label to Inline. When done click on Save (feel free to further customize the teaser display mode to your liking), and view the home page to review your changes.