
This task will quickly go through some of the more helpful configuration options, including some Preference and View settings. Note that these settings are purely my preferences and are only meant to show where to find them. You should set up TextMate however you feel comfortable, and based upon your particular project.
To configure Line Numbers:
From the menu, select View | Gutter | Line Numbers (Option + Command + L) to toggle them on and off.
To configure Soft Tabs:
From the status bar, located at the bottom of the document window, click on the Tab Size pop-up menu, and select Soft Tabs.
From the same pop-up menu, select the desired tab size (usually 2 or 4).
To configure Soft Wrap:
From the menu, select View | Soft Wrap (Option + Command + W).
To choose the width of the wrap, from the menu select View | Wrap Column. Selecting Use Window Frame will change the wrap width depending on the overall width of the document window.
To configure the Show Invisibles option:
From the menu, select View | Show Invisibles (Option + Command + I). Two examples are shown in the following screenshot:

To configure Check Spelling as You Type:
From the menu, select Edit | Spelling | Check Spelling as You Type (Option + Command + ;).
Selecting Highlight current line, Show right margin indicator, and Highlight right margin:
From the menu, select TextMate | Preferences (Command + ,).
In Preferences, under the General tab, check Highlight current line, Show right margin indicator, and Highlight right margin.

Now, let's go through why you may want to use these settings:
Line Numbers: They are helpful to establish where you are in a document. If you'd rather have fewer margin distractions, then you can also determine your cursor's current line and column position in the status bar at the bottom of the document window.
Soft Tabs: Soft tabs versus hard tabs are somewhat controversial (do a Google search and you'll see). You should really use what you're most comfortable with or what conforms to the project or document style rules.
Soft Wrap: This will wrap lines based on your margin column width settings. If this is not set and there's a line that goes beyond the document window's view, scrolling will be necessary to view the rest of the line.
Show Invisibles: This will show tabs and line returns. Sometimes, this is helpful for troubleshooting some oddities in your document, such as why a tab isn't lining up properly. They are also helpful to get a complete picture of your code. However, if you would rather not have the clutter, it's perfectly reasonable to turn this setting off.
Check Spelling as You Type: This will provide the familiar wiggly red line under misspelled words. Right-clicking on the words will provide alternate word options. It's only necessary when composing written words, but TextMate is smart enough to determine when you're writing code and won't try to spell check everything.
Highlight current line: This will provide a horizontal highlight to indicate in which line your cursor is located. The right margin indicator option will provide a vertical line to indicate the right margin, and the Highlight right margin option will highlight the right margin. These visual indicators, or ornaments, will help show you where your cursor is in the document, as well as where the right margin is located. Knowing where the right margin is can be helpful for keeping code readable and well styled. For example, if some of your fellow coders are accessing the files via shell editors (that is, vim, emacs, nano, and so on), they may have limited document width based on their particular terminal program.
Included with the TextMate application is a command-line tool, which can be used in Terminal to open files. In addition, it's quite important to learn the keyboard shortcuts, which will help you do things quickly and efficiently. However, in order to learn the shortcuts, it is vital to learn what the keyboard symbols look like.
When you run TextMate for the first time, you will be prompted to install the shell command mate. Installing this tool will allow you to open files into TextMate from Terminal, for example, mate example.html or mate project/. There is more on opening files in the Traversing files recipe.
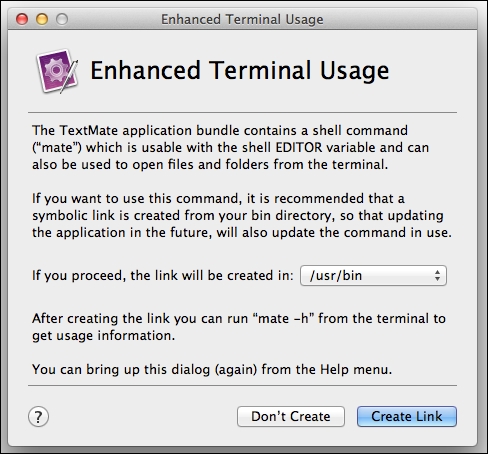
You can open the install dialog at any time from the menu; select Help | Terminal Usage.