

Scalable Vector Graphics (SVG) are a great solution for creating high-definition images for your website. SVG images are an XML-based file format that use code to create graphics. Because SVGs are defined in XML they remain sharp at any size you scale them to. Additionally, they can be animated using JavaScript or Synchronized Multimedia Integration Language (SMIL). This provides a wide range of possibilities that aren't available in traditional images.
Vector graphics are best suited to images that are made up of easily definable shapes. These images could include icons, buttons, illustrations, and user-interface elements.
There are two methods to create an SVG. You can code it directly into an SVG or HTML file or you can create it using a compatible graphics editor. This recipe will show you how to create an SVG using both methods and display them in your browser.
To get started we'll need a graphics editor that works with SVG. If you have Adobe Illustrator or CorelDRAW you can use those applications to create an image and save it as an SVG. If you don't have one of these editors, I recommend using the open source editor Inkscape to create your SVG. You can download it for free at http://inkscape.org/.
First create a simple vector image within your graphics editor and save the file as
vector.svginside of your/images/folder within the/retina/folder.Then create an HTML document called
svg.htmlinside the/retina/folder. Inside the basic HTML structure, we'll embed the SVG graphic that we created in our image editor.<object data="images/vector.svg" type="image/svg+xml"></object>
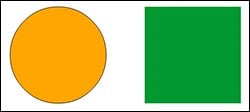
Next we'll create a circle and a rectangle using SVG.
<svg xmlns="http://www.w3.org/2000/svg" version="1.1">

  <circle cx="100" cy="300" r="100" stroke="black" stroke-width="1" fill="orange" />

  <rect x="300" y="200" width="200" height="200" fill="#009933" />

</svg>
If you open the page within your browser you'll see the graphics we just added. Try zooming in or resizing the page to see how sharp they remain.
The first SVG image that we created in our graphics program generated an XML-based file. If you'd like to, you can open it in your code editor and take a look at it. To add it to our page we used an object element. The object element is supported in all major browsers that display SVG images (Safari, Chrome, Firefox, IE 9+, Opera, and more). The disadvantage of this method is that it doesn't allow scripting in old versions of Internet Explorer.
If you'd like to use scripting with your SVG image you can use the <embed> tag. The embed tag (<embed src="vector.svg" type="image/svg+xml" />) still works with the same set of browsers, but if you're using an HTML4 or XHTML doctype at the beginning of your page it is invalid code. This code is allowed if you are using HTML5. More information on this topic is available at http://www.w3.org/Graphics/SVG/IG/resources/svgprimer.html#SVG_in_HTML.
Next we created some SVG shapes directly in our page. In most cases you'll want to have your SVG stored as a separate file, but this is a good way to see how the code works.
First, we added the SVG element and referenced its specification. Then we created a circle and defined the x-axis center (cx), the y-axis center (cy), the radius (r), stroke, stroke-width, and color (fill). The two axis values are not required, but they will help position the shape on your page.
Next we created a rectangle with some similar properties. The axis values (x and y) are based on the top-left corner of the rectangle unlike the circle, which is based on the center point. Notice that in the rectangle we used a hexadecimal value for the color. You can add colors by name, hex code, or RGB just like in CSS.
SVG is not supported in some older browsers, primarily Internet Explorer (below Version 9). If you're concerned about supporting these browsers there are a few solutions available. You could detect support using Modernizr (modernizr.com), use Google Chrome Frame (http://www.google.com/chromeframe?prefersystemlevel=true), or use the Raphael JavaScript Library (raphaeljs.com).