
In this recipe, we will go and look at the available project templates for ASP.NET MVC 4 Web Application. Then, we will take you through a step-by-step approach to create and run ASP.NET MVC 4 Web Application. At the end, we will write some quick Razor syntax for testing.
Before getting started with Razor coding we need a project allowing the use of Razor syntaxes. The Razor view engine is the default view engine for MVC projects; however, we can use Razor syntaxes in Web Forms projects by installing its binaries. Mixing ASPX and Razor syntaxes on the same page is officially not supported, the reason being both syntaxes are developed for different goals, so we need to have a separate view page for Razor syntaxes.
Now, let's go ahead and learn how to set up an MVC Web Application project to use Razor syntaxes discussed throughout this book.
This is going to be a step-by-step task to set up the project, so follow these steps:
Start Visual Studio or Visual Web Developer.
In the File menu, click on New | Project.
In the New Project dialog box, select Visual C# as the programming language and then ASP.NET MVC 4 Web Application.
Finish this by clicking on OK.
Now the following dialog box appears, in which you need to select the Project Template:

The Internet Application template is a regular template for any MVC web application project. This template comes with pre-packed required libraries that help us to build applications to perform CRUD operations on the fly.
The preceding screenshot shows the minimum number of available templates released with Visual Studio 2012; this may vary depending upon the update/version you running. For example, I have installed ASP.NET Web Tools 2012.2 Update on another computer and now I have Single Page Application (also known as SPA) and Facebook Application templates. You could have more templates depending upon the updates you have installed.
In the preceding dialog box, you can also see an option to select View engine. Select the Razor view engine here and don't worry, you will have the opportunity to select the view engine each time you add a new view page in an application.
Finish by clicking on OK.
Now, you will have a ready-to-run project on your screen, like the one shown in the following screenshot:

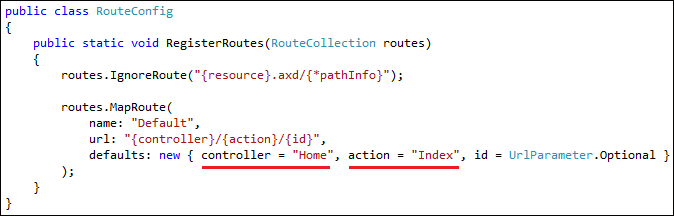
At this time if you run this application, the MVC runtime will render the Index view of Home controller by default. We can control this by adding or modifying the route values which can be found in the RouteConfig.cs file inside the App_Start folder, as follows:
Now, let's try running this application; you will have following output:

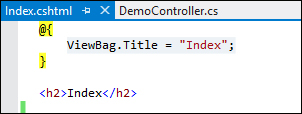
If you look at the Index.cshtml code (given in the following screenshot), you will notice how quickly (with a small amount of code) the code generated the preceding output. That's the power of Razor.

Look at the highlighted codes; these are the Razor syntaxes. At the top, we have a Razor code block and then a section (you will learn about it later) by the name featured and inside the section we have two ViewBag.
Note
ViewBag uses the dynamic feature that was added in C# 4.0. We can say that ViewBag is a combination of ViewData and a dynamic wrapper around the ViewData dictionary.
ViewData and ViewBag serve the same purpose in allowing developers to pass data from controllers to views. When you put objects in either one of these, the objects become accessible in the view.
TempData allows us to store data that will survive for a redirect only. After redirecting, the stored data is automatically evicted.
We are going to learn Razor syntax throughout this book, so I'll recommend adding a clean new controller and view where we will write our codes.
This will be a step-by-step task to add a controller and a view, so follow these steps:
Right-click on the
Controllersfolder and add a new controller.
In the appeared dialog box, change the controller name to
Demo, select the Empty MVC controller template, and click on Add.
Now, you will have a controller named
Demowith anIndexmethod. You just add aViewBag.Messageproperty inside theIndexmethod that will return the view page. After addingViewBag.Messageto your code, it should look as follows:public ActionResult Index() { ViewBag.Message = "Razor View Engine"; return View(); }To add a view page for the
Indexmethod, right-click on the Index() method and click on Add View...:
Now, in the appeared window, select View name as Index and View engine as Razor (CSHTML). Leave the rest as it is and click on Add.
You will have an Index.cshtml page inside Views | Demo in the project root. Look at the following screenshot:
MVC follows the Convention over Configuration concept, which is one of the most distinguishing features. Rather than saving all the settings in the configuration files, MVC heavily relies on the common agreement (convention) such as folder structures and naming conventions.
When we create an MVC project using any MVC project templates, you will see the common structure of folders and files. The structure of files and folders is not just for your convenience. It follows the predefined rules. Thus the developers should understand well how folders and files are organized. Refer to the following points for a few examples:
Controller classes must have names that end with Controller such as HomeController.
Views and partial views should go into the
/Views/Controllername'and'/Views/Sharedfolders respectively.The default view for an action method should be named after that method. For example, the
Editaction method is linked to theEdit.cshtmlview file.The naming convention for layouts is to prefix the file with an underscore (
_) character and the layout files are placed in the/Views/Sharedfolder.
To run this newly added view page, Index.cshtml, you need to browse to http://localhost:port/demo where demo is the controller and by default MVC maps the Index.cshtml view. Now, this page will allow the use of Razor syntax with C# language.
Let's go ahead and follow the same steps given earlier and use the ASPX view engine instead of Razor. Also, add a Demo controller, Index action method, and a view page, Index.aspx. It will look like the following:

Now, compare both view pages; Index.cshtml, which is generated by the Razor view engine; and Index.aspx, which is generated by the ASPX view engine. Can you see the amount of code in both views?
To give you another example, I would like to show you the syntactic differences between the Razor view engine and the ASPX view engine by putting images of both the view engines together. I used a <p> tag to display a line and a <div> tag that will contain an unordered list generated by a for loop.
Let me take this opportunity to ask you, which one would you prefer in development? Take a look at the screenshot of both view engines:

Here, you may not be able to understand some points, but don't worry; we will cover everything later. If you look at the preceding screenshot and compare, you will find:
To print a day of a week, I have to use
<% =DateTime.Now.DayOfWeek %>on the ASPX view page whereas just use@DateTime.Now.DayOfWeekon the Razor view page.To print a
1to5table using aforloop, I have to use the following code snippet on ASPX view page:<%for (int i = 1; i <= 5; i++) { %> <li><% =i%></li> <% } %>whereas just the following code on the Razor view page:
@for (int i = 1; i <= 5; i++)
{
<li>@i</li>
}
Now tell me, isn't this painful in the ASPX view page, switching C# to HTML and then HTML to C# again?
You will also notice the difference in the code quantity of both the view engines produces the following output:

We are using the C# programming language the with Razor and ASPX view engines. We can also make use of the VB programming language with the Razor and ASPX view engines, as shown in the following screenshot:

Thus we can say that Razor looks beautiful with VB as well. So, with the help of @, the magical character, we can make our job quick and simple.
In this recipe, to use the Razor syntax we only set up the project using the MVC Internet Application template; however, you can also use any other template such as Empty, Basic, and Intranet—it is totally up to you, just remember to pick the Razor view engine whenever prompted. Also, Razor syntax can be used with the WebMatrix tools, so reading this book will help you with developing applications using Razor.
In this recipe, we quickly jumped by looking at the MVC architecture overview. If you want to read more visit http://goo.gl/bL2Pw.