

In this recipe, we will look at what a partial view is and then we will learn how to render partial views using Partial, RenderPartial, Action, and RenderAction helper methods. I will also show you how to render them using jQuery.
Partial views allow us to put HTML and C# code into a file that we can reuse across multiple other views. It is like a user control in ASP.NET Web Forms that also allows the reusing of code. With the help of partial views we can reduce the duplication of code.
Let's quickly start by learning Partial and RenderPartial and later we will talk about Action and RenderAction helper methods.
The main difference between Partial and RenderPartial is that Partial returns an MvcHtmlString, whereas RenderPartial returns void and renders directly to the view, and because of this, RenderPartial works a bit faster.
This helper is used to render the specified partial view as an HTML-encoded string. Also, it is very easy to use and does not need to create any action.
To explore this, go to the Models in Razor (Should know) recipe in which we created CRUD views, and open the Index.cshtml file.

In this code, you can see that I am looping through each record in the model using the foreach loop. This produces the following output:

In case we need this view somewhere else in the website, the best way to do this is by creating a partial view with the code we selected earlier and then render it in the view using a set of helpers.
To do this, follow these steps:
Right-click on the folder to add a partial view. You can add it inside the controller's own
Viewfolder or inside theSharedfolder for application-level availability.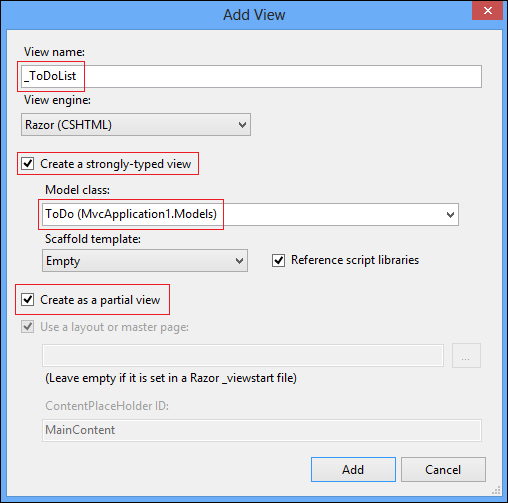
It is a best practice to name the partial view preceded by an underscore character (
_), but it is not mandatory. The underscore character (_) before the view name specifies that it is a reusable component. You can create a strongly-typed view by checking it and selecting theModelclass name, however, that is also not mandatory, as you can go with a simple name. Don't forget to check Create as a partial view.Now, in the opened partial view page add the following code. This code snippet is very similar to earlier one that I selected in the rectangle in the first screenshot of this section.
@model MvcApplication1.Models.ToDo

<tr>
    <td>
        @Html.DisplayFor(model => model.Title)
    </td>
    <td>
        @Html.DisplayFor(model => model.Description)
    </td>
    <td>
        @Html.DisplayFor(model => model.IsDone)
    </td>
    <td>
        @Html.ActionLink("Edit", "Edit", new { id=Model.ToDoId }) |
        @Html.ActionLink("Details", "Details", new { id=Model.ToDoId }) |
        @Html.ActionLink("Delete", "Delete", new { id=Model.ToDoId })
    </td>
</tr>
In this code, I have made some quick modifications to match the model convention. Now this partial view is ready to be used anywhere in the application, by just using a helper as shown in the next step.
When you are done with the previous steps, replace the
Index.cshtmlcode as shown in the following code:
Here, I'm rendering the partial view using the Partial helper method, and for each item in the model, the Partial helper will return a row.
This helper is used to render the specified partial view by using the specified HTML helper. Also, it is very easy to use and does not need to create any action.
To explore this, let's add a fresh partial view in the Shared folder by the name of _WelcomeNote and write a message. Now, this partial view can be rendered on the view page using either Partial or RenderPartial, as shown in the following screenshot:

On running the application, you will see the following output:

You can see how easy it is to render a partial view using Partial and RenderPartial helper methods.
The Action helper is used to invoke the specified child action method that returns the result as an HTML string, whereas the RenderAction helper is used to invoke the specified child action method using the specified controller name and renders the result inline in the parent view. For these helpers, we need to create a child action for rendering the partial view.
To explore this, let's add a child action and update the view page, as shown in the following screenshot:

On running the application, you will see the following output:

Again, this is also very easy.
You learned various ways (Partial, RenderPartial, Action, and RenderAction) for rendering a partial view. I hope you are now quite confident with partial views and how to render them.
By looking at these examples, you will have noticed that it is very easy to bring partial views on view page using Partial and RenderPartial helpers rather than Action and RenderAction helpers, because Action and RenderAction helpers render the partial view with the help of the controller's method (also known as the child action). So, if you just want to render a partial view, use Partial or RenderPartial , and if you want to render a partial view that accepts the model, then you need the child action returning the model.