

You might be familiar with creating presentations with software tools that provides a slide-by-slide view. Presenting on a web browser is completely different from standard slideshows. We have an infinite space to position the slides in web-based presentations where as we get slide after slide in software-based presentations. Unless we plan the design of the presentations slides in a creative way, we are going have problems using presentations with impress.js.
Note
Get a pencil and paper and design your presentation without using tools on your computer. Using a computer to design will limit our creative thinking capabilities.
Let's plan the design for a basic presentation to learn how to use the impress.js library. Once we have the design in mind, it's better to create an outline of the presentation with exact positions of the slides, as shown in the following diagram:
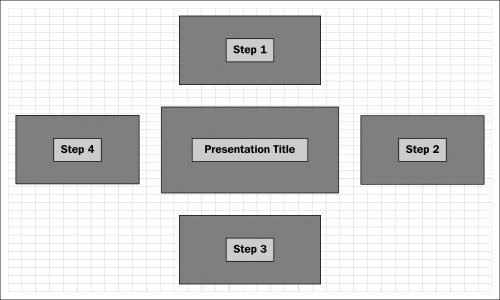
We are going to use five slides for the presentation including the slide with the title. The title of the presentation will be the first slide and it will be placed in the center of the screen. The remaining four slides will be positioned around the first slide at a 90 degree angle allowing the presentation to flow in a circular path. Keeping the design in mind let's start learning about the impress.js elements necessary to create a presentation.
impress.js uses predefined ID's and classes to identify the components in the presentation. Every step of the presentation should be wrapped inside a container with the ID impress and should have a CSS class called step to identify it as a single slide. Here is how a slide will be coded inside the #impress container:
<div id="impress">
            <div class="step">Slide Content</div>
</div>
The title of the presentation will be the first step of our presentation. According to the design the first step is positioned in the center of the screen and it will be larger than the steps around it. Let's create the first slide using the data attributes mentioned earlier:
<div id="impress">
<div id="intro" class="step slide" data-x="-1000" data-y="-1000" data-scale="3">
    <div><h2 class="title1">Building Impressive Presentations</h2>
    <h3 class="title1">with</h3>
    <h3 class="title2">Impress.js</h3>
    </div>
    </div></div>
We can assign a unique ID to each step and the ID can be used in the URL to point directly to a specific step. The first slide can be accessed directly by using #/intro. It will default to #/step-N in scenarios where the ID is omitted. Here N is the step number.
Tip
The ordering of the steps is important when creating impress.js presentations. The presentation will start with the immediate step element after the #impress container. Therefore, you need to place each step in the order you want it to appear on the presentation.
These steps then need to be positioned in the presentation canvas. Data attributes of impress.js can be defined in the step element. We have used the data-x, data-y, and data-scale attributes for the first slide. We have used -1000 for both data-x and data-y attributes. Hence the first slide will be positioned at -1000 px in the x axis and -1000 px in the y axis in the presentation canvas. impress.js uses the HTML data attributes for adding effects and necessary configurations. You can learn more about HTML5 data attributes at http://www.w3.org/TR/2011/WD-html5-20110525/elements.html.
Each step can be scaled using the data-scale attribute which is set to 1 by default. This is similar to the zoom-in and zoom-out features of the web browser. We wanted to make the first step relatively large compared to the other steps. The first step has been scaled three times as compared to the other steps. The next step is going to be on the default scale, so stepping the transition from the first step to the next one can be considered as a zoom-out since the steps are scaled from 3 to 1. Scaling from 1 to 3 will provide the zoom-in feature when necessary.
The first step has been configured successfully and now we can focus on the contents. These steps are built using HTML elements and hence we can use any design inside the presentation steps. We have separated the presentation title contents into three heading tags with different CSS classes. You also might have noted that we have used another class called slide for the steps. The step class is for identifying the steps in the presentation. Thus we are going to use a different class called slide to specify the common styles for all the steps. Styles can be applied on individual steps by providing CSS for the ID in cases where you need custom styles for specific steps.
A demo presentation provided in the downloaded files contains a stylesheet called impress-demo.css for styling the sample presentation. It is not required to use that stylesheet and the creator of impress.js strongly recommends creating your own style files for new presentations.
Note
impress.js doesn't depend on any external stylesheet. The script adds all the styles it needs for the presentation to work.
First take a look at the demo CSS file to get an idea about how the styles are defined. Then, create a new styles file called styles.css. We are going to use common element styles to reset the element styles. Here is how the styles are defined for the slide class in our CSS file:
.slide {
    display: block;
    width: 1000px;
    height: 700px;
    border-left:25px solid #eee;
    color:#fff;
}
Each step has been given a specific width and height to make it consistent. We can design the steps in different sizes unlike most presentation tools. It's up to you to choose the specific dimensions for certain steps. Styles used to design the contents of the first step are self explanatory and anyone with basic CSS knowledge will be able to understand. Look for the #intro section in the styles.css file for specific styles used for the first step.
Step 1 needs to be created after the step with the presentation title. Step 1 is located on top of the title step, so the data-x value will remain the same and we need to adjust the data-y value to position Step 1.
We had -1000 for the data-y value of the title step. Since we are moving towards the top of screen the y value needs to be decreased. The code for the Step 1 slide with the data-y value of -2500 px will be as follows:
<div id="guidelines" class="step slide" data-x="-1000" data-y="-2500" >
<div class="round"><p>Step 1</p></div>
</div>
Apart from the data-x and data-y values, make sure that you include the step class for identifying it as a step, and a slide class for common styles for steps. The rest of the HTML content contains the step data used for the presentation and has no relation with the framework. Custom styles for Step 1 can be found under # guidelines ID of the style.css file.
Step 2 is going to be different to the previous step according to our planned design. All the steps apart from the title are placed in a circular path. Rotations can be used to move the steps in a circular path. The contents of Step 2 will be angled by 90 degree to get the circular path. Consider the following code for the Step 2 slide in our design:
<div id="graphic" class="step slide" data-x="1000" data-y="-1500" data-rotate="90">

    <div class="round">Step 2</div>
    </div>
Step 2 is positioned to the right of title and the data-x value increases from left to right of your screen. We have thus increased the data-x value from -1000 to 1000. Then we need to rotate the slide by 90 degrees in the slide transition process. impress.js provides the data-rotate attribute to define rotation angles. In this scenario, steps are rotated around the z axis and we can use either data-rotate-z or data-rotate to define the rotations. The rest of the HTML code is the contents of the step and the relative styles can be found in the #graphic section of the style.css file.
The remaining two steps are similar to the step we just discussed. We need to adjust the data-x and data-y values to get the proper placement according to our original design plan.
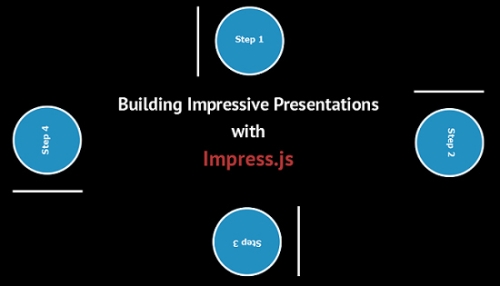
Generally, all the steps will be positioned relative to each other. Unless we have considerable space between the steps, it is possible to get issues displaying during the presentation. The following screen shows the presentation in the earlier scenario:

We are looking at the first step with the title of the presentation and the contents of other steps which are displayed partially. This is one of the problems we face when positioning steps on an infinite screen and we can solve this issue by using simple CSS codes.
There are some CSS classes assigned to the body element by impress.js during the various processes. Once the presentation is initialized the impress-enabled class will be added to the body element. First we hide all the steps by using the following CSS code:
.impress-enabled .step {
    margin: 0;
    opacity: 0;
}
We have used the opacity attribute for hiding the steps in the default view. Alternatively, we can use the visibility attribute instead of opacity. Setting the margins for steps is optional and you can define your own margin values to suit the presentation. Once the presentation is started, the active step is given a class called active. Hence we can display just the active slide and hide all the other steps using the following simple CSS code:
.impress-enabled .step.active { opacity: 1;border:none; }Now we have all the individual styles of the presentation. Creating an overview is very important for the people in the audience as well as for the presenter to know exactly where you are in the presentation. Overview can be considered as a step containing all the other steps. The content of the overview step is intentionally kept blank as follows:
<div id="overview" class="step" data-x="-1000" data-y="-1500" data-scale="5"> </div>The impress.js framework allows you to scale steps using the data-scale attribute. All the steps apart from the title will be considered scale 1 since we haven't specified the data-scale attribute. Overview uses a data-scale value of 5 and it will be five times larger than the other steps. When you increase the scale, more detailed information and steps will be displayed on screen.
Consider the following screen for the overview of our presentation:
Overview doesn't have any information and shows all the steps in our presentation. We can allow users to click on steps from the overview and directly load the step on the screen. By default, the overview is also considered as a step and it will be clickable. Hence we need to first disable clicking on the overview by hiding it using CSS:
#overview { display: none }Now the other steps in overview should be directly accessible. We can enhance the user experience by showing a cursor pointer to the step links using the following code block:
.impress-on-overview .step {
    opacity: 1;
    cursor: pointer;
}
I have kept the overview step at the end of the presentation for explanation purposes. You can make overview the first slide if necessary.
We now have a completed version of our first impressive presentation. Open the chapter1.html file in the web browser and use the arrow keys or Space bar to run the presentation. Impress presentations use the complete browser space to run presentations by default. We will be discussing how we can limit the scope of impress presentations to a specific portion of a web page in the upcoming chapters.