Let’s write some code then! In the following pages you’ll build a simple AJAX application.
Note
This exercise is for the most impatient readers willing to start coding ASAP, but it assumes you’re already familiar with JavaScript, PHP, and XML. If this is not the case, or if at any time you feel this exercise is too challenging, feel free to skip to Chapter 2. In Chapter 2 and Chapter 3 we’ll have a much closer look at the AJAX technologies and techniques and everything will become clear.
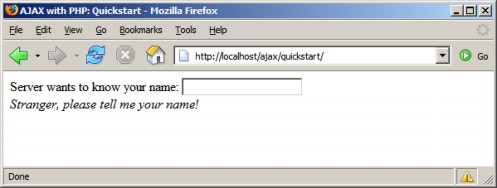
You’ll create here a simple AJAX web application called quickstart where the user is requested to write his or her name, and the server keeps sending back responses while the user is writing. Figure 1.5 shows the initial page, index.html, loaded by the user. (Note that index.html gets loaded by default when requesting the quickstart web folder, even if the file name is not explicitly mentioned.)

Figure 1.5: The Front Page of Your Quickstart Application
While the user is typing, the server is being called asynchronously, at regular intervals, to see if it recognizes the current name. The server is called automatically, approximately one time per second, which explains why we don’t need a button (such as a ‘Send’ button) to notify when we’re done typing. (This method may not be appropriate for real log-in mechanisms but it’s very good to demonstrate some AJAX functionality.)
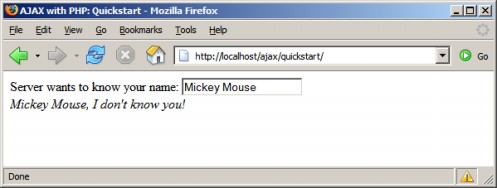
Depending on the entered name, the message from the server may differ; see an example in Figure 1.6.

Figure 1.6: User Receives a Prompt Reply From the Web Application
Check out this example online at http://ajaxphp.packtpub.com/ajax/quickstart
Maybe at first sight there’s nothing extraordinary going on there. We’ve kept this first example simple on purpose, to make things easier to understand. What’s special about this application is that the displayed message comes automatically from the server, without interrupting the user’s actions. (The messages are displayed as the user types a name). The page doesn’t get reloaded to display the new data, even though a server call needs to be made to get that data. This wasn’t a simple task to accomplish using non-AJAX web development techniques.
The application consists of the following three files:
index.htmlis the initial HTML file the user requests.quickstart.jsis a file containing JavaScript code that is loaded on the client along withindex.html. This file will handle making the asynchronous requests to the server, when server-side functionality is needed.quickstart.phpis a PHP script residing on the server that gets called by the JavaScript code inquickstart.jsfile from the client.
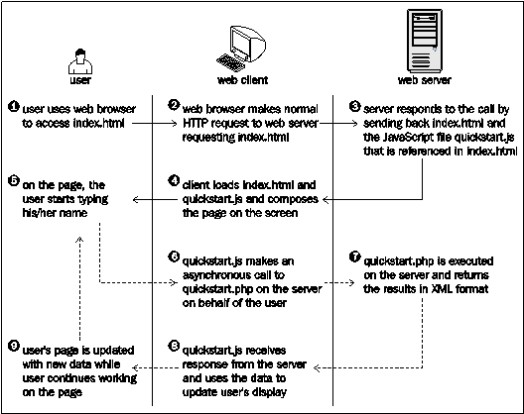
Figure 1.7 shows the actions that happen when running this application:

Figure 1.7: The Diagram Explaining the Inner Works of Your Quickstart Application
Steps 1 through 5 are a typical HTTP request. After making the request, the user needs to wait until the page gets loaded. With typical (non-AJAX) web applications, such a page reload happens every time the client needs to get new data from the server.
Steps 5 through 9 demonstrate an AJAX-type call—more specifically, a sequence of asynchronous HTTP requests. The server is accessed in the background using the XMLHttpRequest object. During this period the user can continue to use the page normally, as if it was a normal desktop application. No page refresh or reload is experienced in order to retrieve data from the server and update the web page with that data.
Now it’s about time to implement this code on your machine. Before moving on, ensure you’ve prepared your working environment as shown in Appendix A, where you’re guided through how to install and set up PHP and Apache, and set up the database used for the examples in this book. (You won’t need a database for this quickstart example.)
Note
All exercises from this book assume that you’ve installed your machine as shown in Appendix A. If you set up your environment differently you may need to implement various changes, such as using different folder names, and so on.
In Appendix A, you’re instructed to set up a web server, and create a web-accessible folder called
ajaxto host all your code for this book. Under theajaxfolder, create a new folder calledquickstart.In the
quickstartfolder, create a file calledindex.html, and add the following code to it:<!DOCTYPE html PUBLIC “-//W3C//DTD XHTML 1.0 Transitional//EN” “http://www.w3.org/TR/xhtml1/DTD/xhtml1-transitional.dtd”> <html xmlns=”http://www.w3.org/1999/xhtml”> <head> <title>AJAX with PHP: Quickstart</title> <script type=”text/javascript” src=”quickstart.js”></script> </head> <body onload=’process()’> Server wants to know your name: <input type=”text” id=”myName” /> <div id=”divMessage” /> </body> </html>Create a new file called
quickstart.js, and add the following code:// stores the reference to the XMLHttpRequest object var xmlHttp = createXmlHttpRequestObject(); // retrieves the XMLHttpRequest object function createXmlHttpRequestObject() { // will store the reference to the XMLHttpRequest object var xmlHttp; // if running Internet Explorer if(window.ActiveXObject) { try { xmlHttp = new ActiveXObject(“Microsoft.XMLHTTP”); } catch (e) { xmlHttp = false; } } // if running Mozilla or other browsers else { try { xmlHttp = new XMLHttpRequest(); } catch (e) { xmlHttp = false; } } // return the created object or display an error message if (!xmlHttp) alert(“Error creating the XMLHttpRequest object.”); else return xmlHttp; } // make asynchronous HTTP request using the XMLHttpRequest object function process() { // proceed only if the xmlHttp object isn’t busy if (xmlHttp.readyState == 4 || xmlHttp.readyState == 0) { // retrieve the name typed by the user on the form name = encodeURIComponent(document.getElementById(“myName”).value); // execute the quickstart.php page from the server xmlHttp.open(“GET”, “quickstart.php?name=” + name, true); // define the method to handle server responses xmlHttp.onreadystatechange = handleServerResponse; // make the server request xmlHttp.send(null); } else // if the connection is busy, try again after one second setTimeout(‘process()’, 1000); } // executed automatically when a message is received from the server function handleServerResponse() { // move forward only if the transaction has completed if (xmlHttp.readyState == 4) { // status of 200 indicates the transaction completed successfully if (xmlHttp.status == 200) { // extract the XML retrieved from the server xmlResponse = xmlHttp.responseXML; // obtain the document element (the root element) of the XML structure xmlDocumentElement = xmlResponse.documentElement; // get the text message, which is in the first child of // the the document element helloMessage = xmlDocumentElement.firstChild.data; // update the client display using the data received from the server document.getElementById(“divMessage”).innerHTML = ‘<i>’ + helloMessage + ‘</i>’; // restart sequence setTimeout(‘process()’, 1000); } // a HTTP status different than 200 signals an error else { alert(“There was a problem accessing the server: “ + xmlHttp.statusText); } } }Create a file called
quickstart.phpand add the following code to it:<?php // we’ll generate XML output header(‘Content-Type: text/xml’); // generate XML header echo ‘<?xml version=”1.0” encoding=”UTF-8” standalone=”yes”?>’; // create the <response> element echo ‘<response>’; // retrieve the user name $name = $_GET[‘name’]; // generate output depending on the user name received from client $userNames = array(‘CRISTIAN’, ‘BOGDAN’, ‘FILIP’, ‘MIHAI’, ‘YODA’); if (in_array(strtoupper($name), $userNames)) echo ‘Hello, master ‘ . htmlentities($name) . ‘!’; else if (trim($name) == ‘’) echo ‘Stranger, please tell me your name!’; else echo htmlentities($name) . ‘, I don\’t know you!’; // close the <response> element echo ‘</response>’; ?>
Now you should be able to access your new program by loading
http://localhost/ajax/quickstartusing your favorite web browser. Load the page, and you should get a page like those shown in Figures 1.5 and 1.6.Note
Should you encounter any problems running the application, check that you correctly followed the installation and configuration procedures as described in Appendix A. Most errors happen because of small problems such as typos. In Chapter 2 and Chapter3 you’ll learn how to implement error handling in your JavaScript and PHP code.
Here comes the fun part—understanding what happens in that code. (Remember that we’ll discuss much more technical details over the following two chapters.)
Let’s start with the file the user first interacts with, index.html. This file references the mysterious JavaScript file called quickstart.js
, and builds a very simple web interface for the client. In the following code snippet from index.html, notice the elements highlighted in bold:
<body onload=’process()’>
    Server wants to know your name:
    <input type=”text” id=”myName” />
    <div id=”divMessage” />
  </body>
When the page loads, a function from quickstart.js called process() gets executed. This somehow causes the <div> element to be populated with a message from the server.
Before seeing what happens inside the
process() function, let’s see what happens at the server side. On the web server you have a script called quickstart.php that builds the XML message to be sent to the client. This XML message consists of a <response> element that packages the message the server needs to send back to the client:
<?xml version=”1.0” encoding=”UTF-8” standalone=”yes”?>
<response>
  ... message the server wants to transmit to the client ...
</response>
If the user name received from the client is empty, the message will be, “Stranger, please tell me your name!”. If the name is Cristian, Bogdan, Filip, Mihai, or Yoda, the server responds with “Hello, master <user name>!”. If the name is anything else, the message will be “<user name>, I don’t know you!”. So if Mickey Mouse types his name, the server will send back the following XML structure:
<?xml version=”1.0” encoding=”UTF-8” standalone=”yes”?>
<response>
  Mickey Mouse, I don’t know you!
</response>
The quickstart.php script starts by generating the XML document header and the opening <response> element:
<?php
// we’ll generate XML output
header(‘Content-Type: text/xml’);
// generate XML header
echo ‘<?xml version=”1.0” encoding=”UTF-8” standalone=”yes”?>’;
// create the <response> element
echo ‘<response>’;
The highlighted header line marks the output as an XML document, and this is important because the client expects to receive XML (the API used to parse the XML on the client will throw an error if the header doesn’t set Content-Type to text/xml). After setting the header, the code builds the XML response by joining strings. The actual text to be returned to the client is encapsulated in the <response> element, which is the root element, and is generated based on the name received from the client via a GET parameter:
// retrieve the user name
$name = $_GET[‘name’];
// generate output depending on the user name received from client
$userNames = array(‘CRISTIAN’, ‘BOGDAN’, ‘FILIP’, ‘MIHAI’, ‘YODA’);
if (in_array(strtoupper($name), $userNames))
  echo ‘Hello, master ‘ . htmlentities($name) . ‘!’;
else if (trim($name) == ‘’)
  echo ‘Stranger, please tell me your name!’;
else
  echo htmlentities($name) . ‘, I don\’t know you!’;
// close the <response> element
echo ‘</response>’;
?>
The text entered by the user (which is supposed to be the user’s name) is sent by the client to the server using a GET parameter. When sending this text back to the client, we use the htmlentities PHP function to replace special characters with their HTML codes (such as &, or >), making sure the message will be safely displayed in the web browser eliminating potential problems and security risks.
Note
Formatting the text on the server for the client (instead of doing this directly at the client) is actually a bad practice when writing production code. Ideally, the server’s responsibility is to send data in a generic format, and it is the recipient’s responsibility to deal with security and formatting issues. This makes even more sense if you think that one day you may need to insert exactly the same text into a database, but the database will need different formatting sequences (in that case as well, a database handling script would do the formatting job, and not the server). For the quickstart scenario, formatting the HTML in PHP allowed us to keep the code shorter and simpler to understand and explain.
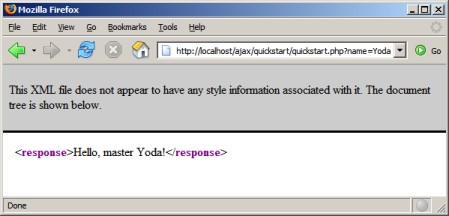
If you’re curious to test quickstart.php and see what it generates, load http://localhost/ajax/quickstart/quickstart.php?name=Yoda in your web browser. The advantage of sending parameters from the client via GET is that it’s very simple to emulate such a request using your web browser, since GET simply means that you append the parameters as name/value pairs in the URL query string. You should get something like this:

Figure 1.8: The XML Data Generated by quickstart.php
This XML message is read on the client by the handleServerResponse() function in quickstart.js. More specifically, the following lines of code extract the “Hello, master Yoda!” message:
      // extract the XML retrieved from the server
      xmlResponse = xmlHttp.responseXML;
      // obtain the document element (the root element) of the XML structure
      xmlDocumentElement = xmlResponse.documentElement;
      // get the text message, which is in the first child of
      // the document element
      helloMessage = xmlDocumentElement.firstChild.data;
Here, xmlHttp is the XMLHttpRequest object used to call the server script quickstart.php from the client. Its responseXML property extracts the retrieved XML document. XML structures are hierarchical by nature, and the root element of an XML document is called the document element. In our case, the document element is the <response> element, which contains a single child, which is the text message we’re interested in. Once the text message is retrieved, it’s displayed on the client’s page by using the DOM to access the divMessage element in index.html:
      // update the client display using the data received from the server
      document.getElementById(‘divMessage’).innerHTML = helloMessage;
document is a default object in JavaScript that allows you to manipulate the elements in the HTML code of your page.
The rest of the code in quickstart.js deals with making the request to the server to obtain the XML message. The createXmlHttpRequestObject() function creates and returns an instance of the XMLHttpRequest object. This function is longer than it could be because we need to make it cross-browser compatible—we’ll discuss the details in Chapter 2, for now it’s important to know what it does. The XMLHttpRequest instance, called xmlHttp, is used in process() to make the asynchronous server request:
// make asynchronous HTTP request using the XMLHttpRequest object
function process()
{
  // proceed only if the xmlHttp object isn’t busy
  if (xmlHttp.readyState == 4 || xmlHttp.readyState == 0)
  {
    // retrieve the name typed by the user on the form
    name = encodeURIComponent(document.getElementById(“myName”).value);
    // execute the quickstart.php page from the server
    xmlHttp.open(“GET”, “quickstart.php?name=” + name, true);
    // define the method to handle server responses
    xmlHttp.onreadystatechange = handleServerResponse;
    // make the server request
    xmlHttp.send(null);
  }
  else
    // if the connection is busy, try again after one second
    setTimeout(‘process()’, 1000);
}
What you see here is, actually, the heart of AJAX—the code that makes the asynchronous call to the server.
Why is it so important to call the server asynchronously? Asynchronous requests, by their nature, don’t freeze processing (and user experience) while the call is made, until the response is received. Asynchronous processing is implemented by event-driven architectures, a good example being the way graphical user interface code is built: without events, you’d probably need to check continuously if the user has clicked a button or resized a window. Using events, the button notifies the application automatically when it has been clicked, and you can take the necessary actions in the event handler function. With AJAX, this theory applies when making a server request—you are automatically notified when the response comes back.
If you’re curious to see how the application would work using a synchronous request, you need to change the third parameter of xmlHttp.open to false, and then call handleServerResponse manually, as shown below. If you try this, the input box where you’re supposed to write your name will freeze when the server is contacted (in this case the freeze length depends largely on the connection speed, so it may not be very noticeable if you’re running the server on the local machine).
// function calls the server using the XMLHttpRequest object
function process()
{
  // retrieve the name typed by the user on the form
  name = encodeURIComponent(document.getElementById(“myName”).value);
  // execute the quickstart.php page from the server  xmlHttp.open(“GET”, “quickstart.php?name=” + name, false);    // make synchronous server request (freezes processing until completed)  xmlHttp.send(null);    // read the response  handleServerResponse();
}
The process() function is supposed to initiate a new server request using the XMLHttpRequest object. However, this is only possible if the XMLHttpRequest object isn’t busy making another request. In our case, this can happen if it takes more than one second for the server to reply, which could happen if the Internet connection is very slow. So, process() starts by verifying that it is clear to initiate a new request:
// make asynchronous HTTP request using the XMLHttpRequest object
function process()
{
  // proceed only if the xmlHttp object isn’t busy
  if (xmlHttp.readyState == 4 || xmlHttp.readyState == 0)
  {
So, if the connection is busy, we use setTimeout to retry after one second (the function’s second argument specifies the number of milliseconds to wait before executing the piece of code specified by the first argument:
    // if the connection is busy, try again after one second
    setTimeout(‘process()’, 1000);
If the line is clear, you can safely make a new request. The line of code that prepares the server request but doesn’t commit it is:
    // execute the quickstart.php page from the server
    xmlHttp.open(“GET”, ‘quickstart.php?name=’ + name, true);
The first parameter specifies the method used to send the user name to the server, and you can choose between GET and POST (learn more about them in Chapter 3). The second parameter is the server page you want to access; when the first parameter is GET, you send the parameters as name/value pairs in the query string. The third parameter is true if you want the call to be made asynchronously. When making asynchronous calls, you don’t wait for a response. Instead, you define another function to be called automatically when the state of the request changes:
    // define the method to handle server responses
    xmlHttp.onreadystatechange = handleServerResponse;
Once you’ve set this option, you can rest calm—the handleServerResponse function will be executed by the system when anything happens to your request. After everything is set up, you initiate the request by calling XMLHttpRequest’s send method:
    // make the server request
    xmlHttp.send(null);
  }
Let’s now look at the handleServerResponse function:
// executed automatically when a message is received from the server
function handleServerResponse()
{
  // move forward only if the transaction has completed
  if (xmlHttp.readyState == 4)
  {
    // status of 200 indicates the transaction completed successfully
    if (xmlHttp.status == 200)
    {
The handleServerResponse function is called multiple times, whenever the status of the request changes. Only when xmlHttp.readyState is 4 will the server request be completed so you can move forward to read the results. You can also check that the HTTP transaction reported a status of 200, signaling that no problems happened during the HTTP request. When these conditions are met, you’re free to read the server response and display the message to the user.
After the response is received and used, the process is restarted using the setTimeout function, which will cause the process() function to be executed after one second (note though that it’s not necessary, or even AJAX specific, to have repetitive tasks in your client-side code):
      // restart sequence
      setTimeout(‘process()’, 1000);
Finally, let’s reiterate what happens after the user loads the page (you can refer to Figure 1.7 for a visual representation):
The user loads
index.html(this corresponds to steps 1-4 in Figure 1.7).User starts (or continues) typing his or her name (this corresponds to step 5 in Figure 1.7).
When the
process()method inquickstart.jsis executed, it calls a server script namedquickstart.phpasynchronously. The text entered by the user is passed on the call as a query string parameter (it is passed viaGET). ThehandeServerResponsefunction is designed to handle request state changes.quickstart.phpexecutes on the server. It composes an XML document that encapsulates the message the server wants to transmit to the client.The
handleServerResponsemethod on the client is executed multiple times as the state of the request changes. The last time it’s called is when the response has been successfully received. The XML is read; the message is extracted and displayed on the page.The user display is updated with the new message from the server, but the user can continue typing without any interruptions. After a delay of one second, the process is restarted from step 2.


