


Welcome to Drupal Rules. This book aims to present site builders and developers with tutorials that help them leverage the power of the Rules framework and turn their Drupal sites into event – action-based, interactive applications.
Rules can be used for building complex and flexible systems that respond to various system events, such as node creation, user registration, or viewing a comment. This book demonstrates the Rules framework in a learning curve style: from the basics, such as Reaction Rules, Events, Conditions, Actions, Components, and Scheduler, through advanced features such as using PHP in Conditions and Actions, combining Rules with other modules such as Views Bulk Operations and Flag to further extend the flexibility, to expertise API examples such as providing custom Events, Conditions, and Actions, creating new entity tokens and default rule configurations, and executing rule configurations programmatically.
This section describes the basics of Reaction Rules, Events, Conditions, and Actions.
We'll create a simple rule that makes newly created articles sticky.
Go to Configuration | Workflow | Rules.
Click on Add new rule.

Enter a name for this rule configuration, as shown in the following screenshot:

Enter values for Tags if required (they can be useful for categorizing rule configurations).

Set the Event to Node, after saving new content.

Go to the Condition, Node | Content is of type and set the value to Article by selecting it in the select box.

Add an Action, Data | Data selector and select the sticky field of the node.

Hit Continue.
Tick the Value checkbox.

Click on Save.
With the following steps, we're telling Rules to do the following: whenever a new content has been created and its content type is Article, set its sticky value to TRUE. This rule configuration will be executed every time a new article has been created.
Let's have a look at the way Events, Conditions, and Actions work.
A reaction rule always needs a specified event to happen on the site so it will execute. This can be done when a user logs in, when a node is created, or various other Events are provided by Rules (or other contributed/custom modules). Events may provide variables that can be used in the configuration. For example, if the event is Node | After saving new content, the created content object will be available in the rest of the rule configurations for Rules to work with.
A reaction rule can have multiple triggering Events. For example, we can execute the same Action when we delete a node or when we delete a comment.
We can use Conditions to check some data, that's available in our current configuration, because we usually want to execute an Action only if certain criteria are matching. For example, we might want to check a node's type (Content is of type), whether a node has a particular field (Entity has field) or a truth value (Data comparison). There are a number of Conditions provided by default, but it's also possible to create our own Conditions in our custom module.
Conditions can be grouped into AND or OR groups. These groups can be used to create complex Conditions and each group may have additional AND and OR groups.
This recipe describes the steps to be taken in order to display a custom message on the site after creating a new article.
All recipes in this book assume that the reader is familiar with the Rules UI and/or has read the first recipe in this book, Understanding the basics of Reaction Rules (Must know).
Create a new rule configuration and set the event to Node | After saving new content.

Add a condition, Node | Content is of type and set CONTENT TYPES to Article, as shown in the following screenshot:

Add an Action and select System | Show a message on the site.

By using the Action, After saving new content, we're asking Rules to react on content creation. This means that the rule will fire every time a new content has been created in the system. By using Conditions, we can tell Rules to only fire the action if the created content type is Article (or any other content type). In the MESSAGE field, we've used REPLACEMENT PATTERNS to insert chunks of data from the objects available in our current rule configuration.
This recipe explains how to send a customized e-mail notification to administrators when a new user registers on the website.
Create a new rule configuration and set the event to User | After saving new user account.

Add an action System | Send mail to all users of a role.
Select the role you want the e-mails to be sent to.

Enter the subject of the mail in the Value section under SUBJECT.

Enter the body of the e-mail in the MESSAGE | Value section.

In this rule configuration, we're telling Rules to act on new user registrations and send e-mail notifications to the site administrators when this event occurs. In the e-mail body we've used REPLACEMENT PATTERNS to display the new user's username, the date and time the account was created, and the site's name will be used as the signature.
While this example is very useful and easy to configure, site builders are advised to use it with care. It is not advised to use this action to send e-mails to a large number of users. Because every action is executed right after an event occurred, it can put a serious load on the server(s) and can cause the site to go down.
If we want to send e-mails to individual users, it's better to use the Send mail Action in our rule configuration. A good use case could be when we want to notify a node's author when someone leaves a comment on a node created by them. We could then use the Event Comment | After saving a new comment, then add two Actions.
The following steps will help you send notifications if a user comments on a node created by another user:
In the first Action, we need to load the author of the node that's being commented on. For that we can use Data | Add a variable Action and set the value of TYPE to User:

We then set the value to the node's author.

Optionally, we can set the label of the variable, so we can easily identify it in the next step:

We add another Action, System | Send mail and use REPLACEMENT PATTERNS to make use of the variable we added in the previous step.

We can then use node-author:mail in the To field which is the e-mail address of the original node author.
If we don't want the author to be notified of their own comments, we can add a Condition, Data | Data comparison and set the DATA TO COMPARE value to the user ID of the node author, as shown in the following screenshot:

Next, we hit Continue and set the data value to the user ID of the comment author, as shown in the following screenshot:

This configuration is of course incorrect at this stage, as Rules would only send an e-mail if the Node author and the Comment author are the same, which is the opposite of what we're looking for. A really good feature in Rules is Negate. This setting basically sets TRUE values to FALSE and vice versa, which is just what we currently need. The Negate feature is shown in the following screenshot:

This way the rule will only fire if the author of Node is not the same as the author of Comment.
The following section will throw light on how to send notifications only to users wanting to receive them.
For usability or to avoid our site users from feeling spammed, ideally we would want to add a new Boolean checkbox field to the user object that is used as a switch to indicate whether the user wants to receive these notifications from our site or not. Then in our rule configuration, we can use the Condition, Data | Data value is empty and set the Data selector value to that field. Assuming that the name of the field is field-notifications, it would look like the following screenshot:

This configuration is of course incorrect at this stage, as Rules would only send an e-mail if the field is empty (the user does not want notifications), which is the opposite of what we're looking for. So we need to use Negate .
This way the rule will only fire if that particular user has checked the Notifications field on his/her user account page.
This recipe explains the basics of lists and loops, creating a list of objects, and executing an action on each item.
Create a new rule configuration and set the Event to Node | After saving new content.
Add a Condition, Node | Content is of type and set it to Article.
Add a new loop and set Data selector to node:field-tags.
Add a new Action System | Show a message on the site and set a message.

Using lists and loops in Rules is the way to handle multiple value fields and execute Actions on each individual item. While this particular recipe is not too useful in the real world, it can be used as a basis for more advanced features, for example, when using a node reference field to provide reference to a list of related nodes. We can then load that list of referenced nodes and create a loop that will send a customized e-mail notification to the authors of the referenced nodes.
This recipe explains the benefits of using Components by creating a Condition that can be re-used in other rule configurations.
In this scenario, we want to perform some action when a node is being commented on. But we only want to execute the action if the node was not created by the super admin (that is, user 1) and the node is either an article, or has an image field (field_image).
Go to Configuration | Workflow | Rules | Components.
Add a new component and set the plugin to Condition set (AND).
Enter a name for the component and add a parameter Entity | Node.

Add a Condition, Data comparison, set the value to the author of the node, set OPERATOR to equals, enter 1 in the Data value field and tick Negate.

Add an OR group by clicking on Add or, as shown in the following screenshot:

Add a Condition, Node | Content is of type and set it to Article.
Add a Condition, Entity | Entity has field, set Entity to node, and select the field, field_image, as shown in the following screenshot:

Organize the Conditions so that the last two Conditions are in the OR group we created before.

Create a new rule configuration and set the Event to Comment | After saving a new comment.
Add a new Condition and select the component that we created. An example is shown in the following screenshot:

Select comment:node as the parameter.
Add a new Action, System | Show a message on the site and configure the message.

Components require parameters to be specified, that will be used as placeholders for the objects we want to execute a rule configuration on. Depending on what our goal is, we can select from the core Rules data types, entities, or lists.
In this example, we've added a Node parameter to the component, because we wanted to see who is the node's author, if it's an article or if it has an image field. Then in our Condition, we've provided the actual object on which we've evaluated the Condition. If you're familiar with programming, then you'll see that components are just like functions; they expect parameters and can be re-used in other scenarios.
The main benefit of using Rules components is that we can re-use complex Conditions, Actions, and other rule configurations. That means that we don't have to configure the same settings over and over again. Instead we can create components and use them in our rule configurations.
Other benefits also include exportability: components can be exported individually, which is a very useful addition when using configuration management, such as Features.
Components can also be executed on the UI, which is very useful for debugging and can also save a lot of development time.
Apart from Condition sets, there are a few other component types we can use. They are as follows:
Action set
As the name suggests, this is a set of Actions, executed one after the other. It can be useful when we have a certain chain of Actions that we want to execute in various scenarios.
Rule
We can also create a rule configuration as a component to be used in other rule configurations. Think about a scenario when you want to perform an action on a list of node references (which would require a looped Action) but only if those nodes were created before 2012. While it is not possible to create a Condition within an Action, we can create a
Rulecomponent so we can add a Condition and an Action within the component itself and then use it as the Action of the other rule configuration.Rule set
Rule sets are a set of Rules, executed one after the other. It can be useful when we want to execute a chain of Rules when an event occurs.
Condition sets require parameters which are input data for the component. These are the variables that need to be specified so that the Condition can evaluate to FALSE or TRUE.
Action sets, Rules, and Rule sets can provide variables. That means they can return data after the action is executed.
In this recipe we create a rule configuration that sends a reminder e-mail to a user that hasn't logged in to the website for a week.
Create a new Action set component and provide a user object as a parameter.
Add a new Action, System | Send mail and configure the various fields, set the To field to [user:mail], enter a subject and fill in the MESSAGE field with something such as
Hey, you haven't logged in to our site for a week now....Add a new rule configuration and set the Event to User | User has logged in.
Add an Action, Rules scheduler | Schedule component evaluation.
Select the component which we created in step 1.
Click on Switch to direct input mode and enter +7 days.

Set a unique identifier to this scheduled component.

Provide the account object to the component.
In this example we wanted to send reminder e-mails to individual users, who haven't logged in to the website for a week. For that we've created a component (that executes the Send mail Action), which we use in our rule configuration as a scheduled component. In the rule configuration, we set the Event to User has logged in because we want to set the scheduled date to a week from the user's last login. Please note that you'll need cron running for the scheduler to work.
Additionally, we would probably want to add an Action Delete scheduled tasks, using the same identifier we've used for the scheduled component and place it before the Schedule component evaluation Action.
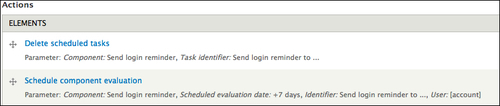
This way we make sure that the scheduled date always gets updated when the user logs in and new reminders get scheduled.
Rules Scheduler provides a user interface through the Views module which can be found at Configuration | Workflow | Rules | Schedule. This interface can be very useful as it displays all the components that are scheduled for execution. It is also a very useful tool for debugging scheduled components.
This recipe explains how to debug the rule configurations using the user interface.
Go to Configuration | Workflow | Rules | Settings.
Set Show debug information to Always.
Save the form.

Rules provides a very useful debugging system. This allows us to follow all the steps of a rule configuration as it's being executed. The following screenshot will show you if the Conditions evaluate and how long each step takes:
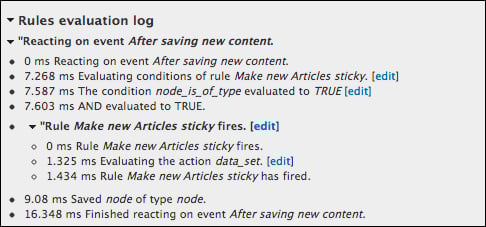
This is useful when our rule configuration doesn't work the way we want it to. It's always advised to use the debugger to see if the Conditions we used to evaluate the way we want them to. It's also useful that we're able to see how long each step takes. In this case, 16 ms is not a huge overhead when creating a node. However, if our rule configuration is set to fire Actions on each page load, it might lead to problems and it's advised to refactor that particular configuration.
Despite there being user permissions related to the display of debugging information, it's advised that on production sites we don't display debug information on the UI. Instead, we make Rules write the logs into the log file by setting the value Log debug information to the system log on the Settings page, as shown in the following screenshot:

The following recipes describe some more advanced features of the Rules framework, including the usage of PHP in Conditions and Actions and explains how to use Rules together with other modules, such as Flag, Views Bulk Operations, and Rules Bonus Pack.
This section explains how to use PHP input in Conditions and Actions.
In this simple example we'll display a message on the front page every Monday. To do that, we'll use a PHP input in our Condition to evaluate to TRUE if we're currently on the front page of our site, and if it's Monday today.
Enable the PHP Filter module on Drupal's module list page and assign relevant permissions if necessary. Take extra care as to whom you assign these permissions to, as the PHP input may cause security concerns so you probably don't want everyone on your website to be able to use it.
Add a new rule configuration and set the Event to System | Drupal is initializing.
Add a new Condition, Data | Data comparison and set it to site:current-date.

In the DATA VALUE field set, click on Switch to data selection and enter
site:current-date.
In the PHP EVALUATION field, enter the Code value, as shown in the following screenshot, and save the Condition:

Add a new Condition and set the handler to PHP | Execute custom PHP code and enter this code in the text area:

Add a new Action, System | Show a message on the site and enter the following Value, as shown in the screenshot:

In the first Condition, we compare the current date value to figure out what day it is today. In the PHP Evaluation field, we always receive the value of the selected field in the $value variable, which in this case is a timestamp of the current date. We're using this value in Drupal's format_date() function to return TRUE if it's Monday today.
In the second Condition, we're returning TRUE if the current page we're visiting is the front page of our website.
PHP can be put to use in many other ways too. Some are described as follows:
We can also use PHP in Actions to execute functions, update database entries, and perform other tasks as required. To do that we can add an Action, Execute custom PHP code, and enter the PHP code we want to execute.
Using a PHP input in Rules is a very effective way to create custom Conditions and Actions if we don't want to programmatically create new ones in our custom module (more on that in the Providing new Events, Conditions, and Actions (Become an expert) recipe in this book). However, there are a number of things we want to keep in mind:
Permissions
It is highly advised that we don't let regular users use the PHP input filter, as it is a high security risk.
Never use delimiters
We should never use the
<?php ?>delimiters in our custom code. Rules takes care of that for us. If we use the delimiters in our Condition or Action, it won't work.Always test on a development site
Of course, it is advised that all Rules configurations are tested on a development site before using them on production sites. This is particularly valid for configurations that include the PHP code in Conditions or Actions. We always want to make sure we enter code without typos, execute the right database commands, or update the right user information.
It is also advised that Debugging is turned on on our development site, that way we can save a lot of time testing our configuration.
This recipe describes the usage of condition groups and the ability to combine Conditions.
We'll create a rule that sends an e-mail to the administrators if either a new article or any content type gets posted on the site that has an image field (field_image).
Create a new rule configuration and set the Event to Node | After saving new content.
Add a new Condition, Entities | Entity is new.
Add an OR Group.

Add a new Condition to the group by clicking on Add condition in the group's row, as shown in the following screenshot:

Add the Condition, Node | Content is of type and set the content type to Article.
Add another Condition to the OR group, use Entities | Entity has field and set the field to
field_image.Add an Action to the rule configuration, use System | Send email to all users of a role, select the administrators role and fill out the SUBJECT and MESSAGE fields.
To create complex Conditions, in Rules we can use condition groups. This way we can create a chain of Conditions using AND or OR groups. AND groups require all Conditions within the group to evaluate to TRUE, while OR groups require only one Condition to evaluate to TRUE.
The following section describes combining of conditional groups:
We can also combine condition groups, that means we can create condition groups within condition groups. Again, it is advised that Debugging is turned on when creating nested condition groups as it can save a lot of time figuring out why a configuration doesn't work as expected.
This recipe explains how to use Rules and Flag to send out e-mail notifications to users when someone comments on a node users are subscribed to.
Create a new flag configuration at Structure | Flags.

Enter a name and set the type to Nodes.

Enter
Subscribeas the label for the new Flag and set and Flaggable content to Article, as shown in the following screenshot, and save the Flag configuration:
Create a new rule configuration at Configuration | Workflow | Rules, set the Event to Comment | After saving a new comment.
Add an Action, Flag | Fetch users who have flagged a node, as shown in the following screenshot:

Set the Flag to the new flag configuration we created.

We want to act on the node the comment belongs to, so we'll use the comment's node in the Data selector field and save the Action, as shown in the following screenshot:

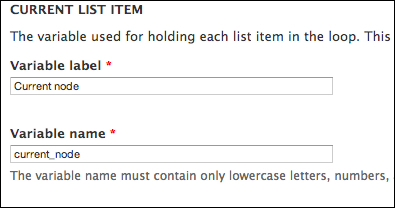
Add a new loop in the Actions section and select users in the Data selector section, as shown in the following screenshot:

Optionally, set the variable name to something that's more descriptive, as shown in the following screenshot, and save the loop.

Add a new Action within the loop System | Send mail and configure the various fields using REPLACEMENT PATTERNS.

Fill in the TO text area. Note, that we make use of a-user:mail token, which became available to Rules in the previous step, when defining the loop and setting the labels of the current list item.
Enter the subject. Again, the a-user:name token is used, which will be replaced with the name of the user in the loop.

Enter the message. Here we make use of other available tokens. This is shown in the following screenshot:

In this recipe, we're creating a new flag configuration for article nodes and using that in our rule configuration to get the list of users that are subscribed to a node that's being commented on (using the Flag we created), and send them a notification e-mail. Flag provides a list data type (Fetch users who have flagged a node) that Rules can use to create a loop of all users who flagged a node, and act on each individual object.
Flag provides various Events, Conditions, and Actions that we can use in our rule configurations.
A node can be flagged or unflagged: This acts on Events that involve flagging or unflagging a node, user, or comment.
The following are the Conditions provided by Flag:
Node/Comment/User is flagged: This checks if the entity is already flagged.
Node/Comment/User has flagging count: This checks the number of flags an entity has.
The Action for fetch users who have flagged a comment/node/user creates a list of users who have flagged an entity. The data will be provided to Rules as a list type, so it can execute a looped action on each individual object.
Flag a comment/node/user: This programmatically flags an entity.
Trim a flag: This sets the maximum number of flags an entity can have.
Unflag a comment/node/user: This programmatically unflags an entity.
This recipe describes how to add a specific taxonomy term to a list of nodes using Views Bulk Operations (VBO) and Rules.
Install and enable Views, Views UI, and Views Bulk Operations. Go to Structure | Views and create a new table view that lists all nodes posted on the site, and add a Bulk operations: Content field to it.
Create a new rule component, select the Rule plugin and require an Entity | Node parameter. Name the new component
Add taxonomy term to node.Add a Condition, Entities | Entity has field, use node as the entity, and set the field to field_tags.

Add a new Action, Data | Add an item to a list and set the value to node:field-tags.

In the Item to add fieldset, click on the Switch to the direct input mode button and enter the ID of the taxonomy term to add, as shown in the following screenshot:

Go back to the view and click on the Bulk Operations: Content field.
In the popup window, select the rule component we created in the SELECTED OPERATIONS fieldset, as shown in the following screenshot:

Views Bulk Operations can use Rules components to execute Actions on a list of entities and objects. We can create the Rules components with parameters and VBO will make these components available as operations in our Bulk Operations field configuration, if the field type matches the component's parameter type. For example, when creating a component that requires a Node parameter, we need to add the same type of VBO field (Content: Bulk Operations) to the view, because this is how VBO determines what kind of parameter is being passed to Rules.
If we want this feature to be a bit more flexible and choose a taxonomy term, we want to add to the nodes instead of always adding a preconfigured term ID, we can do the following:
Add a new Entity | Taxonomy term parameter to our component, set the machine name to the term.
Edit our Action, Add an item to a list, in the Item to add fieldset, click on Switch to data selection, and enter term. This is given in the following screenshot:

Now when executing the operation, VBO will display a configuration screen where we can enter the ID of the taxonomy term we want to add to the node.
This recipe explains how to load the result of a VBO view into Rules.
We will create a view that lists all nodes that are:
Created by user 1 (admin)
Promoted to the front page
More than two weeks old
We will then demote these nodes from the front page using Rules.
Go to Structure | Views and create a new view that lists all the nodes that are created by user 1, are promoted to front page, and are more than two weeks old, and add a VBO field to it. Call this new view Old admin content.

Go to Configuration | Workflow | Rules | Components and add a new Action set component. No parameters are needed; we will get the objects from the view.
Add a new Action, Views Bulk Operations | Load a list of entity objects from a VBO View and select the view we created in the first step, as shown in the following screenshot:

Optionally, enter a descriptive label for the variables and save the Action.

Add a new loop in the Actions section and select the VBO view result as the list data, shown as follows:

Optionally, enter a descriptive label for the variable to be used in the loop.
Add a new Action within the loop Node | Remove content from front page, as shown in the following screenshot:

Select the current node to be removed from the front page.

VBO views can be used to create a list of objects for Rules to execute an action on. This is a useful feature for developers and site builders who make extensive use of views on their sites. The advantage of using this feature is that we can create complex views with relationships and contextual filters (Rules provides an interface to pass arguments to views) and perform actions on the results.
In this example, we will create a new view that lists nodes that are created by user 1 (admin), are promoted to the front page, and are posted two weeks ago or earlier. Then, by adding a VBO field to the view, we make the results of the view available for Rules to use. Because the data type provided to Rules is a list, we can create a loop in our action and perform operations on each individual item.
This recipe describes some extra Rules functionality added by the Rules Bonus Pack module. This module is a set of extensions and integrations with other modules to extend Rules to provide additional Events, Conditions, and Actions and also integrate with other modules, such as CTools.
In this example, we will act on the node view by modifying the page title to include the node's associated taxonomy terms.
Create a new rule configuration, set the Event to Node | Content is viewed.

Add a Condition, Entities | Entity has field, use node as the entity and select field_tags as the field to check for.
Add an Action, Rules Bonus: Miscellaneous | Set page title.

Use REPLACEMENT PATTERNS to modify the page title.

In this example we've used a custom action provided by the Rules Bonus Pack module. We tell Rules to act on a node view by modifying the node's title, if it has any tags associated with it. For safety, we could also add a Condition, Data | Data value is empty, set it to node:field-tags, and check Negate to make sure we only do that if the node actually has terms.
Rules Bonus Pack provides a number of essential extensions to the Rules framework. The following is a list of the main features:
CTools / Page manager integration: Rules Bonus Pack provides a bridge between the Page manager and Rules. It can provide an Event for viewing each custom page variant, which is useful when using Panels and Rules together.
Rules Bonus Pack also provides integration with the Page manager's Access control feature. We can create condition components that can be used by the Page manager to determine whether a user can access the custom page.
Blocks and Theme related Actions: Rules Bonus Pack provides various Block and Theme related Actions. By enabling Rules Bonus: Block and Rules Bonus: Theme modules, we get access to various Actions, such as, placing a block in a region based on a condition or adding a custom CSS class to the body.
These recipes target developers who wish to extend Rules with their own custom Events, Conditions, and Actions. We'll also learn how to provide new entity tokens for Rules to use, how to execute rule configurations in code, and how to provide default rule configurations in our custom module.
The code snippets in these recipes are for demonstration purposes only. They are intended only to explain a specific hook or functionality and do not always provide a generic solution to a problem.
This recipe explains how to create our custom Events, Conditions, and Actions.
In this example, we'll act on a view that's being rendered on the site. We'll create a new condition, where we set the view that's being rendered, and in our action, we'll update a custom database table with the number of times the view has been rendered.
Enable the Views and Views UI modules, and create a view of the latest content on the site. In this example, we'll use the latest content as the view name, and create a block displaying the latest content by the admin that lists all new content posted by user 1.
We also need to create a new database table where we'll store the information; we'll call it custom_view_render. We use hook_schema() in our .install file so our custom table will be available in all supported database engines automatically.
Create a new custom module with the following structure:
{modules_folder}/custom/
 custom.info
 custom.module
 custom.rules.inc
 custom.install
Define the module's information in the
custom.infofile:name = Custom description = Provides an integration with the Rules framework to store the number of times a view was rendered core = 7.x package = Rules Custom dependencies[] = rules dependencies[] = rules_admin dependencies[] = views dependencies[] = views_ui
Define our custom database table in the
custom.installfile:/** * Implements hook_schema() */ function custom_schema() { $schema['custom_views_render'] = array ( 'description' => 'The base table for custom views render.', 'fields' => array( 'view' => array( 'description' => 'The name and display ID of the view.', 'type' => 'varchar', 'length' => '32', 'not null' => TRUE, 'default' => '', ), 'rendered' => array( 'description' => 'The number of times the view was rendered.', 'type' => 'int', 'unsigned' => TRUE, 'not null' => TRUE, ), ), 'primary key' => array('view'), ); return $schema; }Define our new custom Event in
custom.rules.inc:/** * Implements hook_rules_event_info() * Define our new custom event for Rules */ function custom_rules_event_info() { return array( 'custom_views_render' => array ( 'label' => 'A view is rendered', 'group' => 'Rules Custom', 'variables' => array( 'view' => array( 'type' => 'custom_view_datatype', 'label' => t('View being rendered') ) ) ) ); }Because views are not regular data types natively available to Rules; we provided the
custom_view_datatypetype as the variable type. We also need to define this new data type in ourhook_rules_data_info()function:/** * Implements hook_rules_data_info(). * This hook should be used to define new data types to Rules. * * In this case, we simply pass on the view object to Rules */ function custom_rules_data_info() { return array( 'custom_view_datatype' => array( 'label' => t('view') ), ); }We want Rules to invoke our event when a view is being rendered, so we'll use
hook_views_pre_render()in custom.rules.inc and userules_invoke_event_by_args()function to notify Rules that the event needs to be invoked:/** * Implements hook_views_pre_render() * Invoke our custom event when a view is being rendered */ function custom_views_pre_render(&$view) { rules_invoke_event_by_args('custom_views_render', array($view)); }Define our new Condition, that will compare a rendered view's name and display ID with a specified view:
/**
* Implements hook_rules_condition_info()
*/
function custom_rules_condition_info() {
  return array(
    'custom_views_condition' => array(
      'label' => t('View being rendered'),
      'parameter' => array(
        'view' => array(
          'type' => 'text',
          'label' => t('View and display'),
          'options list' => 'custom_views_list',
          'description' => t('Select the view and display ID'),
          'restriction' => 'input',
        ),
      ),
      'group' => t('Rules Custom')
      )
  );
}
In the
options listattribute, we define a custom functioncustom_views_listthat returns an array of the available views on our site:/** * Helper function that returns all available views on our site */ function custom_views_list() { $views = array(); foreach (views_get_enabled_views() as $view_name => $view) { foreach ($view->display as $display_name => $display) { $views[$view_name . '-' . $display_name] = check_plain($view->human_name) . ' - ' . check_plain($display->display_title); } } return $views; }The array key
custom_views_condition, defined in ourcustom_rules_condition_info()function, will be used to execute the actual comparison that will return a Boolean value, so we'll add a function with the same name:/** * Callback function for our custom condition * The function name must match the array key defined in hook_rules_condition_info() */ function custom_views_condition($view = array()) { $current_view = views_get_current_view(); $parts = explode('-', $view); if (($parts[0] == $current_view->name) && ($parts[1] == $current_view->current_display)) { return TRUE; } return FALSE; }Let's create our custom Action for Rules:
function custom_rules_action_info() {
  return array(
    'custom_update_table' => array(
      'label' => t('Update "custom_views_render" table'),
      'parameter' => array(
        'view' => array(
          'type' => 'custom_view_datatype',
          'label' => t('Rendered View'),
        ),
      ),
      'group' => t('Rules Custom')
      ),
  );
}
We also need to add a function that actually gets called by Rules when the action fires. The name of this function must match the value of the "base" attribute defined in
hook_rules_action_info():/** * The database function that gets called by the Rules Action * The function name must match the value in the 'base' attribute * defined in hook_rules_action_info() */ function custom_update_table($view) { if (!is_object($view)) { return FALSE; } $result = db_select('custom_views_render', 'c') ->fields('c') ->condition('view', $view->name .'_'. $view->current_display, '=') ->execute() ->fetchAssoc(); if ($result) { $update = db_update('custom_views_render') ->expression('rendered', 'rendered + :one', array(':one' => 1)) ->condition('view', $view->name .'_'. $view->current_display, '=') ->execute(); } else { $insert = db_insert('custom_views_render') ->fields(array( 'view' => $view->name .'_'. $view->current_display, 'rendered' => 1 )) ->execute(); } }The last step is to create a new rule configuration, set the Event to Rules Custom | A view is rendered, add a Condition Rules Custom | View being rendered and set it to our latest content view, and add an Action Update "custom_views_render" table:
Set the Event.

Add the Condition.

Set the view and display ID in the Condition, as shown in the following screenshot:

Add our custom Action:

Set the rendered view's Data selector value to the view object provided by our event:

In this example, we're creating a custom workflow by providing a new Event, Condition, and Action. In this virtual example, we want to track how many times a given view has been rendered. First we create a new database table to store the data in. Then we define our custom Event (A view is rendered) and our Condition (View being rendered) where we can choose the view and display that's being rendered. In the last step, we define our Action (Update "custom_views_render" table) which takes care of the database operations. Then we go ahead and create the rule configuration using our new Event, Condition, and Action.
It is the best practice to add all Rules hooks to a custom *.rules.inc file. Rules will automatically detect this file and fire the hooks.
The following sections provide more information on creating Events, Conditions and Actions, and clearing caches.
To create new Events for Rules, we need to implement hook_rules_event_info(). In this hook we need to return an array of Events, with the keys becoming the machine readable names of the Events. We can define the label, group, and variables this event will use. We can then fire this event by using rules_invoke_event() or rules_invoke_event_by_args() in another function or hook.
We can define new Conditions by implementing hook_rules_condition_info(). Again, we need to return an array of Conditions with the array keys becoming the machine readable names of the Conditions, and by default, Rules will look for a function with the same name which will be fired when the Condition is invoked. Therefore, we need to create a function using the same machine readable name.
We must also define the parameters used by the condition. These parameters will be used in the custom function that returns either TRUE or FALSE.
When defining new Actions, we need to implement hook_rules_action_info(). Actions have a similar structure to Conditions, the definition consists of an array with information about the Action and a callback function that gets fired. The main difference is that an Action may execute an operation or return additional data for Rules.
This recipe demonstrates how to provide new entity tokens for Rules. Entity tokens provides a way to use placeholders in Rules (and other modules) and dynamically replace them with chunks of data.
In this example, we'll provide the current number of registered users on our site as a globally available token for Rules.
Implement
hook_entity_property_info()to provide our new entity token:/** * Implements hook_entity_property_info() * We extend the natively available 'site' properties */ function custom_entity_property_info() { $info = array(); $properties = &$info['site']['properties']; $properties['registered_users'] = array( 'label' => t("Number of registered users"), 'type' => 'integer', 'description' => t("Returns the current number of registered users on the site."), 'getter callback' => 'custom_number_of_users' ); return $info; }We've defined
custom_number_of_usersas the callback function in thegetter callbackproperty, so we'll create this function:/** * Callback function that returns the current number of registered users */ function custom_number_of_users() { $result = db_query("SELECT count(*) FROM {users} WHERE uid > 1")->fetchField(); return $result; }The newly created entity token will be available to use in Conditions and Actions in REPLACEMENT PATTERNS:

By implementing hook_entity_property_info(), we're providing the Entity API information about our new entity token. The function that returns data needs to be defined in the getter callback property. Implementing this hook makes it possible to use new tokens in the rule configurations, or any other configuration that uses Entity API.
This recipe explains how to execute Actions, Rules, or Rule sets programmatically.
In this example, we'll create a simple component that sends an e-mail to the site administrators and execute this component programmatically.
Add a new action set component, call it Send message to all admins:

Add a new Action, System | Send message to all users of a role.
Select administrators in the ROLES select box:

Enter some text to the SUBJECT text field:

Enter a message and save the component:

Now that we've created our component, we can execute it in our custom module using
rules_invoke_component():<?php rules_invoke_component('send_message_to_all_admins'); ?>
Components can be executed programmatically using the rules_invoke_component() function. The first parameter of the function will receive the machine readable name of the component, followed by any additional parameters that the component requires. This way we can execute complex Actions, Rules, Rule sets, Conditions, or additional plugins defined by other modules.
The following section describes the execution of standalone plugins programmatically.
It's also possible to programmatically execute plugins without combining them into a component. We can, for example, execute a Condition in the following way:
<?php
$condition = rules_condition('user_has_role', array('role' => array('editor')));
$condition->execute($user);
?>This example explains how to modify existing or provide new variables and data for Rules in Actions.
We'll extend our previously defined action with a new one that provides additional data to Rules after the action is executed. In this case, the data provided to Rules is the number of currently registered users on the site.
This recipe is based on the recipe Providing new Events, Conditions, and Actions (Become an expert) in this book.
Add a new associative array to our
hook_rules_action_info()function and instead of "parameters" we'll use the "provides" property:'custom_registered_users' => array( 'label' => t('Get number of registered users'), 'provides' => array( 'number_of_users' => array( 'type' => 'integer', 'label' => t('Number of users') ), ), 'group' => t('Rules Custom') )Create the callback function that returns an array in the format Rules expects it:
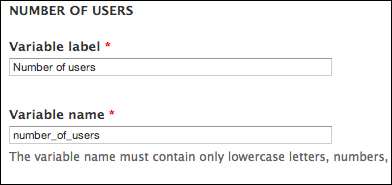
/**
* Callback function that returns the current number
* of registered users and returns it to Rules in an
* array
*/
  function custom_registered_users() {
    $result = db_query("SELECT count(*) FROM {users} WHERE uid > 1")->fetchField();
    // Return an array for Rules with the array key
    // being the machine readable name defined in the
    // 'provides' property
    return array(
       'number_of_users' => $result
    );
  }
After clearing caches, the newly created action will be available in the list of Actions:

Optionally we can modify the variable's label and suggested machine readable name in the next configuration screen.
Tip
When adding additional Actions our new variable becomes available to Rules. For the purpose of this example, we'll add the Action, System | Show a message on the site and display the results in the MESSAGE field. Note that the created variable doesn't become available as a token, so we need to Switch to data selection and select the variable from the drop-down list.

Actions can provide new variables to Rules by making use of the provides property in hook_rules_action_info(). The data structure is almost identical to the way we declare parameters, the only difference is that user input is not allowed. By providing new variables to Rules, we can execute complex functions in an action and then work with their return data while still in Rules.
This recipe explains how to provide default rule configurations in code. The advantage of that is that we can keep our configurations in code and use version control, such as, SVN or Git.
In our custom module's folder, we add a new file called
custom.rules_defaults.incand declare the rule configuration by implementinghook_default_rules_configuration(). The contents of the file are as follows:/** * Implements hook_default_rules_configuration() */ function custom_default_rules_configuration() { $rule = rules_reaction_rule(); $rule->label = 'Default Rule'; $rule->active = TRUE; $rule->event('node_insert') ->condition('data_is', array('data:select' => 'node:type', 'value' => 'article')) ->condition(rules_condition('data_is', array('data:select' => 'node:author:uid', 'value' => 1))->negate()) ->action('drupal_message', array('message' => 'Hey [node:author], thanks for creating a new article!')); $configs['custom_default_rule'] = $rule; return $configs; }After clearing the caches, our newly created default rule will become available in the list of configurations, as shown in the following screenshot:

Using hook_default_rules_configuration(), we can define our rule configuration in code using Rules' methods for Events, Conditions, and Actions. Rules will look for a file *.rules_defatuls.inc in our module's folder, and automatically add our default rule to the available configurations after clearing the caches.
Rules is compatible with the Features module, which provides a centralized API for exporting and importing configuration from the database. This is also an effective way to manage configuration in code and version control systems.
It is also possible to modify a default rule configuration in code. For that we could use hook_default_rules_configuration_alter() in our *.rules_defaults.inc file.
  /**
   * Implements hook_default_rules_configuration_alter()
   */
  function custom_default_rules_configuration_alter(&$configs) {
    $configs['custom_default_rule']->condition('data_is', array('data:select' => 'node:is_new', 'value' => TRUE));
}Rules tracks the state of a Rule configuration that has been added programmatically. What that means is that it can determine whether an imported configuration is in its default state (not modified compared to the code) or overridden (modified using the UI, but not in code). When a configuration is modified, Rules allows to revert it back to its original state.

By clicking on that, we're telling Rules that it should re-read the configuration that we've defined in code and revert it to its original state.


