Download code from GitHub
Platform-as-a-Service (PaaS) is probably the next (or current) big thing in computing that is here to stay in the future of software and services. With PaaS, companies can abstract their services from the underlying IT infrastructure, investing the majority of the effort in the core business instead of managing several building blocks, often with repetitive actions and operations.
However, Azure is not just PaaS, and in this chapter, we are going to use IaaS instead. Infrastructure-as-a-Service (IaaS) is a model-provisioning IT low-level infrastructure (such as virtual machines) that works without having to manage the entire stack as it takes place on-premise.

A figure showing what customers manage (blue) in different scenarios.
In this chapter, we present the first scenario of the book, where a fictional company wants to start up, minimizing the initial IT investment as well as the time to market. We learn how several Azure building blocks (such as virtual machines, Visual Studio Online, Azure Resource Manager, RemoteApp, Azure Storage, among others) can be combined in order to provide a set of foundation platforms for a software development company.
As mentioned in the preface, in order to better understand the key points of this book, we decided to translate them into practical situations, using scenarios taken from a fictional company named "Cloud Makers XYZ" (hereafter mentioned as just "CloudMakers" or "CM").
The entire book is divided into four main scenarios, which explore the company's assets in a step-by-step manner, focusing on how Microsoft Azure has been used to provide foundation services:
Scenario 1: Bootstrapping the company
Scenario 2: Building the e-commerce product
Scenario 3: Building the GeoProvider product
Scenario 4: Enhancing the company
These four scenarios have been conceived to create a coherent and straightforward path for readers who are already aware of the issues to be managed when dealing with software and services. Furthermore, it is useful in order to understand cloud services, such as Microsoft Azure, while they are used in connection with existing processes and workflows instead of having them deployed as is with "Hello World" samples.
Real-world experiences are the inspiration behind providing the samples shown in the scenarios; the majority of the tips, procedures, and code samples come from real production environments.
Note
As with many books claiming to represent a "best practice" or a "suggested usage" of a given service, this book does not have a complete understanding of what's going on in your specific company. We also know that each case is different and, finally, we strongly believe that architectures are not good or bad in an absolute sense and that they depend on specific use cases.
Hence, in this chapter and in the next one, we walk through the first scenario, where CM is bootstrapping itself.
CloudMakers is a newly founded company in Milano, Italy. The founders are as follows:
Han, the CEO (chief executive officer), has a strong management background. His top qualities are leadership and commitment. He deeply understands technical inputs from the CTO and translates them into opportunities for the market. However, he demonstrated almost no real knowledge of how to build software.
Luke, the CTO (chief technology officer), has a strong technical background. He prototypes new products, helps select candidate developers, and is responsible for the quality of the software produced by CM in general.
Leila, the CFO (chief financial officer) and main project manager, is responsible for the financial strategy of CM and is in charge of managing and monitoring the projects delivered by CM.
In addition to these three key people, who have been getting along for many years before founding CM, there are a couple of additional, IT-related people:
Owen, a senior IT professional, has a strong background in managing IT infrastructure. Before joining CM, he was responsible for the entire physical infrastructure of his old workplace.
Flint, a full-stack developer, has previous experience in a failed start-up. He has been hired to develop the main products with Luke and learn everything about cloud computing and Microsoft Azure from him.

A summary of the most relevant resources of CloudMakers
CM has been founded with a very limited budget, and the board has taken the decision to minimize the IT investment in order to prioritize their marketing and advertisement efforts until they break even. Under this constraint, every initial investment should be evaluated and approved while pay-per-use services are welcomed.
Luke planned to build the new core infrastructure on Microsoft Azure, using the cloud to quickly deliver new services as well as the development environments required for the entire company and the technical team.
He planned to implement a BYOD (Bring Your Own Device) policy to reduce the governance of physical assets; so, the employees are invited to use their personal laptops and mobile phones for the purpose of work while they're at home or in the office.
Luke's plan is to build a consistent development environment entirely on the cloud, where employees can connect through Remote Desktop Protocol (RDP) to do their work (refer to the Setting up the development environment section).
Since the majority of the code is going to be written using Visual Studio and Luke has had strong experience in using Team Foundation Server (TFS) for Application Lifecycle Management (ALM), CM is going to use Visual Studio Online to store the company's code base as well as to help Leila keep track of the actual activities of the technical team (refer to the Implementing the development process section).
Since Luke is often out of the office due to several business events with Han and due to his participation in international meetings about start-ups and technical conferences and as a consequence of the ability of the entire staff to work from home, CM planned to introduce a way to let employees have a complete workplace even from their mobile devices: smartphones, tablets, and non-Windows PCs (refer to the Provisioning development environments for mobility section).
After a demand made by Owen, overwhelmed by growing requests from Flint to prepare a complex Test/Prod Deployment Environment, Han asks Luke to find an appropriate solution to simplify and automate the process of the creation and maintenance of these environments since they are used to provide clients with demo products. In addition, they should be online in minutes with minimal administrative effort (refer to the Automating repetitive operations section)
In Chapter 2, Enhancing the Hybrid Process, we'll learn how CM enhances the process it's just been created with by paying particular attention to security, disaster recovery, and the control of resources.
In this book, we started with the assumption that the right cloud computing vendor has been chosen already. But, in general, when planning a cloud approach, these are useful questions to answer before you start working:
What do I need from the cloud vendor?
Which vendors have the stuff I need?
What does it cost, compared to other major cloud vendors?
Are there some pros/cons of one platform over another?
Where is my business located (in conjunction with the cloud vendor data centers) and, more importantly, where are my services going to be consumed by users?
These are just a few of the initial questions we need to answer before we go ahead with making any plans. To answer these questions, a little bit of foresight is required.
Some of the most relevant players in the cloud computing market of IaaS and PaaS are listed as follows:
|
IaaS |
PaaS |
|---|---|
|
Amazon Web Service Microsoft Azure Rackspace CenturyLink Google Cloud Platform VMware IBM SoftLayer |
Salesforce Microsoft Azure Google Cloud Platform Red Hat Progess IBM SoftLayer SAP |
IaaS might suffice for putting a development infrastructure in the cloud is something. However, as the scenario evolves into a more complex cloud positioning made of services for the customer base, the answer is not something as simple as "We need just VMs."
These other questions can help identify which services are required:
Is my company planning to sell Software-as-a-Service (SaaS)?
Building SaaS products on a PaaS can be effective in terms of pros versus cons. It is proven that a minor focus on managing the infrastructure can reduce costs but also improve the overall focus a company has on its core business.
A PaaS pricing model can also be translated into a SaaS pricing model, helping companies find out the right price for an elastic service, avoiding the complexity of the CAPEX approach.
Does my company have dedicated IT staff capable of maintaining infrastructures?
If the answer is no, you should probably take into consideration only PaaS, avoiding the use of IaaS, which, however small, introduces some administrative effort.
Does my company have a preference between make or buy choices?
If make choices are always preferred (although the term always is a per-se limitation), PaaS can be avoided and IaaS should be enough to build end-to-end services.
If buy is the choice, PaaS should be optimal. There are ready-to-go PaaS services where users just have to deploy some custom preexistent code in order to go live. But of course, since it is a value-added service, it costs more.
If the correct balance between make and buy choices has been made, both IaaS and PaaS are useful depending on the specific situation.
This is not the right place to perform a comparison between cloud vendors—first, because it is really hard to do, and second, because it is beyond the scope of this book. However, everybody knows the following vendors, beyond among the most important players in the Public Cloud market (in alphabetical order):
Amazon Web Services
Google Cloud Platform
Microsoft Azure
At the time of writing, each of the three platform has an almost comparable cloud offer, so the choice has to be taken with some in-depth analysis.
If we need IaaS, these can be valid questions:
Does the platform provide virtual machines?
Of which sizes?
Can the VM environment (network, attached disks, or balancer) be customizable?
How is it customizable and does it fit the needs?
Is there any appliance we need (or should need) in order to work better with the chosen public cloud?
Is that a mandatory choice or is it up to the user?
If, instead, we need PaaS, these can be valid questions:
Do we have an existing product to deploy? In which language has it been written? Does it have constraints for deployment?
Does the cloud vendor PaaS fit this product?
Does the provided PaaS accelerate our existing development process?
Does it propose a new one?
Is there good integration between services of the same cloud vendor?
Is there good integration from/to other cloud vendors (that is, to enable multicloud solutions)?
Is there a lock-in while choosing a given PaaS product?
How much could it cost in the case of an outside migration?
Does is have a learning curve to go live?
How much could it cost in the case of adoption?
We always prefer to exploit questions to analyze problems, since we should never take a decision without evaluating the pros and cons.
Finally, we should look at an aspect that seems to be secondary (but isn't): the data center location.
In the public cloud, there is often no private data center, so resources are almost always shared between different customers from around the world. This points to several potential issues about security, isolation, and more, but it is up to the cloud vendor to solve these issues.
Anyway, there comes a time when we need to decide where to place our data, our code, and our VMs. If the business is primarily located in the US and we choose a cloud vendor that has a single data center in Australia, this is probably not the better choice in terms of latency.
Note
Latency is a term that indicates the time between input arriving to the other side of the communication channel. If we send a signal to a satellite, an average latency could be around 600 ms, which means that more than a second is required to make a round-trip (that is, an HTTP request). Latency depends on the physical constraints of the channel plus the distance, so the second is of primary importance while evaluating a data center location.
Again, if we decided for a cloud vendor that has a data center near us (the company) but far from the customers (that is, a company located in the UK with the data center in the UK but users in the US), this is, again, not a good choice. The best idea is a cloud vendor that provides different locations for a service, where companies can choose appropriately where to place (or replicate) services.
Content Delivery Networks (CDNs), covered later on in the book, represent a solution to shorten the distance between content and the end users. While Data Centers (DCs) are few, a CDN has hundreds of nodes distributed in regions even outside the Azure perimeter. For instance, a web application serving photos for users throughout the whole planet can have this topology:
The deployment of the web application code into a few DCs (or even just one)
The replication of the contents (the photos) all around the globe with a CDN
The intention of the user is to gain access to resources faster, since the content is served from the nearest CDN location while the page is served by the central DC.
A good point to start building the company's development environment is to build a development machine for employees. In the last few years, developing through a well-configured virtual machine (either on-premise or in the cloud) has been a growing trend that has had consistent advantages:
It reduces the need to maintain several pieces of hardware in order to comply with performance needs
It enables the use of legacy hardware (thin clients and netbooks, among others) to act as a workstation proxy
It centralizes the governance of the involved VMs into a single place where it should be easier to provide support
It provides an efficient method to build a new workstation, with the required software, to let a new employee work immediately
In Microsoft Azure, VMs are basically provided in two main operating systems: Windows and Linux. The requirements a VM has are as follows:
Since VNs, NSGs, and IPs will be covered in the next chapters, we'll now introduce the concept of a storage account. For this account, the other requirements discussed earlier can be met even during VM provisioning, but it is better to plan this in advance according to requirement analysis:
How many storage accounts should we create?
One per VM? One per division? Just one?
What are the constraints of the storage account service?
Can I create an indefinite number of accounts?
Does each account have its own limits in terms of capacity and bandwidth?
Is there a different type of storage we can use?
These questions should help you understand how it is very important to stop and think before creating a new resource in the cloud. It is true that one of the main pillars of cloud computing is to be "elastic" (and in fact you can create/destroy almost everything in a few seconds/clicks); however, since different services are often interdependent, it is very important to avoid the use of a blind Next | Next approach.
Let's start with creating a new storage account:
Go to https://portal.azure.com (the new portal) and locate your desired directory/subscription in the upper-right corner.
Locate the New action and choose Data + Storage (or another semantically equivalent group).
Note
As the Portal can change its layout and/or internal links frequently, a good advice is to abstract from the exact steps you need to do in order to complete an action. Since the Azure Portal can change frequently, it is useless to imprint solid step-by-step guidance where a reasoning-based approach is more efficient.
Look up the Storage account item (with the green icon) and follow the steps required to create it. Ensure that you specify Resource Manager and Deployment model before starting with the creation process.
Note
Azure started transitioning from the original deployment model (classic) to a new one (Resource Manager) a few years ago. This new deployment model is almost complete, but we are still in an intermediate phase. Later in the chapter and in the book, always use the Resource Manager model (as well as the new portal) when available.
During the creation process, some inputs are required:
Name: This is the account name as well as the DNS prefix of the root service domain (
*.core.windows.net). Choose it according to the requirements (https://msdn.microsoft.com/en-us/library/azure/dd135715.aspx) and know that we cannot change it after the creation process.Type/pricing: This is the type of offer (and consequently, the feature set) of the storage account. It is primarily divided into two areas:
Premium: This is made just to host the disks of the virtual machine, and it has great performances since it is an SSD-based service. Of course, it is more expensive.
Standard: This is a general-purpose service to host disks as well as generic resources, plus it has three other services (Queues, Tables, and Files) that we will explain later.

A group of three service types with prices (valid at the time of writing) with a different feature set
The resource group: For now, think about this as a logical group of resources. So, depending on the planned life cycle of the storage account, choose the appropriate existing group, or, if new, name it appropriately (that is,
TestResourceGroup,CM_Storage, orCM_Development).
In the next few steps, we provide a fresh Windows Server environment to later configure the applications required for the reference workstation:
Locate the New action and navigate to Compute | Visual Studio.
Select the appropriate image type for your needs (like in the following screenshot):

This provides the latest Windows Server image with Visual Studio preinstalled
Again, ensure that you choose Resource Manager as the deployment model before clicking on the Create button.
Following the creation steps, you will be prompted with some input requests, such as the following:
Basics: This includes information about the administrator username and password, location, and the resource group.
Size: This includes the actual size of the VM. There are several options since the available sizes span small machines to very large ones. Some instance types are named
DSX(whereXis a number), indicating that they support the usage of Premium Storage and provisioned IOPS.As for the storage account (and for every single Azure service, actually), we can choose the service type, which maps the feature set of the service. In the case of VMs, the differences between them are as follows:
Cores, memory, and data disks: Primarily, these are metrics that define the performance
Load balancing: This provides the support of a load balancer on top of the VMs in the same set (in the case of just one VM, this option is useless)
Auto scaling: This is the capability to dynamically create new VM instances based on some triggers
Advanced features: Provisioned IOPS, SSD local disks, and RDMA support are included in some of the most powerful (and often, the most expensive) pricing tiers

Some DS instance types and D1, a good choice for a simple remote development environment.
Settings: As mentioned earlier in this chapter, we use default settings for VNs, IPs, and NSGs, covering them in further detail later in the chapter.

This is the provisioned VM with a configured public IP address and firewall rules, allowing us to connect to it
The creation of a VM also implies the creation of one (or more) Virtual Hard Disks (VHDs) in order to store the operating system and the data of the running instance. It is possible to look at the contents of a storage account (containing the VHDs of the VMs) in the vhds container of Blob service directly from Portal, as shown in the following figures:


This is the storage account blade, where it is possible to inspect storage services and perform basic operations
When the VM is ready for use, it is possible to connect through RDP to customize it by deploying local software, such as SDKs, development tools, productivity suites, and so on. This is not in the scope of the book, so we assume it has already been done. What we want to do, instead, is create a generalized image of the VM in order to enable further image-based VM creation with minimal administrative effort.
In Windows-based operating systems, the sysprep command is used to generalize the operating system instance, removing specialized details, such as users, keys, and profiles. In Linux, we need to use the Azure Agent with the waagent command.

You can just launch the sysprep command to open this window. Then, specify the Generalize and Shutdown options.
Earlier in this chapter, we used a portal to perform various administrative activities. However, Azure has a fully featured REST management API. In addition, Microsoft provides a .NET management library wrapped by PowerShell in order to perform almost every operation from the command line. We will properly use PowerShell later in the book.
But now, we use a third option to operate on Azure, the ARM Explorer. During the creation of the storage account, we briefly went over the concept of resource groups, the logical container for a group of service instances. The ARM Explorer (available here in preview: https://resources.azure.com/) is a lightweight tool used to inspect and administer Microsoft Azure using the Resource Manager deployment model (which is actually JSON-based).
The ARM Explorer tool is a great tool to learn what's under the hood of the ARM model. For example, for the given VM created previously, this is what the explorer shows:

The output shown by ARM Explorer while selecting a resource from the resources tree
As we can see in the preceding image, ARM Explorer lets us explore the various objects in the Azure subscriptions, also providing a PowerShell sample code to perform basic contextual operations.
In the previous figure, we selected the virtualMachines node. However, if we select the specific VM (in the preceding case, the CMDevReference tree node), the Action tab becomes available with a series of options. To perform the capture of the VM's image, we can proceed as follows:
First, deallocate the VM by invoking the
deallocatecommand.After the status of the VM has passed from Stopped to Stopped (deallocated) (you can even check this in the ARM Explorer itself or in the portal), launch the
generalizeaction.Now the VM is ready to be captured, while the
captureoperation needs some arguments for it to be executed, as specified here:
The
captureoperation with its argument to be executed properly. At the time of writing,destinationContainerNamemay have been ignored from the platform during the capturing process
We can check out the image that has been properly created by navigating the storage account, looking for the VHD we just created. Along with the VHD, Azure created a JSON representing the command to be used with ARM in order to create a fresh VM based on the captured image.

The location where Azure stored the generalized images with the corresponding ARM-ready JSON template to create new VMs
CloudMakers now has a generalized Windows-based image for development machines. In the Automating repetitive operations section, we'll learn how to automate many of these related activities.
Instead of teaching you how to manage the development process at its best, this is an overview of how to integrate services in order to reduce the complexity of the deployment and the administration of a popular Team Foundation Server (TFS) infrastructure.
Tip
TFS is a comprehensive product providing source code control, automated testing, an automated build platform, reporting, project management, and counting. On the other hand, the new kid on the block (over the last few years) is called Visual Studio Online (VSO), which is the Azure-hosted version of TFS, missing just some advanced features (such as SQL Reporting/BI).
There are a lot of connected products and services around TFS/VSO, designed to integrate and develop the even more complex scenarios of Application Lifecycle Management (ALM). The advantage of using VSO is that, as SaaS, it requires zero maintenance (it is all up by Microsoft) and a very short provisioning time: this is why it is useful in many contexts where a ready-to-go solution is required with a minimal set of customization points.
CM primarily needs to save/control its code base by adopting a source code repository service. As usual, some questions can help while choosing the appropriate vendor/service:
Where is the code repository located?
Which protocols (a.k.a. source control engines) is CM using?
Does the service integrate with third-party services? Which ones?
We know that real questions can be many more than just these, but always try to stop and write down the requirements before jumping into a new service.
Note
SaaS and PaaS maintenance
We are repeating the power of Platform-as-a-Service (and, consequently, also the power of SaaS) as a prayer in reducing the overall governance of a company by focusing just on its core businesses without dealing with the management and maintenance of the IT infrastructure. All true and all beautiful, but do not confuse this with the capability of raising the number of services indefinitely and without any real scope.
Even PaaS services require, as far as possible, some maintenance effort; once created, they need attention. Try to introduce a new service only if the existing services in place do not cover the requirements and only if the new service can be correctly investigated before building strong dependencies on it.
CloudMakers developers (which are actually two in number, Luke and Flint, at the time of beginning the start-up) come with different kinds of experience. Among the differences between them, Luke has always used TFS in his project, and he is accustomed to its native, centralized source control engine. On the other hand, Flint has been a full stack developer, using distributed source control engines, such as Mercurial and Git.
As we see later, since every team project has its own source control engine, we can create personal workspaces (workspaces under the control of a single developer to test, play, and prototype) according to the developers' preference, while the company's workspaces (those containing the actual code base) can use a single, shared, and different engine.
Tip
Using different source control engines can be very fair in organizations where several languages and technologies are put in place. However, some operations (such as collection-level branching and merging) are not allowed, making the integration between projects managed with different engines harder.
We can create a brand new VSO account by directly going to https://go.microsoft.com/fwlink/?LinkId=307137&clcid=0x409. Or, we can use the Azure Portal by creating our first team project.
In the TFS/VSO ecosystem, a single deployment can have this tree structure:
Project collections: These can be 1 to n in number. A project collection is a high-level collection of folders named
Team Projects.Team Projects: These can be 1 to n in number. A Team Project is a collection of code, no matter how many real software solutions there may be. The term "project" should refer to a business project, which, of course, is a collection of multiple software packages/solutions/projects itself.
In VSO, there is just one collection (DefaultCollection) with many (to be created by users) Team Projects.
Tip
For more information on what a team project is (or should be), go to https://msdn.microsoft.com/en-us/library/ms181234(v=vs.90).aspx.
From within the Azure Portal, we can find the New Team Project wizard to open this blade:
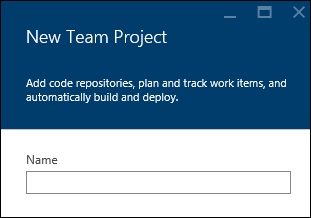
This is where we can create new Team Projects
Contextually, if not already created/owned, we need to create a new VSO account.

The creation of the CM account within DefaultCollection
The first team project we create can be a test, so play with the configuration settings:
Version control: We can choose between TFVC (the standard engine of TFS) and Git (the well-known open and distributed engine)
Process Template: We can choose how the development process should be set in order to organize the frontend experience as well as part of the implicit ALM (the current options are Scrum 2013, Agile 2013 and CMMI 2013)
VSO can integrate users with personal identities (Microsoft accounts) or organizations' identities (Azure AD). We'll learn how Azure AD works in the next sections, but remember that it is a good practice to bind a VSO account with an Azure AD tenant in order to implement better control of who has access to resources.
Tip
In fact, try to imagine a contributor using the company's VSO with their personal identity: during the development process, even if it lasts years, they can gain access to multiple resources by adding their ID to various projects/folders. When they decide to leave (or when the contribution ends), an administrator has to manually check all the projects and resources involved and disable the ID from access. With Azure AD, which is an Identity and Access Management (IAM) solution, an administrator can just centrally disable the access of the single account, disabling all the connected services' entry points with a single action.
After provisioning a VSO account, when the billing and some minor configuration details are summarized in the Azure Portal, its management console is available here:
https://<<name_of_account>>.visualstudio.com
Each team project is available at this link, as shown here:
https://<<name_of_account>>.visualstudio.com/DefaultCollection/<<name_of_project>>
The management console of the portal looks similar to the one shown in the following screenshot:

This is the Kanban board created as a consequence of the Process Template selection while creating the team project. We can define tasks, assign people, create items (such as Stories, Iterations, and Features) and also manage other aspects of the development process (using the Code/Build/Test menus).
Visual Studio automatically recognizes VSO/TFS based on the endpoint URL we give to it. In the case of VSO, a web-based sign-in is asked from the user in order to perform a claims-based authentication for the correct provider (a Microsoft account or Azure AD). If a standard TFS is detected, even basic authentication will be available.

This is the DefaultCollection collection of the Team Project of the VSO account along with three Team Projects
Visual Studio 2013/2015 natively supports both Git and TFS as backend source control engines, but only one at time can be the default, as shown in the following screenshot:

This is where we can choose the default source control engine
In the case of TFVC-based Team Projects, we can map and get the entire project collection in a base local folder, as follows:

This is the source control explorer, the place where we can manage the TFVC-based projects of the collection
In the case of a Git-based team project, we can start by just cloning the repository.

We are now cloning the Git-based repo into a local folder
Tip
The Git backend of VSO has been implemented in a standard way in order to enable the majority of the existing clients to connect to it and push the code.
Finally, after writing some code, we can save our work as follows:

In this example, we both Commit (save locally) and Push (align the remote Git repo) in a single action. For further information regarding Git, refer to the Git documentation
As mentioned at the beginning of this section, VSO is a complete solution for ALM, and it's not just another source control environment. It can automatically deploy the build result to connected services, and more generally, it can react to specific triggers with custom actions even against third-party services.
A webhook is a method to notify decoupled systems in a standard way based on HTTP and public endpoints. In VSO, there are several predefined service hooks, whose purpose is to trigger events against third-party services in the case of a specific VSO event that has occurred. At the time of writing, the events supported by VSO (which VSO can listen to) are as follows:
Build completed: This triggers if a build is completed (in the case of failure, success, and other supported statuses)
Code checked-in/pushed: This triggers when someone saves their code
Team room message posted: This is self-explanatory
Work item actions (creation/comment/update): This triggers in the event of one of the supported actions on work items
Tip
This last one is particularly useful for the purpose of integrating with a company chat service in order to create real-time engagement on the progress of the overall work.
In fact, among the built-in supported third-party services, we have the following:
Azure Service Bus and Storage: Supported actions are related to sending a message on a queue, a topic, a notification hub, or a storage queue. It's useful in building some logic applications in response to these events.
Jenkins: Supported actions are related to triggering a build into Jenkins since it is a popular (and open source) Continuous Integration (CI) service.
MyGet: This is a NuGet-as-a-Service solution with great features. The most useful supported action is to automatically publish a NuGet package into the MyGet repository if a build occurs on the VSO side.
Slack: Since this is one of the most popular messaging systems, the obvious supported action is to post a message on a specific channel in the case of an event on the VSO side.
ZenDesk: This is one of the most popular ticketing systems in the world. A nice use case for integration shows that users from Visual Studio can comment on a work item, triggering a private comment in a ticket on the ZenDesk side.
In fact, there are a lot more built-in integrations, and there is also a provider, Zapier, that acts as a simple orchestrator itself. On the Zapier side, we can react to webhooks by triggering a lot (hundreds) of different services, even the ones mentioned earlier.
Note
Take a look at Zapier's capabilities here: https://zapier.com/app/use-cases in order to get an idea about the possible integration scenarios.
Finally, if you want to trigger a custom HTTP listener, there is a simple webhooks provider, letting you decide what to notify and how to do it as long as it's understood that the target should be an HTTP endpoint.

In this hook, we listen to the Work item updated event in case the event occurred in the Core area for an Epic work item type and when someone change the State field

These are some of the invocation settings in custom webhooks. We can also specify an optional basic authentication and the details of what to send in the body of the POST request.
In the Setting up the development environment section, we saw how much value resides in off-shoring the development environment (later called DevEnv) in the cloud by building VMs with development tools instead of using the local computer.
This pattern also highlights some hidden advantages:
If the connectivity between the remote development environment and the company deployments is low-latency and high-speed, then every operation between them can be easier and the productivity witnesses a boost compared to local environments.
If you are in the middle of a complicated debugging session just before the office closes, you can disconnect from the remote VM and continue debugging from anywhere else (even from your home computer).
Your data is generally more secure in terms of availability than a personal workstation. A remote VM can obviously be accessed from the Internet (directly or through a VPN), along with the potential issues related, but a personal computer can also be stolen or damaged (backups are always our best friends in such scenarios).
This pattern leads to a consideration: "Do we still need powerful IT stuff to run development environments?". Since the DevEnv is remote, we can use any device supporting the RDP protocol (for Windows VMs) or the SSH protocol (for Linux ones). The next step is to use a mobile phone, a tablet, or a thin client.
Note
Microsoft Thin PC, for example, is a reduced Windows 7-based OS project with minimal functions and a RDP client. The purpose of this OS is to run on legacy computers with outdated hardware, enabling the consumption of even complex applications through the Internet and the remote desktop. For more information, refer to the deployment guide here: https://www.microsoft.com/en-us/download/details.aspx?id=26676.
Under this hypothesis, we can build a workstation with almost any device connected to the Internet.
Note
Nobody really wants to develop with Visual Studio and multiple open windows on a smartphone display. However, Project Continuum by Microsoft lets users use their continuum-enabled devices as workstations by connecting them to a TV or a PC monitor. The idea behind this is the thin client pattern, where services or applications are available on the Internet through HTTP or RDP. At this link, there is an accessory for Windows Phone devices that makes the magic happen: http://www.microsoft.com/en-us/mobile/accessory/hd-500/.
That said, CloudMakers wants to enable its workers to have the same facilities that they have in their office while on the move. Luke also has a Surface 2 RT tablet, which is very useful for basic office usage and for Internet usage/e-mail and less useful for development due to its ARM-based processor architecture (Surface RT has a specific version of Windows compiled for ARM).

This is the final result of a correct deployment of RemoteApp. In this case, the company user (blurred) has access to a bunch of applications, which are not running from its local environment but are provided through an abstraction on Remote Desktop Protocol instead.
Until this point, the remote development environment requirement can be easily fitted by the VMs created in the previous part of the chapter: Luke just has to connect to them from the Surface, and that's it! However, as a CTO, he identifies some drawbacks in the previous approach, as follows:
As the provisioning is one VM per user, with each new employee Owen needs to:
Run the scripts to build the VM (we'll learn later which kind of scripts)
Tell new users the appropriate credentials
In the case of reimaging, Owen has to set up an appropriate backup-restore solution for the personal archives on the remote machine
Users need to maintain (at least) two different accounts: one for the company and one for the newly created VM
In the case of software updates, each user has to manually update their VM
Finally, and this is both an advantage and a disadvantage, each user is the administrator of the remote VM, with these two main categories of possible consequences:
As Luke plans to extend this pattern to the whole company, it emerges that it is not really sustainable in terms of the management effort (the time spent to activate/deactivate or support people), consistency (some VMs are different from others), and security.
Let's introduce Azure AD before explaining RemoteApp, and let's start identifying what Azure AD is not. It is not the managed version of the Windows Server Active Directory. Despite its resemblance in name, Azure AD is just an IAM service managed and hosted by Microsoft in Azure. We should not even try to make a comparison because they have different scopes and different features. It is true that we can link Azure AD with an on-premise Active Directory, but that will be just for the purpose of extending the on-premise AD functionalities to work with Internet-based applications.
Azure Active Directory is a growing Identity and Access Management (IAM) service (now with B2C features), with great integration options for custom applications; different applications (and the various services of Azure itself) can use Azure AD as their IAM solution in order to provide authentication/authorization.
Tip
It is a good practice to group multiple subscriptions (related to the same organization or logic group) into the same Azure Active Directory (AD).
To create a new Azure AD tenant, we need to move to the old portal (https://manage.windowsazure.com) and proceed as follows:

We create the Azure AD tenant for the CM company.
This directory will host the users of the company in order to provide them with authentication/authorization of services.
If we plan to centralize the access rules for online resources, Azure AD can help us by providing a single identity for our users, created one by one (or through REST APIs), as follows:

This creates a new user
Microsoft tries to solve the issues of the scenario mentioned earlier, implementing a layer of abstraction between the user and the actual VM performing the work. RemoteApp is this layer, completely based on existing technologies (such as RDP), and enables users to connect to applications instead of VMs.

This is the architecture overview of how RemoteApp works
To start from the beginning, we should:
Create an Azure Active Directory tenant for the organization (we did this in the previous section).
Create a custom VM image with the complete development environment (we can use the previously created one).
Activate RemoteApp and assign users.
Note
A pricing note
RemoteApp has an elastic pricing model, just like many cloud services. However, it has a strong requirement: a minimum of 20 users (at the time of writing). This is due to how the service is internally provisioned; if you have less than 20 users, you would still be billed for 20. If you compare the service to a medium-sized instance (or even a small one) per user, it is probably still more convenient. However, this is an aspect that should be considered before implementation.
As for the Azure AD tenant, even the RemoteApp collection can be created only from the old portal (https://manage.windowsazure.com).
Note
Classic versus Resource Manager: the hidden issue
Earlier in this chapter, we recommended that you create new resources by always using the Resource Manager mode and not the classic one. This is because the Resource Manager mode is the new one, and hosts new features and investments. However, there is a strong separation between these two areas: so strong that, for example in the old portal (which is based on the classic model), there is no way to reuse components created in the new way.
As an example of this, try to look at storage accounts or custom VM images in the old portal:

This screenshot has been taken in the same subscription where the storage account and the custom VM image were created previously. Remember this behavior and plan your deployments accordingly.
As a quick fix for the lack of the VM image in the old portal, proceed as follows:
Create a new storage account from the old portal.
Note the credentials for both the old and new storage accounts (the storage account name and one of the access keys).
Install this software: http://www.cerebrata.com/products/azure-management-studio/introduction in the trial mode.
Configure the two storage accounts (despite being created under different methods, they are equal from an API's perspective).
Copy the blob and paste it into the Classic Storage Account (the operation is almost immediate if accounts are in the same data center).
Create a Custom Image and, in order to enable RemoteApp using your image, import the VM image into the TEMPLATE IMAGES tab of the RemoteApp section of the old portal.


This creates a RemoteApp image based on the generalized VM image
Finally, to complete the creation process, go to REMOTEAPP COLLECTIONS and create a new collection based on the custom image you've just registered.
If all went well, you can now do the following:
Publish individual programs.

Selecting RemoteApp programs
Assign individual users to the RemoteApp collection (through the USER ACCESS tab)
Create multiple collections to accommodate different types of users
Update the VM image by simply running the Update wizard (custom user data is retained between sessions and between updates)

Updating the VM image through the Update wizard
Connect from your iPad/iPhone through the dedicated RemoteApp application.

The file system seen by a RemoteApp application is the remote file system, which is persisted across different sessions and image updates
In IT, automation is often the key to improving the overall efficiency of a process while reducing the surface area of recurring exceptions due to human errors. Despite the intensive use of PaaS, which can reduce the amount of configuration effort required to set up complex environments by design, the provisioning process (even for those advanced PaaS solutions) is probably still a manual one.
Try to think about this scenario:
CloudMakers.XYZ needs an HTTP proxy to simulate the web surfing activity coming in from the US despite the offices being located in Italy
The proxy is used a few hours per day and only during working hours (9 to 18 or 9 A.M. to 6 P.M. +1 UTC)
Luke says that it is a waste of money to keep the proxy running outside the boundary of the working hours mentioned
As per the preceding scenario, Owen must set up a process where he (or a colleague) has to switch off the VM at 6 PM and bring it back online at 9 AM. Needless to say, this process itself is a waste of time; if, for some reason, the person in charge of carrying it out is temporarily unavailable, employees cannot use the proxy as it may lead to bad consequences.
We approach this section with this scenario in mind using Azure Automation and Azure Scheduler.
Azure Automation is a comprehensive set of features that provide automation over Azure resources as well as on-premise ones using PowerShell in conjunction with Azure APIs and other services. Think about Azure Automation as PowerShell-as-a-Service, since it provides an isolated execution engine for arbitrary PowerShell code.
Tip
Currently, cmdLets modules supported out of the box are Azure, AzureRM (Compute and Profile only), PowerShell.Core, PowerShell.Diagnostics, PowerShell.Management, PowerShell.Security, PowerShell.Utility, plus some management and orchestration modules.
After creating an automation account, it is possible to import existing PowerShell modules by entering the Assets tile in the Automation Account blade and then selecting Modules.
During the creation process, you can choose to create a sample hello world
A custom module can be added to the built-in ones by uploading the corresponding ZIP archive, as follows:
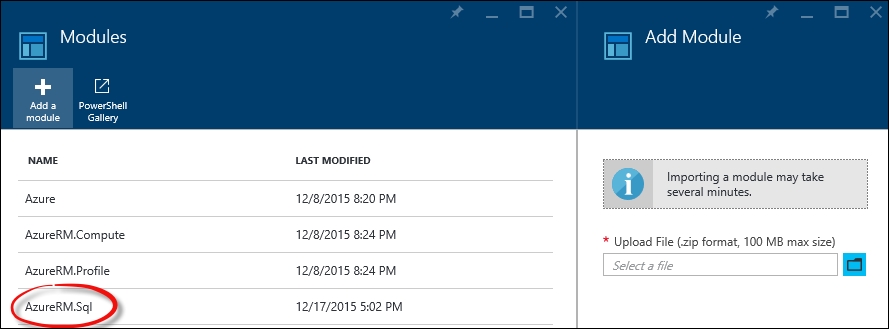
A custom module added to the built-in ones
To be able to write code against actual Azure resources, a valid credential or management certificate is required (in fact, there is no trust between the automation account and the subscription that hosts it).
It is strongly recommended that you create an Azure AD credential with specific permissions in order to place it in the automation code. Azure Automation provides an efficient mechanism to hide the actual credentials for the various Runbooks (scripts) by storing them in advance in the Assets folder.
The Assets folder actually contains resources, as follows:
Schedules: This is the representation of an agnostic schedule without any information about what is to be scheduled.
Modules: This refers to PowerShell modules, and contains built-in ones (global modules that cannot be deleted) as well as user-uploaded ones.
Certificates: These are
.ceror.pfxcertificates that are to be used in the runbooks but securely stored as assets.Variables: These are the custom key-value pairs to be used as variables in the runbooks. The supported value types are String, Boolean, DateTime, and Integer.
Credentials: The credentials set (just key pairs of
usernameandpasswordstrings) to be used in runbooks. It is not necessary that they be related to Azure or Azure AD as they can also be custom credentials.
It is recommended that you provide default credentials with permissions to operate of the decider Azure subscriptions
When creating a new automation account, if specified during creation, a sample runbook (named Get-AzureVMTutorial) is added to the collection. The purpose of this runbook is to list the first 10 Azure VMs in the default subscription.
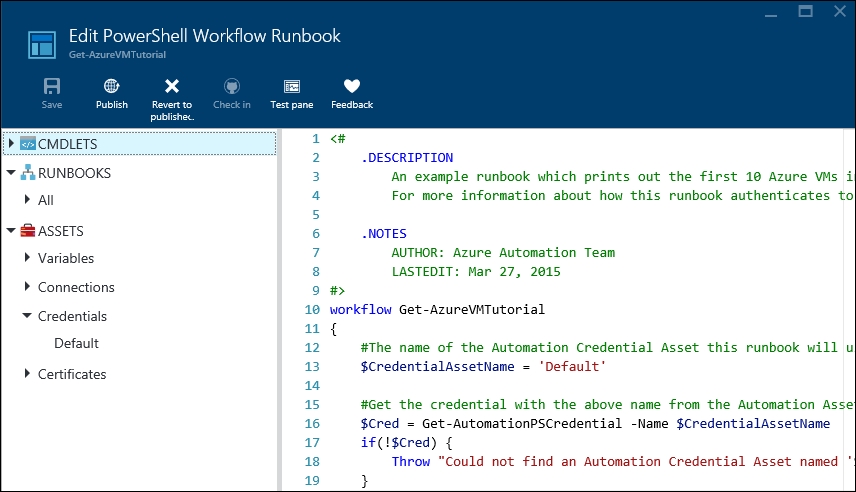
In this sample runbook, we edit $CredentialAssetName to reflect the Credential asset that we have in the Assets folder
With automation, we can write PowerShell code directly into browser windows and test it using the managed execution engine of Azure. After some tests using the Test pane window (also shown in the preceding screenshot), a runbook can be published, which means that it is available in the Runbooks collection and can be used by other runbooks as a child activity.
In the next few pages, we set up the scenario mentioned earlier, where a well-known VM must be shut down after 6 P.M. and brought back online at 9 AM. To do this, we use a graphical runbook, which is, as the name suggests, a runbook created and edited completely with a GUI composer without touching a line of PowerShell code directly.
We start by creating the runbook, as follows:
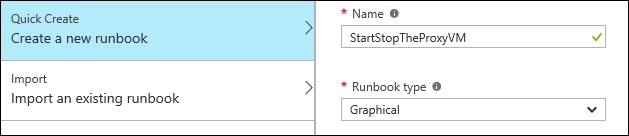
We specify the name and the Graphical type
We can now search for the Add-AzureAccount CmdLet and add it in the central canvas.
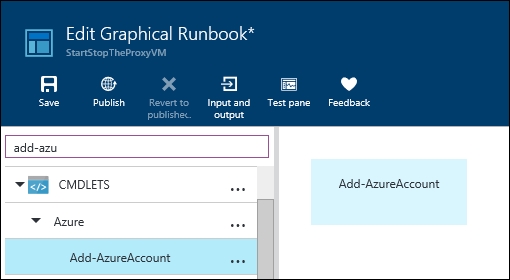
In the left-hand side pane, we search for CmdLets and add them in the right canvas
Each PowerShell CmdLet has its own set of parameters. The GUI of a Graphical runbook provides a complete and strongly typed mapping between these parameters and the user interface. In fact, for the Add-AzureAccount command, it recognizes the mandatory parameter as follows:
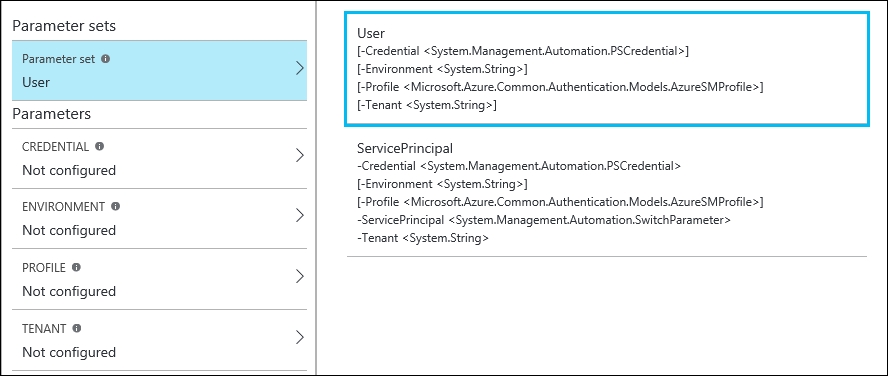
The GUI lets you choose between different parameter sets, and for each set, it provides assistance in filling the expected values
In the preceding example, we just need to select Credential and specify that we need to pick it from the Credentials assets. We can find (if previously set up) the Default credential and use it for the sample.
Following this pattern, we can now add Get-AzureVM, Start-AzureVM and Stop-AzureVM to the canvas.
Tip
Each of these activities can be joined by connecting the dots to each other. However, the connection itself has two different behaviors that can be controlled by clicking on the connection and editing its properties in the right-hand side pane.
The Get-AzureVM activity required at least the ServiceName parameter, but VMName can also be specified to get a specific VM instance. We provide this information without hardcoding it into the runbook in two ways:
Defining variables in the
AssetsfolderDefining inputs in the Input and Output pane of the runbook
Using the second method, we define two inputs with default values, as follows:
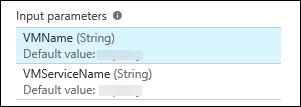
We specify both input parameters to keep the runbook implementation generic. Default values are used in case no values are provided by the runbook executor.
We can now connect the dots to obtain the following structure:
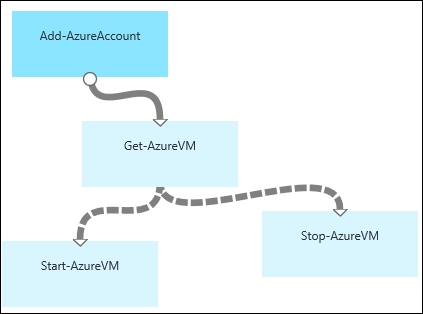
We linked the three activities in a single workflow. The connections between Get-AzureVM and the lower nodes are different because they apply conditions
The connections from Get-AzureVM to the lower nodes are dashed because we specify a condition to navigate them. By clicking on the single connection, we can specify a set of parameters.
Type: Choosing by
PipelineorSequence, we can specify whether the target activity has to be run for each result of the source activity (Pipeline) or just once (Sequence)Apply condition: If specified
Yes, a PowerShell expression can be specified in the Condition expression text area
The respective conditions for the two tasks are as follows:
For Start-AzureVM, run the following code:
$ActivityOutput['Get-AzureVM'].Status -eq "StoppedDeallocated" -and ((Get-Date).Hour -lt 18 -or (Get-Date).Hour -gt 9)
For Stop-AzureVM, run the following code:
$ActivityOutput['Get-AzureVM'].Status -ne "StoppedDeallocated" -and ((Get-Date).Hour -gt 18 -or (Get-Date).Hour -lt 9)
Tip
Detailed steps to download the code bundle are mentioned in the Preface of this book. Please have a look.
The code bundle for the book is also hosted on GitHub at https://github.com/PacktPublishing/Mastering-Cloud-Development-using-Microsoft-Azure. We also have other code bundles from our rich catalog of books and videos available at https://github.com/PacktPublishing/. Check them out!
Each activity can have an output: in the preceding case, we check the Status property of the output of the Get-AzureVM activity, and in conjunction with a temporal condition, we activate the appropriate node.
For the Start-AzureVM and Stop-AzureVM activities, the VM can be specified by name using the runbook input, as mentioned earlier or using the activity output data source with one of the available sources for parameter values.
Tip
The available data sources are runbook input, activity output, PowerShell expression, variable asset, credential asset, connection asset, and certificate asset.
The runbook can now be saved, published, or scheduled on an hourly basis. We can run a runbook in these three ways:
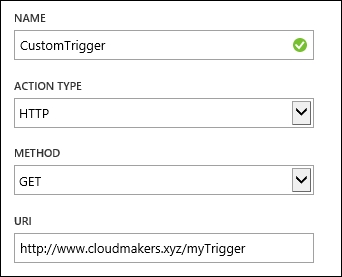
Using the Start button in the Runbook blade: This command immediately puts a new job based on the runbook definition in the execution queue. There is some delay between the
Startoperation and the job execution, but that is completely normal.Triggering a webhook by a remote location: A webhook is a specific URL (it is often a hard-to-remind URL) which, called with an HTTP POST, triggers the execution of a new job. It requires no authentication, and it can be configured to have an expiration.
By setting up a schedule from inside the runbook blade: This method can link an existing schedule (remember that it is created in the assets and is agnostic) to the runbook. The current options for the scheduling of a job are very limited, so it is often recommended that you use the Azure Scheduler service in connections to webhooks.
There are a lot of other advanced features in Azure Automation. It provides complete support in order to help you avoid mistakes during repetitive actions, while encouraging the IT staff to use Platform-as-a-service as the execution engine for their scripts.
Azure Scheduler lets us create scheduled actions against an HTTP(s) endpoint as a storage queue. By implementing complex infrastructures, we often need to schedule some actions with specific recurrence: also, Windows Task Scheduler helps us run custom processes in a scheduled fashion. However, having a task scheduler running on a user-managed virtual machine involves maintenance and skills, not to mention that it is not a highly available solution, as the underlying VM represents a single point of failure.
Azure Scheduler, via the Azure Portal or the Management API, lets us submit jobs of two types:
The HTTP endpoint call
Message in Queue
In the former case, we can customize the request by appending custom headers and choosing the appropriate method (GET, POST, and so on); in the latter, we can place a message in a storage queue, assuming there is someone on the other side ready to process it before or later.
Azure Scheduler does not run custom code in .NET or other runtimes: triggered by Azure itself and following the recurrence rules, its purpose is to start a user process. It can be used, for example, in conjunction with Azure Automation webhooks to start specific runbook jobs on an advanced schedule basis.
From the old portal, in the Scheduler section, we can create a new job like this. In this case, we call a plain HTTP endpoint with the GET method
Jobs are created in Job collections and stored in a specific region (the call will happen from this region to the target endpoint specified in the action).
As mentioned earlier, Azure Scheduler is more powerful than the Azure Automation built-in scheduler. In the following figure, we see an example of this:
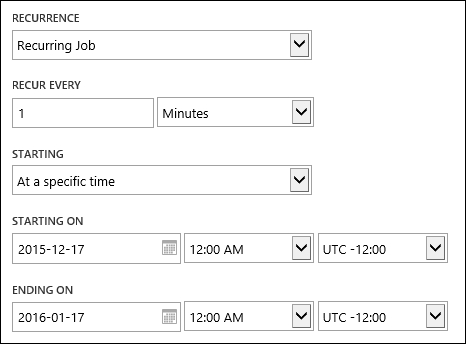
In this example, we set up a schedule every 1 minute with accurate starting and ending times
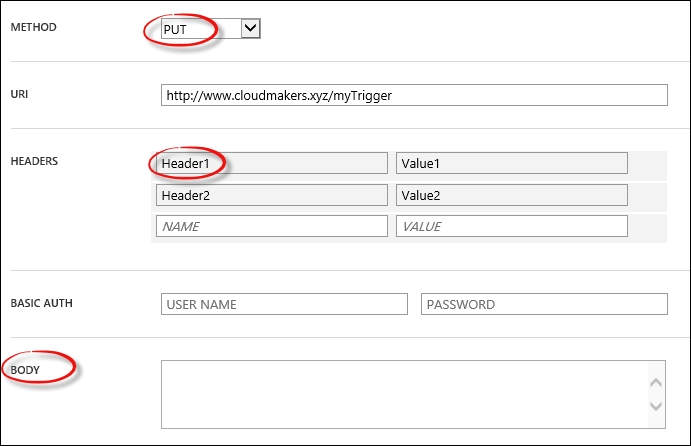
We can even specify a body for the HTTP method that allows it, in addition to specific HTTP headers and basic authorization
In this chapter, we introduced the CloudMakers.XYZ scenario, highlighting some of the most important aspects a start-up has to cope with. We learned how to build a simple development environment, how to generalize it, and how to abstract it as just "Applications"-as-a-Service. We looked at how to create an ALM environment with VSO and what integration entry points are useful in various business contexts. Finally, we performed some automation using scripting technologies and we learned how to set up advanced schedules.
In the next chapter, we enhance the scenario with some hybrid options using networking and working with VMs.