

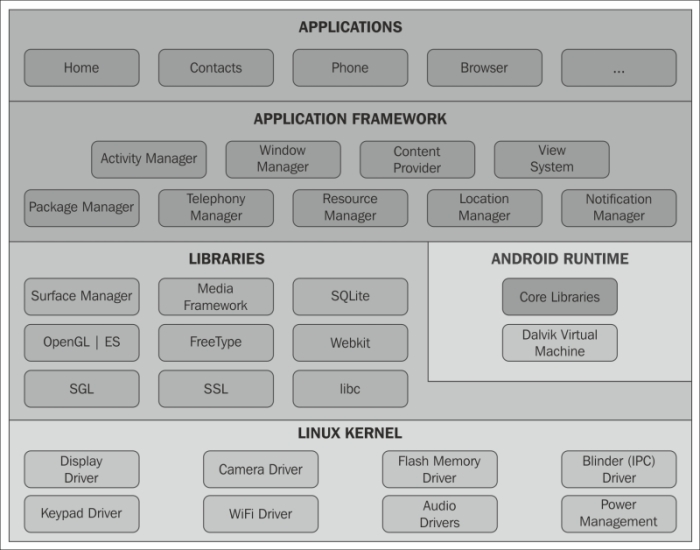
The Android software stack consists of core Linux kernel, Android runtime, Android libraries that support the Android framework, and finally Android applications that run on top of everything. The Android runtime uses Dalvik virtual machine (DVM) to execute the dex code. In newer versions of Android, that is, from KitKat (4.4), Android has enabled an experimental feature known as ART, which will eventually replace DVM. It is based on Ahead of Time (AOT), whereas DVM is based on Just in Time (JIT). In the following diagram, we can see that SQLite provides native database support and is part of the libraries that support the application framework along with libraries such as SSL, OpenGL ES, WebKit, and so on. These libraries, written in C/C++, run over the Linux kernel and, along with the Android runtime, forms the backbone of the application framework, as shown in the following diagram:
Before we start exploring SQLite in Android, let's take a look at the other persistent storage alternatives in Android:
Shared preference: Data is stored in a shared preference in the key-value form. The file itself is an XML file containing the key-value pairs. The file is present in the internal storage of an application, and access to it can be public or private as needed. Android provides APIs to write and read shared preferences. It is advised to use this in case we have to save a small collection of such data. A general example would be saving the last read position in a PDF, or saving a user's preference to show a rating box.
Internal/external storage: This terminology can be a little misleading; Android defines two storage spaces to save files. On some devices, you might have an external storage device in form of an SD card, whereas on others, you will find that the system has partitioned its memory into two parts, to be labeled as internal and external. Paths to the external as well as internal storage can be fetched by using Android APIs. Internal storage, by default, is limited and accessible only to the application, whereas the external storage may or may not be available in case it is mounted.
Since API level 1, Android ships with SQLite. At the time of writing this book, the current version of SQLite was 3.8.4.1. According to the documentation, the version of SQLite is 3.4.0, but different Android versions are known to ship with different versions of SQLite. We can easily verify this via the use of a tool called SQLite3 present in the platform-tools folder inside the Android SDK installation folder and Android Emulator:
adb shell SQLite3 --version
SQLite 3.7.11: API 16 - 19
SQLite 3.7.4: API 11 - 15
SQLite 3.6.22: API 8 - 10
SQLite 3.5.9: API 3 - 7
We need not worry about the different versions of SQLite and should stick to 3.5.9 for compatibility, or we can go by the saying that API 14 is the new minSdkVersion and switch it with 3.7.4. Until and unless you have something very specific to a particular version, it will hardly matter.
The
android.database package contains all the necessary classes for working with databases. The
android.database.SQLite package contains the SQLite-specific classes.
Android provides various APIs to enable us to create, access, modify, and delete a database. The complete list can be quite overwhelming; for the sake of brevity, we will cover the most important and used ones.
The SQLiteOpenHelper class is the first and most essential class of Android to work with SQLite databases; it is present in the android.database.SQLite namespace. SQLiteOpenHelper is a helper class that is designed for extension and to implement the tasks and actions you deem important when creating, opening, and using a database. This helper class is provided by the Android framework to work with the SQLite database and helps in managing the database creation and version management. The modus operandi would be to extend the class and implement tasks and actions as required by our application. SQLiteOpenHelper has constructors defined as follows:
SQLiteOpenHelper(Context context, String name, SQLiteDatabase.CursorFactory factory, int version)

SQLiteOpenHelper(Context context, String name, SQLiteDatabase.CursorFactory factory, int version, DatabaseErrorHandler errorHandler)
The application context permits access to all the shared resources and assets for the application. The name parameter consists of the database filename in the Android storage. SQLiteDatabase.CursorFactory is a factory class that creates cursor objects that act as the output set for all the queries you apply against SQLite under Android. The application-specific version number for the database will be the version parameter (or more particularly, its schema).
The constructor of SQLiteOpenHelper is used to create a helper object to create, open, or manage a database. The
context is the application context that allows access to all the shared resources and assets. The name parameter either contains the name of a database or null for an in-memory database. The SQLiteDatabase.CursorFactory factory creates a cursor object that acts as the result set for all the queries. The version parameter defines the version number of the database and is used to upgrade/downgrade the database. The errorHandler parameter in the second constructor is used when SQLite reports database corruption.
SQLiteOpenHelper will trigger its onUpgrade() method if our database version number is not at default 1. Important methods of the SQLiteOpenHelper class are as follows:
synchronized void close()synchronized SQLiteDatabase getReadableDatabase()synchronized SQLiteDatabase getWritableDatabase()abstract void onCreate(SQLiteDatabase db)void onOpen(SQLiteDatabase db)abstract void onUpgrade(SQLiteDatabase db, int oldVersion, int newVersion)
The synchronized close() method closes any open database object. The synchronized keyword prevents thread and memory consistency errors.
The next two methods, getReadableDatabase() and getWriteableDatabase(), are the methods in which the database is actually created or opened. Both return the same SQLiteDatabase object; the difference lies in the fact that getReadableDatabase() will return a readable database in case it cannot return a writable database, whereas getWriteableDatabase() returns a writable database object. The getWriteableDatabase() method will throw an SQLiteException if a database cannot be opened for writing. In case of getReadableDatabase(), if a database cannot be opened, it will throw the same exception.
We can use the isReadOnly() method of the SQLiteDatabase class on the database object to know the state of the database. It returns true for read-only databases.
Calling either methods will invoke the onCreate() method if the database doesn't exist yet. Otherwise, it will invoke the onOpen() or onUpgrade() methods, depending on the version number. The
onOpen() method should check the isReadOnly() method before updating the database. Once opened, the database is cached to improve performance. Finally, we need to call the close() method to close the database object.
The onCreate(), onOpen(), and onUpgrade() methods are designed for the subclass to implement the intended behavior. The onCreate() method is called when the database is created for the first time. This is the place where we create our tables by using SQLite statements, which we saw earlier in the example. The onOpen() method is triggered when the database has been configured and after the database schema has been created, upgraded, or downgraded as necessary. Read/write status should be checked here with the help of the isReadOnly() method.
The onUpgrade() method is called when the database needs to be upgraded depending on the version number supplied to it. By default, the database version is 1, and as we increment the database version numbers and release new versions, the upgrade will be performed.
A simple example illustrating the use of the SQLiteOpenHelper class is present in the code bundle for this chapter; we would be using it for explanation:
class SQLiteHelperClass
    {
    ...
    ...
    public static final int VERSION_NUMBER = 1;

    sqlHelper =
       new SQLiteOpenHelper(context, "ContactDatabase", null,
      VERSION_NUMBER)
    {

      @Override
      public void onUpgrade(SQLiteDatabase db,
            int oldVersion, int newVersion)
      {

        //drop table on upgrade
        db.execSQL("DROP TABLE IF EXISTS "
                + TABLE_CONTACTS);
        // Create tables again
        onCreate(db);

      }

   @Override
   public void onCreate(SQLiteDatabase db)
   {
      // creating table during onCreate
      String createContactsTable =
 "CREATE TABLE "
 + TABLE_CONTACTS + "("
 + KEY_ID + " INTEGER PRIMARY KEY,"
 + KEY_NAME + " TEXT,"
 + KEY_NUMBER + " INTEGER" + ")";

        try {
       db.execSQL(createContactsTable);
        } catch(SQLException e) {
          e.printStackTrace();
        }
   }

   @Override
   public synchronized void close()
   {
      super.close();
      Log.d("TAG", "Database closed");
   }

   @Override
   public void onOpen(SQLiteDatabase db)
   {
         super.onOpen(db);
         Log.d("TAG", "Database opened");
   }

};

...
...

//open the database in read-only mode
SQLiteDatabase db = SQLiteOpenHelper.getWritableDatabase();

...
...

//open the database in read/write mode
SQLiteDatabase db = SQLiteOpenHelper.getWritableDatabase();
Note
Downloading the example code
You can download the example code files for all Packt books you have purchased from your account at http://www.packtpub.com. If you purchased this book elsewhere, you can visit http://www.packtpub.com/support and register to have the files e-mailed directly to you.
Now that you are familiar with the helper class that kick-starts the use of SQLite databases within Android, it's time to look at the core SQLiteDatabase class. SQLiteDatabase is the base class required to work with an SQLite database in Android and provides methods to open, query, update, and close the database.
More than 50 methods are available for the SQLiteDatabase class, each with its own nuances and use cases. Rather than an exhaustive list, we'll cover the most important subsets of methods and allow you to explore some of the overloaded methods at your leisure. At any time, you can refer to the full online Android documentation for the SQLiteDatabase class at http://developer.android.com/reference/android/database/sqlite/SQLiteDatabase.html.
Some methods of the SQLiteDatabase class are shown in the following list:
public long insert (String table, String nullColumnHack, ContentValues values)public Cursor query (String table, String[] columns, String selection, String[] selectionArgs, String groupBy, String having, String orderBy)public Cursor rawQuery(String sql, String[] selectionArgs)public int delete (String table, String whereClause, String[] whereArgs)public int update (String table, ContentValues values, String whereClause, String[] whereArgs)
Let us see these SQLiteDatabase classes in action with an example. We will insert a name and number in our table. Then we will use the raw query to fetch data back from the table. After this, we will go through the delete() and update() methods, both of which will take id as a parameter to identify which row of data in our database table we intend to delete or update:
public void insertToSimpleDataBase()
{
   SQLiteDatabase db = sqlHelper.getWritableDatabase();

   ContentValues cv = new ContentValues();
   cv.put(KEY_NAME, "John");
   cv.put(KEY_NUMBER, "0000000000");
   // Inserting values in different columns of the table using
   // Content Values
   db.insert(TABLE_CONTACTS, null, cv);

   cv = new ContentValues();
   cv.put(KEY_NAME, "Tom");
   cv.put(KEY_NUMBER, "5555555");
   // Inserting values in different columns of the table using
   // Content Values
   db.insert(TABLE_CONTACTS, null, cv);
}
...
...

public void getDataFromDatabase()
{
   int count;
   db = sqlHelper.getReadableDatabase();
   // Use of normal query to fetch data
   Cursor cr = db. query(TABLE_CONTACTS, null, null,
                           null, null, null, null);

   if(cr != null) {
      count = cr.getCount();
      Log.d("DATABASE", "count is : " + count);
   }

   // Use of raw query to fetch data
   cr = db.rawQuery("select * from " + TABLE_CONTACTS, null);
   if(cr != null) {
      count = cr.getCount();
      Log.d("DATABASE", "count is : " + count);
   }

}
...
...

public void delete(String name)
 {
     String whereClause = KEY_NAME + "=?";
     String[] whereArgs = new String[]{name};
     db = sqlHelper.getWritableDatabase();
     int rowsDeleted = db.delete(TABLE_CONTACTS, whereClause, whereArgs);
 }
...
...

public void update(String name)
 {
     String whereClause = KEY_NAME + "=?";
     String[] whereArgs = new String[]{name};
     ContentValues cv = new ContentValues();
     cv.put(KEY_NAME, "Betty");
     cv.put(KEY_NUMBER, "999000");
     db = sqlHelper.getWritableDatabase();
     int rowsUpdated = db.update(TABLE_CONTACTS, cv, whereClause, whereArgs);
 }
ContentValues is essentially a set of key-value pairs, where the key represents the column for the table and the value is the value to be inserted in that column. So, in the case of values.put("COL_1", 1);, the column is COL_1 and the value being inserted for that column is 1.
The following is an example:
ContentValues cv = new ContentValues();
cv.put(COL_NAME, "john doe");
cv.put(COL_NUMBER, "12345000");
dataBase.insert(TABLE_CONTACTS, null, cv);
A query recovers a Cursor object. A Cursor object depicts the result of a query and fundamentally points to one row of the result of the query. With this method, Android can buffer the results of the query in a productive manner; as it doesn't need to load all of the data into memory.
To obtain the elements of the resulting query, you can use the getCount() method.
To navigate amid individual data rows, you can utilize the moveToFirst() and moveToNext() methods. The isAfterLast() method permits you to analyze whether the end of the output has arrived.
The Cursor object provides typed get*() methods, for example, the getLong(columnIndex) and getString(columnIndex) methods to gain entry to the column data for the ongoing position of the result. columnIndex is the number of the column you will be accessing.
The Cursor object also provides the getColumnIndexOrThrow(String) method that permits you to get the column index for a column name of the table.
To close the Cursor object, the close() method call will be used.
A database query returns a cursor. This interface provides random read-write access to the result set. It points to a row of the query result that enables Android to buffer the results effectively since now it is not required to load all the data in the memory.
The pointer of the returned cursor points to the 0th location, which is known as the first location of the cursor. We need to call the moveToFirst() method on the Cursor object; it takes the cursor pointer to the first location. Now we can access the data present in the first record.
Cursor implementations, if from multiple threads, should perform their own synchronization when using the cursor. A cursor needs to be closed to free the resource the object holds by calling the close() method.
Some other support methods we will encounter are as follows:
The
getCount()method: This returns the numbers of elements in the resulting query.The
get*()methods: These are used to access the column data for the current position of the result, for example,getLong(columnIndex)andgetString(columnIndex).The
moveToNext()method: This moves the cursor to the next row. If the cursor is already past the last entry in the result set, it will returnfalse.