

An Android application consists of one or more activities. These activities are visual representations of an application in transitioning flow while performing the task, taking user inputs, and showing results to the user. Each activity presents the user with a visual representation on the screen for user interaction. Android keeps all the activities in a back stack following the last in, first out rule. Whenever a new activity is started, the current activity is pushed in the back stack. Thus, Android gives focus focuses on the new activity. The activity can take up the whole screen of the device, or it can also take part of the screen, or it can be dragged as well. Whether it is an activity taking the whole area of a screen or a small part of screen, only one activity is focused at a time in Android. When, any existing activity is stopped, it is pushed into the back stack, which in turn results the next top activity being focused.
Note
Android 4.x versions introduced fragments. Fragments can be referred to as sub-activities, which are embedded in an activity to perform different tasks in a single activity at the same time, unlike activities.
Usually, an Android application consists of more than one activity. These activities are loosely bounded with each other. It is a good practice to create each activity for a specific task to be performed. For example, in a simple phone dialing application, there might be one activity to show all contacts, one to show full contact details of any specific contact, one for dialing a number, and so on. In all the applications, there is a main activity that behaves as the starting point of the application. This activity starts when the application is launched. Then this activity starts some other activity, which starts another, and so on. Android manages all the activities in a back stack.
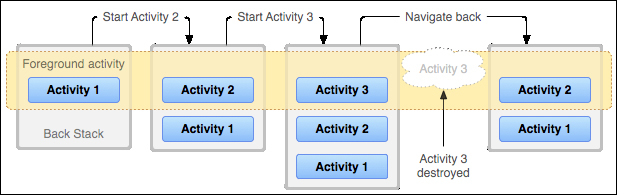
Android Activity back stack
The previous figure shows a simple representation of how back stack works. The area highlighting top activities in a stack represents foreground activity, sometimes called focused activity or running activity. When a new activity is created, it is pushed in the stack, and when any existing activity is destroyed, it is pulled out of the stack. This process of being pushed in the stack and pulled out of the stack is managed by the activity lifecycle in Android. This lifecycle is called Activity lifecycle. The lifecycle manages the activities in the stack and notifies about the changes in the state in the activities through the callback methods of the cycle. An activity receives different types of states such as activity created, activity destroyed, and so on, due to change in the state. A developer overrides these callback methods to perform the necessary steps for respective change of state. For example, when an activity is started, the necessary resources should be loaded, or when an activity is destroyed, those resources should be unloaded for better performance of the app. All these callback methods play a crucial role in managing the Activity lifecycle. It is the developer's choice to override none, some, or all methods.
Basically, an activity remains in three states: Resumed, Paused, and Stopped. When an activity is resumed, it is shown on the screen and gets the focus of the user. This activity remains in the foreground section of the back stack. When another activity is started and it becomes visible on the screen, then this activity is paused. This activity still remains on the foreground task, and it is still alive, but it has not gotten any user focus. It is also possible that the new activity partially covers the screen. In that case, the part of the paused activity will be visible on the screen. The activity comes in the Stopped state when it becomes completely invisible from the screen, and is replaced by another activity in the foreground. In this stopped state, the activity is still alive, but it is in the background section of the back stack. The difference between the paused and stopped states is that, in the paused state, the activity is attached to the window manager, but in the stopped state, it is not attached to the window manager.
Note
In an extremely low memory situation, an Android system can kill any paused or stopped activity by asking to finish it, or without asking by killing the process. To avoid this problem, the developer should store all the necessary data in a pause and stop callback, and should retrieve this data in the resume callback.
There are various callback methods that are called when the state of any activity is changed. Developers perform the necessary tasks and actions in these methods for better performance of the app. To show the Activity lifecycle in action, we are creating a small Android application in this section. Here is the step-by-step approach:
Start Android Studio.
Create an empty project with the details as shown in the following screenshot:

New Project Dialog in Android Studio
Add the following code in the
MainActivity.javafile of the project:package com.learningandroidintents.callbacksdemo; import android.os.Bundle; import android.app.Activity; import android.view.Menu; import android.widget.Toast; public class MainActivity extends Activity { @Override public void onCreate (Bundle savedInstanceState){ super.onCreate(savedInstanceState); Toast.makeText( this, "Activity Created!", Toast.LENGTH_SHORT ).show(); } @Override protected void onStart () { super.onStart(); Toast.makeText(this, "Activity Started!", Toast.LENGTH_SHORT ).show(); } @Override protected void onResume() { super.onResume(); Toast.makeText(this, "Activity Resumed!", Toast.LENGTH_SHORT ).show(); } @Override protected void onPause() { super.onPause(); Toast.makeText(this, "Activity Paused!", Toast.LENGTH_SHORT ).show(); } @Override protected void onStop() { super.onStop(); Toast.makeText(this, "Activity Stopped!", Toast.LENGTH_SHORT ).show(); } @Override protected void onDestroy() { super.onDestroy(); Toast.makeText(this, "Activity Destroyed!", Toast.LENGTH_SHORT ).show(); } }Run the project in the emulator, and you will see toasts being printed on screen in the following order:
Activity Created
Activity Started
Activity Resumed
Activity Paused
Activity Stopped
Activity Destroyed
Let us see the working of the previously mentioned code.
When you run the project, the emulator will display all the toasts in the previously given order on the screen. At the start of project, an activity is created, and then the activity is started. After starting the activity, it is displayed on the screen and emulator prints Resumed. Now, we go back by pressing the back key, and the Android system prepares to finish the activity. So, the activity is first paused, then it is stopped, and finally it is destroyed. All these callbacks together are called the Activity lifecycle. Activity lifecycle starts from the onCreate() method and it stops at the onStop() method. The activity is visible from the onStart() method to the onStop() method, and the activity remains in foreground from the onResume() method to the onPause() method. The following figure shows this cycle distribution:

Until now, we have discussed the lifecycle callback methods used, their states, and their purpose. Now, we will look into the callback method's flow. In Android, when one activity is started, the already opened activity is stopped, and this change of activity happens in a flow. The following figure shows the visual flowchart of the Activity lifecycle:
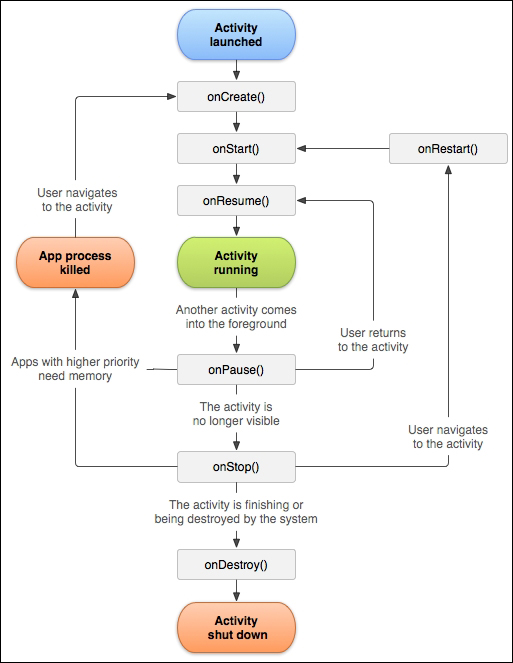
Callback methods are shown with rectangles. The very first step in the Activity lifecycle is to create an activity. Android creates an activity, if no instance of that activity is running in the same task. The noHistory tag does not allow multiple activities; rather it will determine whether an activity will have historical trace or not (refer to http://developer.android.com/guide/topics/manifest/activity-element.html#nohist), where you can determine multiple instances by the android:launchmode flag tag. Making this tag's value true means only one instance of the activity will be created in the stack, and whenever an activity intent is called, the same instance is pushed on top of the stack to show the activity on screen.
After the onCreate() method, the onStart() method is called. This method is responsible for the initial settings, but it is best practice configure these in the onResume() method, which is called after the onStart() method. Remember, the foreground phase is started from the onResume() method. Say a user gets a call on his or her phone, then this activity will be paused through the onPause() method. So, all the steps involved in storing the necessary data when the activity is paused should be done here. This method can be very beneficial in critical memory situations because in these situations, Android can stop the paused activities, which in turn can show unexpected behavior in the app. If the activity is killed due to a critical memory situation, the onCreate() method is called instead of the onResume() method, resulting in the creation of a new instance of the activity.
But, if everything goes right, then the activity returns to its same state through the onResume() method. In this method, the user can do all the work of reloading the stored data in the onPause() method, and can get the activity back to life. On turning off the activity after onResume() is launched the onStop() method is called. This triggers either the onRestart() method, or the onDestroy() method depending on user action. In a nutshell, the developer can control the Activity lifecycle using callback methods. It is a good practice to use the onPause() and onResume() methods for data management, whether the activity remains foreground or not, and onCreate() and onDestroy() should be used for only initial data management and cleaning up the resources respectively.
Note
All callback methods except the onCreate() method take no parameter or argument. In case of a critical memory situation, if an activity is destroyed, then that instance state is passed in the onCreate() method at the time of creation of that activity.
It is not necessary to override all the methods. The user can override any number of methods as there is no such restriction on it. The user should set a view in the onCreate() method. If you don't set any view for the content, a blank screen will show up. In each callback, first of all, the same callback method of the superclass should be called before doing anything. This super callback method operates the Activity lifecycle through standard flow developed by Android systems.