Book Image

Java Projects - Second Edition

By : Peter Verhas
Book Image

Java Projects - Second Edition

By: Peter Verhas

Overview of this book

Java is one of the most commonly used software languages by programmers and developers. In this book, you’ll learn the new features of Java 11 quickly and experience a simple and powerful approach to software development. You’ll see how to use the Java runtime tools, understand the Java environment, and create a simple namesorting Java application. Further on, you'll learn about advanced technologies that Java delivers, such as web programming and parallel computing, and will develop a mastermind game. Moving on, we provide more simple examples, to build a foundation before diving into some complex data structure problems that will solidify your Java 11 skills. With a special focus on the features of new projects: Project Valhalla, Project Panama, Project Amber, and Project Loom, this book will help you get employed as a top-notch Java developer. By the end of the book, you’ll have a firm foundation to continue your journey toward becoming a professional Java developer.
Table of Contents (12 chapters)

Installing Java

To develop, compile, and execute Java programs, you will need the Java execution environment. As the operating systems that we usually use for software development do not contain the language preinstalled, you will have to download it. Although there are multiple implementations of the language, I recommend that you download the official version of the software from Oracle. The official site for Java is http://java.com, and this is the site from where the latest release of the language can be downloaded. At the time of writing this book, the 11th version of Java has not yet been released. An early pre-release version is accessible via http://jdk.java.net/11/ to download. Later, the release versions will also be available from here:

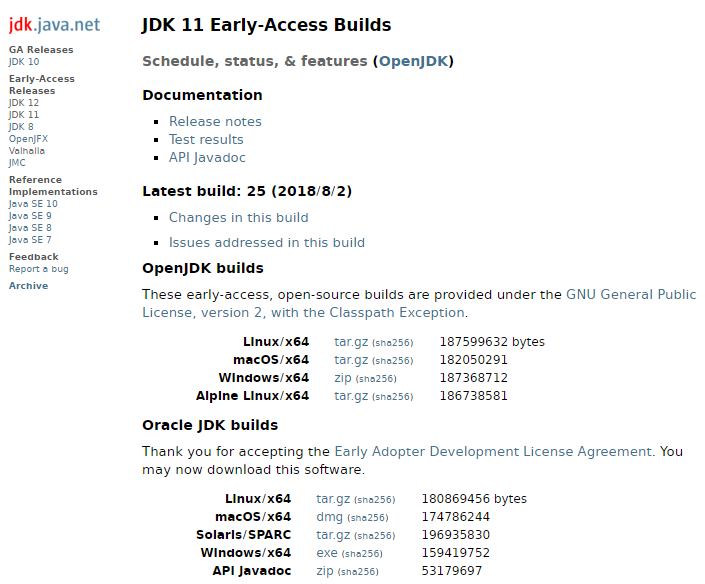
What you can download from here is a so-called early access version of the code that is available only to experiment with it, and no professionals should use it for commercial purposes.

On the page, you have to click on the radio button to accept, but the license. After that, you can click on the link that directly starts the download of the installation kit. The license is a special early access license version that you, as a professional, should carefully read, understand, and accept only if you are agreeable to the terms.

There is a separate installation kit for Windows 32 and 64 bit systems, macOS, Linux 32, and 64-bit versions, Linux for ARM processor, Solaris for SPARC processor systems, and Solaris x86 versions. As it is not likely that you will use Solaris, I will detail the installation procedure only for Windows, Linux, and macOS. In the later chapters, the samples will always be macOS, but since Java is a write once, run anywhere language, there is no difference after the installation. The directory separator may be slanted differently, the classpath separator character is a semicolon on Windows instead of a colon, and the look and feel of the Terminal or command application is also different. However, where it is important, I will try not to forget to mention it.

To confuse you, the Java download for each of these operating system versions lists a link for the JRE and one for the JDK. JRE stands for Java Runtime Environment, and it contains all the tools and executables that are needed to run Java programs. JDK is the Java Development Kit that contains all the tools and executables needed to develop Java programs, including the execution of the Java program. In other words, JDK contains its own JRE. For now, all you need to do is download the JDK.

There is one important point of the installation that is the same on each of the three operating systems, which you have to be prepared for before the installation—to install Java, you should have administrative privileges.

Installation on Windows

The installation process on Windows starts by double-clicking on the downloaded file. It will start the installer and will present you with a welcome screen. Windows 10 may ask you the admin permission to install Java:

Pressing the Next button gets a window where you can select the parts you want to install, and also, we can change the location where Java will be installed:

Let's leave the default settings here, which means that we install all the downloaded parts of Java and press Next:

We get to a progress screen while Java is installing. This is a fairly fast process, no more than a 10-second process. After Java has been installed, we get a confirmation screen:

We can press Close. It is possible to press the Next Steps button, that opens the browser and brings us to a page that describes the next steps we can do with Java. Using the prerelease version results in an HTTP 404 error. This will hopefully be fixed when you read this book.

The last step is to set the environment variable JAVA_HOME. To do that, in Windows, we have to open the control center and select the Edit environment variables for your account menu:

This will open a new window that we should use to create a new environment variable for the current user:

The name of the new variable has to be JAVA_HOME, and the value should point to the installation directory of the JDK:

This value on most systems is C:\Program Files\Java\jdk-11. This is used by many Java programs and tools to locate the Java runtime.

Installation on macOS

In this section, we will take look at how to install Java step by step on a macOS platform. I will describe the installation process for the released version available at the time of writing this book. As of now, the Java 18.9 early access version is a bit tricky to install. It is probable that the release version of Java 18.9 will have similar or the same installation steps as Java 9.

The macOS version of Java comes in the form of a .dmg file. This is a packaging format of macOS. To open it, simply double-click on the file in the Download folder where the browser saves it, and the operating system will mount the file as a read-only disk image:


There is only one file on this disk—the installation image. Double-click on the filename or icon in the Finder application and the installation process will start:

The first screen is a welcome screen. Click on Continue, and you will see the Summary page that displays what will be installed.

It is not a surprise that you will see a standard Java installation. This time, the button is called Install. Click on it and you will see the following:

This is the time when you have to provide the login parameters for the administrative user—a username and password:

When provided, installation starts and, in a few seconds, you will see a Summary page:

Click on Close and you are ready. You have Java installed on your Mac. Optionally, you can dismount the installation disk and, sometime later, you can also delete the .dmg file. You will not need that, and in case you do, you can download it any time from Oracle.

The last thing is to check whether the installation was okay. The proof of the pudding is in eating it. Start a Terminal window and type java -version at the prompt; Java will tell you the version that's been installed.

In the following screenshot, you can see the output on my workstation and also the macOS commands that are handy to switch between the different versions of Java:

In the preceding screenshot, you can see that I have installed the Java 11 version and, at the same time, I also have a Java 18.9 early release installation, which I will use to test the new features of Java for this book.

Installation on Linux

There are several ways to install Java on Linux, depending on its flavor. Here, I will describe an installation method that works more or less the same way on all flavors. The one I used is Debian.

The first step is the same as in any other operating system—download the installation kit. In the case of Linux, you should select a package that has a tar.gz ending. This is a compressed archive format. You should also carefully select the package that matches the processor in your machine and the 32/64 bit version of the operating system. After the package is downloaded, you have to switch to root mode, issuing the su command. This is the first command you can see in the following screenshot, that shows the installation commands:

The tar command uncompressed the archive into a subfolder. In Debian, this subfolder has to be moved to /opt/jdk, and the mv command is used for this purpose. The two update-alternatives commands are Debian-specific. These tell the operating system to use this newly installed Java in case there is already an older Java installed. The Debian I was using to test and demonstrate the installation process on a virtual machine came with a 7-year-old version of Java.

The final step of the installation is the same as any other operating system—checking whether the installation was successful in issuing the java -version command. In the case of Linux, this is even more important. The installation process does not check that the downloaded version matches the operating system and the processor architecture.

Setting JAVA_HOME

The JAVA_HOME environment variable plays a special role in Java. Even though the JVM executable, java.exe or java, is on the PATH (thus, you can execute it by typing the name java without specifying the directory in the Command Prompt) (Terminal), it is recommended that you use the correct Java installation to set this environment variable. The value of the variable should point to the installed JDK. There are many Java-related programs, Tomcat or Maven for example, that use this variable to locate the installed and currently used Java version. In macOS, setting this variable is unavoidable.

In macOS, the program that starts to execute when you type java, is a wrapper that first looks at JAVA_HOME to decide which Java version to start. If this variable is not set, macOS will decide on its own, selecting from the available installed JDK versions. To see the available versions, you can issue the following command:

~$ /usr/libexec/java_home -V
Matching Java Virtual Machines (13):
    11, x86_64: "Java SE 11-ea" /Library/Java/JavaVirtualMachines/jdk-11.jdk/Contents/Home
    10, x86_64: "Java SE 10"    /Library/Java/JavaVirtualMachines/jdk-10.jdk/Contents/Home
    9.0.1, x86_64:      "Java SE 9.0.1" /Library/Java/JavaVirtualMachines/jdk-9.0.1.jdk/Contents/Home
    9, x86_64:  "Java SE 9-ea"  /Library/Java/JavaVirtualMachines/jdk-9.jdk/Contents/Home
    1.8.0_92, x86_64:   "Java SE 8"     /Library/Java/JavaVirtualMachines/jdk1.8.0_92.jdk/Contents/Home
    1.8.0_20, x86_64:   "Java SE 8"     /Library/Java/JavaVirtualMachines/jdk1.8.0_20.jdk/Contents/Home
    1.8.0_05, x86_64:   "Java SE 8"     /Library/Java/JavaVirtualMachines/jdk1.8.0_05.jdk/Contents/Home
    1.8.0, x86_64:      "Java SE 8"     /Library/Java/JavaVirtualMachines/jdk1.8.0.jdk/Contents/Home
    1.7.0_60, x86_64:   "Java SE 7"     /Library/Java/JavaVirtualMachines/jdk1.7.0_60.jdk/Contents/Home
    1.7.0_40, x86_64:   "Java SE 7"     /Library/Java/JavaVirtualMachines/jdk1.7.0_40.jdk/Contents/Home
    1.7.0_21, x86_64:   "Java SE 7"     /Library/Java/JavaVirtualMachines/jdk1.7.0_21.jdk/Contents/Home
    1.7.0_07, x86_64:   "Java SE 7"     /Library/Java/JavaVirtualMachines/jdk1.7.0_07.jdk/Contents/Home
    1.7.0_04, x86_64:   "Java SE 7"     /Library/Java/JavaVirtualMachines/1.7.0.jdk/Contents/Home

/Library/Java/JavaVirtualMachines/jdk-11.jdk/Contents/Home

You will then get the list of installed JDKs. Note that the command is lowercase, but the option is capitalized. If you do not provide any options and argument to the program, it will simply return the JDK it thinks is the newest and most appropriate for the purpose. As I copied the output of the command from my Terminal window, you can see that I have quite a few versions of Java installed on my machine.

The last line of the program response is the home directory of JDK, which is the default. You can use this to set your JAVA_HOME variable using some bash programming:

export JAVA_HOME=$(/usr/libexec/java_home)

You can place this file in your .bashrc file, which is executed each time you start a Terminal application, and thus JAVA_HOME will always be set. If you want to use a different version, you can use -v, with the lowercase option this time, to the same utility, as follows:

export JAVA_HOME=$(/usr/libexec/java_home -v 1.8)

The argument is the version of Java you want to use. Note that this versioning becomes the following:

export JAVA_HOME=$(/usr/libexec/java_home -v 11)

If you want to use the Java JDK Early Access version and not 1.11, there is not an explanation for the same—fact of life.

Note that there is another environment variable that is important for Java—CLASSPATH. We will talk about it later.