

In the previous recipe we have covered how to create a JUnit test case. Now we will code tests for the Employee class methods.
First of all you need to open the EmployeeTests class, which we have created in the previous recipe.
As you can see, the EmployeeTests class has a test() method with @Test above it. @Test is an annotation, which specifies that the current method is a single test. Before we start coding, let's find out what other annotations are available.
Besides @Test, there are:
@Before: Putting this annotation before the method means that this method will be executed before every test.
@After: Putting this annotation before the method means that this method will be executed after every test.
@Ignore: Putting this annotation before the method means that this method will be ignored. (This can be used when you want to temporarily exclude a test or if the class functionality that is tested is not used anymore.)
@BeforeClass: Putting this annotation before the method means that this method will be executed only once, before all the tests.
@AfterClass: Putting this annotation before the method means that this method will be executed only once, after all the tests finish executing.
These are the major annotation types for JUnit testing. Let's find out how to use them.
Our Employee class has several places that need to be tested. We have three class variables (position, number, and age), which must hold valid values or otherwise our application will fail. Thus, we will test the Employee class by passing different values to the setter function, and making sure that only valid values are accepted. Sounds good?
So let's start.
First of all I need to create the
Employeeobject that we will be using throughout all the tests. So in myEmployeeTestsclass I put:Employee emp = new Employee();
My next step is to create a test for one of the class variables. I have decided to start with
position. As position is set by thesetPosition(String)method, this will be the method that I will be passing values to. After setting the position, I will be checking if the tests have been passed by comparing the expected position value withemp.getPosition(). In my comparison I will be using some of the JUnit assert methods.
Let's take a look at them and see what they do:
assertNull(object)/assertNoNull(object): When this method is called, the test will pass only if the object is null (assertNull) or not null (assertNotNull)assertEquals(value1, value2): When this method is called, the test will pass ifvalue1equals tovalue2assertTrue(condition)/assertFalse(condition): When these methods are called, the test will pass when the condition either returns true (assertTrue) or false (assertFalse)
There are more assert methods, but in our example we will use only those listed previously.
I do the following using these assert methods:
I created a
@Beforemethod that assigns a position to the tester before every test is executed.I created five tests to check the following:
The
Employeeobject is not nullThe
positionvariable accepts the valid positionThe
positionvariable cannot be assigned tonullThe
positionvariable cannot be assigned to an empty stringThe
positionvariable accepts only valid strings (which is in thevalidPositionsarray)
My
EmployeeTests class looks like the following:1. package how.to.eclipse.tests; 2. 3. import static org.junit.Assert.*; 4. import how.to.eclipse.Employee; 5. import org.junit.*; 6. 7. public class EmployeeTests { 8. Employee emp = new Employee(); 9. 10. /** 11. * Before every test this method sets position to "tester" 12. */ 13. @Before 14. public void setUp() { 15. emp.setPosition("tester"); 16. } 17. 18. @Test 19. public void testEmployeeNotNull(){ 20. assertNotNull(emp); 21. } 22. 23. @Test 24. public void testPositionValid(){ 25. emp.setPosition("engineer"); 26. assertEquals("engineer", emp.getPosition()); 27. } 28. 29. @Test 30. public void testPositionNull(){ 31. emp.setPosition(null); 32. assertFalse(emp.getPosition().equals(null)); 33. } 34. 35. @Test 36. public void testPositionEmptyString(){ 37. emp.setPosition(""); 38. assertTrue(emp.getPosition().equals("tester")); 39. } 40. 41. @Test 42. public void testPositionInvalidString(){ 43. emp.setPosition(" tester"); //extra space 44. assertFalse(emp.getPosition().equals(" tester")); 45. } 46. }As you can see, I have been using different variations of assert methods to check if the values that I have passed to
setPosition()are saved to the position. Ideally, you should put as much assert cases as you can think of. Try not to put cases that are identical, as it is just a waste of the resources.Now let's run the
EmployeeTestsclass. Click on the icon. You should see the following screenshot:
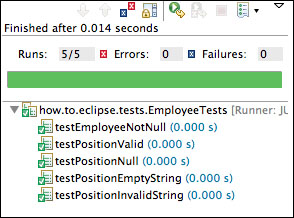
As you can see, all the five tests have passed successfully. Let's make some changes to our Employee class and see what will happen.
Go to the
Employeeclass, then to thesetPosition(String)function (on line 30), and comment out theifstatement (on lines numbers 31 and 33). YoursetPosition(String)function should look like the following:public void setPosition (String _position) { //if (Arrays.asList(validPositions).contains(_position)){ position = _position; //} }Save your changes, go to the
EmployeeTestsclass, and run it again.After running
EmployeeTestsyou should see the following output: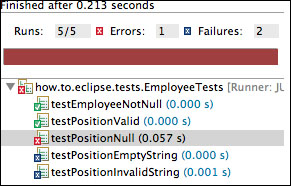
As you can see in the previous screenshot, two tests have successfully passed. The testPositionNull() test has a red cross on it, which means that it produced an error, and two tests have failed because the assert methods in these tests returned false.
This error stack is very informative as it shows directly what caused the problem. As we have commented out the if statement that does not allow invalid values to be assigned to position, when null was passed to setPosition() it was saved into position. As a result, when getPosition() was called, it threw NullPointerException that broke our application.
Also, testPositionEmptyString() and testPositionInvalidStrin() assigned an empty string and an invalid string to position. Hence, assert failed.
Now we know what test failures look like. Please uncomment the changes in setPosition(String) (on lines 31 and 33).
Now we know how to test methods that receive strings. Let's also create a couple of methods to test age.
I base my age tests on the following criteria:
The
agevariable accepts a valid ageThe
agevariable accepts a minimum valid ageThe
agevariable accepts a maximum valid ageThe
agevariable does not accept a value that is more than the maximum valid ageThe
agevariable does not accept a value that is less than the minimum valid ageThe
agevariable does not accept a negative value
My age tests look like the following (continue the EmployeeTests class):
47. @Test
48. public void testAgeValid(){
49.     emp.setAge(25);
50.     assertEquals(25, emp.getAge());
51. }
52.
53. @Test
54. public void testAgeMin(){
55.     emp.setAge(19);
56.     assertTrue(emp.getAge() == 19);
57. }
58.
59. @Test
60. public void testAgeMax(){
61.     emp.setAge(84);
62.     assertTrue(emp.getAge() == 84);
63. }
64.
65. @Test
66. public void testAgeMoreThanMax(){
67.     emp.setAge(90);
68.     assertFalse(emp.getAge() == 90);
69. }
70.
71. @Test
72. public void testAgeLessThanMin(){
73.     emp.setAge(10);
74.     assertFalse(emp.getAge() == 10);
75. }
76.
77. @Test
78. public void testAgeNegative(){
79.     emp.setAge(-84);
80.     assertFalse(emp.getAge() == -84);
81. }
82. }// end of the class
Now let's run the EmployeeTests class.
Your output should look like the following screenshot:
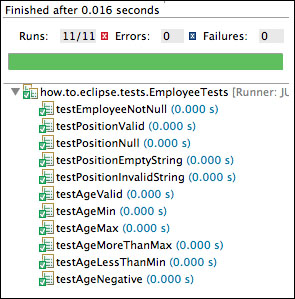
You can see that all tests are conveniently put into a tree; thus it is easy to follow the test hierarchy, and in case any of the tests fail, it is easy to find the problematic spot. Fortunately for us, all our tests have successfully passed, so we can say that the position and age variables are protected from getting junk values. Now you know how to create JUnit tests, so please create tests for number yourself and make sure that these tests pass when you run the EmployeeTests class.