
To create the scheduled tasks page, go back to the xdm-poc-flow page flow. If you have closed the page flow window, you can find it again in the application navigator in the top-left corner in the JDeveloper window under Web Content | Page Flows.
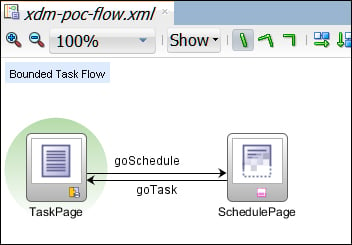
Note the difference between the TaskPage and the SchedulePage icons, as shown in the following screenshot. The TaskPage icon now has a solid border and shows a document icon to illustrate that a TaskPage actually exists. The SchedulePage icon still has a dashed lower edge and a pixelated lower half to show that the page doesn't exist yet.
Double-click on the SchedulePage icon and then click on OK to create the page. JDeveloper remembers the settings you selected the last time you created a page.
Again, we start by dragging a Panel Stretch Layout component onto the page from the Components palette.
The component that we need to implement the graphic representation of tasks assigned to persons is a Gantt chart of the type scheduling.
Under Data Controls, open the ScheduledTaskServiceDataControl node and drag the PersonsVO1 view object instance onto the center facet and drop it as Gantt | Scheduling. The Create Scheduling Gantt dialog appears, as shown in the following screenshot:
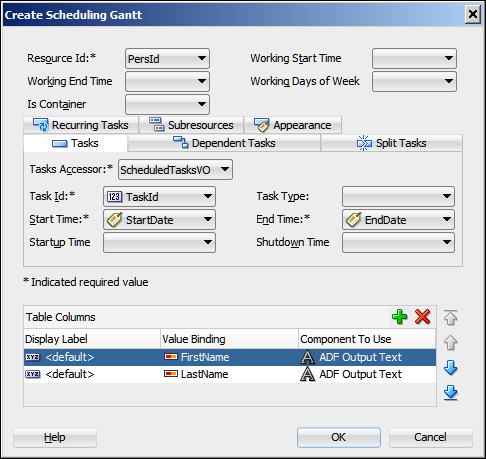
Set the fields in this dialog as follows:
Resource Id: PersId
Tasks Accessor: ScheduledTasksVO
Task Id: TaskId
Start Time: StartDate
End Time: EndDate
Under Table Columns, remove the extra columns, leaving only FirstName and LastName. Then, click on OK. You will see a graphical representation of a scheduling Gantt chart.
Tip
You might see both ScheduledTasksVO and ScheduledTasksVO1 in the Tasks Accessor list. Select ScheduledTasksVO and not
ScheduledTasksVO1. You can get from one view object to another in two ways: by referring to the view object instance name and by referring to the code method (the accessor) that gets built when you define the view link. The Gantt components need the accessor.
Click on the chart and then go to the Properties window to set values for the StartTime and EndTime properties (from 2014-10-15 to 2014-10-31 so that it matches the sample data). The Gantt component does not automatically scale to the dates used, and making it do so involves a bit of code—we have chosen to leave this functionality out of this Proof of Concept.
Right-click anywhere on the page and choose Run to see the actual values in the browser and play around with the capabilities of the Gantt chart component. We are using it in default configuration here, but there are many customization options. Refer to the Help section (press F1 with the Gantt component selected) or the documentation for a full description of this powerful component.
The last thing that we need to add to the Proof of Concept application is the navigation feature between the pages.
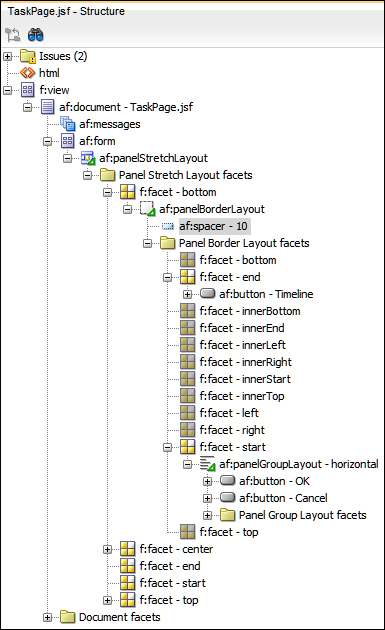
Open the TaskPage and look at the Structure window. Open the af:panelStretchLayout, then the bottom facet, and then the af:panelBorderLayout. Find the facet called End and drag a Button component from the Components window (in the top-right of the JDeveloper window) across and drop it into this facet. In the Property Inspector, set the Text property to Timeline, and under Action, select goSchedule.
The goSchedule option comes from the page flow—remember that this was the title of the only control flow arrow going away from the TaskPage.
Finally, we need to drop a Spacer layout component from the Components palette directly onto the af:panelBorderLayout. Your Structure panel should now look like the one shown in the following screenshot:
The reason we need the Spacer component is that ADF automatically optimizes the page and doesn't show any facets that do not have content. So, if the Panel Border Layout doesn't contain anything, the middle part isn't shown and the Start and End facets are right next to each other. With the spacer in place, the central part will take up all of the available space, pushing the Start facet to the left and the End facet to the right.
Now, open the SchedulePage. Drag a Panel Group Layout into the Bottom facet and set the Layout property to horizontal and the Halign property to right. Then, drop a Button onto the Panel Group Layout, and set the Text to Overview and Action to goTask.
To test the navigation, you can now run the entire task flow. Open the xdm-poc-flow task flow, right-click anywhere on the window, and click on Run. Your application starts with the default activity (TaskPage). Check if you can use the Timeline button to go to the SchedulePage and the Overview button to go back.