
In order to make it easier to internationalize Java applications, the Java language offers a mechanism for centralizing all of the strings that a user might see. This is called a resource bundle and can be implemented in several ways as described later in the chapter. The application will use a key (for example, START_DATE_LABEL), and there will be a resource bundle for each supported language, thus mapping that key to the user interface string in that language.
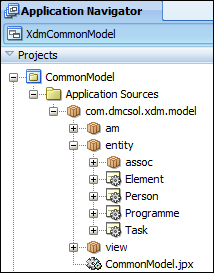
JDeveloper is built for enterprise applications so that it automatically uses the resource bundles to prepare your application for localization. Let's take the XDM Common Model, shown in the following screenshot, as an example:
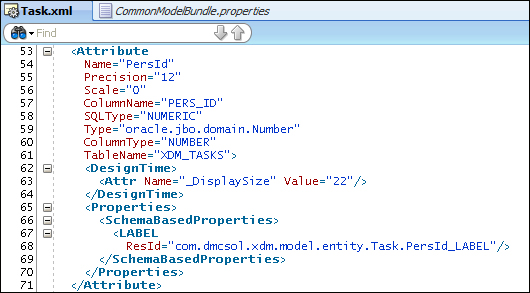
Now, watch what happens when we go into the Task entity object and define Control Hints for an attribute, as shown in the following screenshot:
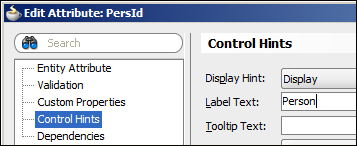
As PersId is something that might be shown to the application end user, for example, as a prompt for a drop-down list, JDeveloper doesn't just hardwire the literal string into the application. Instead, JDeveloper automatically creates a resource bundle for you. You can see this new file in the
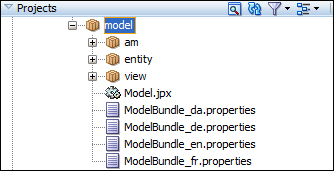
Application Navigator window, as shown in the following screenshot:
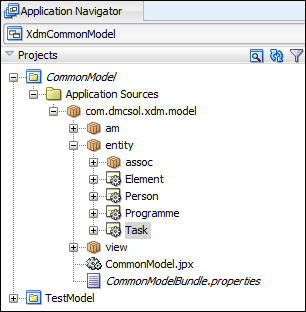
Notice the new CommonModelBundle.properties file. If you open this file, you'll see something similar to the following screenshot:

JDeveloper has automatically executed the following tasks:
Extracted the value that you defined as the label control hint for the attribute
Created a resource bundle file
Placed the text that you entered into the resource bundle and assigned a key to it
Inserted a reference to the resource key in the entity object
If you click on the Source tab for the entity object, you can see that the ResId attribute for the label points to the com.dmcsol.xdm.model.entity.Task.PersId_LABEL key, as shown in the following screenshot. This is the key that JDeveloper automatically created in the resource bundle.
There are three ways to store localizable strings in an ADF application. They are as follows:
In a simple
.propertiesfileIn an XLIFF file (an XML file format)
In a Java
ListResourceBundleclass
The preceding example uses a simple .properties file, which is the easiest to work with.
If you will be using a professional translation service to translate the user-visible text strings, they are likely to ask you for an XLIFF file. XLIFF stands for XML Localization Interface File Format, and professional translation software will be able to read and write XLIFF files. Oracle Metadata Services also uses XLIFF files to store customized strings, as we saw in Chapter 9, Customizing Functionality.
The last option is to define all of your strings in a Java class that extends java.util.ListResourceBundle. This class must implement a method to return all of the localizable strings in an Object[][] array as follows:
package com.dmcsol.xdm.model;
import java.util.ListResourceBundle;
public class ModelBundle extends ListResourceBundle {
  private static final Object[][] contents = {
    { "com.dmcsol.xdm.model.entity.Task.PersId_LABEL",
      "Person" },
    { "com.dmcsol.xdm.model.entity.Task.StartDate_LABEL",
      "Start time" }
    { "com.dmcsol.xdm.model.entity.Task.StartWhere_LABEL",
      "Start location" }
  }

  public Object[][] getContents() {
    return contents;
  }
}
The class has to define an array with an element for each of your localizable strings. This element is again an array containing exactly two values: the key and the localized value. As the ListResourceBundle class is much more difficult to read and write, you typically don't use this if you are using only static strings. If you try to deliver a file like this to your localization team, you can be sure that the commas and curly brackets won't all be correct in the file that you get back. However, it does make sense to use a ListResourceBundle class if you plan to keep all of your localizable strings in a database. In this case, your resource bundle class can access the database to retrieve the values.
You can choose the way in which you want to store your localizable strings for each project by setting Project Properties. In this dialog, choose the Resource Bundle node in the left-hand side and the desired Resource Bundle Type in the right-hand side, as shown in the following screenshot. For the XDM application, we choose the XLIFF format because we expect the application to become an international success, and we expect to send out the application UI strings to a translation agency when that happens. The Resource Bundle settings dialog looks as shown in the following screenshot:

Tip
A binding choice
Once you have selected the resource bundle type, your project will use that type. If you go back into the Properties dialog and change the resource bundle type after you have started using another type, you will need to delete the resource bundle that was started by JDeveloper for you in order to start over with the new type.
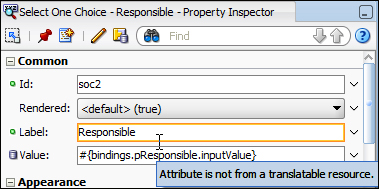
It's a good idea to check the Warn About Hard-coded Translatable Strings checkbox. This tells JDeveloper to present you with a warning if you hard code a string into a translatable field, such as the Label field. This will be shown with an orange border around the properties that should come from a resource bundle, as shown in the following screenshot:
The warning will also be shown in the source view for a page or Business Component.
Every string the user sees can be localized—labels for fields, mouseover texts, validation messages, and so on.
In some cases (such as the preceding entity attribute), JDeveloper can automatically register a new string and create an associated key in a resource bundle. However, you will normally work in the Select Text Resource dialog to define your strings because this dialog provides the option to select an already defined string for a new purpose. You can invoke this dialog from many places, which are detailed as follows:
To set a Business Component attribute (for example,
Label), you click on the search icon in the right-hand side of the field in the Control Hints dialogTo set a text for a user interface element from Property Palette, you can click on the little triangle in the right-hand side of the field and choose Select Text Resource from the pop-up menu
To set a text for a user interface element from the visual page designer, right-click on the element, choose Select Text Resource for, and then choose the element you want to define (for example, Label), as shown in the following screenshot:

All of these bring up the Select Text Resource dialog, where you can define new strings or choose among the existing ones. The dialog looks as shown in the following screenshot:

As you start typing in the Display Value field, JDeveloper automatically fills in the Key field with a suggested key. At the same time, the Matching Text Resources box is automatically reduced to the elements matching the display text that you are entering. If an already defined text resource contains the text you want, you can select it in this box and click on Select. Otherwise, type the display value, accept or change the suggested key, and click on Save and Select to store your new key/value pair in the resource bundle.
The Description field is optional unless you have checked the Always Prompt for Description checkbox under Resource Bundle in the Project Properties dialog.
Tip
Give us a clue
It is very hard for a translator to translate an individual word without any indication of the context where it is used. If you don't provide proper descriptions, you'll either be spending a lot of time answering questions from your translator or a lot of time in correcting the language errors once you show your enterprise application to the native speakers of your target language.
Now that you have your strings separated from the components and user interface, it's time to translate them. You have a resource bundle (the .properties file, XLIFF file, or Java class) with your default text, but you haven't really told the ADF framework about the language. To add this information, you can add a suffix to the file using a two-character ISO 639 language code. If, for example, your default language is English, you should add _en to the filename (for example, ModelBundle_en.properties).
If you wish to specify the version of the language of a specific country, you can add an additional suffix using a two-character ISO 3166 country code. For example, French as spoken in France would be ModelBundle_fr_FR, while French as spoken in Canada would be ModelBundle_fr_CA.
To start your translation process, you can create copies of your default file or class with different suffixes for all of your target languages. You can then send out your property or XLIFF file to be translated.
Tip
Don't send a Java ListResourceBundle class to be translated unless your translator happens to be a Java programmer in his or her spare time.
When you get your translation back, you need to place all of your translated resource files in the filesystem next to the original default resource files in your project, as shown in the following screenshot:
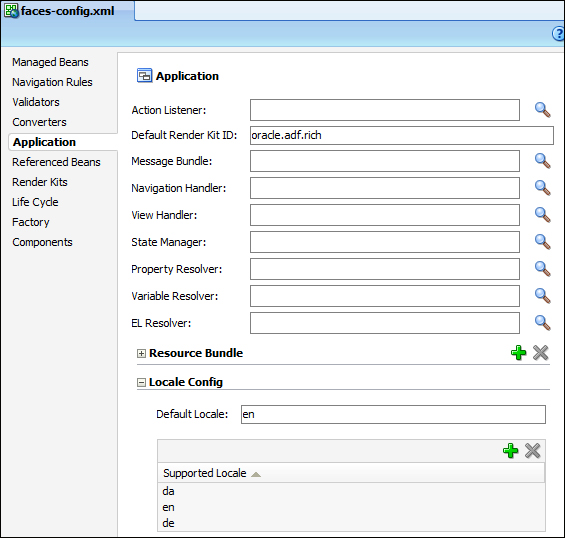
Additionally, you will have to define the languages that your application will offer in the faces-config.xml file. You will find this file in your View project under Web Content / WEB-INF. On the Application subtab, scroll down to the Locale Config section, set Default Locale, and add all of the languages that your application supports, as shown in the following screenshot: