
To effectively write geoprocessing scripts for ArcGIS, you are going to need to understand at least the basic constructs of the Python language. Python is easier to learn than most other programming languages, but it does take some time to learn and effectively use it. This section will teach you how to create variables, assign various data types to variables, understand the different types of data that can be assigned to variables, use different types of statements, use objects, read and write files, and import third-party Python modules.
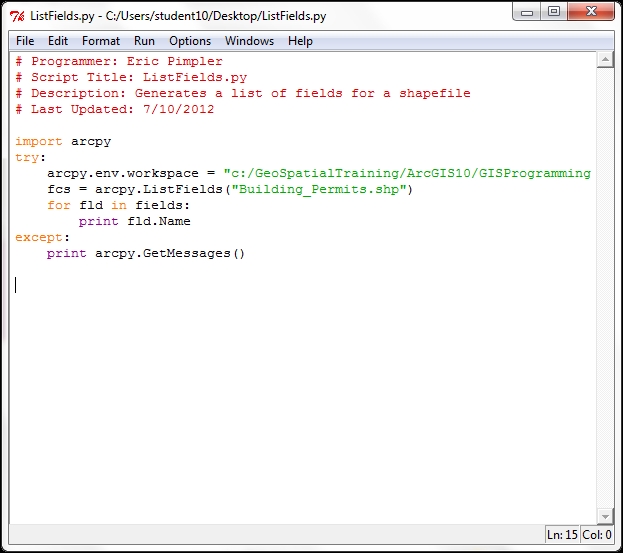
Python scripts should follow a common structure. It is a commonly accepted practice that the beginning of each script should serve as documentation, detailing the script name, author, and a general description of the processing provided by the script. This introductory documentation will help you and other programmers in the future to quickly scan the details and purpose of a script. This documentation is accomplished in Python through the use of comments. Comments are lines of code that you add to your script that serve as a documentation of what functionality the script provides. These lines of code begin with a single pound sign (#) or a double pound sign (##), and are followed by whatever text you need to document the code. The Python interpreter does not execute these lines of code. They are simply used to document your code. In the next screenshot, the commented lines of code are displayed with a single pound sign that prefixes the line of code. You should also strive to include comments throughout your script to describe important sections of your script. This will be useful to you (or another programmer) when the time comes to update your scripts:
Tip
Downloading the example code
You can download the example code files for all Packt books you have purchased from your account at http://www.PacktPub.com. If you have purchased this book elsewhere, you can visit http://www.PacktPub.com/support and register to have the files e-mailed directly to you.
Although Python includes many built-in functions, you will frequently need to access specific bundles of functionality, which are stored in external modules. For instance, the Math module stores specific functions related to processing numeric values and the R module provides statistical analysis functions. We haven't discussed the topic of functions yet, but basically functions are a named block of code that execute when called. Modules are imported through the use of the import statement. When writing geoprocessing scripts with ArcGIS, you will always need to import the arcpy module, which is the Python package that is used to access GIS tools and functions provided by ArcGIS. The import statements will be the first lines of code (not including comments) in your scripts. The following line of code imports the arcpy and os modules. The Python os module provides a way of interfacing with the underlying operating system:
import arcpy
import os
At a high level, you can think of a variable as an area in your computer's memory that is reserved to store values while the script is running. Variables that you define in Python are given a name and a value. The values assigned to variables can then be accessed by different areas of your script as needed, simply by referring to the variable name. For example, you might create a variable that contains a feature class name, which is then used by the Buffer tool to create a new output dataset. To create a variable, simply give it a name followed by the assignment operator, which is just an equals sign (=), and then a value:
fcParcels = "Parcels"
fcStreets = "Streets"
The following table illustrates the variable name and value assigned to the variable using the preceding code example:
|
Variable name |
Variable value |
|---|---|
|
|
|
|
|
|
There are certain naming rules that you must follow when creating variables, including the following:
It can contain letters, numbers, and underscores
The first character must be a letter
No special characters can be used in a variable name other an underscore
Python keywords and spaces are not permitted
There are a few dozen Python keywords that must be avoided, including class, if, for, while, and others. These keywords are typically highlighted in a different font color from other Python statements.
Here are some examples of legal variable names in Python:
featureClassParcelfieldPopulationfield2ssnmy_name
These are some examples of illegal variable names in Python:
class(Python keyword)return(Python keyword)$featureClass(illegal character, must start with a letter)2fields(must start with a letter)parcels&Streets(illegal character)
Python is a case-sensitive language, so pay particular attention to the capitalization and naming of variables in your scripts. Case-sensitivity issues are probably the most common source of errors for new Python programmers, so always consider this as a possibility when you encounter errors in your code. Let's look at an example. The following is a list of three variables; note that although each variable name is the same, the casing is different, resulting in three distinct variables:
mapsize = "22x34"MapSize = "8x11"Mapsize = "36x48"
If you print these variables, you will get the following output:
print(mapsize)
>>> 22x34

print(MapSize)
>>> 8x11  #output from print statement

print(Mapsize)
>>>36x48  #output from print statement
Python variable names need to be consistent throughout the script. The best practice is to use camel casing, wherein the first word of a variable name is all lowercase and then each successive word begins with an uppercase letter. This concept is illustrated in the following example with the fieldOwnerName variable name. The first word (field) is all lowercase followed by an uppercase letter for the second word (Owner) and third word (Name):
fieldOwnerName
In Python, variables are dynamically typed. Dynamic typing means that you can define a variable and assign data to it without specifically defining that a variable name will contain a specific type of data. Commonly used data types that can be assigned to variables include the following:
|
Data type |
Example value |
Code example |
|---|---|---|
|
String |
|
|
|
Number |
|
|
|
Boolean |
|
|
|
List |
|
|
|
Dictionary |
|
|
|
Object |
|
|
We will discuss each of these data types in greater detail in the coming sections.
For instance, in C#, you would need to define a variable's name and type before using it. This is not necessary in Python. To use a variable, simply give it a name and value, and you can begin using it right away. Python does the work behind the scenes to figure out what type of data is being held in the variable.
In the following C# code example, we've created a new variable called aTouchdown, which is defined as an integer variable, meaning that it can contain only integer data. We then assign the 6 value to the variable:
int aTouchdown;
aTouchdown = 6;
In Python, this variable can be created and assigned data through dynamic typing. The Python interpreter is tasked with dynamically figuring out what type of data is assigned to the variable:
aTouchdown = 6
There may be times when you know that your script will need a variable, but don't necessarily know ahead of time what data will be assigned to the variable. In these cases, you could simply define a variable without assigning data to it. Here, you will find a code example that depicts creating a variable without assigning data:
aVariable = ''
aVariable = NULL
Data that is assigned to the variable can also be changed while the script is running.
Variables can hold many different kinds of data, including primitive data types, such as strings and numbers, along with more complex data, such as lists, dictionaries, and even objects. We're going to examine the different types of data that can be assigned to a variable along with various functions that are provided by Python to manipulate the data.
Python has a number of built-in data types. The first built-in type that we will discuss is the string data type. We've already seen several examples of string variables, but these types of variables can be manipulated in a lot of ways, so let's take a closer look at this data type.
Strings are ordered collections of characters that store and represent text-based information. This is a rather dry way of saying that string variables hold text. String variables are surrounded by single or double quotes when being assigned to a variable. Examples could include a name, feature class name, a Where clause, or anything else that can be encoded as text.
Strings can be manipulated in a number of ways in Python. String concatenation is one of the more commonly used functions and is simple to accomplish. The + operator is used with string variables on either side of the operator to produce a new string variable that ties the two string variables together:
shpStreets = "c:\\GISData\\Streets" + ".shp"
print(shpStreets)
Running this code example produces the following result:
>>>c:\GISData\Streets.shp
String equality can be tested using Python's == operator, which is simply two equals signs placed together. Don't confuse the equality operator with the assignment operator, which is a single equals sign. The equality operator tests two variables for equality, while the assignment operator assigns a value to a variable:
firstName = "Eric"
lastName = "Pimpler"
firstName == lastName
Running this code example produces the following result because the firstName and lastName variables are not equal:
>>>False
Strings can be tested for containment using the in operator, which returns True if the first operand is contained in the second:
fcName = "Floodplain.shp"
print(".shp" in fcName)
>>>True
I have briefly mentioned that strings are an ordered collection of characters. What does this mean? It simply means that we can access individual characters or a series of characters from the string and that the order of the characters will remain the same until we change them. Some collections, such as a dictionary, do not maintain a set order. In Python, this is referred to as indexing in the case of accessing an individual character, and slicing in the case of accessing a series of characters.
Characters in a string are obtained by providing the numeric offset contained within square brackets after a string. For example, you could obtain the first string character in the fc variable by using the fc[0] syntax. Python is a zero-based language, meaning the first item in a list is 0. Negative offsets can be used to search backwards from the end of a string. In this case, the last character in a string is stored at the -1 index. Indexing always creates a new variable to hold the character:
fc = "Floodplain.shp"
print(fc[0])
>>>'F'
print(fc[10])
>>>'.'
print(fc[13])
>>>'p'
The following image illustrates how strings are an ordered collection of characters with the first character occupying the 0 position, the second character occupying the 1 position, and each successive character occupying the next index number:

While string indexing allows you to obtain a single character from a string variable, string slicing enables you to extract a contiguous sequence of strings. The format and syntax is similar to indexing, but with the addition of a second offset, which is used to tell Python which characters to return.
The following code example provides an example of string slicing. The theString variable has been assigned a value of Floodplain.shp. To obtain a sliced variable with the contents of Flood, you would use the theString[0:5] syntax:
theString = "Floodplain.shp"
print(theString[0:5])
>>>Flood
Note
Python slicing returns the characters beginning with the first offset up to, but not including, the second offset. This can be particularly confusing for new Python programmers and is a common source of errors. In our example, the returned variable will contain the Flood characters. The first character, which occupies the 0 position, is F. The last character returned is the 4 index, which corresponds to the d character. Notice the 5 index number is not included since Python slicing only returns characters up to, but not including, the second offset
Either of the offsets can be left off. This, in effect, creates a wild card. In the case of theString[1:], you are telling Python to return all characters starting from the second character to the end of the string. In the second case, theString[:-1], you are telling Python to start at character zero and return all characters except the last.
Python is an excellent language to manipulate strings and there are many additional functions that you can use to process this type of data. Most of these are beyond the scope of this text, but in general, all the following string manipulation functions are available:
String length
Casing functions for conversion to upper and lowercase
The removal of leading and trailing whitespace
Finding a character within a string
The replacement of text
Splitting into a list of words based on a delimiter
Formatting
Your Python geoprocessing scripts for ArcGIS will often need to reference the location of a dataset on your computer or, perhaps, a shared server. References to these datasets will often consist of paths stored in a variable. In Python, pathnames are a special case that deserve some extra mention. The backslash character in Python is a reserved escape character and a line continuation character, thus there is a need to define paths using two back slashes, a single forward slash, or a regular single backslash prefixed with r. These pathnames are always stored as strings in Python. You'll see an example of this in the following section.
The example for an illegal path reference is as follows:
fcParcels = "c:\Data\Parcels.shp"
The example for legal path references are as follows:
fcParcels = "c:/Data/Parcels.shp"
fcParcels = "c:\\Data\\Parcels.shp"
fcParcels = r"c:\Data\Parcels.shp"
Python also has built-in support for numeric data, including int, long, float, and complex values. Numbers are assigned to variables in much the same way as strings, with the exception that you do not enclose the value in quotes and obviously, it must be a numeric value.
Python supports all the commonly used numeric operators, including addition, subtraction, multiplication, division, and modulus or remainder. In addition to this, functions used to return the absolute value, conversion of strings to numeric data types, and rounding are also available.
Although Python provides a few built-in mathematical functions, the math module can be used to access a wide variety of more advanced math functions. To use these functions, you must specifically import the math module as follows:
import math
Functions provided by the math module include those that return the ceiling and floor of a number, the absolute value, trigonometric functions, logarithmic functions, angular conversion, and hyperbolic functions. It is worth noting that there is no simple function to calculate mean or average and these will have to be coded to be calculated. More details about the math module can be found by navigating to All Programs | ArcGIS | Python 2.7 | Python Manuals. After opening the python manual, navigate to Python Standard Library | Numeric and Mathematical Modules. You can also reference this for any data types, syntax, built-in functions, and other things that you wish to understand in more detail, of which there are too many to be covered here.
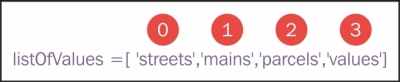
A third built-in data type provided by Python is lists. A list is an ordered collection of elements that can hold any type of data supported by Python as well as being able to hold multiple data types at the same time. This could be numbers, strings, other lists, dictionaries, or objects. So, for instance, a list variable could hold numeric and string data at the same time. Lists are zero-based, with the first element in the list occupying the 0 position. This is illustrated here:
Each successive object in the list is incremented by one. Additionally, lists have the special capability of dynamically growing and shrinking.
Lists are created by assigning a series of values enclosed by brackets. To pull a value from a list, simply use an integer value in brackets along with the variable name. The following code example provides an illustration of this:
fcList = ["Hydrants", "Water Mains", "Valves", "Wells"]
fc = fcList[0] ##first item in the list - Hydrants
print(fc)
>>>Hydrants
fc = fcList[3]  ##fourth item in the list - Wells
print(fc)
>>>Wells
You can add a new item to an existing list by using the append() method, as seen in this code example:
fcList.append("Sewer Pipes")
print(fcList)
>> Hydrants, Water Mains, Valves, Wells, Sewer Pipes
You can also use slicing with lists to return multiple values. To slice a list, you can provide two offset values separated by a colon, as seen in the following code example. The first offset indicates the starting index number and the second indicates the stopping point. The second index number will not be returned. Slicing a list always returns a new list:
fcList = ["Hydrants", "Water Mains", "Valves", "Wells"]
fc = fcList[0:2] ##get the first two items – Hydrants, Water Mains
Lists are dynamic in nature, meaning that you can add and remove items from an existing list as well as change the existing contents. This is all done without the need to create a new copy of the list. Changing values in a list can be accomplished either through indexing or slicing. Indexing allows you to change a single value, while slicing allows you to change multiple list items.
Lists have a number of methods that allow you to manipulate the values that are part of the list. You can sort the contents of the list in either an ascending or descending order through the use of the sort() method. Items can be added to a list with the append() method, which adds an object to the end of the list, and with the insert() method, which inserts an object at a position within the list. Items can be removed from a list with the remove() method, which removes the first occurrence of a value from the list, or the pop() method, which removes and returns the object at the end of the list. The contents of the list can also be reversed with the reverse() method.
Tuples are similar to lists but with some important differences. Just like lists, tuples contain a sequence of values. The contents of a tuple can include any type of data just like lists. However, unlike lists, the contents of a tuple are static. After a tuple has been created, you can't make any changes to the sequence of the values nor can you add or remove values. This can be a good thing for situations where you want data to always occupy a specific position. Creating a tuple is as simple as placing a number of comma-separated values inside parentheses, as shown in the following code example:
fcTuples = ("Hydrants", "Water Mains", "Valves", "Wells")You've probably noticed that creating a tuple is very similar to creating a list. The only difference is the use of parentheses instead of square braces around the values.
Similar to lists, tuple indices start with an index value of 0. Access to values stored in a tuple occurs in the same way as lists. This is illustrated in the following code example:
fcTuples = ("Hydrants", "Water Mains", "Valves", "Wells")
print(fcTuples[1])
>>>Water Mains
Tuples are typically used in place of a list when it is important for the contents of the structure to be static. You can't ensure this with a list, but you can with a tuple.
Dictionaries are a second type of collection object in Python. They are similar to lists, except that dictionaries are an unordered collection of objects. Instead of fetching objects from the collection through the use of an offset, items in a dictionary are stored and fetched by a key. Each key in a dictionary has an associated value, as seen here:

Similar to lists, dictionaries can grow and shrink in place through the use of methods on dictionary. In the following code example, you will learn to create and populate a dictionary and see how values can be accessed through the use of a key. Dictionaries are created with the use of curly braces. Inside these braces, each key is followed by a colon and then a value is associated with the key. These key/value pairs are separated by commas:
##create the dictionary
dictLayers = {'Roads': 0, 'Airports': 1, 'Rail': 2}

##access the dictionary by key
print(dictLayers['Airports'])
>>>1
print(dictLayers['Rail'])
>>>2
Basic dictionary operations include getting the number of items in a dictionary, acquiring a value using a key, determining if the key exists, converting the keys to a list, and getting a list of values. The dictionary objects can be changed, expanded, and shrunk in place. What this means is that Python does not have to create a new dictionary object to hold the altered version of the dictionary. Assigning values to a dictionary key can be accomplished by stating the key value in brackets and setting it equal to some value.
Tip
Unlike lists, dictionaries can't be sliced due to the fact that their contents are unordered. Should you have the need to iterate over all the values in a dictionary, simply use the keys() method, which returns a collection of all the keys in the dictionary and can then be used individually to set or get their value.
Classes and objects are a fundamental concept in object-oriented programming. While Python is more of a procedural language, it also supports object-oriented programming. In object-oriented programming, classes are used to create object instances. You can think of classes as blueprints for the creation of one or more objects. Each object instance has the same properties and methods, but the data contained in an object can and usually will differ. Objects are complex data types in Python composed of properties and methods, and can be assigned to variables just like any other data type. Properties contain data associated with an object, while methods are actions that an object can perform.
These concepts are best illustrated with an example. In ArcPy, the extent class is a rectangle specified by providing the coordinate of the lower-left corner and the coordinate of the upper-right corner in map units. The extent class contains a number of properties and methods. Properties include XMin, XMax, YMin, YMax, spatialReference, and others. The minimum and maximum of x and y properties provide the coordinates for the extent rectangle. The spatialReference property holds a reference to a spatialReference object for extent. Object instances of the extent class can be used both to set and get the values of these properties through dot notation. An example of this is seen in the following code example:
# get the extent of the county boundary
ext = row[0].extent
# print out the bounding coordinates and spatial reference
print("XMin: " + str(ext.XMin))
print("XMax: " + str(ext.XMax))
print("YMin: " + str(ext.YMin))
print("YMax: " + str(ext.YMax))
print("Spatial Reference: " + ext.spatialReference.name)
Running this script yields the following output:
XMin: 2977896.74002
XMax: 3230651.20622
YMin: 9981999.27708
YMax:10200100.7854
Spatial Reference: NAD_1983_StatePlane_Texas_Central_FIPS_4203_Feet
The extent class also has a number of methods, which are actions that an object can perform. In the case of this particular object, most of the methods are related to performing some sort of geometric test between the extent object and another geometry. Examples include contains(), crosses(), disjoint(), equals(), overlaps(), touches(), and within().
One additional object-oriented concept that you need to understand is dot notation. Dot notation provides a way of accessing the properties and methods of an object. It is used to indicate that a property or method belongs to a particular class.
The syntax for using dot notation includes an object instance followed by a dot and then the property or method. The syntax is the same regardless of whether you're accessing a property or a method. A parenthesis and zero or more parameters at the end of the word following the dot indicates that a method is being accessed. Here are a couple of examples to better illustrate this concept:
Property: extent.XMin
Method: extent.touches()
Each line of code that you write with Python is known as a statement. There are many different kinds of statements, including those that create and assign data to variables, decision support statements that branch your code based on a test, looping statements that execute a code block multiple times, and others. There are various rules that your code will need to follow as you create the statements that are part of your script. You've already encountered one type of statement: variable creation and assignment.
The
if/elif/else statement is the primary decision-making statement in Python and tests for a True/False condition. Decision statements enable you to control the flow of your programs. Here are some example decisions that you can make in your code: if the variable holds a point feature class, get the X, Y coordinates; if the feature class name equals Roads, then get the Name field.
Decision statements, such as if/elif/else, test for a True/False condition. In Python, a True value means any nonzero number or nonempty object. A False value indicates not true and is represented in Python with a zero number or empty object. Comparison tests return values of one or zero (true or false). Boolean and/or operators return a true or false operand value:
if fcName == 'Roads':
  arcpy.Buffer_analysis(fc, "c:\\temp\\roads.shp", 100)
elif fcName == 'Rail':
  arcpy.Buffer_analysis(fc, "c:\\temp\\rail.shp", 50)
else:
  print("Can't buffer this layer")
The Python code must follow certain syntax rules. Statements execute one after another until your code branches. Branching typically occurs through the use of if/elif/else. In addition to this, the use of looping structures, such as for and while, can alter the statement flow. Python automatically detects statement and block boundaries, so there is no need for braces or delimiters around your blocks of code. Instead, indentation is used to group statements in a block. Many languages terminate statements with the use of a semicolon, but Python simply uses the end of line character to mark the end of a statement. Compound statements include a ":" character. Compound statements follow this pattern, that is, header terminated by a colon. Blocks of code are then written as individual statements and are indented underneath the header.
Looping statements allow your program to repeat lines of code over and over as necessary. The while loops repeatedly execute a block of statements as long as the test at the top of the loop evaluates to True. When the condition test evaluates to False, Python begins interpreting code immediately after the while loop. In the next code example, a value of 10 has been assigned to the x variable. The test for the while loop then checks to see if x is less than 100. If x is less than 100, the current value of x is printed to the screen and the value of x is incremented by 10. Processing then continues with the while loop test. The second time, the value of x will be 20; so the test evaluates to True once again. This process continues until x is equal to or greater than 100. At this time, the test will evaluate to False and processing will stop. It is very important that the while statements have some way of breaking out of the loop. Otherwise, you will wind up in an infinite loop. An infinite loop is a sequence of instructions in a computer program that loops endlessly, either due to the loop having no terminating condition, having one that can never be met, or one that causes the loop to start over:
x = 10
while x < 100:
     print(x)
     x = x + 10
The for loops execute a block of statements a predetermined number of times. They come in two varieties—a counted loop to run a block of code a set number of times, and a list loop that enables you to loop through all the objects in a list. The list loop in the following example executes once for each value in the dictionary and then stops looping:
dictLayers = {"Roads":"Line","Rail":"Line","Parks":"Polygon"}
for key in dictLayers:
  print(dictLayers[key])
There are times when it will be necessary for you to break out of the execution of a loop. The break and continue statements can be used to do this. The break jumps out of the closest enclosing loop, while continue jumps back to the top of the closest enclosing loop. These statements can appear anywhere inside the block of code.
A
try statement is a complete, compound statement that is used to handle exceptions. Exceptions are a high-level control device used primarily for error interception or triggering. Exceptions in Python can either be intercepted or triggered. When an error condition occurs in your code, Python automatically triggers an exception, which may or may not be handled by your code. It is up to you as a programmer to catch an automatically triggered exception. Exceptions can also be triggered manually by your code. In this case, you would also need to provide an exception handling routine to catch these manually triggered exceptions.
There are two basic types of
try statements: try/except/else and try/finally. The basic
try statement starts with a try header line followed by a block of indented statements. Then, this is followed by one or more optional except clauses that name the exceptions that are to be caught. After this, you will find an optional else clause at the end:
import arcpy
import sys

inFeatureClass = arcpy.GetParameterAsText(0)
outFeatureClass = arcpy.GetParameterAsText(1)

try:
  # If the output feature class exists, raise an error

  if arcpy.Exists(inFeatureClass):
    raise overwriteError(outFeatureClass)
  else:
    # Additional processing steps
    print("Additional processing steps")

except overwriteError as e:
  # Use message ID 12, and provide the output feature class
  #  to complete the message.

  arcpy.AddIDMessage("Error", 12, str(e))
The try/except/else statement works as follows. Once inside a try statement, Python marks the fact that you are in a try block and knows that any exception condition that occurs at this point will be sent to the various except statements for handling. If a matching exception is found, the code block inside the except block is executed. The code then picks up the full try statement, which will be mentioned shortly. The else statements are not executed in this case. Each statement inside the try block is executed. Assuming that no exception conditions occur, the code pointer will then jump to the else statement and execute the code block contained by the else statement before moving to the next line of code that follows the try block.
The other type of try statement is the try/finally statement, which allows for finalization actions. When a finally clause is used in a try statement, its block of statements always run at the very end, whether an error condition occurs or not.
Here is how the try/finally statement works: if an exception occurs, Python runs the try block, then the except block, followed by the finally block, and then execution continues past the entire try statement. If an exception does not occur during execution, Python runs the try block, then the finally block. This is useful when you want to make sure an action happens after a code block runs, regardless of whether an error condition occurs. Cleanup operations, such as closing a file or a connection to a database, are commonly placed inside a finally block to ensure that they are executed regardless of whether an exception occurs in your code:
import arcpy

try:
  if arcpy.CheckExtension("3D") == "Available":
    arcpy.CheckOutExtension("3D")
  else:
    # Raise a custom exception
    raise LicenseError

  arcpy.env.workspace = "D:/GrosMorne"
  arcpy.HillShade_3d("WesternBrook", "westbrook_hill", 300)
  arcpy.Aspect_3d("WesternBrook", "westbrook_aspect")

except LicenseError:
  print("3D Analyst license is unavailable")
except:
  print(arcpy.GetMessages(2))
finally:
  # Check in the 3D Analyst extension
arcpy.CheckInExtension("3D")The
with statement is handy when you have two related operations that need to be executed as a pair with a block of code in between. A common scenario to use the with statements is opening, reading, and closing a file. Opening and closing a file are the related operations, and reading a file and doing something with the contents is the block of code in between. When writing geoprocessing scripts with ArcGIS, the new cursor objects introduced with version 10.1 of ArcGIS are ideal when using the with statements. We'll discuss the cursor objects in great detail in a later chapter, but I'll briefly describe these objects now. Cursors are an in-memory copy of records from the attribute table of a feature class or table. There are various types of cursors. Insert cursors allow you to insert new records, search cursors are a read-only copy of records, and update cursors allow you to edit or delete records. Cursor objects are opened, processed in some way, and closed automatically using a with statement.
The closure of a file or cursor object is handled automatically by the with statement, resulting in cleaner, more efficient coding. It's basically like using a try/finally block, but with fewer lines of code. In the following code example, the with block is used to create a new search cursor, read information from the cursor, and implicitly close the cursor:
import arcpy

fc = "c:/data/city.gdb/streets"

# For each row print the Object ID field, and use the SHAPE@AREA
# token to access geometry properties

with arcpy.da.SearchCursor(fc, ("OID@", "SHAPE@AREA")) as cursor:
  for row in cursor:
    print("Feature {0} has an area of {1}".format(row[0], row[1]))
Statement indentation deserves a special mention as it is critical to the way Python interprets code. Compound statements in Python use indentation to create a group of statements. This includes the if/then, for, while, try, and with statements. The Python interpreter uses indentation to detect these code blocks. The beginning of a compound statement is defined through the use of a colon. All lines following the beginning of the compound statement should be indented the same distance. You can use any number of spaces to define the indentation, but you should use the same indentation level for each statement. A common practice is to define indentation through the use of a tab. When the Python interpreter encounters a line that is less indented, it will assume that the code block has ended. The following code illustrates this concept through the use of a try statement. Notice that there is a colon after the try statement. This indicates that the statements that follow are part of a compound statement and should be indented. These statements will form a code block.
Also, an if statement is inside the try statement. This too is a compound statement as defined by the colon at the end of the statement. Therefore, any statements that are part of the if statement should be further indented. You should also notice that there is a statement that is not indented inside the if statement, but is rather at the same level. This statement4 is part of the try code block but not part of the if code block:
try:
  if <statement1>:
    <statement2>
    <statement3>
  <statement4> <………..>
except:
  <statement>
  <………..>
except:
  <statement>
  <…………>
Many languages, including JavaScript, Java, and .NET, use curly braces to indicate a group of statements. Python uses indentation instead of curly braces in an attempt to cut down on the amount of code you have to write and to make code more readable. Anyone who has ever used these other languages can attest to the difficulty in reading code that contains many curly braces. However, indentation does take some getting used to and is critical to the way that Python executes lines of code.
You will often find it necessary to retrieve or write information to files on your computer. Python has a built-in object type that provides a way to access files for many tasks. We're only going to cover a small subset of the file manipulation functionality provided, but we'll touch on the most commonly used functions, including opening and closing files, and reading and writing data to a file.
Python's open() function creates a file object, which serves as a link to a file residing on your computer. You must call the open() function on a file before reading and/or writing data to a file. The first parameter for the open() function is a path to the file you'd like to open. The second parameter corresponds to a mode, which is typically read (r), write (w), or append (a). A value of r indicates that you'd like to open the file for read-only operations, while a value of w indicates you'd like to open the file for write operations. In the event that you open a file that already exists for write operations, this will overwrite any data currently in the file, so you must be careful with the write mode. The append mode (a) will open a file for write operations, but instead of overwriting any existing data, it will append the new data to the end of the file. The following code example shows the use of the open() function to open a text file in a read-only mode:
with open('Wildfires.txt','r') as f:Notice that we have also used the with keyword to open the file, ensuring that the file resource will be cleaned up after the code that uses it has finished executing.
After a file has been opened, data can be read from it in a number of ways and using various methods. The most typical scenario would be to read data one line at a time from a file through the readline() method. The readline() function can be used to read the file one line at a time into a string variable. You would need to create a looping mechanism in your Python code to read the entire file line by line. If you would prefer to read the entire file into a variable, you can use the read() method, which will read the file up to the
End Of File (EOF) marker. You can also use the readlines() method to read the entire contents of a file, separating each line into individual strings, until the EOF is found.
In the following code example, we have opened a text file called Wildfires.txt in the read-only mode and used the readlines() method on the file to read its entire contents into a variable called lstFires, which is a Python list containing each line of the file as a separate string value in the list. In this case, the Wildfire.txt file is a comma-delimited text file containing the latitude and longitude of the fire along with the confidence values for each fire. We then loop through each line of text in lstFires and use the split() function to extract the values based on a comma as the delimiter, including the latitude, longitude, and confidence values. The latitude and longitude values are used to create a new Point object, which is then inserted into the feature class using an insert cursor:
import arcpy, os
try:

  arcpy.env.workspace = "C:/data/WildlandFires.mdb"
  # open the file to read
  with open('Wildfires.txt','r') as f:   #open the file

    lstFires = f.readlines() #read the file into a list
    cur = arcpy.InsertCursor("FireIncidents")

    for fire in lstFires: #loop through each line
      if 'Latitude' in fire: #skip the header
        continue
      vals = fire.split(",") #split the values based on comma
      latitude = float(vals[0]) #get latitude
      longitude = float(vals[1]) #get longitude
      confid = int(vals[2]) #get confidence value
      #create new Point and set values
      pnt = arcpy.Point(longitude,latitude)
      feat = cur.newRow()
      feat.shape = pnt
      feat.setValue("CONFIDENCEVALUE", confid)
      cur.insertRow(feat) #insert the row into featureclass
except:
    print(arcpy.GetMessages()) #print out any errors
finally:
  del cur
  f.close()
Just as is the case with reading files, there are a number of methods that you can use to write data to a file. The write() function is probably the easiest to use and takes a single string argument and writes it to a file. The writelines() function can be used to write the contents of a list structure to a file. In the following code example, we have created a list structure called fcList, which contains a list of feature classes. We can write this list to a file using the writelines() method:
outfile = open('c:\\temp\\data.txt','w')
fcList = ["Streams", "Roads", "Counties"]
outfile.writelines(fcList)