
OpenCV is an open source library for developing computer vision applications that can run on multiple platforms, such as Windows, Linux, Mac, Android, and iOS. It can be used in both academic and commercial applications under a BSD license that allows you to freely use, distribute, and adapt it. This recipe will show you how to install the library on your machine.
When you visit the OpenCV official website at http://opencv.org/ , you will find the latest release of the library, the online documentation describing the Application Programming Interface (API), and many other useful resources on OpenCV.
From the OpenCV website, find the latest available downloads and select the one that corresponds to the platform of your choice (Windows, Linux/Mac, or iOS). Once the OpenCV package is downloaded, run the WinZip self-extractor and select the location of your choice. An opencv directory will be created; it is a good idea to rename it in a way that will show which version you are using (for example, in Windows, your final directory could be C:\opencv-3.2). This directory will contain a collection of files and directories that constitute the library. Notably, you will find the sources directory that will contain all the source files (yes, it is open source!).
In order to complete the installation of the library and have it ready for use, you need to take an important step: generate the binary files of the library for the environment of your choice. This is indeed the point where you have to make a decision on the target platform you wish to use to create your OpenCV applications. Which operating system do you prefer to use? Which compiler should you select? Which version? 32-bit or 64-bit? As you can see, there are many possible options, and this is why you have to build the library that fits your needs.
The Integrated Development Environment (IDE) you will use in your project development will also guide you to make these choices. Note that the library package also comes with precompiled binaries that you can directly use if they correspond to your situation (check the build directory adjacent to the sources directory). If one of the precompiled binaries satisfies your requirements, then you are ready to go.
One important remark, however. Since version 3, OpenCV has been split into two major components. The first one is the main OpenCV source repository that includes the mature algorithms. This is the one you have downloaded. A separate contribution repository also exists, and it contains the new computer vision algorithm, recently added by the OpenCV contributors. If your plan is to use only the core functions of OpenCV, you do not need the contrib package. But if you want to play with the latest state-of-the-art algorithms, then there is a good chance that you will need this extra module. As a matter of fact, this cookbook will show you how to use several of these advanced algorithms. You therefore need the contrib modules to follow the recipes of this book. So you have to go to
https://github.com/opencv/opencv_contrib
and download OpenCV's extra modules (download the ZIP file). You can unzip the extra modules into the directory of your choice; these modules should be found at opencv_contrib-master/modules. For simplicity, you can rename this directory as contrib and copy it directly inside the sources directory of the main package. Note that you can also pick the extra modules of your choice and only save them; however, you will probably find it easier, at this point, to simply keep everything.
You are now ready to proceed with the installation. To build the OpenCV binaries, it is highly suggested that you use the CMake tool, available at
http://cmake.org
. CMake is another open source software tool designed to control the compilation process of a software system using platform-independent configuration files. It generates the required makefile or solution files needed for compiling a software library in your environment. Therefore, you have to download and install CMake. Also see the There's more... section of this recipe for an additional software package, the Visualization Toolkit (VTK), that you may want to install before compiling the library.
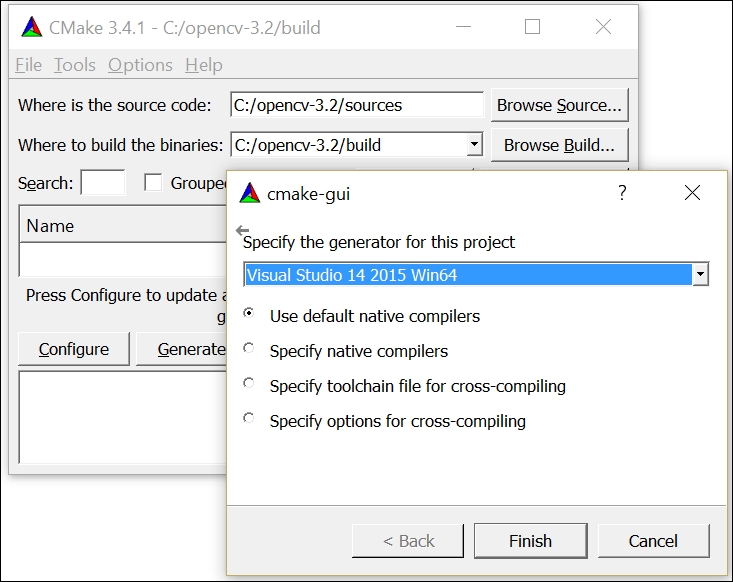
You can run cmake using a command-line interface, but it is easier to use CMake with its graphical interface (cmake-gui). In the latter case, all you need to do is specify the folder containing the OpenCV library source and the one that will contain the binaries. Now click on Configure and select the compiler of your choice:
Once this initial configuration is completed, CMake will provide you with a number of configuration options. You have to decide, for example, whether you want to have the documentation installed or whether you wish to have some additional libraries installed. Unless you know what you are doing, it is probably better to leave the default options as they are. However, since we want to include the extra modules, we have to specify the directory where they can be found:
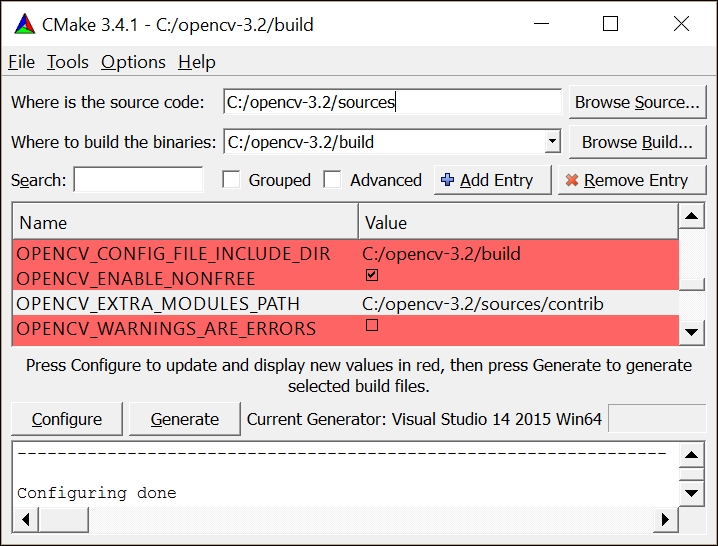
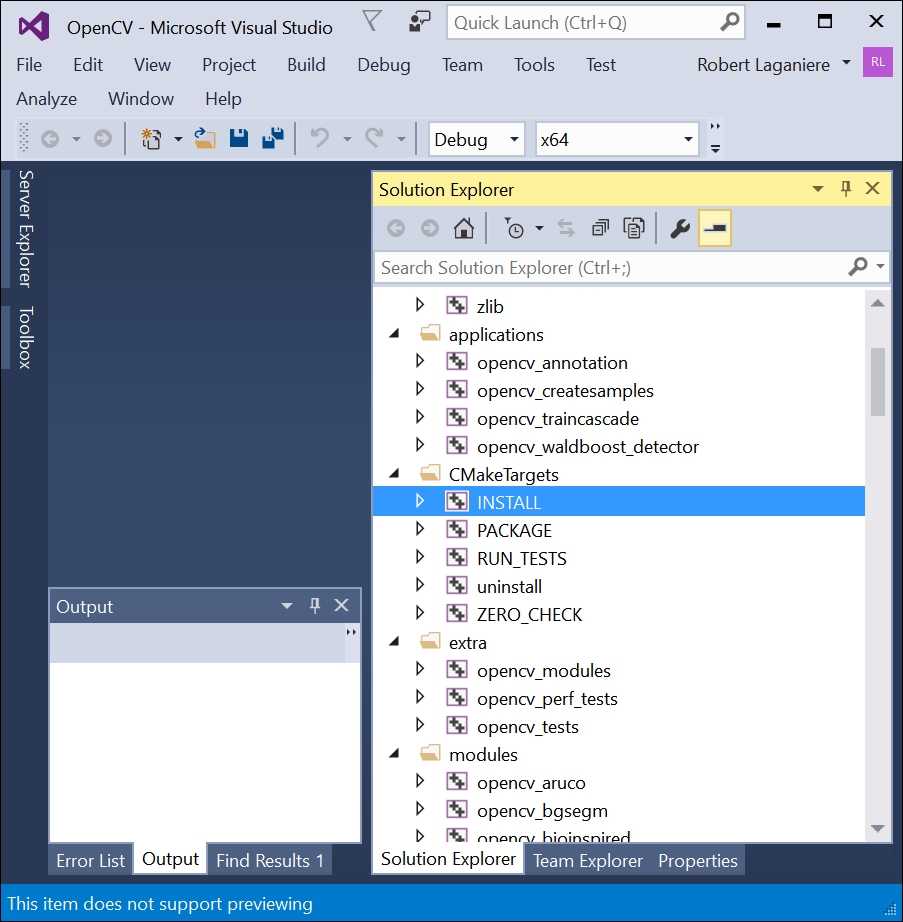
Once the extra module path is specified, click on Configure again. You are now ready to generate the project files by clicking on the Generate button. These files will allow you to compile the library. This is the last step of the installation process, which will make the library ready to be used in your development environment. For example, if you select MS Visual Studio, then all you need to do is open the top-level solution file that CMake has created for you (the OpenCV.sln file). You then select the INSTALL project (under CMakeTargets) and issue the Build command (use right-click).
To get both a Release and Debug build, you will have to repeat the compilation process twice, one for each configuration. If everything goes well, you will have an install directory (under build) created. This directory will contain all the binary files of the OpenCV library to be linked with your application as well as the dynamic library files that your executables have to call at runtime. Make sure you set your system's PATH environment variable (from Control Panel) such that your operating system would be able to find the .dll files when you run your applications (for example, C:\opencv-3.2\build \install\x64\vc14\bin). You should also define the environment variable, OPENCV_DIR pointing to the INSTALL directory. This way, CMake will be able to find the library when configuring future projects.
In Linux environments, you can use Cmake to generate the required Makefiles; you then complete the installation by executing a sudo make install command. Alternatively, you could also use the packaging tool apt-get which can automatically perform a complete installation of the library. For Mac OS, you should use the Homebrew package manager. Once installed, you just have to type brew install opencv3 --with-contrib in order to have the complete library installed (run brew info opencv3 to view all possible options).
OpenCV is a library that is in constant evolution. With version 3, the library continues to expand offering a lot of new functionalities with enhanced performances. The move to having a full C++ API, which was initiated in version 2, is now almost complete, and more uniform interfaces have been implemented. One of the major changes introduced in this new version is the restructuring of the modules of the library in order to facilitate its distribution. In particular, a separate repository containing the most recent algorithms has been created. This contrib repository also contains non-free algorithms that are subject to specific licenses. The idea is for OpenCV to be able to offer state-of-the-art functionalities that developers and researchers want to share while still being able to offer a very stable and well-maintained core API. The main modules are therefore the ones you get when you download the library at http://opencv.org/. The extra modules must be downloaded directly from the development repository hosted on GitHub (
https://github.com/opencv/
). Since these extra modules are in constant development, you should expect more frequent changes to the algorithms they contain.
The OpenCV library is divided into several modules. For example, the opencv_core module contains the core functionalities of the library; the opencv_imgproc module includes the main image processing functions; the opencv_highgui module offers the image and video reading and writing functions along with some user interface functions; and so on. To use a particular module, you have to include the corresponding top-level header file. For instance, most applications that use OpenCV start with the following declarations:
    #include <opencv2/core.hpp>
    #include <opencv2/imgproc.hpp>
    #include <opencv2/highgui.hpp>
As you learn to work with OpenCV, you will discover more and more functionalities available in its numerous modules.
The OpenCV website at http://opencv.org/ contains detailed instructions on how to install the library. It also contains complete online documentation that includes several tutorials on the different components of the library.
In some applications, computer vision is used to reconstruct the 3D information of a scene from images. When working with 3D data, it is often useful to be able to visualize the results in some 3D virtual world. As you will learn in
Chapter 11
, Reconstructing 3D Scenes, the cv::viz module offers many useful functions that allow you to visualize scene objects and cameras in 3D. However, this module is built on top of another open source library: VTK. Therefore, if you want to use the cv::viz module, you need to install VTK on your machine before compiling OpenCV.
VTK is available at http://www.vtk.org/. All you have to do is download the library and use CMake in order to create the binaries for your development environment. In this book, we used version 6.3.0. In addition, you should define the VTK_DIR environment variable, pointing to the directory containing the built files. Also, in the configuration options proposed during the OpenCV installation process with CMake, make sure that the WITH_VTK option is checked.
OpenCV is an open source project that welcomes user contributions. The library is hosted on GitHub, a web service that offers version control and source code management tools based on Git. You can access the developer site at https://github.com/opencv/opencv/wiki . Among other things, you can access the currently developed version of OpenCV. The community uses Git as their version control system. Git is also a free open source software system; it is probably the best tool you can use to manage your own source code.
Note
Downloading the example source code of this book: The source code files of the examples presented in this cookbook are also hosted on GitHub. Please visit the author's repository at https://github.com/laganiere to obtain the latest version of the code. Note that you can download the example code files for all the Packt books you have purchased from your account at http://www.packtpub.com . If you have purchased this book elsewhere, you can visit http://www.packtpub.com/support and register yourselves there to have the files e-mailed directly to you.
The author's website (http://www.laganiere.name/) also presents step-by-step instructions on how to install the latest versions of the OpenCV library
Visit https://git-scm.com/ and https://github.com/ to learn more about source code management.