

The basic unit of data that can be processed by a Storm application is called a tuple. Each tuple consists of a predefined list of fields. The value of each field can be a byte, char, integer, long, float, double, Boolean, or byte array. Storm also provides an API to define your own data types, which can be serialized as fields in a tuple.
A tuple is dynamically typed, that is, you just need to define the names of the fields in a tuple and not their data type. The choice of dynamic typing helps to simplify the API and makes it easy to use. Also, since a processing unit in Storm can process multiple types of tuples, it's not practical to declare field types.
Each of the fields in a tuple can be accessed by its name getValueByField(String) or its positional index getValue(int) in the tuple. Tuples also provide convenient methods such as getIntegerByField(String)that save you from typecasting the objects. For example, if you have a Fraction(numerator, denominator) tuple, representing fractional numbers, then you can get the value of the numerator by either using getIntegerByField("numerator") or getInteger(0).
You can see the full set of operations supported by backtype.storm.tuple.backtype.storm.tuple.Tuple in the javadoc located at https://storm.incubator.apache.org/apidocs/backtype/storm/tuple/Tuple.html.
In Storm terminology, a topology is an abstraction that defines the graph of the computation. You create a Storm topology and deploy it on a Storm cluster to process the data. A topology can be represented by a direct acyclic graph, where each node does some kind of processing and forwards it to the next node(s) in the flow. The following is a sample Storm topology:
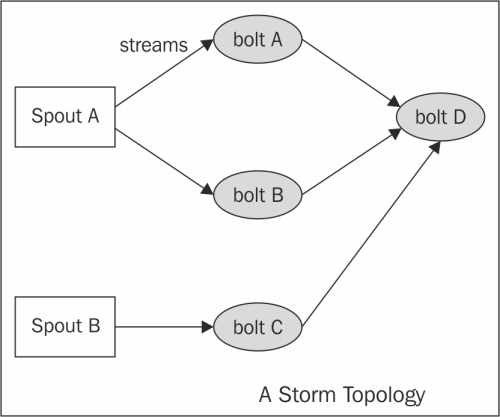
Graphical representation of the Storm topology
The following are the components of a Storm topology:
Stream: The key abstraction in Storm is that of a stream. A stream is an unbounded sequence of tuples that can be processed in parallel by Storm. Each stream can be processed by a single or multiple types of bolts (the processing units in Storm, which are defined later in this section). Thus, Storm can also be viewed as a platform to transform streams. In the preceding diagram, streams are represented by arrows.
Each stream in a Storm application is given an ID and the bolts can produce and consume tuples from these streams on the basis of their ID. Each stream also has an associated schema for the tuples that will flow through it.
Spout: A spout is the source of tuples in a Storm topology. It is responsible for reading or listening to data from an external source, for example, by reading from a logfile or listening for new messages in a queue and publishing them—emitting, in Storm terminology—into streams. A spout can emit multiple streams, each of different schemas. For example, it can read 10-field records from a logfile and emit them as different streams of 7-tuples and 4-tuples each.
The
backtype.storm.spout.ISpoutinterface is the interface used to define spouts. If you are writing your topology in Java, then you should usebacktype.storm.topology.IRichSpoutas it declares methods to use theTopologyBuilderAPI. Whenever a spout emits a tuple, Storm tracks all the tuples generated while processing this tuple, and when the execution of all the tuples in the graph of this source tuple is complete, it will send back an acknowledgement to the spout. This tracking happens only if a message ID was provided while emitting the tuple. Ifnullwas used as message ID, this tracking will not happen.A tuple-processing timeout can also be defined for a topology, and if a tuple is not processed within the specified timeout, a fail message will be sent back to the spout. Again, this will happen only if you define a message ID. A small performance gain can be extracted out of Storm at the risk of some data loss by disabling the message acknowledgements, which can be done by skipping the message ID while emitting tuples.
The important methods of spout are:
nextTuple(): This method is called by Storm to get the next tuple from the input source. Inside this method, you will have the logic of reading data from the external sources and emitting them to an instance ofbacktype.storm.spout.ISpoutOutputCollector. The schema for streams can be declared by using thedeclareStreammethod ofbacktype.storm.topology.OutputFieldsDeclarer.If a spout wants to emit data to more than one stream, it can declare multiple streams using the
declareStreammethod and specify a stream ID while emitting the tuple. If there are no more tuples to emit at the moment, this method would not be blocked. Also, if this method does not emit a tuple, then Storm will wait for 1 millisecond before calling it again. This waiting time can be configured using thetopology.sleep.spout.wait.strategy.time.mssetting.ack(Object msgId): This method is invoked by Storm when the tuple with the given message ID is completely processed by the topology. At this point, the user should mark the message as processed and do the required cleaning up such as removing the message from the message queue so that it does not get processed again.fail(Object msgId): This method is invoked by Storm when it identifies that the tuple with the given message ID has not been processed successfully or has timed out of the configured interval. In such scenarios, the user should do the required processing so that the messages can be emitted again by thenextTuplemethod. A common way to do this is to put the message back in the incoming message queue.open(): This method is called only once—when the spout is initialized. If it is required to connect to an external source for the input data, define the logic to connect to the external source in theopenmethod, and then keep fetching the data from this external source in thenextTuplemethod to emit it further.
Another point to note while writing your spout is that none of the methods should be blocking, as Storm calls all the methods in the same thread. Every spout has an internal buffer to keep track of the status of the tuples emitted so far. The spout will keep the tuples in this buffer until they are either acknowledged or failed, calling the
ackorfailmethod respectively. Storm will call thenextTuplemethod only when this buffer is not full.Bolt: A bolt is the processing powerhouse of a Storm topology and is responsible for transforming a stream. Ideally, each bolt in the topology should be doing a simple transformation of the tuples, and many such bolts can coordinate with each other to exhibit a complex transformation.
The
backtype.storm.task.IBoltinterface is preferably used to define bolts, and if a topology is written in Java, you should use thebacktype.storm.topology.IRichBoltinterface. A bolt can subscribe to multiple streams of other components—either spouts or other bolts—in the topology and similarly can emit output to multiple streams. Output streams can be declared using thedeclareStreammethod ofbacktype.storm.topology.OutputFieldsDeclarer.The important methods of a bolt are:
execute(Tuple input): This method is executed for each tuple that comes through the subscribed input streams. In this method, you can do whatever processing is required for the tuple and then produce the output either in the form of emitting more tuples to the declared output streams or other things such as persisting the results in a database.You are not required to process the tuple as soon as this method is called, and the tuples can be held until required. For example, while joining two streams, when a tuple arrives, you can hold it until its counterpart also comes, and then you can emit the joined tuple.
The metadata associated with the tuple can be retrieved by the various methods defined in the
Tupleinterface. If a message ID is associated with a tuple, theexecutemethod must publish anackorfailevent usingOutputCollectorfor the bolt or else Storm will not know whether the tuple was processed successfully or not. Thebacktype.storm.topology.IBasicBoltinterface is a convenient interface that sends an acknowledgement automatically after the completion of theexecutemethod. In the case that afailevent is to be sent, this method should throwbacktype.storm.topology.FailedException.prepare(Map stormConf, TopologyContext context, OutputCollector collector): A bolt can be executed by multiple workers in a Storm topology. The instance of a bolt is created on the client machine and then serialized and submitted to Nimbus. When Nimbus creates the worker instances for the topology, it sends this serialized bolt to the workers. The work will desterilize the bolt and call thepreparemethod. In this method, you should make sure the bolt is properly configured to execute tuples now. Any state that you want to maintain can be stored as instance variables for the bolt that can be serialized/deserialized later.
Operation modes indicate how the topology is deployed in Storm. Storm supports two types of operation modes to execute the Storm topology
The local mode: In the local mode, Storm topologies run on the local machine in a single JVM. This mode simulates a Storm cluster in a single JVM and is used for the testing and debugging of a topology.
The remote mode: In the remote mode, we will use the Storm client to submit the topology to the master along with all the necessary code required to execute the topology. Nimbus will then take care of distributing your code.
Before you can start developing Storm topologies, you must first check/set up your development environment, which involves installing the following software packages on your development computer:
Java SDK 6
Maven
Git: Distributed version control
Spring Tool Suite: IDE
The following installation steps are valid for CentOS, and going forward, all the commands used in this book are valid for CentOS.
Perform the following steps to install the Java SDK 6 on your machine:
Download the Java SDK 6 RPM from Oracle's site (http://www.oracle.com/technetwork/java/javase/downloads/index.html).
Install the Java
jdk-6u31-linux-amd64.rpmfile on your CentOS machine using the following command:sudo rpm -ivh jdk-6u31-linux-amd64.rpmAdd the environment variable in the
~/.bashrcfile:export JAVA_HOME=/usr/java/jdk1.6.0_31/Add the path of the
bindirectory of the JDK in thePATHsystem environment variable in the~/.bashrcfile:export PATH=$JAVA_HOME/bin:$PATHRun the following command to reload the
bashrcfile on the current login terminal:source ~/.bashrcCheck the Java installation as follows:
java -versionThe output of the preceding command is:
java version "1.6.0_31"
Java(TM) SE Runtime Environment (build 1.6.0_31-b04)
Java HotSpot(TM) 64-Bit Server VM (build 20.6-b01, mixed mode)
Apache Maven is a software dependency management tool and is used to manage the project's build, reporting, and documentation. We are using this so that we do not need to download all the dependencies manually. Perform the following steps to install the Maven on your machine:
Download the stable release of Maven from Maven's site (http://maven.apache.org/download.cgi).
Once you have downloaded the latest version, unzip it. Now, set the
MAVEN_HOMEenvironment variable in the~/.bashrcfile to make the setting up of Maven easier.export MAVEN_HOME=/home/root/apache-maven-3.0.4Add the path to the
bindirectory of Maven in the$PATHenvironment variable in the~/.bashrcfile:export PATH=$JAVA_HOME/bin:$PATH:$MAVEN_HOME/binRun the following command to reload the
bashrcfile on the current login terminal:source ~/.bashrcCheck the Maven installation as follows:
mvn –versionThe following information will be displayed:
Apache Maven 3.0.4 (r1232337; 2012-01-17 14:14:56+0530)
Maven home: /home/root/apache-maven-3.0.4
Java version: 1.6.0_31, vendor: Sun Microsystems Inc.
Java home: /usr/java/jdk1.6.0_31/jre
Default locale: en_US, platform encoding: UTF-8
OS name: "linux", version: "2.6.32-279.22.1.el6.x86_64", arch: "amd64", family: "unix"
Git is one of the most used open source version control systems. It is used to track content such as files and directories and allows multiple users to work on the same file. Perform the following steps to install Git on your machine:
The command to install Git on a CentOS machine is:
sudo yum install gitCheck the installation of Git using the following command:
git --versionThe preceding command's output is:
git version 1.7.1
The STS IDE is an integrated development environment and is used to develop applications. We will be using this to develop all the examples in this book. Perform the following steps to install the STS IDE on your machine:
Download the latest version of STS from the Spring site (https://spring.io/tools/sts/all).
Once you have downloaded the latest version, unzip it.
Start the STS IDE.
Go to Windows | Preferences | Maven | Installations and add the path of
maven-3.0.4, as shown in the following screenshot:
Add
maven-3.0.4to launch MavenGo to Window | Preferences | Java | Installed JREs and add the path of Java Runtime Environment 6 (JRE 6), as shown in the following screenshot:

Add
jdk1.6.0_31to the build path
From now on, we will use the Spring Tool Suite to develop all the sample Storm topologies.
The sample topology shown in the following diagram will cover how to create a basic Storm project, including a spout and bolt, build it, and execute it:
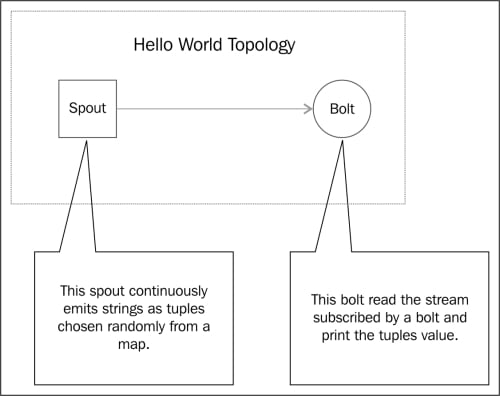
A sample Hello World topology
Perform the following steps to create and execute a sample topology:
Start your STS IDE and create a Maven project as shown in the following screenshot:

Create a Maven project
Specify
com.learningstormas Group Id andstorm-exampleas Artifact Id, as shown in the following screenshot:
Specify Archetype Parameters
Add the following Maven dependencies in the
pom.xmlfile:<dependencies> <dependency> <groupId>junit</groupId> <artifactId>junit</artifactId> <version>3.8.1</version> <scope>test</scope> </dependency> <dependency> <groupId>storm</groupId> <artifactId>storm</artifactId> <version>0.9.0.1</version> <scope>provided</scope> </dependency> </dependencies>Add the following Maven repository in the
pom.xmlfile:<repositories> <repository> <id>clojars.org</id> <url>http://clojars.org/repo</url> </repository> </repositories>Add the following Maven build plugins in the
pom.xmlfile:<build> <plugins> <plugin> <artifactId>maven-assembly-plugin</artifactId> <version>2.2.1</version> <configuration> <descriptorRefs> <descriptorRef>jar-with-dependencies</descriptorRef> </descriptorRefs> <archive> <manifest> <mainClass /> </manifest> </archive> </configuration> <executions> <execution> <id>make-assembly</id> <phase>package</phase> <goals> <goal>single</goal> </goals> </execution> </executions> </plugin> </plugins> </build>Write your first sample spout by creating a
LearningStormSpoutclass in thecom.learningstorm.storm_examplepackage. TheLearningStormSpoutclass extends the serializedBaseRichSpoutclass. This spout does not connect to an external source to fetch data but randomly generates the data and emits a continuous stream of records. The following is the source code of theLearningStormSpoutclass with an explanation:public class LearningStormSpout extends BaseRichSpout{ private static final long serialVersionUID = 1L; private SpoutOutputCollectorspoutOutputCollector; private static final Map<Integer, String> map = new HashMap<Integer, String>(); static { map.put(0, "google"); map.put(1, "facebook"); map.put(2, "twitter"); map.put(3, "youtube"); map.put(4, "linkedin"); } public void open(Map conf, TopologyContext context, SpoutOutputCollector spoutOutputCollector) { // Open the spout this.spoutOutputCollector = spoutOutputCollector; } public void nextTuple() { // Storm cluster repeatedly calls this method to emit a continuous // stream of tuples. final Random rand = new Random(); // generate the random number from 0 to 4. int randomNumber = rand.nextInt(5); spoutOutputCollector.emit(new Values(map.get(randomNumber))); } public void declareOutputFields(OutputFieldsDeclarer declarer) { // emit the tuple with field "site" declarer.declare(new Fields("site")); } }Write your first sample bolt by creating a
LearningStormBoltclass within the same package. TheLearningStormBoltclass extends the serializedBaseRichBoltclass. This bolt will consume the tuples emitted byLearningStormSpoutspout and will print the value of the field"site"on the console. The following is the source code of theLearningStormBoltclass with an explanation:public class LearningStormBolt extends BaseBasicBolt{ private static final long serialVersionUID = 1L; public void execute(Tuple input, BasicOutputCollector collector) { // fetched the field "site" from input tuple. String test = input.getStringByField("site"); // print the value of field "site" on console. System.out.println("Name of input site is : " + test); } public void declareOutputFields(OutputFieldsDeclarer declarer) { } }Create a main
LearningStormTopologyclass within the same package. This class creates an instance of the spout and bolt, classes and chained together using aTopologyBuilderclass. The following is the implementation of the main class:public class LearningStormTopology { public static void main(String[] args) throws AlreadyAliveException, InvalidTopologyException { // create an instance of TopologyBuilder class TopologyBuilder builder = new TopologyBuilder(); // set the spout class builder.setSpout("LearningStormSpout", new LearningStormSpout(), 2); // set the bolt class builder.setBolt("LearningStormBolt", new LearningStormBolt(), 4).shuffleGrouping("LearningStormSpout"); Config conf = new Config(); conf.setDebug(true); // create an instance of LocalCluster class for // executing topology in local mode. LocalCluster cluster = new LocalCluster(); // LearningStormTopolgy is the name of submitted topology. cluster.submitTopology("LearningStormToplogy", conf, builder.createTopology()); try { Thread.sleep(10000); } catch (Exception exception) { System.out.println("Thread interrupted exception : " + exception); } // kill the LearningStormTopology cluster.killTopology("LearningStormToplogy"); // shutdown the storm test cluster cluster.shutdown(); } }Go to your project's home directory and run the following commands to execute the topology in the local mode:
mvn compile exec:java -Dexec.classpathScope=compile
-
Dexec.mainClass=com.learningstorm.storm_example.LearningStormTopology
Tip
Downloading the example code
You can download the example code files for all Packt books you have purchased from your account at http://www.packtpub.com. If you purchased this book elsewhere, you can visit http://www.packtpub.com/support and register to have the files e-mailed directly to you.
Also, we can execute the topology by simply running the main class through the STS IDE.
In the preceding example, we used a utility called LocalCluster to execute the topology in a single JVM. The LocalCluster class simulates the Storm cluster and starts all the Storm processes in a single JVM.
We have submitted a topology in a simulated cluster by calling the submitTopology method of the LocalCluster class. The submitTopology method takes the name of a topology, a configuration for the topology, and then the topology itself as arguments.
The topology name is used to identify the topology in the Storm cluster. Hence, it is good practice to use a unique name for each topology.
Running the Storm infrastructure in local mode is useful when we want to test and debug the topology.
The upcoming sections will cover the deployment of ZooKeeper, Storm native dependencies, and Storm, and how we can submit the topology on a single-node Storm cluster.
This section describes how you can set up a ZooKeeper cluster. We are deploying ZooKeeper in standalone mode, but in the distributed cluster mode, it is always recommended that you should run a ZooKeeper ensemble of at least three nodes to support failover and high availability. Perform the following steps to set up ZooKeeper on your machine:
Download the latest stable ZooKeeper release from the ZooKeeper's site (http://www.apache.org/dyn/closer.cgi/zookeeper/); at this moment, the latest version is ZooKeeper 3.4.5.
Once you have downloaded the latest version, unzip it and set the
ZK_HOMEenvironment variable.Create the configuration file,
zoo.cfg, at the$ZK_HOME/confdirectory using the following command:cd $ZK_HOME/conf touch zoo.cfg
Add the following three properties in the
zoo.cfgfile:tickTime=2000 dataDir=/tmp/zookeeper clientPort=2181
The following are the definitions of each of these properties:
tickTime: This is the basic time unit in milliseconds used by ZooKeeper. It is used to send heartbeats and the minimum session timeout will be twice thetickTimevalue.dataDir: This is an empty directory to store the in-memory database snapshots and transactional log.clientPort: This is the port used to listen for client connections.
The command to start the ZooKeeper node is as follows:
bin/zkServer.sh startThe following information is displayed:
JMX enabled by default
Using config: /home/root/zookeeper-3.4.5/bin/../conf/zoo.cfg
Starting zookeeper ... STARTED
At this point, the following Java process must be started:
jpsThe following information is displayed:
23074 QuorumPeerMainThe command to check the status of running the ZooKeeper node is as follows:
bin/zkServer.sh statusThe following information is displayed:
JMX enabled by default
Using config: ../conf/zoo.cfg
Mode: standalone
This section describes you how to install Storm on a single machine. Download the latest stable Storm release from https://storm.incubator.apache.org/downloads.html; at the time of this writing, the latest version is storm-0.9.0.1. Perform the following steps to set up Storm on a single development machine:
Once you have downloaded the latest version, unzip it and set the
STORM_HOMEenvironment variable.Perform the following steps to edit the
storm.yamlconfiguration file:cd $STORM_HOME/conf vi storm.yaml
Add the following information:
storm.zookeeper.servers:
     - "127.0.0.1"
storm.zookeeper.port: 2181
nimbus.host: "127.0.0.1"
storm.local.dir: "/tmp/storm-data"
java.library.path: "/usr/local/lib"
storm.messaging.transport: backtype.storm.messaging.netty.Context
supervisor.slots.ports:
     - 6700
     - 6701
     - 6702
     - 6703
The following is a definition of properties used in the
storm.yamlfile:storm.zookeeper.servers: This property contains the IP addresses of ZooKeeper servers.storm.zookeeper.port: This property contains the ZooKeeper client port.storm.local.dir: The Nimbus and supervisor daemons require a directory on the local disk to store small amounts of state (such as JARs, CONFs, and more).java.library.path: This is used to load the Java native libraries that Storm uses (ZeroMQ and JZMQ). The default location of Storm native libraries is/usr/local/lib:/opt/local/lib:/usr/lib.nimbus.host: This specifies the IP address of the master (Nimbus) node:supervisor.slots.ports: For every worker machine, we can configure how many workers run on that machine with this property. Each worker binds with a single port and uses that port to receive incoming messages.
Start the master node using the following commands:
cd $STORM_HOME
bin/storm nimbus
Start the supervisor node using the following commands:
cd $STORM_HOME
bin/storm supervisor
In the previous example, we executed the Storm topology in the local mode. Now, we will deploy the topology on the single-node Storm cluster.
We will first create a
LearningStormSingleNodeTopologyclass within the same package. The followingLearningStormSingleNodeTopologyclass will use thesubmitTopologymethod of theStormSubmitterclass to deploy the topology on the Storm cluster:public class LearningStormSingleNodeTopology { public static void main(String[] args) { TopologyBuilder builder = new TopologyBuilder(); // set the spout class builder.setSpout("LearningStormSpout", new LearningStormSpout(), 4); // set the bolt class builder.setBolt("LearningStormBolt", new LearningStormBolt(), 2).shuffleGrouping("LearningStormSpout"); Config conf = new Config(); conf.setNumWorkers(3); try { // This statement submit the topology on remote cluster. // args[0] = name of topology StormSubmitter.submitTopology(args[0], conf, builder.createTopology()); }catch(AlreadyAliveException alreadyAliveException) { System.out.println(alreadyAliveException); } catch (InvalidTopologyException invalidTopologyException) { System.out.println(invalidTopologyException); } } }Build your Maven project by running the following command on the project home directory:
mvn clean installThe output of the preceding command is:
-----------------------------------------------------------------------
[INFO] ----------------------------------------------------------------
[INFO] BUILD SUCCESS
[INFO] ----------------------------------------------------------------
[INFO] Total time: 58.326s
[INFO] Finished at: Mon Jan 20 00:55:52 IST 2014
[INFO] Final Memory: 14M/116M
[INFO] ----------------------------------------------------------------
We can deploy the topology to the cluster using the following Storm client command:
bin/storm jar jarName.jar [TopologyMainClass] [Args]The preceding command runs
TopologyMainClasswith the arguments,arg1andarg2. The main function ofTopologyMainClassis to define the topology and submit it to Nimbus. The Storm JAR part takes care of connecting to Nimbus and uploading the JAR part.Go to the
$STORM_HOMEdirectory and run the following command to deployLearningStormSingleNodeTopologyto the Storm cluster:bin/storm jar $PROJECT_HOME/target/storm-example-0.0.1-SNAPSHOT-jar-with-dependencies.jar com.learningstorm.storm_example.LearningStormSingleNodeTopology LearningStormSingleNodeTopologyThe following information is displayed:
0    [main] INFO  backtype.storm.StormSubmitter  - Jar not uploaded to master yet. Submitting jar...
7    [main] INFO  backtype.storm.StormSubmitter  - Uploading topology jar /home/root/storm-example/target/storm-example-0.0.1-SNAPSHOT-jar-with-dependencies.jar to assigned location: /tmp/storm-data/nimbus/inbox/stormjar-dfce742b-ca0b-4121-bcbe-1856dc1846a4.jar
19   [main] INFO  backtype.storm.StormSubmitter  - Successfully uploaded topology jar to assigned location: /tmp/storm-data/nimbus/inbox/stormjar-dfce742b-ca0b-4121-bcbe-1856dc1846a4.jar
19   [main] INFO  backtype.storm.StormSubmitter  - Submitting topology LearningStormSingleNodeTopologyin distributed mode with conf{"topology.workers":3}
219  [main] INFO  backtype.storm.StormSubmitter  - Finished submitting topology: LearningStormSingleNodeTopology
Run the
jpscommand to see the number of running JVM processes as follows:jpsThe preceding command's output is:
26827 worker
26530 supervisor
26824 worker
26468 nimbus
15987 QuorumPeerMain
26822 worker
Storm supports deactivating a topology. In the deactivated state, spouts will not emits any new tuples into pipeline, but the processing of already emitted tuples will continue. The following is the command to deactivate the running topology:
bin/storm deactivate topologyNameDeactivate
LearningStormSingleNodeTopologyusing the following command:bin/storm deactivate LearningStormSingleNodeTopologyThe following information is displayed:
0    [main] INFO  backtype.storm.thrift  - Connecting to Nimbus at localhost:6627r
76   [main] INFO  backtype.storm.command.deactivate  - Deactivated topology: LearningStormSingleNodeTopology
Storm also supports activating a topology. When a topology is activated, spouts will again start emitting tuples. The following is the command to activate the topology:
bin/storm activate topologyNameActivate
LearningStormSingleNodeTopologyusing the following command:bin/storm activate LearningStormSingleNodeTopologyThe following information is displayed:
0    [main] INFO  backtype.storm.thrift  - Connecting to Nimbus at localhost:6627
65   [main] INFO  backtype.storm.command.activate  - Activated topology: LearningStormSingleNodeTopology
Storm topologies are never-ending processes. To stop a topology, we need to kill it. When killed, the topology first enters into the deactivation state, processes all the tuples already emitted into it, and then stops. Run the following command to kill
LearningStormSingleNodeTopology:bin/storm kill LearningStormSingleNodeTopologyThe following information is displayed:
0    [main] INFO  backtype.storm.thrift  - Connecting to Nimbus at localhost:6627
80   [main] INFO  backtype.storm.command.kill-topology  - Killed topology: LearningStormSingleNodeTopology
Now, run the
jpscommand again to see the remaining JVM processes as follows:jpsThe preceding command's output is:
26530 supervisor
27193 Jps
26468 nimbus
15987 QuorumPeerMain
To update a running topology, the only option available is to kill the currently running topology and submit a new one.