Book Image

MongoDB 4 Quick Start Guide

By : Doug Bierer
Book Image

MongoDB 4 Quick Start Guide

By: Doug Bierer

Overview of this book

MongoDB has grown to become the de facto NoSQL database with millions of users, from small start-ups to Fortune 500 companies. It can solve problems that are considered difficult, if not impossible, for aging RDBMS technologies. Written for version 4 of MongoDB, this book is the easiest way to get started with MongoDB. You will start by getting a MongoDB installation up and running in a safe and secure manner. You will learn how to perform mission-critical create, read, update, and delete operations, and set up database security. You will also learn about advanced features of MongoDB such as the aggregation pipeline, replication, and sharding. You will learn how to build a simple web application that uses MongoDB to respond to AJAX queries, and see how to make use of the MongoDB programming language driver for PHP. The examples incorporate new features available in MongoDB version 4 where appropriate.
Table of Contents (11 chapters)

Installing MongoDB on Linux

It is important to understand the MongoDB installation process on Linux, even if you are a developer or IT professional and are not using Linux personally, it's extremely likely that the internet-facing server you or your customer use is running Linux. W3Techs (https://w3techs.com/), a company that does web technology surveys, estimates that in 2018, the running on Linux was at 68.1% compared with 32% for Windows.

There are three primary considerations when installing MongoDB on Linux, each of which we will address in turn:

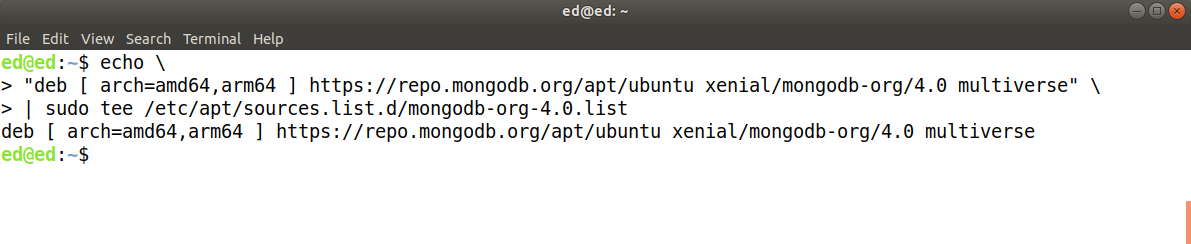
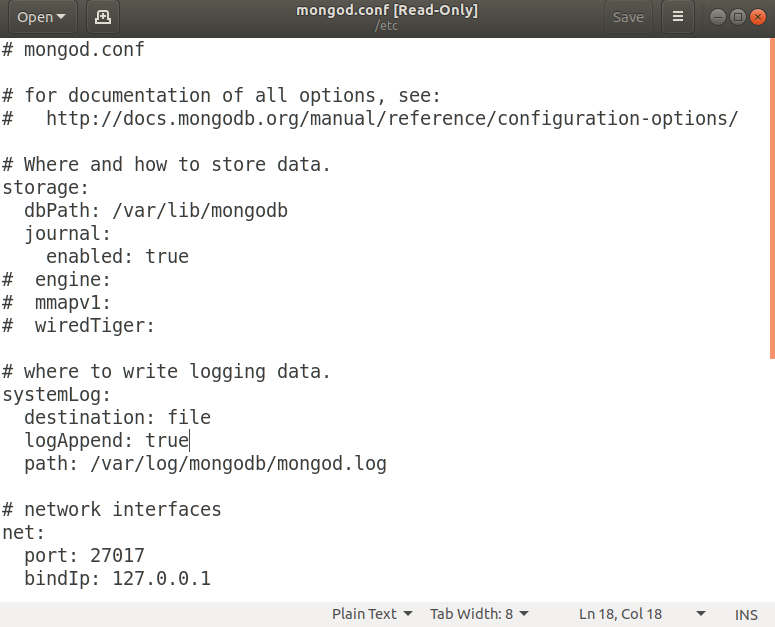
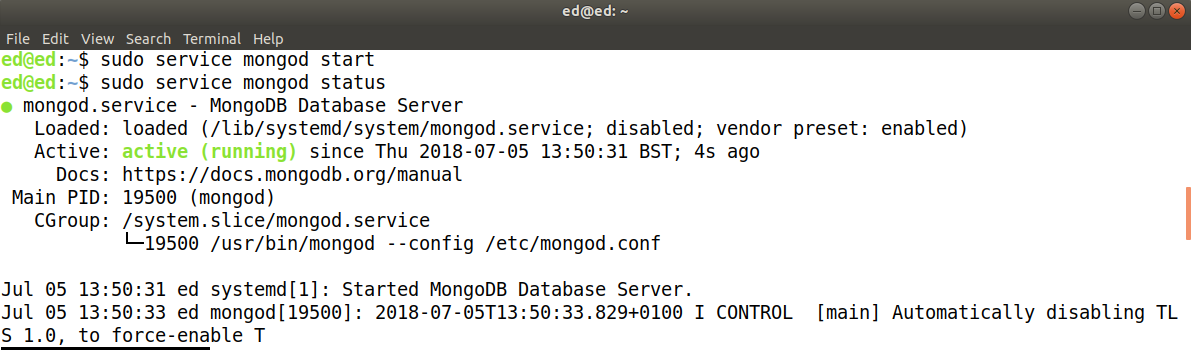
  • Linux based upon Debian and Ubuntu
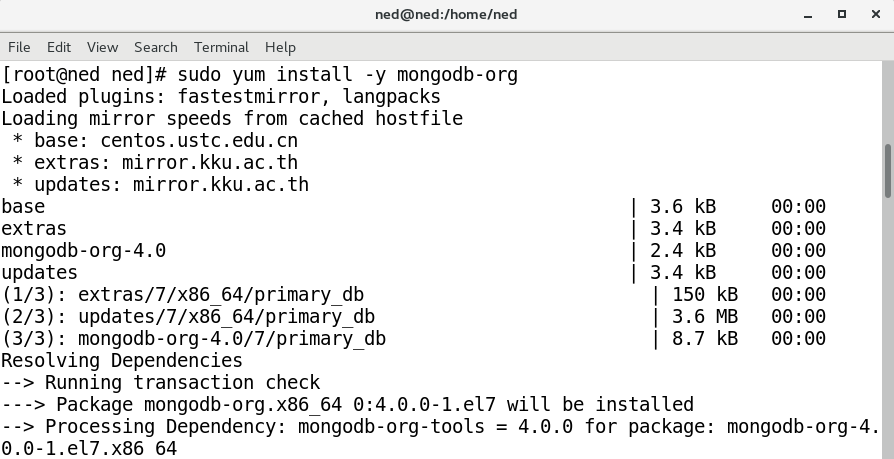
  • Linux based upon RedHat, Fedora, and CentOS
  • Installing directly from source code
With the bewildering array of Linux distributions currently available, it is difficult to decide which version to feature for the purposes of demonstrating MongoDB on Linux. A significant number of Linux distributions are based on either Debian or Red Hat Linux. Accordingly, this section covers installing MongoDB on both. A website which gives good insight on all reported Linux distributions is DistroWatch (https://distrowatch.com/). Linux Mint (https://linuxmint.com/), although now extremely popular, wasn't included here, as it's Debian-based and not as commercially available as Ubuntu.

Installing on Debian or Ubuntu Linux

Debian Linux (https://www.debian.org/), self-described as the universal operating system, is a free open-source project that uses a fork of the Linux kernel, and draws heavily upon GNU (http://www.gnu.org/software/software.html, for example, GNU Not Unix) software. Ubuntu Linux (https://www.ubuntu.com/) is produced by the Canonical Group Ltd based in South Africa, and is based upon Debian. For the purposes of this book, we will focus on Ubuntu version 18.04, code-named Bionic Beaver, released in April 2018, a designated LTS (Long Term Support) version.

The preferred way to install any given software on Ubuntu is to use a Debian package. Such packages have the extension *.deb and include a script that tells the package management program where to place the pre-compiled binary files as they are extracted. Popular package management programs include synaptic (http://www.nongnu.org/synaptic/, graphical interface, resolves dependencies, and does a lot of "housekeeping"), aptitude (https://help.ubuntu.com/lts/serverguide/aptitude.html, like synaptic but has a textual, command-line menu), and apt-* (that is apt-get (https://linux.die.net/man/8/apt-get), apt-key so on: very fast, command-line only). For the purposes of this section we will use apt-get.

Ubuntu provides its own MongoDB package, which is what gets installed if you simply run sudo apt-get install mongodb. To get the latest "official" version directly from MongoDB, you should follow the procedure outlined as follows. If you already have installed the Ubuntu mongodb package, you will need to first uninstall it before proceeding.

The MongoDB packages available for Ubuntu/Debian include the following:

mongodb-org-server

Primary MongoDB system daemon

mongodb-org-mongos

MongoDB shard routing service

mongodb-org-shell

MongoDB shell

mongodb-org-tools

Provides various mongo* tools for import, export, restore, and so on.

In addition, a composite package, mongodb-org, which contains all four of these packages, is provided.

Package installation

To install MongoDB on an Ubuntu/Debian server, you will need root access. A unique feature of Debian-based Linux distributions is that direct login as root is not allowed for security reasons. Accordingly, you can promote yourself to root using su, or you can precede the various commands with sudo, which instructs the OS to process this command as root.

Please proceed as follows:

  1. Import the public key from the MongoDB key server. This is needed so that the package manager can authenticate the MongoDB package:
  1. Add the MongoDB repository to the Linux server's sources list:
The commands listed should be on one line. We use a backslash (\) to indicate a line of text that is too long to fit the printed page. When typing the command, omit the backslash (\) and do not hit enter until the command has been fully entered.
  1. Refresh the package database from the sources list by running:
      sudo apt-get update
Ubuntu version 18.04 is code-named bionic. You will note this name is used in step #2 here, where the MongoDB repository is added to the sources list. If this source is not found, you will receive an error message:
The repository ... bionic/mongodb-org/4.0 ... does not have a Release file
In this situation, substitute the code name xenial (Ubuntu 16.04) in place of bionic (Ubuntu 18.04).
  1. Install the latest (stable) version of MongoDB. Here, we install only the composite package, which alleviates the need to separately install the four primary packages listed previously:
      sudo apt-get install -y mongodb-org
You will note, at the end of the installation, that the installer creates a user mongodb who belongs to a group mongodb, which is also newly created. This is the system user MongoDB uses when it runs.

Configure and run MongoDB on Ubuntu/Debian

If you followed the procedure outlined in the previous section, a configuration file /etc/mongod.conf will have been auto-generated by the installation script. By default, data files will be placed in /var/lib/mongodb and log files in /var/log/mongodb/mongod.log:

You are now able to perform these operations:

Operation Command
Start | stop | restart the server sudo service mongod start|stop|restart
Get the server status sudo service mongod status
Access MongoDB via the shell (covered later) mongo --host 127.0.0.1:27017
Here you can see the server started, along with its status:
MongoDB installation scripts now automatically bind MongoDB to localhost (IP address 127.0.0.1) for security reasons.

Installing on Red Hat, Fedora, or CentOS Linux

Red Hat, Fedora, and CentOS have a relationship similar to that of Debian and Ubuntu. Red Hat (https://www.redhat.com/en) is the original company behind this distribution, producing its first release in 1995. In addition to making improvements in the graphical interface and overall management of Linux, Red Hat is known for its RPM (Red Hat Package Management) technology. In this corner of the Linux world, packages are bundled into files with the extension *.rpm, and contain installation instructions, which makes the installation, updating, and management of Linux software much easier.

Fedora (https://getfedora.org/) is a free open source version of what is now RHEL (Red Hat Enterprise Linux). Fedora and the Fedora Project are sponsored by Red Hat, and serve as a test bed for innovation, which, when stable, is ported to RHEL. Fedora Linux releases tend to have rapid development cycles and short lifespans. CentOS (https://www.centos.org/) is also affiliated with Red Hat, and is allowed direct use of RHEL source code. The main difference is that CentOS is free, but support is only available via the community (which is to say, you are on your own!). For the purposes of this book we will use CentOS version 7.

Package installation

The MongoDB packages available for RHEL/Fedora/CentOS are exactly the same as those described in preceding sections for Debian/Ubuntu. Also, as described earlier, a composite package called mongodb-org that contains all four packages is available. Because RHEL/Fedora/CentOS packages use RPM for packaging, the tool of choice for installation, updating and management of packages is yum (Yellowdog Updater, Modified).

To install MongoDB on RHEL/Fedora/CentOS Linux distributions, proceed as follows:

  1. Create a repository file for yum in the /etc/yum.repos.d directory. The filename should be like this, mongodb-org-X.Y.repo, where X is the major version number for MongoDB, and Y is the minor release. As an example, for MongoDB version 4.0, the current version as of this writing, the filename would be:
    /etc/yum.repos.d/mongodb-org-4.0.repo:

  1. Install the composite package using: sudo yum install -y mongodb-org:

Configure and run MongoDB on RHEL/Fedora/CentOS

If you followed the procedure outlined previously, a configuration file /etc/mongod.conf will have been auto-generated by the installation script. By default, database files will be placed in /var/lib/mongodb and log files in /var/log/mongodb/mongod.log. Here is an example of the auto-generated file for MongoDB v4.0 on CentOS 7:

You are now able to perform these operations:

Operation Command
Start | stop | restart the server /bin/systemctl start|stop|restart mongod.service
Access MongoDB via the shell (covered later) mongo --host 127.0.0.1:27017

After starting the service, use the command /bin/systemctl status mongod.service to confirm the status of MongoDB:

Installing from source

The beauty of installing MongoDB directly from its source code is that it ensures that you can run MongoDB on any server, and that you have the absolute latest version. Minimum requirements for source installation include:

In addition, there are OS-specific requirements, which are detailed in this table:

Linux Compiler: GCC 4.8.2 or later
Red Hat, and suchlike.

Libraries needed:
glibc-devel
libcurl-devel
openssl-devel
epel-release
python-devel

Ubuntu, and suchlike.

Libraries needed:
build-essential
libffi-dev
libssl-dev
python-dev

macOSX Compiler: Clang 3.4 of XCode 5
Libraries: XCode (especially command line tools)
Windows Compiler: Visual Studio 2013 Update 4 or later
It is highly recommended that you carefully read through the source installation process documentation, which can be found on github.com at this URL: https://github.com/mongodb/mongo/wiki/Build-Mongodb-From-Source.

The source build process does not follow the traditional sequence of configure, make, and make install. Installation is performed using SCons (Software Construction Tool, https://www.scons.org/), which, in turn, uses the programming language Python. Accordingly, after you clone or download the MongoDB source, you will notice many Python scripts and configuration files.

For the purposes of this illustration, we use CentOS 7. To install MongoDB from source, assuming all prerequisites listed previously are met, proceed as follows:

  1. Download the source code from github.com. There are two ways to download the MongoDB source code from github.com:
    1. Download directly from this URL:
      https://github.com/mongodb/mongo/archive/master.zip.
      You would then need to unzip it into a folder such as /home/user/mongo.
    1. If you have installed git, you can clone the repository from a command line terminal as follows:
  1. Change to the newly created (or cloned) mongo directory.
  2. Install pip requirements:
On Windows you would need to run this command:
pip.exe install -r buildscripts\requirements.txt
  1. Build the source code using SCons:

At this point, you can then follow the same steps listed previously to run MongoDB:

  • Create a directory for the database (for example /var/lib/mongo)
  • Create a directory for the log (for example /var/log/mongo)
  • Create a config file, which indicates the locations of the database and log (for example /etc/mongod.conf)
  • Start MongoDB