

Adding a custom field to an existing form is a common customization, and it can be done from the user interface, without the need to create a custom module.
For our Library app, we want to add the Is Book Author? flag to the Partner model, to make it easier to list everyone who is a book author.
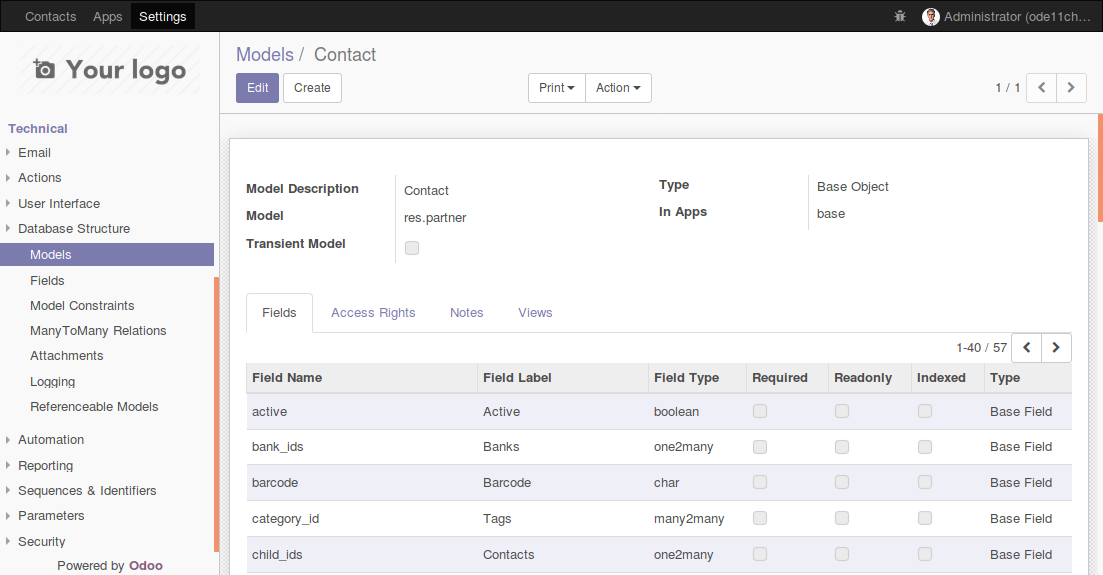
To do this, in the Settings app, go to the Technical | Database Structure | Models menu item, and look up the res.partner model, with Contacts for Model Description. Click on it to open the corresponding form view, and you will see all the specific details about the Partner model, including the field list:
Now, Edit the form and click on Add an item at the bottom of the Fields list. A pop-up window will be presented for the new field creation.
Let's fill in the configuration:
- Field Name:
x_is_book_author - Field Label:
Is Book Author? - Field Type:
boolean
The Field Name must start with x_. This is mandatory for Models and Fields created directly through the user interface. Customizations made through addon modules don't have this limitation.
That's it. Click Save & Close and our new field should have been added to the Fields list. Chances are that this model has more than 80 fields, and so you might need to navigate to the next page of the Fields list to see it. To do so, use the right arrow at the top left of the Fields list.
Now, click on the top-left Save button to make this change permanent.
Our new field is now available in the Partners model, but it is not yet visible to users. For that, we need to add it to the Views.
Still, on the Partner/Contact Model form, click on the Views tab, and we will be able to see all the View definitions for the res.partner model. As you can see, each View is a record in the database. Changing or adding View records is immediately effective, and will be visible the next time that View is reloaded.
There are a couple of important things to notice in the Views list.
We can see that there are several View Type, such as Form, Tree, Search, or Kanban. The Search views are actually definitions on the filters available in the top-right search box. The other view types are the different ways the data can be displayed. The basic ones are Tree, for list views, and Form, for the detailed form view.
Note
Both Tree and List can be used to refer to the same view type. They are in fact lists, and the Tree name exists for historical reasons: in the past list views used to have a "tree" hierarchical mode.
If you sort the list by View Type, you will notice that the same view type can have multiple definitions. In fact, we can have several Base view definitions, the ones with an empty Inherited View field. And we can have several Extension view definitions, also called Inherited Views, adding incremental changes to a base view, for example, to add a field to an existing form.
Note
Extension views can themselves be extended by other extension views. In this case, the later extension is applied to the base view after all preceding extensions have been already applied to it.
For the res.partner model, we can see that there are two base forms: res.partner.form and res.partner.simplified.form. Client Actions, such as the ones in menu items, can specify the particular base view to use. If none are defined, the one with the lowest Sequence is used. You can think of it as being the default view. Clicking on a Views line, we will see a form with the View's details, including the Sequence value.
To learn what the specific view used somewhere in the user interface is, we can inspect it using the Debug menu. Let's try it now. Click on the Contacts app and we will be presented with a list of contact cards. Clicking on any of the cards will show us the corresponding FormViewDebug menu (the bug icon at the top right), select the Edit FormView option:
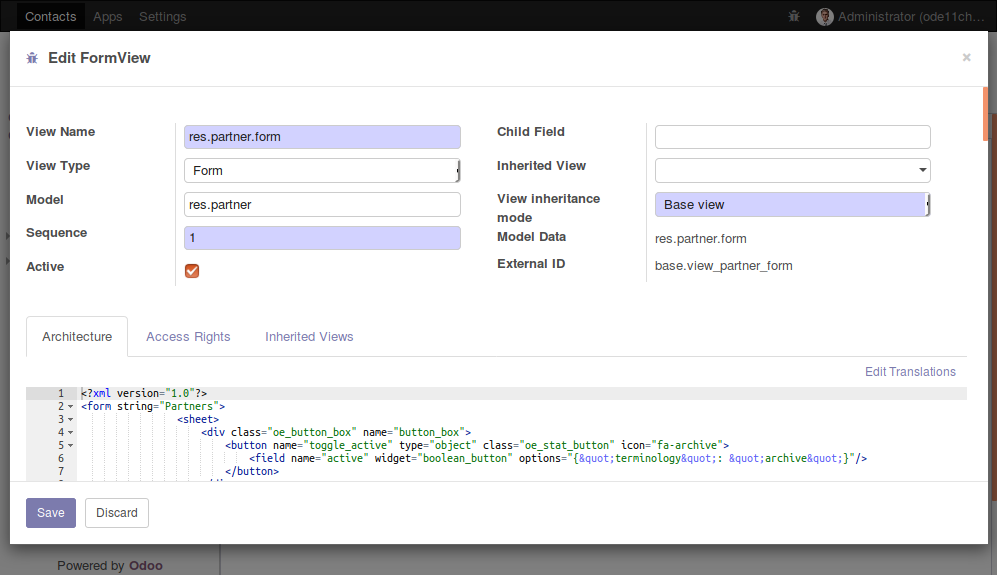
This will show the same view details form we saw before in Models, but positioned on the actual view definition used here. As you can see, it is the res.partner.form view.
In the Architecture field, we can see the XML with the view definition. We could just edit it to add our new field. While that works, in the long run it is not a good idea. This view is owned by an addon module, and if some time in the future that module is upgraded, these customizations would be overwritten and lost. We can learn about the owner module through the External ID field. In this case, it is base.view_partner_form, so we know that this view belongs to the base module.
The proper way to modify a view is to create an Inherited View extension.
First, we need to pick an element from the original view to use as the extension point. We can do that by inspecting the base view and choosing an XML element with a name attribute. Most of the time, this will be a <field> element. Here, we will pick the <field name="category_id" ...> element.
Now, open the Debug menu, click on the Edit Form View option, select the Inherited Views tab, and click on Add an item at the bottom of the list.
A pop-up window, Create: Views which inherit from this one, will be shown, and we should fill it with the following values:
View Name:Contacts - Custom Is Book Author FlagArchitecture: Use the following XML:
<field name="category_id" position="after">
  <field name="x_is_book_author" />
</field>
The other important fields, such as the Model, View Type, and Inherited View, already have correct default values.
We can now Save & Close. Save in the Edit Form View window and then close it. We will be able to see the change done once we reload the Contacts form view. This means reloading the page in your web browser. In most browsers, you would do that by pressing F5.