
Now that your first class is set up in Google, you can see its different parts, the Banner, Menu, Sidebar, and Content:
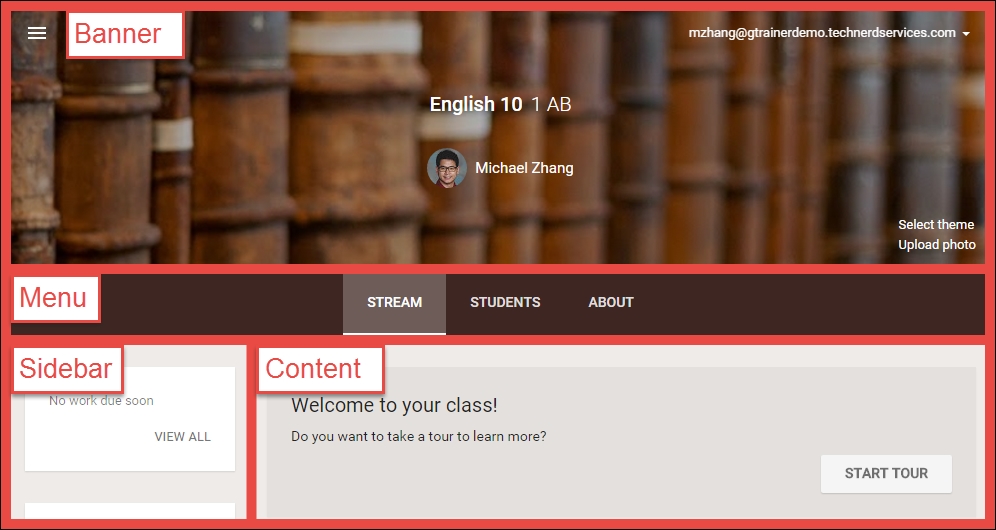
Banner displays a banner image, class name, section, and teachers. The banner is the first thing students see when they enter the class, and it allows them to quickly identify which class they are accessing in Google Classroom.
Menu allows teachers and students to switch between the different sections of Google Classroom. Menu has the following subsections:
The STREAM page is where announcements, assignments, and discussion questions appear. The features within this section are elaborated in Chapter 3, Sending Your First Announcement; Chapter 4, Starting an Online Discussion with Questions; and Chapter 5, Handing out and Taking in Assignments.
The STUDENTS page displays a list of all students enrolled in the class. Teachers can e-mail students from this section and change student-related settings in Google Classroom. The features of this section are elaborated in Chapter 2, Inviting Students to Their Virtual Classroom.
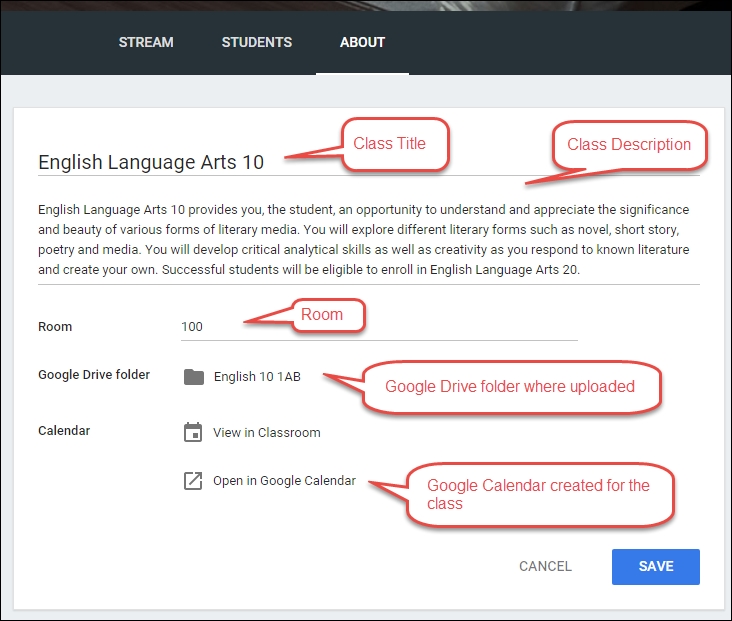
The ABOUT section displays the class title, description, and room number. Students are able to e-mail teachers from this section and find classroom material. Continue reading this chapter to learn about the features within the ABOUT section.
Sidebar displays upcoming assignments, settings for the Stream, and the class code for students to be added to this class. The settings for the Stream and class code are only visible to the teacher.
Content displays the current section in the class.
It's time to set up the class and start adding content. Similar to how teachers have a couple of days before students arrive at school to prepare their classroom, you need to take some time to add information to your online class before students are invited into the class. The tasks you can perform in Google Classroom are as follows:
Changing the class theme
Uploading a banner image
Adding information about your class
Adding files to your class
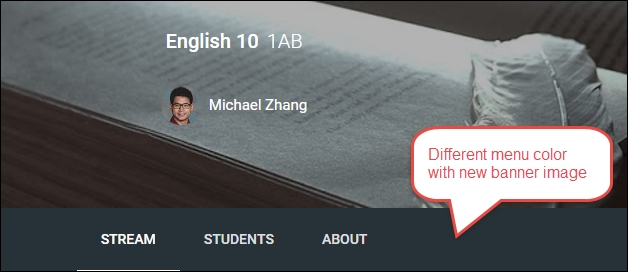
The class banner is the most prominent part of your class. It creates the atmosphere for the students when they arrive. Google Classroom will automatically apply a theme appropriate to the class name for common subjects. This feature is why the theme banner is books on a bookshelf for the English 10 class created in the previous section. The theme also changes the colors of the background and menus. To change your class theme, follow these steps:
Click on Select theme on the bottom-right corner of the banner image:

Select the desired Google Classroom provided banner image. The colors within the class will change to match the banner. Click on the Select class theme button:

Your class with the new theme will appear as shown in the following screenshot:
Tip
If this is your first foray into Google Classroom, try different themes before choosing one for your class. The most prominent colors in the banner image will suggest which colors the theme will use for the background and the menu.
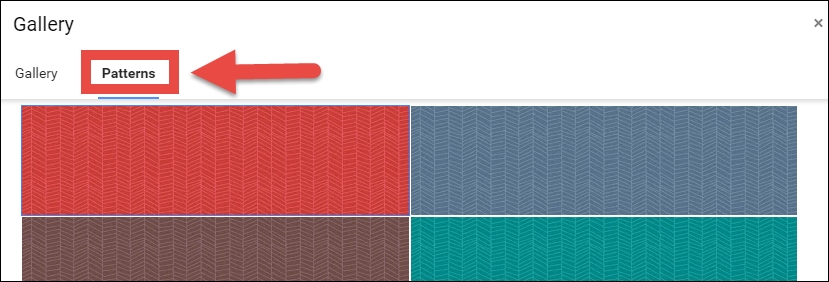
Google Classroom also offers several patterns to use as the banner of the class. Simply select the Patterns tab in the dialog box to view the available patterns:
Another alternative to using the images and patterns found within Google Classroom is to upload your own picture. The following steps will guide you through uploading a banner image.
Click on Upload photo at the bottom right corner of the banner image:

Click on the Select a photo from your computer button:

In the File Explorer, select the desired image and click on the Open button:

If the image is too large, crop the image by resizing the frame and move it to the desired location on the image.
Then click on the Select class theme button:


You will not be able to change the colors of the theme independently from those of the banner image.
Note
Size matters when it comes to your banner image. Google Classroom will only use images with a pixel dimension of at least 800 x 200.
Once you have chosen the appropriate theme to personalize your Google class, you can start adding information and resources.
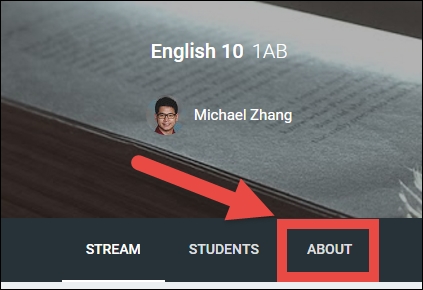
Students and co-teachers will be able to find information and resources related to the class in the ABOUT section of the Stream:
On your newly created site, the Class Title, Class Description, and Room fields will be blank. Filling in this information will provide students with a summary of what to expect from the class and where the physical room is, if your class also meets face-to-face. If you already have a course syllabus, filling in this section can be as easy as copying directly from your syllabus. The following screenshot shows where to enter the class information as well as links to the file folder in Google Drive and the class calendar in Google Calendar. Google Classroom automatically creates the folder in Google Drive during class creation, but does not create the calendar until the first assignment is posted in the Stream:
Once you have finished adding information about your class, you can also add files for your students to access.
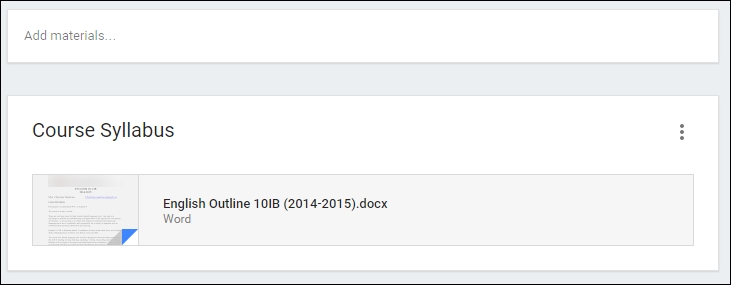
There are two areas where you can add files to Google Classroom: The STREAM and the ABOUT page. Files uploaded to the STREAM page are for short term uses such as announcements or assignments, whereas files uploaded to the ABOUT page are relevant for the duration of the course, such as a course syllabus. Furthermore, you can use the ABOUT page to add files from Google Drive, link videos from YouTube, and link websites. In this section, you will upload a file from your computer to the ABOUT page, as follows:
In the ABOUT page, click on Add materials...:

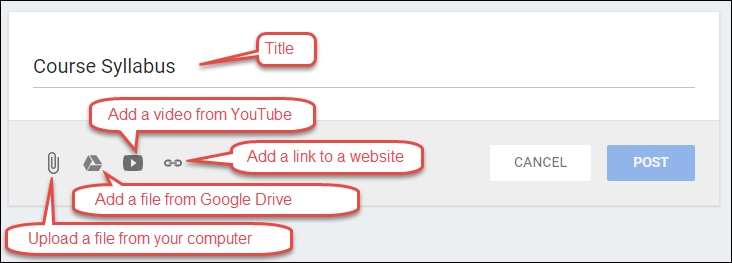
In the Title field, give the resource a title.
Click on the paperclip icon:

Click on the Select files from your computer button:

Find and open your file in File Explorer:

Click on the Upload button in the dialog box and watch your file upload:

If you would like to add more files under the same title, simply click on the Add more files button to select another file to upload.
Click on the POST button to add the file to the ABOUT page:

Your file will now be available to students and co-teachers. The added material will display as a card on the ABOUT page. The uploaded files will be available in the Google Drive folder associated with the class:
To add files from Google Drive, a YouTube video, or a website, click on the appropriate icon for each item. For YouTube videos and websites, you need the URL to add them to the ABOUT page:
Files added from Google Drive will remain in their locations within Google Drive instead of being moved to the folder associated with the class.
When you add materials to the ABOUT page, newer materials will appear closer to the top of the page. Therefore, plan which files you want to be readily accessible to your students when they appear on this page. If you want to reorder the cards, you can delete and recreate the cards in the desired order.
It is currently not possible to easily add Google Drive folders to Google Classroom. You can add all the files within a folder to the ABOUT page in a single card to mimic using a folder.

