
How you organize your library will depend greatly on the type of photography that you do. There are generally two ways photographers go about managing photos on their memory cards. Some will do a single shoot at a time and some who shoot more casually will gather a lot of different subjects on a memory card from various events before importing the photos. Presented in the following are a few ideas on how you might structure and organize your library. As with many things in Aperture, there are lots of different ways to approach a task, and organizing your library is no different. So the ideas that follow are just a few possible ways you might approach this task. You might have an equally valid approach that you feel more confident about using.
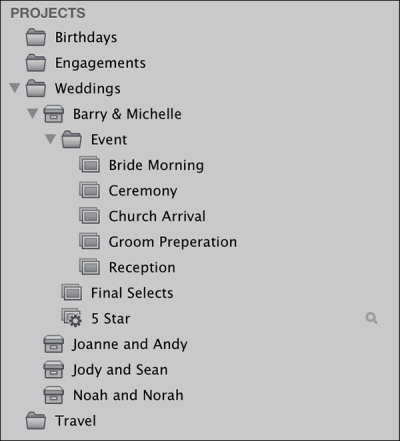
If you're working on a single shoot at a time, such as a wedding for example, then organizing your library becomes a lot easier. In this case, you could have folders for each type of shoot and within those folders, your individual projects for each shoot. Let's take the example of a wedding photographer. A typical wedding photographer also might shoot engagement sessions as well as anniversaries. So you would start with root-level folders for Weddings, Engagements, and Anniversaries, and so on for each of the other types of jobs that you do. Inside each of these folders you could have a project for each job, named after the couple. Inside each project you could then break the event down into albums for things such as the arrival at the church, the reception, the rehearsal dinner, and so on. You could then have separate albums or smart albums for your picks and selects.
An alternative method would be to have nested folders for each job. A particular wedding could be the name of the job and this would be a folder within the Weddings folder. Within that folder there are projects for each part of the day and there could also be more albums within the weddings folder to break the project down further.
If you are the other kind of more casually organized photographer, one that ends up with a lot of different events in the one memory card, then organizing can be a bit trickier. There are several approaches that can work. You can start by creating folders for each month of the year. Within those folders, import your shoots into individual projects with names for the most common type of shot on the card. So, for example, if you had been doing a photo walk you could name your project photo walk and append the date. You could also create a project called Misc and then when there are images from a session that aren't really appropriate for the project (some shots of your house, for example, which are on your photo walk card), you can copy them to the Misc project.
Outside these set of folders you can create a series of root-level albums for common themes in your photography. These can either be regular albums or smart albums, which you can tie to keywords. If you are doing some long-running photo projects then this can be the way you organize them. Say you are collecting shots of coffee cups, every time you import a shoot to a new project, you can copy any images you may have taken of coffee cups and put them into a coffee cups root-level album.
Tip
Using keywords and smart albums
An alternative method that some people prefer to use for sorting photos into albums is to use keywords. By adding keywords to your images that correspond to the ongoing projects or the subjects by which you wish to sort, you can use smart albums to curate these. The advantages of this method are that it is generally quicker to apply keywords to images than it is to drag them into an album in the sidebar. The disadvantage is that you have to be careful to use the exact same keyword each time otherwise your smart folder won't pick up the image. You can use the keyword bar to make this easier. I'll show you how to do this in Chapter 7, Making Metadata Work for you.
One of the things that you can do to ease your organizing chores is to create a project template. If you have created a whole set of albums and folders within a project that you find works for you, it can be useful to use this as a template for creating similar projects in the future. This is especially handy if you have created a whole set of smart folders with complex search setups that you really don't want to have to create manually again. Luckily there is a function in Aperture that makes this pretty easy. Here's what to do in the following steps:
Select an existing project that you want to duplicate.
From the File menu choose Duplicate Project Structure.
Rename the duplicated project.
What this does is duplicate the project, and all included albums, books, folders, smart albums, and so on, only without the images. What you get is a new and empty project with the structure you created, all in place, ready to go.
You can merge two projects into one if you need to. Simply select the two projects in the library view and from the menu choose File | Merge Projects.
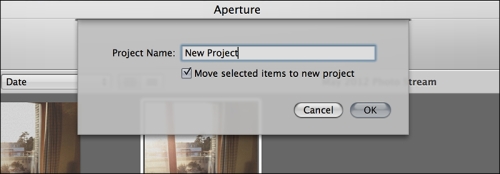
The process of splitting a project is a little more involved, but still fairly simple. In the project that you want to split, select the images you want to split into the new project. From the toolbar choose the New button and then select New Project. This will then pop up a dialog box asking whether you want to move the selected images to the new project. Tick this box, give the project a name and then click on the OK button.