
Well, we're kicking things off with a bang! Our first recipe is probably the longest recipe in this book, but that's because you have choices when it comes to setting up your development sandbox. Will you use a sandbox hosted in Business Central or will you set up your sandbox on a machine? Will that machine be hosted in Azure or on your local machine? Will you use a container or not? The choice is yours, and we'll go through each process in this recipe. By the end of this recipe, you will have a place to do all of your AL coding!
Setting up your development sandbox
Getting ready
Depending on how you want to set up your development sandbox, you may need to do a few different things to prepare:
- Sign up for or get access to a Business Central subscription
- Sign up for or get access to an Azure subscription for which you can create virtual machines
- Install Docker
- Obtain the latest Business Central installation media
How to do it...
We have four different choices here. If you're super savvy, then by all means, try them all out, but really, you only need to do the one that fits you best.
Option 1 – Sandbox hosted in Business Central
If you want to set up your development sandbox to be hosted in Business Central—which, by the way, is the simplest of all the options—perform the following steps:
- Sign up for a Microsoft Dynamics 365 Business Central sandbox at https://aka.ms/getsandboxforbusinesscentral.
When you sign up for your sandbox, you cannot use a personal email address. You must use either a work or school account.
- Install the AL Language extension from the Visual Studio Code Marketplace at https://marketplace.visualstudio.com/items?itemName=ms-dynamics-smb.al:
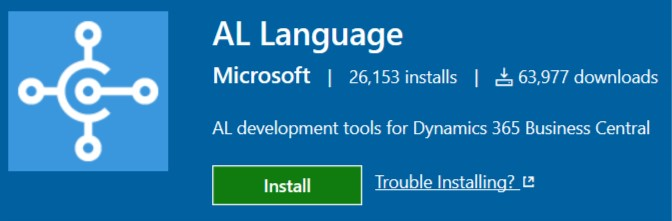
There are just two steps to getting your sandbox! Once you go through the signup process, you'll be logged into your sandbox and will be greeted with a message similar to the following:
Option 2 – Azure-hosted sandbox
If you want to use a container hosted on a virtual machine in Azure, perform the following steps:
- If you have not already done so, you can sign up for an Azure subscription at https://azure.microsoft.com and start with a free account.
- Now that we have an Azure subscription, we need to create a virtual machine within that subscription. This virtual machine will host a Business Central environment inside a Docker container. To make this easy, there is an Azure Resource Manager (ARM) template available for you to use.
You can access the template at https://aka.ms/getbc. Make sure to use your Azure subscription login credentials.
The template contains a lot of options, but for our purposes, we're going to focus on just a few of them. Once you're familiar with the process, take a look at the other options and do things such as connecting your sandbox to an Office 365 account! See the options in the following table:
| Option | Comment |
| Resource Group | Select Create new to create a new resource group for this virtual machine. You can name it whatever you like. |
| Location | Choose the region closest to where you are connecting from. Selecting a region on the other side of the world from you will impact connection performance. |
| VM Name | Give your machine a name – any name you want! Azure will make sure that the name you choose is acceptable. |
| Time zone Id | Select the time zone you wish to work in. |
| Accept EULA | You must accept the End User License Agreement (EULA) by selecting Yes for this option. The EULA can be found at https://go.microsoft.com/fwlink/?linkid=861843. |
| Remote Desktop Access | Use this option to configure whether you are able to use Remote Desktop Protocol (RDP) to remotely log in to the virtual machine. Set this to an asterisk (*) if you want to connect to this machine from any machine. |
| VM Admin username | You can leave this as the default value, vmadmin, or change it to one that suits you better. This login will be used to remote connect (via RDP) to the machine. This login is configured as the local administrator for the virtual machine. |
| BC Admin username | You can leave this as the default value, admin, or change it to one that suits you better. You will use this login to launch the Business Central Web Client. This user is configured as a super user in the Business Central system. |
| Admin Password | Set this to any password you want. This password applies to both the virtual machine and BC admin logins. Azure will ensure that the password you enter is strong enough. |
| BC Docker Image | Here, you can configure the Docker image you wish to use. Set this option to microsoft/bcsandbox:xx, where :xx represents the country localization you want (for example, microsoft/bcsandbox:ca for Canada). For the list of countries available, see https://hub.docker.com/_/microsoft-businesscentral-sandbox. |
| License File URL | If you uploaded a Business Central license to an online storage account, specify the secure URL to the file in this option. You can leave this option blank if you want to use a demo license. |
You can get more information on each option in the template by using the '!' icon onscreen, which is directly to the right of each option name.
- Once you have filled in the ARM template, accept the terms and conditions at the bottom of the screen and then click the Purchase button.
Now, you can just sit back and relax, and if your template was configured properly, your virtual machine will be created. Go grab a coffee and check back later.
Make sure you wait at least one hour before logging into the virtual machine. Even after it is successfully created, the machine will go through a series of configurations to create and set up the container.
- To test the connection to your Azure virtual machine, you need to remotely connect to the machine to get some information from it. You need to use the Azure web portal (https://portal.azure.com) to find the address of your virtual machine:
- In the Azure web portal, click on Virtual Machines in the navigation pane on the left:
- If you do not see Virtual Machines, press All Services and search for Virtual Machines to select it.
- Select the name of the virtual machine that you just created.
- Look for the DNS Name and take note of the address listed below it:
- For example, myvirtualmachine.canadaeast.cloudapp.azure.com
- In the Azure web portal, click on Virtual Machines in the navigation pane on the left:
- We can monitor the status of the virtual machine configuration by navigating to the virtual machine landing page:
- In your web browser, navigate to the DNS Name you noted previously.
- Click the View Installation Status link. Here, you can see when the virtual machine configuration is complete and is ready to use for development.
Once the virtual machine has been fully configured, the landing page will look similar to this:
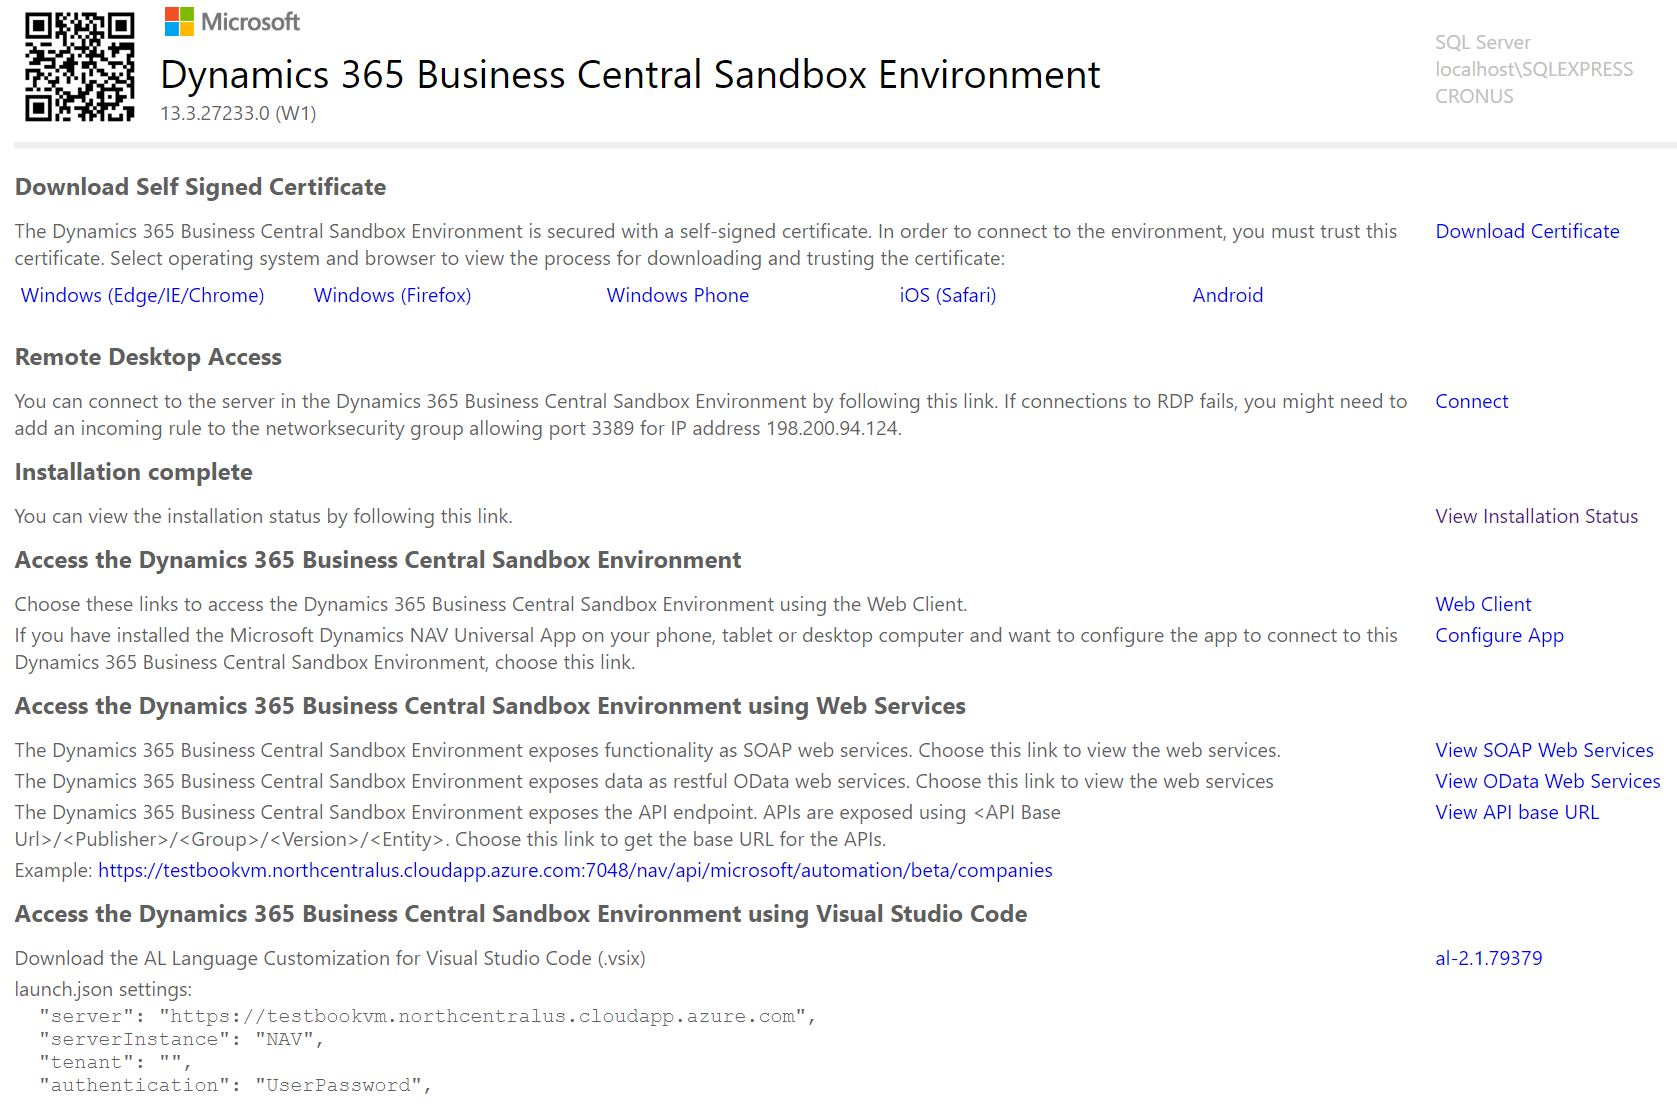
- Now, we need to take note of a few pieces of information, for later.
At the bottom of the landing page is a section named Access the Dynamics 365 Business Central Sandbox Environment using Visual Studio Code. In this section, take note of the following values:

You can also download a remote connection file from the landing page in the event that you want to connect to and work directly within the server.
- Before we close the landing page, we need to install the security certificate so that we can connect to the sandbox:
- On the landing page, click the Download Certificate link and save the file to your local machine.
- Depending on which web browser you are using, click either the Windows (Edge/IE/Chrome) or the Windows (Firefox) link and follow the onscreen instructions to install the certificate.
- Let's check to make sure we can connect to the Business Central Web Client:
- Close your web browser and navigate to the landing page for your virtual machine.
- Click the Web Client link on the right-hand side of the page.
You should now be looking at the Business Central login page:

If you get an error about an unsecured connection, try restarting your web browser and/or reinstalling the security certificate.
- Install the AL Language extension from the Visual Studio Code Marketplace: https://marketplace.visualstudio.com/items?itemName=ms-dynamics-smb.al.
Option 3 – Sandbox in a local container
If you prefer to have your development sandbox in a container on your local machine, you must have Docker installed and working on your machine. It should be configured to run Windows containers, rather than the default Linux ones. Once you have that, you can perform the following steps:
- Download CreateSandboxContainer.ps1 from the GitHub repository.
- Run PowerShell ISE as an administrator and open CreateSandboxContainer.ps1.
Let's look at what the code does. The first line in the script installs NavContainerHelper, which is a PowerShell module that contains an entire toolbox of commands for interacting with Business Central containers:
$install-module navcontainerhelper -force
If you would like to read more about NavContainerHelper, there's a wonderful set of blogs about it at https://blogs.msdn.microsoft.com/freddyk/tag/navcontainerhelper/.
- We have the end-user license agreement. You must manually accept the agreement by setting $accept_eula = $true:
# set to $true to accept the eula (https://go.microsoft.com/fwlink/?linkid=861843)
$accept_eula = $false
- You need to assign your sandbox container a name:
# set the name of your container (must be 15 characters or less)
$containername = ''
Docker container names are case-sensitive, so I recommend using lowercase names.
- You need to define which Docker image will be used for the sandbox container. Refer to the link in the script for information on which images are available, as follows:
# set image to use to create container (see here for available images: https://hub.docker.com/_/microsoft-businesscentral-sandbox)
$bcdockerimage = 'mcr.microsoft.com/businesscentral/sandbox:us'
- Set your login credentials. The script will configure the container to be based on a user and password login, so here is where you can define what the username and password will be:
# the user you use to login to the Business Central client (is a SUPER user)
$userName = "admin"
$password = ConvertTo-SecureString -String "Pass@word1" -AsPlainText -Force
If you have a Business Central license, you can upload it to an online storage account and access it with a secure URL. You can put the URL in the script, as follows:
# set the secure URL to your Business Central license file (leave blank to use the demo license)
$licenseFileUri = ''
If you upload your license file, you must upload it to a storage account that allows direct download links.
The rest of the script is where the magic happens. First, the username and password that you defined will be converted into PowerShell credential objects, and then the New-NavContainer command does all the heavy lifting to create your sandbox:
$credential = New-Object -TypeName "System.Management.Automation.PSCredential" -ArgumentList $userName, $password

New-NavContainer -accept_eula:$accept_eula `
 -containername $containername `
 -auth UserPassword `
 -Credential $credential `
 -licenseFile $licenseFileUri `
 -includeCSide `
 -alwaysPull `
 -doNotExportObjectsToText `
 -usessl:$false `
 -updateHosts `
 -assignPremiumPlan `
 -shortcuts Desktop `
 -imageName $bcdockerimage `
 -useBestContainerOS
In order to execute the preceding script, you may need to configure the Execution Policy on your machine in order to allow it to run unsigned scripts. You can do that using the Set-ExecutionPolicy command-let. For more details, follow https://docs.microsoft.com/en-us/powershell/module/microsoft.powershell.security/set-executionpolicy?view=powershell-6.
- At this point, if you've filled in all the configuration in the script, you can run it by pressing F5. Then, sit back and relax while your container is created. The first thing that will happen is that the Docker image will be downloaded to your machine. This is the longest part of the process because the files are being downloaded, unpacked, and verified. A typical image will be around 10 - 20 GB.
Once that is finished, the container will be created and should be ready in under 10 minutes.
Do not close the PowerShell window yet!
- We need to take note of some important information that we're going to need later. In the PowerShell window, look for the following information and save it for later:

- To verify that your machine is working, open your web browser and navigate to the Web Client address that was listed in the PowerShell window (see the preceding example).
- Install the AL Language extension from the Visual Studio Code Marketplace: https://marketplace.visualstudio.com/items?itemName=ms-dynamics-smb.al.
Option 4 – Local sandbox using installation media
If you want to install Business Central onto your local machine using the installation media, you can do that by following these steps:
- From the installation media, run setup.exe.
- You must accept the licensing terms. Once you do that, click Advanced Installation Options.
- Here, you can choose between two setup options:
- Install Demo: This installs a pre-configuration selection of components without manual intervention.
- Choose an installation option: This allows you to choose which components to install and allows you to select some additional configuration options.
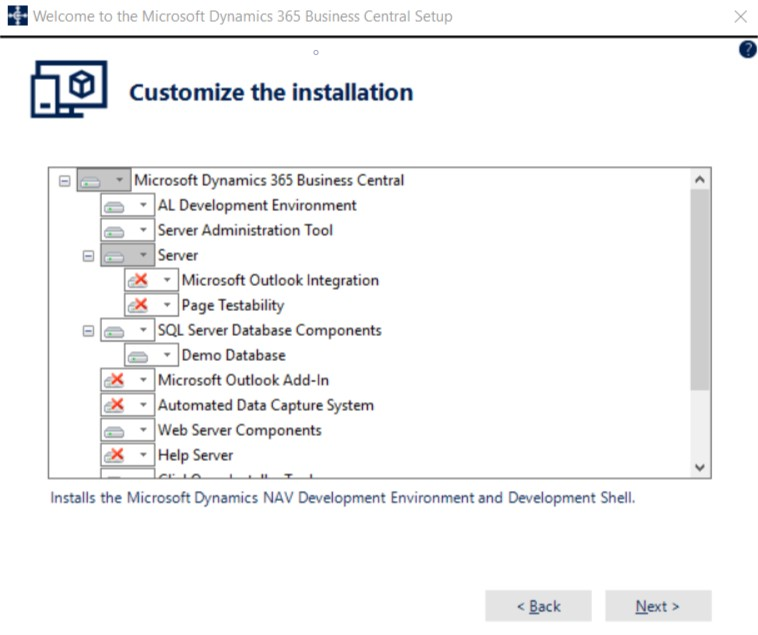
- Click the Choose an installation option so that we can select the components that we need to complete the recipes in this book.
- Click Customize... under the Developer option.
- Make sure that the following components are set to Run from My Computer:
- AL Development Environment
- Server Administration Tool
- Server
- SQL Server Database Components
- SQL Server Database Components | Demo Database
- Web Server Components
- Dynamics NAV Client | Development Environment (C/SIDE)
Here is a screenshot for your reference:
- Click Next and you will see some additional installation parameters. For the purposes of the recipes in this book, you do not need to change anything here.
If you already have a compatible version of Microsoft SQL Server installed on your local machine, you can change the SQL Server and SQL Server Instance parameters to the corresponding ones so that the Business Central installation will use that instead of installing a new instance.
- Click Apply to perform the installation.
If the installation cannot find a compatible version of Microsoft SQL Server, then you will be notified that it will install a new instance. At the time of writing, Microsoft SQL Server 2016 Express is the version that will be installed.
- Once the installation has completed, click Close to close the installation wizard.
- You can verify the installation by opening the Business Central Web Client from the following URL: http://localhost:8080/BC130.
- Install the AL Language extension from the Visual Studio Code Marketplace at https://marketplace.visualstudio.com/items?itemName=ms-dynamics-smb.al.
How it works...
As you can see, you have a variety of ways you can configure your development sandbox. Personal preference may lead you to choose one way or another, but there are a few things to keep in mind when selecting which configuration to use:
- Do you need offline access to your development sandbox? If so, then an Azure-hosted system might not be the right choice for you.
- Do you need to build for the current Business Central SaaS version? If so, then you might want to consider setting up your development sandbox to be hosted in Business Central so that it is always on the current release.
- Do you need to make sure your application will work on a future Business Central release? If so, you will want to take part in Microsoft's Ready to Go (http://aka.ms/readytogo) program so that you can gain access to future releases made available via Docker images.
- Do you need to have multiple versions of Business Central on your local machine? If so, there's no easier way than using Docker containers to do that!
Each of the processes resulted in the same thing: a development system that will be used to build and test new Business Central applications. Whether it is hosted or not, or a container or local installation, the end result is the same: a development sandbox that you will build and publish your Business Central applications to.
See also
For more information on setting up development sandboxes, you can refer to the Getting Started With AL article on the Microsoft Docs website at https://docs.microsoft.com/en-us/dynamics365/business-central/dev-itpro/developer/devenv-get-started.