Implementing the development process
Instead of teaching you how to manage the development process at its best, this is an overview of how to integrate services in order to reduce the complexity of the deployment and the administration of a popular Team Foundation Server (TFS) infrastructure.
Tip
TFS is a comprehensive product providing source code control, automated testing, an automated build platform, reporting, project management, and counting. On the other hand, the new kid on the block (over the last few years) is called Visual Studio Online (VSO), which is the Azure-hosted version of TFS, missing just some advanced features (such as SQL Reporting/BI).
There are a lot of connected products and services around TFS/VSO, designed to integrate and develop the even more complex scenarios of Application Lifecycle Management (ALM). The advantage of using VSO is that, as SaaS, it requires zero maintenance (it is all up by Microsoft) and a very short provisioning time: this is why it is useful in many contexts where a ready-to-go solution is required with a minimal set of customization points.
CM primarily needs to save/control its code base by adopting a source code repository service. As usual, some questions can help while choosing the appropriate vendor/service:
- Where is the code repository located?
- Which protocols (a.k.a. source control engines) is CM using?
- Does the service integrate with third-party services? Which ones?
We know that real questions can be many more than just these, but always try to stop and write down the requirements before jumping into a new service.
Note
SaaS and PaaS maintenance
We are repeating the power of Platform-as-a-Service (and, consequently, also the power of SaaS) as a prayer in reducing the overall governance of a company by focusing just on its core businesses without dealing with the management and maintenance of the IT infrastructure. All true and all beautiful, but do not confuse this with the capability of raising the number of services indefinitely and without any real scope.
Even PaaS services require, as far as possible, some maintenance effort; once created, they need attention. Try to introduce a new service only if the existing services in place do not cover the requirements and only if the new service can be correctly investigated before building strong dependencies on it.
Creating a new VSO environment
CloudMakers developers (which are actually two in number, Luke and Flint, at the time of beginning the start-up) come with different kinds of experience. Among the differences between them, Luke has always used TFS in his project, and he is accustomed to its native, centralized source control engine. On the other hand, Flint has been a full stack developer, using distributed source control engines, such as Mercurial and Git.
As we see later, since every team project has its own source control engine, we can create personal workspaces (workspaces under the control of a single developer to test, play, and prototype) according to the developers' preference, while the company's workspaces (those containing the actual code base) can use a single, shared, and different engine.
Tip
Using different source control engines can be very fair in organizations where several languages and technologies are put in place. However, some operations (such as collection-level branching and merging) are not allowed, making the integration between projects managed with different engines harder.
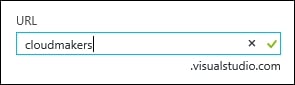
We can create a brand new VSO account by directly going to https://go.microsoft.com/fwlink/?LinkId=307137&clcid=0x409. Or, we can use the Azure Portal by creating our first team project.
In the TFS/VSO ecosystem, a single deployment can have this tree structure:
- Project collections: These can be 1 to n in number. A project collection is a high-level collection of folders named
Team Projects. - Team Projects: These can be 1 to n in number. A Team Project is a collection of code, no matter how many real software solutions there may be. The term "project" should refer to a business project, which, of course, is a collection of multiple software packages/solutions/projects itself.
In VSO, there is just one collection (DefaultCollection) with many (to be created by users) Team Projects.
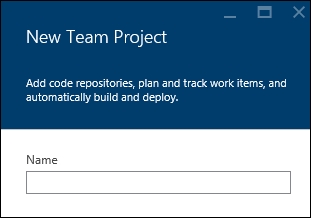
From within the Azure Portal, we can find the New Team Project wizard to open this blade:
Contextually, if not already created/owned, we need to create a new VSO account.
The first team project we create can be a test, so play with the configuration settings:
- Version control: We can choose between TFVC (the standard engine of TFS) and Git (the well-known open and distributed engine)
- Process Template: We can choose how the development process should be set in order to organize the frontend experience as well as part of the implicit ALM (the current options are Scrum 2013, Agile 2013 and CMMI 2013)
VSO can integrate users with personal identities (Microsoft accounts) or organizations' identities (Azure AD). We'll learn how Azure AD works in the next sections, but remember that it is a good practice to bind a VSO account with an Azure AD tenant in order to implement better control of who has access to resources.
Tip
In fact, try to imagine a contributor using the company's VSO with their personal identity: during the development process, even if it lasts years, they can gain access to multiple resources by adding their ID to various projects/folders. When they decide to leave (or when the contribution ends), an administrator has to manually check all the projects and resources involved and disable the ID from access. With Azure AD, which is an Identity and Access Management (IAM) solution, an administrator can just centrally disable the access of the single account, disabling all the connected services' entry points with a single action.
After provisioning a VSO account, when the billing and some minor configuration details are summarized in the Azure Portal, its management console is available here:
https://<<name_of_account>>.visualstudio.com
Each team project is available at this link, as shown here:
https://<<name_of_account>>.visualstudio.com/DefaultCollection/<<name_of_project>>
The management console of the portal looks similar to the one shown in the following screenshot:
Integrating Visual Studio
Visual Studio automatically recognizes VSO/TFS based on the endpoint URL we give to it. In the case of VSO, a web-based sign-in is asked from the user in order to perform a claims-based authentication for the correct provider (a Microsoft account or Azure AD). If a standard TFS is detected, even basic authentication will be available.
Visual Studio 2013/2015 natively supports both Git and TFS as backend source control engines, but only one at time can be the default, as shown in the following screenshot:
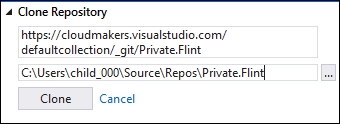
In the case of TFVC-based Team Projects, we can map and get the entire project collection in a base local folder, as follows:
In the case of a Git-based team project, we can start by just cloning the repository.
Tip
The Git backend of VSO has been implemented in a standard way in order to enable the majority of the existing clients to connect to it and push the code.
Finally, after writing some code, we can save our work as follows:
Integrating third-party services
As mentioned at the beginning of this section, VSO is a complete solution for ALM, and it's not just another source control environment. It can automatically deploy the build result to connected services, and more generally, it can react to specific triggers with custom actions even against third-party services.
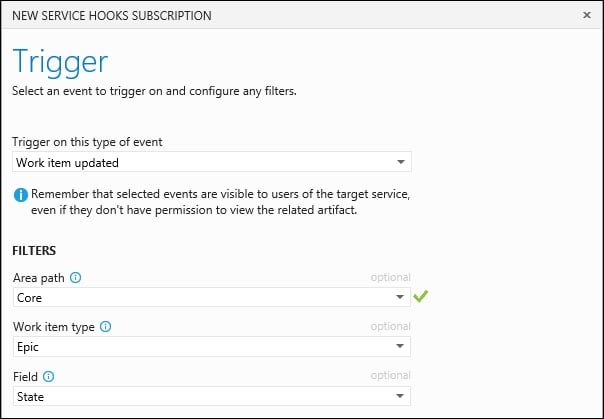
A webhook is a method to notify decoupled systems in a standard way based on HTTP and public endpoints. In VSO, there are several predefined service hooks, whose purpose is to trigger events against third-party services in the case of a specific VSO event that has occurred. At the time of writing, the events supported by VSO (which VSO can listen to) are as follows:
- Build completed: This triggers if a build is completed (in the case of failure, success, and other supported statuses)
- Code checked-in/pushed: This triggers when someone saves their code
- Team room message posted: This is self-explanatory
- Work item actions (creation/comment/update): This triggers in the event of one of the supported actions on work items
Tip
This last one is particularly useful for the purpose of integrating with a company chat service in order to create real-time engagement on the progress of the overall work.
In fact, among the built-in supported third-party services, we have the following:
- Azure Service Bus and Storage: Supported actions are related to sending a message on a queue, a topic, a notification hub, or a storage queue. It's useful in building some logic applications in response to these events.
- Jenkins: Supported actions are related to triggering a build into Jenkins since it is a popular (and open source) Continuous Integration (CI) service.
- MyGet: This is a NuGet-as-a-Service solution with great features. The most useful supported action is to automatically publish a NuGet package into the MyGet repository if a build occurs on the VSO side.
- Slack: Since this is one of the most popular messaging systems, the obvious supported action is to post a message on a specific channel in the case of an event on the VSO side.
- ZenDesk: This is one of the most popular ticketing systems in the world. A nice use case for integration shows that users from Visual Studio can comment on a work item, triggering a private comment in a ticket on the ZenDesk side.
In fact, there are a lot more built-in integrations, and there is also a provider, Zapier, that acts as a simple orchestrator itself. On the Zapier side, we can react to webhooks by triggering a lot (hundreds) of different services, even the ones mentioned earlier.
Finally, if you want to trigger a custom HTTP listener, there is a simple webhooks provider, letting you decide what to notify and how to do it as long as it's understood that the target should be an HTTP endpoint.


 Free Chapter