Sign In Start Free Trial
Account

Add to playlist

Create a Playlist

Modal Close icon
You need to login to use this feature.
  • Book Overview & Buying CentOS 7 Server Deployment Cookbook
  • Table Of Contents Toc
CentOS 7 Server Deployment Cookbook

CentOS 7 Server Deployment Cookbook

By : Boronczyk, NADAREISHVILI
5 (1)
close
close
CentOS 7 Server Deployment Cookbook

CentOS 7 Server Deployment Cookbook

5 (1)
By: Boronczyk, NADAREISHVILI

Overview of this book

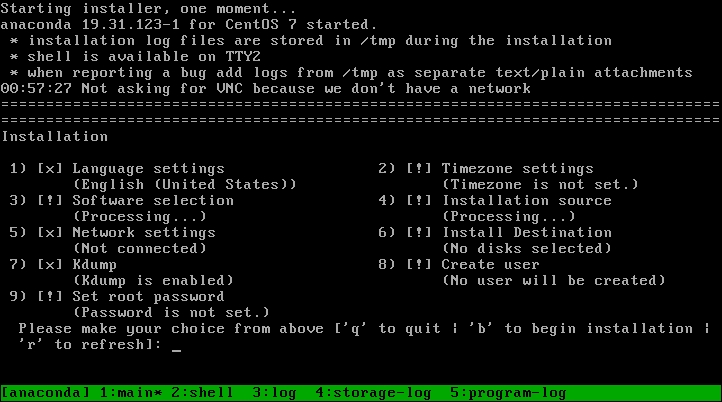
CentOS is derived from Red Hat Enterprise Linux (RHEL) sources and is widely used as a Linux server. This book will help you to better configure and manage Linux servers in varying scenarios and business requirements. 
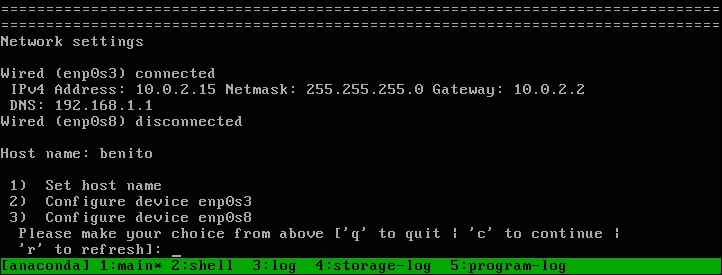
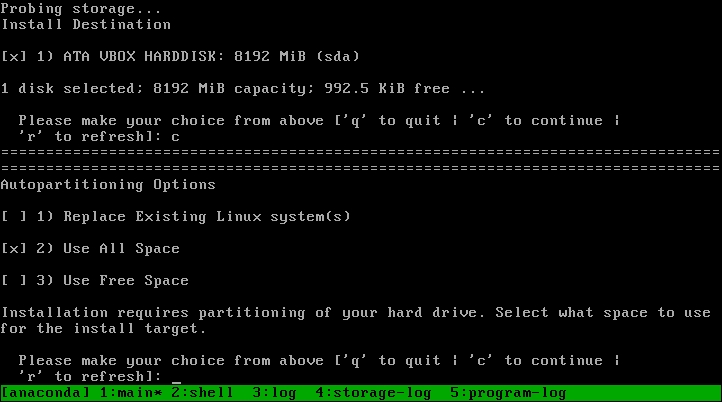
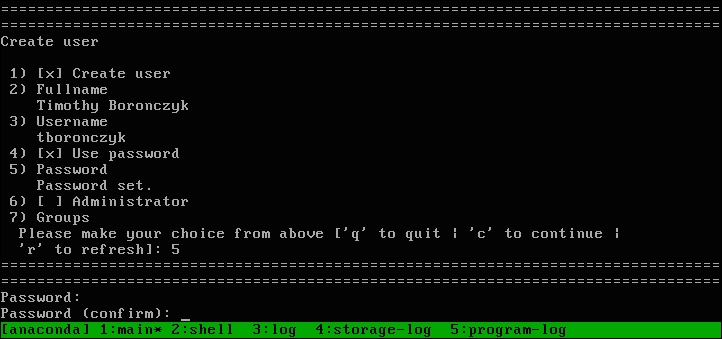
Starting with installing CentOS, this book will walk you through the networking aspects of CentOS. You will then learn how to manage users and their permissions, software installs, disks, filesystems, and so on. You’ll then see how to secure connection to remotely access a desktop and work with databases. Toward the end, you will find out how to manage DNS, e-mails, web servers, and more. You will also learn to detect threats by monitoring network intrusion. Finally, the book will cover virtualization techniques that will help you make the most of CentOS.
Table of Contents (13 chapters)
close
close

Installing CentOS using Anaconda in text mode

Next, you'll learn how to install CentOS using Anaconda in text mode. It's recommended that you install CentOS graphically because graphics mode is easier to use and offers more functionality. However, it may not be available when the system lacks sufficient resources to run the installer in graphical mode, for example, if the display adaptor's capabilities are limited or if there is reduced RAM.

Getting ready

This recipe assumes that you have a copy of the CentOS 7 installation medium. If you don't, visit https://www.centos.org to download an ISO image and then burn the image to a disc.

How to do it...

Follow these steps to perform a text-based installation of CentOS:

  1. Insert the installation disc into your system's optical drive (or USB stick into a USB port) and reboot. The system should boot to the CentOS 7 installation menu.
  2. Using the arrow keys, make sure the Install CentOS 7 option is highlighted and press Tab. The command to boot the installer kernel appears at the bottom of the screen.
  3. Add the word text to the end of the list of arguments and press Enter. Anaconda will launch in text mode:
           vmzlinuz initrd=initrd.img inst.stage2=hd:LABEL=CentOS 
           \x207\x20x86_64 rd.live.check quiet text 
    

    Note

    Anaconda will launch in text mode automatically if your system has less than 768 MB of RAM.

  4. The Installation menu presents the installation options by category. Type 2 and press Enter to select Timezone settings:
    How to do it...

    The text-based installation menu categorizes the installation options

  5. The Timezone settings menu presents a list of regions. Enter the number for the desired value.
  6. You will be given a list of available time zones in the selected region (paginate through the list by pressing Enter if the list is long). Enter the number for the desired time zone.
  7. If you know what purpose the system will serve and require something more than a minimal installation, enter 3 to select Software selection. Here you can select groups of software packages for that purpose. When finished, enter c to continue back to the Installation menu.
  8. Enter 5 to select Network settings.
  9. Enter 1 to set the system's hostname. Type the desired name and press Enter.
  10. Enter the number to configure the system's primary network interface. Then, enter 7 to mark Connect automatically after reboot and 8 to mark Apply configuration in installer. Enter c to go back to the Network settings menu and c again to return to the Installation menu:
    How to do it...

    The Network settings menu lets us configure the system's network interfaces

  11. Enter 6 to select Install Destination.
  12. If the desired drive is not already marked, enter the number for the drive. Then, enter c to continue. The Autopartioning Options menu is shown in the following screenshot:
    How to do it...

    The Install Destination menu let us set the installation target and the Autopartioning Options menu lets us specify how the disk will be used

  13. Enter the number for the desired partitioning (Use All Space is the default) and then c to continue.
  14. Select the desired partition scheme (LVM is the default) and then enter c to return to the Installation menu.
  15. Enter 8 to select Create user.
  16. Enter 1 to mark the Create user option. Provide your name and set a username for the account by entering 2 and 3 respectively. Enter 4 to mark the Use password option and then 5 to set your password. Then, enter c to return to the Installation menu:

    Note

    You must confirm you really want to use your password if you provide a password that is too weak.

    How to do it...

    The Create User menu let us create an unprivileged user account

  17. Enter 9 to select Set root password. Enter and confirm the password you want to use for the system's root account.
  18. After all of the sections that required attention have been resolved, enter b to begin the installation process.
  19. When the installation is complete, remove the media from the drive and reboot the system.

How it works...

This recipe showed you how to install CentOS using Anaconda running in text mode. The process began when we booted the system from the installation disc, selected Install CentOS 7 from the installation menu, and added the text option to the boot parameters. The installer's kernel loaded into memory and Anaconda launched in text mode.

The text-based installation is similar to installing CentOS in graphical mode, answering prompts for time zone, software, and networking information. However, Anaconda presents the prompts in a different order when running in text mode and some functionality is missing. For example, we can't perform custom disk partitioning. Nevertheless, text mode enables us to quickly install a basic CentOS system.

See also

For more information on installing CentOS 7, refer to the RHEL 7 Installation Guide (https://access.redhat.com/documentation/en-US/Red_Hat_Enterprise_Linux/7/html/Installation_Guide).

Visually different images
CONTINUE READING
83
Tech Concepts
36
Programming languages
73
Tech Tools
Icon Unlimited access to the largest independent learning library in tech of over 8,000 expert-authored tech books and videos.
Icon Innovative learning tools, including AI book assistants, code context explainers, and text-to-speech.
Icon 50+ new titles added per month and exclusive early access to books as they are being written.
CentOS 7 Server Deployment Cookbook
notes
bookmark Notes and Bookmarks search Search in title playlist Add to playlist font-size Font size

Change the font size

margin-width Margin width

Change margin width

day-mode Day/Sepia/Night Modes

Change background colour

Close icon Search
Country selected

Close icon Your notes and bookmarks

Confirmation

Modal Close icon
claim successful

Buy this book with your credits?

Modal Close icon
Are you sure you want to buy this book with one of your credits?
Close
YES, BUY

Submit Your Feedback

Modal Close icon
Modal Close icon
Modal Close icon