

This recipe will explain how to write basic CasperJS tests and will help us get familiar with the CasperJS approach.
In this recipe, we will build simple web pages in order to run our CasperJS tests in an appropriate context.
As we need to serve just static content (HTML, CSS, JavaScript), we need a very basic HTTP server and the simplest existing HTTP server is the Python 2 SimpleHTTTPServer, as it is part of the standard Python installation (so that no extra deployment is needed), and it does not need any system configuration.
On Mac OS X and Linux, Python 2 is part of the system; we just launch the following command line from the folder containing our web content:
~ python -m SimpleHTTPServer
The preceding command should return this message:
Serving HTTP on 0.0.0.0 port 8000 …
The message means that our local web server is running on the 8000 port and we can access it with our web browser using the following URL:
http://localhost:8000/
On Windows, we can do the very same thing but Python is not installed by default, so we first need to install it this way:
Go to http://www.python.org/getit/.
Download the Python 2.7 Windows installer.
Run it.
Add Python to our system path:
...the existing PATH value...;C:\Python27\
We are now ready to write CasperJS tests. For our first test, we will not need our local web server as we will use the Wikipedia website:
Let's create the following file and name it
example1.js:var casper = require('casper').create(); casper.start('http://en.wikipedia.org/', function() { this.echo(this.getTitle()); }); casper.run();When we run our script, we get the following output:

Let's see how it works:
In the first line, we get a new
'casper'instance.Then, in the second line, we start this instance and open the Wikipedia page.
We give the
start()method a function that will be executed once the page is loaded. In this function, the context (this) is thecasperinstance. Here, we just use theecho()method to display the current page title (obtained usinggetTitle()).In the last line, we launch the registered steps.
Now, let's change a little bit of our script in order to perform a search on Wikipedia about
'javascript':var casper = require('casper').create(); casper.start('http://en.wikipedia.org/', function() { this.echo(this.getTitle()); this.fill('form#searchform', { 'search': 'javascript' }, true); }); casper.then(function() { this.echo(this.getCurrentUrl()); }) casper.run();Let's run it:

We have made two changes:
We used the
fill()method to submit our search keyword to the Wikipedia search formWe added a new step in our script using the
then()method to make sure that we wait for the search result to be returned; we also displayed the current URL
As we can see, it works perfectly as we obtained the URL of the Wikipedia article about JavaScript. Now, let's "assert" the world!
We just wrote a basic CasperJS script, but it is not a very efficient test script as a test script is supposed to check if an expected behavior is properly performed by the web page that we are testing.
To do that, CasperJS provides a tester API, which can be accessed via the
testproperty of our CasperJS instance.Let's create the following example page and name it
example2.html:<html><body> <button id="button1" onclick="this.innerText='Done';">Click me</button> </body></html>
Now, let's launch our SimpleHTTPServer and see what the page looks like by going to
http://localhost:8000/example2.html.It shows a Click me button and if we click on it, its label is changed to Done.
The following is a CasperJS test that could validate this behavior:
casper.test.begin('Test my form', 3, function(test) {
    casper.start('http://localhost:8000/example2.html', function() {
        test.assertVisible("button#button1");
        test.assertSelectorHasText("button#button1", "Click me");
    });

    casper.then(function() {
        this.click("button#button1");
    });

    casper.then(function() {
      test.assertSelectorHasText("button#button1", "Done");
    })

    casper.run(function() {
        test.done();
    });
});
Let's save this script as
example2.jsand run it using thecasperjs testcommand:
The
casperjs testcommand allows us to use thecasper.testproperty, which provides all the testing methods.When using the
casperjs testcommand, we do not need to create thecasperinstance, but we need to call thebeginmethod and end the test with thedonemethod.First, with
assertVisible, we make sure that our button is visible. The most common way to designate an element is by providing an accurate CSS selector.Then, we use
assertSelectorHasTextto check the text content of the button before and after clicking on it. We can see that all our tests pass.Now, let's break our tests by changing the second
assertSelectorHasTexttester as shown in the following code:this.test.assertSelectorHasText("button#button1", "You can click again");Tip
Downloading the example code
You can download the example code files for all Packt books you have purchased from your account at http://www.PacktPub.com. If you purchased this book elsewhere, you can visit http://www.PacktPub.com/support and register to have the files e-mailed directly to you.
And the result is as follows:

We clearly see that our two assertions still pass, but one is now failing.
When developing with JavaScript, we often need to chain two pieces of code (for instance, first we load some JSON data, then we update the page content using that data). But, each step is generally non-blocking, which means that the rest of the code will continue to execute even if the step is not complete, and there is no way to predict when the first step will be complete.
The most solid and common approach to solve this problem is the callback mechanism. We put the second piece of code in a function and pass it as a parameter to the first one, so that it can call that function when it finishes.
As a result, there is no linear and predictably-ordered execution of the code. This makes testing a little bit tricky.
The following is an example (example3.html):
<html>
<head>
   <script type='text/javascript' src='http://code.jquery.com/jquery-1.9.1.js'></script>
   <style>
   .searching { color: grey;}
   .success { color: green;}
   .noresults {color: red;}
   </style>
</head>
<body>
   <script>
   function geonamesSearch() {
      $('#results').html("Searching...");
      $('#results').attr('class', 'searching');
      var url = "http://api.geonames.org/searchJSON";
      var query = $('#searchedlocation').val();
        $.getJSON(url + "?username=demo&q="+ query +"&maxRows=25&featureClass=P",null,            function(data) {
                var data = data.geonames;
                var names = [];
                if(data.length > 0) {
                    $.each(data, function(i, val){
                        names.push(val.name +" ("+val.adminName1+")");
                    });
                    $('#results').html(names.join("<br/>"));
                    $('#results').attr('class', 'success');
                } else {
                    $('#results').html("No matching place.");
                    $('#results').attr('class', 'noresults');
                }
            }
        );
   }
   </script>
   <input type="text" id="searchedlocation" />
   <button id="search" onclick="geonamesSearch();">Click me</button>
   <div id="results"></div>
</body>
</html>
The demo account we are using here to access the Geonames.org service has a daily limit, if the limit is reached, we can go http://www.geonames.org/login and create our own account. The preceding code will create a page that contains a text input field, a button, and an empty div with an ID as 'results'. When we click on the button, the JavaScript function geonamesSearch does the following:
It puts the
'searching'class on theresultsdiv and inserts the Searching... mentionIt reads the text input's current value
It calls the GeoNames JSON web services to get the place names matching the value that you input
This JSON call is performed by jQuery and we provide it with a callback function that will be called when the GeoNames web service will respond and read the results
If there is no result, it changes the
resultsdiv class to'noresults'and its text to No matching place.If there are some results, it sets the class to
'success'and displays the matching place names
We can try it with our web browser and see it work nicely.
Now, let's test this page with the following script (example3.js), which enters the value 'barcelona' and asserts that we do get Barcelona (Catalonia) in the results:
casper.userAgent('Mozilla/5.0 (Macintosh; Intel Mac OS X)');

casper.test.begin('Search a city by name', 1, function(test) {
    casper.start('http://localhost:8000/example3.html', function() {
        this.sendKeys("input#searchedlocation", "barcelona");
        this.click("button#search");
    });

    casper.then(function() {
        test.assertTextExists('Barcelona (Catalonia)', 'Barcelona (Catalonia) has been found.');
    })

    casper.run(function() {
        test.done();
    });
});
Note
We need to set up a regular user agent to make sure that geonames.org will accept to process our request.
If we run it, we get a failure:
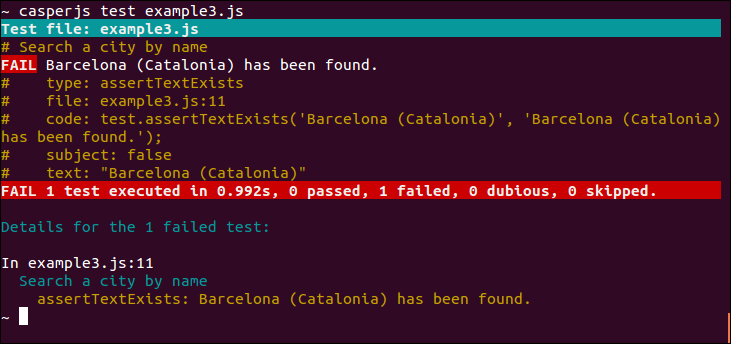
Why is that? Because our this.click() triggers the geonamesSearch function and immediately after that we try to assert the result content. However, as the GeoNames web service did not have enough time to respond, the content is not yet the one expected at the time the assertion is performed.
To manage these kinds of cases, CasperJS offers us the ability to wait before executing the rest of our tests.
The following is a working test script:
casper.userAgent('Mozilla/5.0 (Macintosh; Intel Mac OS X)');

casper.test.begin('Search a city by name', 1, function(test) {
    casper.start('http://localhost:8000/example3.html', function() {
        this.sendKeys("input#searchedlocation", "barcelona");
        this.click("button#search");
    });

    casper.waitForSelector('div.success', function() {
        test.assertTextExists('Barcelona (Catalonia)', 'Barcelona (Catalonia) has been found.');
    })

    casper.run(function() {
        test.done();
    });
});
We can see that the tests pass successfully now:

With waitForSelector, we make sure that the assertion will be performed only when the results div will have the 'success' class, and it will happen only once our JSON loading callback function has been called.
Writing tests can take time. A quick and convenient way to produce tests is to record an actual usage sequence directly from our web browser (just like the Firefox Selenium plug-in).
To record web sequences as CasperJS tests, we can use a Chrome extension named Resurrectio.
We install it from the Chrome Web Store (go to https://chrome.google.com/webstore/, search for resurrectio, and then click on the add button), and it just appends a new button next to the URL bar:
We click on the Resurrectio button to start a recording:

We can then navigate or perform any regular action in our window.
By right-clicking, we can add some assertions or screenshots:

By clicking again on the Resurrectio button, we can stop the recording and then export the previous sequence as a a CasperJS test:

Nevertheless, be careful; in some cases, we might need to manually modify the generated test because of the following reasons:
It might contain a lot of useless assertions (due to extra clicks during the recording).
It might be too heavy and verbose, making it more difficult to maintain. So, we would prefer to simplify it to focus on the most meaningful aspects.
All assertions cannot be registered from Resurrectio, and we might need different assertions.
One of the key advantages of CasperJS is its ability to chain test steps, knowing that these steps will be executed in the order they have been registered in.
As explained previously, the way to chain steps in JavaScript is by using callback functions as follows:
doStep1AndThen(function() {
   doStep2AndThen(function() {
      doStep3AndThen(function() {
         doStep4AndThen(function() {
            ...
         })
      })
   })
})
If we were using PhantomJS directly, that would be how our tests would look, and it would not be very convenient to read or maintain.
But with CasperJS, using the then() or waitFor() methods, we can declare successive steps without this infinite callback nesting cascade.
CasperJS does that callback chaining for us behind the scenes, creating much more readable test scripts.
Let's see a few more details about the different features we have just used here.
By default, CasperJS uses CSS3 selectors, but we can use XPath selectors if we prefer or if we have to.
XPath selectors are less readable than CSS3 selectors but they are more powerful (for instance, while matching text contents or putting conditions on the DOM element's ascendants or descendants).
To use XPath selectors, we just need to load the CasperJS selectXPath utility:
var x = require('casper').selectXPath;
...
test.assertExists(x("//*[contains(text(), 'Barcelona (Catalonia)')]"), 'The search results are correct');The CasperJS tester API offers a large collection of assertion methods.
We can assert conditions and function results in the following ways:
The
assert(Boolean condition[, String message])method asserts that the condition is strictlytrueThe
assertNot(mixed subject[, String message])method asserts that the condition is nottrueThe
assertTruthy(Mixed subject[, String message])method asserts that the subject istruthyThe
assertFalsy(Mixed subject[, String message])method asserts that the subject isfalsyNote
Let's explain what
true,false,truthy,andfalsyis.In JavaScript,
trueandfalseare the two Boolean values stricto sensu. Values such asnull,undefined, the empty string'', the number0, the numberNaNarefalsy, which means that if they are evaluated in a condition, they will returnfalse.And any other values are
truthy, which means that if they are evaluated in a condition, they will returntrue.The
assertEquals(mixed testValue, mixed expected[, String message])method asserts that the two parameters are equalThe
assertNotEquals(mixed testValue, mixed expected[, String message])method asserts that the two parameters are not equalThe
assertEval(Function fn[, String message, Mixed arguments])method asserts that the function evaluated in the page DOM returnstrueExample:
this.test.assertEval(function() {
   if(window.jQuery) {
      return true;
   } else {
      return false;
   }
}, "jQuery is available");
The
assertEvalEquals(Function fn, mixed expected[, String message, Mixed arguments])method asserts that the function evaluated in the DOM page returns the expected valueThe
assertMatch(mixed subject, RegExp pattern[, String message])method asserts that the value matches the regular expressionThe
assertRaises(Function fn, Array args[, String message])method asserts that the function called with the provided arguments raises an errorThe
assertType(mixed value, String type[, String message])method asserts that the value type is the expected one
We can assert the DOM elements in the following ways:
The
assertExists(String selector[, String message])method asserts that the selector matches at least one element in the pageThe
assertDoesntExist(String selector[, String message])method asserts that the selector does not match any element in the pageThe
assertField(String inputName, String expected[, String message])method asserts that the form field has the expected valueThe
assertVisible(String selector[, String message])method asserts that the element is visibleThe
assertNotVisible(String selector[, String message])method asserts that the matched element is not visibleThe
assertSelectorHasText(String selector, String text[, String message])method asserts that the matched element contains the expected textThe
assertSelectorDoesntHaveText(String selector, String text[, String message])method asserts that the matched element does not contain the given text
We can assert the page information in the following ways:
The
assertHttpStatus(Number status[, String message])method asserts that the current HTTP status is the expected oneThe
assertResourceExists(Function testFx[, String message])method asserts that the resource exists on the pageThe
assertTextExists(String expected[, String message])method asserts that the page contains the expected textThe
assertTextDoesntExist(String unexpected[, String message])method asserts that the page does not contain the given textThe
assertTitle(String expected[, String message])method asserts that the page title is the expected oneThe
assertTitleMatch(RegExp pattern[, String message])method asserts that the page title matches the given regular expressionThe
assertUrlMatch(Regexp pattern[, String message])method asserts that the page URL matches the given regular expression
The following is the list of the CasperJS waitFor methods:
The
waitForText(String|RegExp pattern[, Function then, Function onTimeout, Number timeout])method waits until the text is presentThe
waitForSelector(String selector[, Function then, Function onTimeout, Number timeout])method waits until the selector is satisfiedThe
waitWhileSelector(String selector[, Function then, Function onTimeout, Number timeout])method waits until the selector is not satisfied anymoreThe
waitUntilVisible(String selector[, Function then, Function onTimeout, Number timeout])method waits until the selected element is visibleThe
waitWhileVisible(String selector[, Function then, Function onTimeout, Number timeout])method waits until the selected element is not visible anymoreThe
waitFor(Function testFx[, Function then, Function onTimeout, Number timeout])method waits until the function returns trueThe
waitForResource(Function testFx[, Function then, Function onTimeout, Number timeout])method waits until the function matches an existing resourceThe
waitForPopup(String|RegExp urlPattern[, Function then, Function onTimeout, Number timeout])method waits until the pattern matches a pop-up URL
In the list of waitFor methods, we have not mentioned the following one:
wait(Number timeout[, Function then])
It just waits for a certain amount of time (in milliseconds).
But as discussed previously, in JavaScript, time is nothing and timing is everything. Similarly, in JavaScript, waiting for a given amount of time brings no guarantee to the accuracy of our test.Generally, we use wait() when we are desperate. For instance, if we have no way to modify the tested page, we cannot append an interesting signal to observe such as the 'noresult' and 'success' classes in our example.
Nevertheless, let's just note a relevant usage of the wait() method. When our page contains some progressive JPEG images and we want to capture a new image (see the Beyond testing (Advanced) recipe), we need to wait for some time before capturing, in order to let our images render entirely.
Resurrectio is not entirely stable yet, so it might be interesting to use the current development version.
To do so, you have to clone the resurrectio GitHub repository:
~ git clone git://github.com/ebrehault/resurrectio.git
It will produce a ./resurrectio folder.
Then, in Chrome, perform the following steps:
Go to Tools | Extensions.
Check the Developer mode checkbox.
Click on the Load unpacked extension button.
Select the
./resurrectiofolder.