
Getting started to write Vagrant plugins is identical to setting up a Ruby development environment.
It's typically good practice to develop using the target runtime. Vagrant embeds a Ruby runtime in the installed operating system package that can be used to find the proper version of Ruby to use as a development target. You can set up a Ruby environment by performing the following steps:
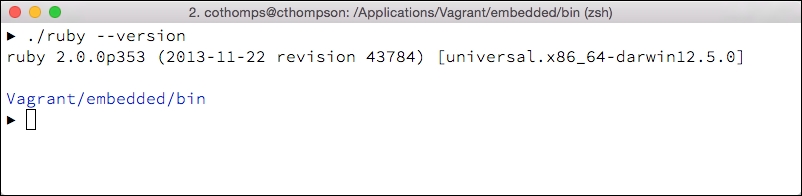
Find the location of the Vagrant installation. On OS X for example, Vagrant is typically installed in
/Applications/Vagrant/. The Vagrant installation contains a folder namedembedded/that contains the Ruby runtime used by Vagrant.In a terminal window, execute a version command on the embedded Ruby. To do this, change directories to
/Applications/Vagrant/embedded/binand execute:./ruby –versionThis will return a value of the Ruby runtime. In this case, OS X package, Vagrant 1.6.5) of:
Set up a development version of Ruby. The simplest method can be to download, install, and configure a package from the Ruby website, but installing a tool such as rbenv (http://rbenv.org) can make Ruby development and installation of development tools much simpler. There are many ways to install rbenv; on OS X, it can be as simple as using the Homebrew package manager (http://brew.sh) to install using the
brew install rbenvcommand.The companion ruby-build project (https://github.com/sstephenson/ruby-build) can also be installed using a Homebrew package:
brew install ruby-buildNote
There are also other methods of installing rbenv and ruby-build for other platforms. In many recent Linux distributions, rbenv is available in package repositories. For example, installing on a recent version of Ubuntu is as simple as installing with the
apt-get install rbenvcommand.Installing ruby-build in these cases is often recommended as a plugin to rbenv. Consult the documentation on GitHub for rbenv (https://github.com/sstephenson/rbenv) and ruby-build (https://github.com/sstephenson/ruby-build) for more information.
With rbenv/ruby-build installed and configured, we can install the desired version of Ruby with the installation command. In this case, we'll install the version we determined from the Vagrant runtime in an earlier step:
rbenv install 2.0.0p353With Ruby installed, we can then install the bundler gem that allows us to begin creating our own gems:
gem install bundler
With these tools installed and a good text editor or Ruby Integrated Development Environment such as JetBrains' RubyMine (https://www.jetbrains.com/ruby/), we can start developing our own Vagrant plugin.
For this example, we'll develop a very simple plugin (a provisioner) with a single input variable that says "Hello" when the provisioner runs.
Developing a Vagrant plugin is identical to developing a Ruby gem and extending the Vagrant runtime by defining classes in the VagrantPlugins module. In practice, it is often useful to start by consulting other plugins to determine how to implement the plugin interfaces. This example relies heavily on the setup done in the vagrant-aws plugin (https://github.com/mitchellh/vagrant-aws) and the vagrant-host-shell plugin (https://github.com/phinze/vagrant-host-shell). You might find these two examples useful, but there are also many more plugins (nearly all of them open source) to use in starting a project.
This appendix will rely on code examples included with the book; we will highlight the steps required and a few important aspects of this simple plugin.
Create a new project in a working directory with the Ruby bundler tool, which might be the simplest way to start:
bundle gem vagrant_helloThere is a naming convention that Vagrant plugins typically use where Vagrant plugins start with
vagrant-, but if you are starting with the bundle, the command bundler often interprets dashes to create folders within projects. When starting with thegemcommand, it might be simpler to create names with an underscore character, then rename them to fit the dash naming convention of Vagrant plugins.Once the folder structure has been renamed, we should have a file structure that looks like this:
.
├── Gemfile
├── LICENSE.txt
├── README.md
├── Rakefile
├── lib
│   ├── vagrant-hello
│   │   └── version.rb
│   └── vagrant-hello.rb
└── vagrant-hello.gemspec
With the gem dependencies in place, declare dependencies in our Gemfile and gemspec (
vagrant-hello.gemspec).The Gemfile is fairly simple; we simply declare that we wish to use a gemspec file and we will declare the Vagrant source code as well. This gem is not added as a requirement to our plugin gem because we assume that a Vagrant plugin will run within the context of Vagrant itself at runtime. What we will need for development is the code that defines the
VagrantPluginmodule:source 'https://rubygems.org' # Specify your gem's dependencies in vagrant-hello.gemspec gemspec gem "vagrant", :git => "git://github.com/mitchellh/vagrant.git"
With the Gemfile written, we can edit the
vagrant-hello.gemspecto define some information and development dependencies:# coding: utf-8 $:.unshift File.expand_path("../lib", __FILE__) require 'vagrant-hello/version' Gem::Specification.new do |spec| spec.name = "vagrant-hello" spec.version = VagrantPlugins::Hello::VERSION spec.authors = ["Chad Thompson"] spec.email = ["[email protected]"] spec.summary = "Say Hello" spec.description = "Say Hello" spec.homepage = "" spec.license = "Apache2" spec.add_development_dependency "bundler", "~> 1.7" spec.add_development_dependency "rake", "~> 10.0" endMost of this is gem metadata that describes the gem itself and some information that could be published to a gem repository. We've also declared a few dependencies for development, ensuring that we have the
rakeandbundletasks commands available to our project.Two items to take note of are as follows:
We require the version file in our
libdirectory namedvagrant-hello/version. This corresponds to theversion.rbfile present in this directory.The version itself will be part of the
VagrantPluginsmodule.bundle install
With these dependency files in place, we can install the dependencies (bundler, rake) as well as the Vagrant source code with the simple command:
This will download several Ruby gems as well as download the Vagrant source code from Git to our Ruby runtime.
Note
We might want to take care that our Vagrant runtime that we normally use is in our executable
PATHuser variable. Verify the version of Vagrant that your system will use with thewhich vagrantcommand.If the command returns the normal Vagrant, your system will continue to use the installed Vagrant executables. If the system returns a path that includes
.rbenv/shims, you might wish to modify your executablePATHor simply make sure to delete the Vagrant executable in the rbenv environment.Modify the version file to match the structure we declared in the gemspec file in the previous step:
module VagrantPlugins
  module Hello
    VERSION = "0.0.1"
  end
end
Note that our version file defines the
VERSIONvariable to be in theVagrantPluginsparent module and theHellosubmodule. This will ensure that our plugin defines an extension within the larger Vagrant plugins module that is part of the Vagrant runtime.Define our "Hello" plugin by creating the
plugin.rbfile in thelib/directory. This Ruby file contains a bit of error handling (to ensure that Vagrant is present) and includes our plugin definition:begin require 'vagrant' rescue LoadError raise 'The vagrant-hello plugin must be run within Vagrant.' end module VagrantPlugins::Hello class Plugin < Vagrant.plugin('2') name 'vagrant-hello' description <<-DESC.gsub(/^ +/, '') A simple plugin to say hello in the host OS. DESC config(:hello, :provisioner) do require_relative 'config' Config end provisioner(:hello) do require_relative 'provisioner' Provisioner end end endNote here a few items of syntax:
The definition of the
HelloPluginclass that inherits from a specific version of Vagrant. This allows future versions of Vagrant to identify and perhaps use your plugin without further modification. This extension guarantees that your plugin will always load and not potentially corrupt the operation of future versions of Vagrant.Note here the syntax used to call the
configandprovisionermethods, each will require a relative file (in this case,config.rbandprovisioner.rb) and call the appropriate functions.
Define the configuration in
config.rb. The config file typically defines how our Vagrantfiles will interact with the plugin. In this case, theaccessor :inlineattribute allows us to create a configuration parameter namedinlinein the provisioner block of our Vagrantfile:module VagrantPlugins::Hello class Config < Vagrant.plugin('2', :config) attr_accessor :inline def initialize @inline = UNSET_VALUE end def finalize! @inline = nil if @inline == UNSET_VALUE end def validate(machine) errors = _detected_errors unless inline errors << ':hello provisioner requires someone to say hello to!' end end end endImplement the actions of the provisioner in an additional file named
provisioner.rb:module VagrantPlugins::Hello class Provisioner < Vagrant.plugin('2', :provisioner) def provision result = Vagrant::Util::Subprocess.execute( 'bash', '-c', "echo 'Hello #{config.inline}!'", :notify => [:stdout, :stderr] ) do |io_name, data| @machine.env.ui.info "[#{io_name}] #{data}" end end end endIn this example, the provisioner is very basic; a provision method will simply execute a Bash process within the guest that echoes the "Hello string " with the value of
config.inlineappended to the output.Create a simple Vagrantfile to test our new plugin. In this case, we'll also need to tell our Vagrantfile to load the local plugin (gem) file:
vagrant-hello.# -*- mode: ruby -*- # vi: set ft=ruby : $LOAD_PATH.unshift File.expand_path('../../lib', __FILE__) require 'vagrant-hello' Vagrant.configure("2") do |config| config.vm.box = "puppetlabs/ubuntu-14.04-32-nocm" config.vm.provision :hello do |hello| hello.inline = 'Chad!' end end
With everything in place, our file structure now looks like this:
.
├── Gemfile
├── Gemfile.lock
├── LICENSE.txt
├── README.md
├── Rakefile
├── Vagrantfile
├── lib
│   ├── vagrant-hello
│   │   ├── config.rb
│   │   ├── plugin.rb
│   │   ├── provisioner.rb
│   │   └── version.rb
│   └── vagrant-hello.rb
└── vagrant-hello.gemspec
Start this local environment with a slightly different command:
bundle exec vagrant up –provisioner=virtualbox
The bundle exec command will ensure that our Ruby runtime is defined locally. If you have defined a different default provisioner for Vagrant, you might also wish to define our box provisioner to be the virtualbox provisioner that is bundled with Vagrant.
The vagrant up command should proceed normally. The output will provision and boot a virtual machine as normal (using a base box), with the final output being that of our custom provisioner:
==> default: Running provisioner: hello...
[stdout] Hello Chad!!
We have now implemented a simple provisioner that can be built with a rake task and distributed as a RubyGem. Publishing the gem to RubyForge allows the following command to install the plugin to your local Vagrant installation:
vagrant plugin install vagrant-hello
Developing a Vagrant plugin is very similar to developing a typical Ruby gem; if you are not familiar with Gem development, there are a variety of Ruby programming books that can help you get started. The structure of the Vagrant plugins allows you to define a few different types of functions:
Provisioners: In this example, we defined a simple provisioner that executed a Bash script.
Guests and guest capabilities: These functions allow plugin developers to both test for certain guest operating systems and add functions to guests without requiring additional provisioners.
Hosts and host capabilities: These functions allow Vagrant to modify functions of the host operating system within the confines of operating system permissions. Primary examples are plugins that modify the host operating system's
/etc/hostfiles or DNS entries that allow other system services to refer to Vagrant machines by a defined name in a Vagrantfile.Providers: Defining providers allows Vagrant to provision and manage virtual environments other than VirtualBox. For example, Vagrant's support for VMware, Amazon Web Services, and DigitalOcean are all custom providers that use the APIs of each of these services.
The plugin framework allows developers to extend the Vagrant runtime that allows for additional capability. However, there is a downside to this feature: using a plugin requires end users to install it prior to executing Vagrantfiles that require the plugin, and code written in plugins can be nonportable if Vagrant is being used to support a full development lifecycle from Vagrant development boxes to production servers. In this specific case (executing a bash command), a simpler and more portable solution would be to use the existing shell provisioner. While there are some cases where plugin extensibility is desired, developing plugins is something that should be carefully considered in the majority of software development cases.
The Ruby programming language: http://ruby-lang.org
rbenv (http://rbenv.org): a tool to set up Ruby development environments
ruby-build (https://github.com/sstephenson/ruby-build): A companion to rbenv to install Ruby versions
A list of currently available plugins published by the Vagrant project: https://github.com/mitchellh/vagrant/wiki/Available-Vagrant-Plugins